-
Posts
2,397 -
Joined
-
Last visited
Content Type
Profiles
Forums
Events
Blogs
Gallery
Store
Everything posted by Cyberthrasher
-
From the album: Custom Leather Seats
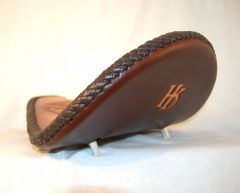
Iron Cross chopper seat featuring kangaroo round braid. Seat is constructed with 10 gauge steel pan, 3/4" closed cell neoprene padding, and 8/9 oz Hermann Oak leather top and bottom.© Hellhound Kustoms Leatherwork
-
- chopper
- chopper seat
- (and 7 more)
-
From the album: Custom Leather Seats
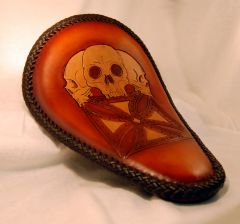
Iron Cross chopper seat featuring kangaroo round braid. Seat is constructed with 10 gauge steel pan, 3/4" closed cell neoprene padding, and 8/9 oz Hermann Oak leather top and bottom.© Hellhound Kustoms Leatherwork
-
- chopper
- chopper seat
- (and 7 more)
-
From the album: Custom Leather Seats
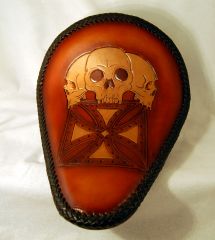
Iron Cross chopper seat featuring kangaroo round braid. Seat is constructed with 10 gauge steel pan, 3/4" closed cell neoprene padding, and 8/9 oz Hermann Oak leather top and bottom.© Hellhound Kustoms Leatherwork
-
- chopper
- chopper seat
- (and 7 more)
-
Barry King is the best choice for low cost, without sacrificing quality. All of Barry King's are steep angled, as I believe that most of the pro tool makers are. There are lots of options out there though. Look for smooth "Sheridan" beveler's, or just look at the side profile of images when shopping around.
-

How Do I Keep The Dye From Rubbing Off My Edges!
Cyberthrasher replied to Kcinnick's topic in How Do I Do That?
YES!! I don't match your edging, but I do constantly stress a good edge. I used the EdgeKote once, watched it peel off before my eyes, then stripped it and went back to dye (I have a bottle of edgekote if anybody wants it). Seriously, following Bob's edging guide, you can't have any problems getting a perfect edge and getting it colored. Throw the Gum Trag out because it's a crutch. I only use Fiebing's Pro Oil and get good coverage every time. Admittedly there are times where It's a little light, but then I just add some oil to the edge and then apply another coat. This is all AFTER burnishing. I tried dying before burnishing once and made a mess of my leather. Also, remember to buff your edge BEFORE you seal it. The edge is just like any other part of the leather and you will have residual pigment left on there. Here's an edge I did a couple weeks ago for reference. This is sanded, burnished using glycerin saddle soap and a cocobolo burnisher, dyed, buffed, sealed with a touch of Resolene, then a final buff using some beeswax and a piece of denim (buffed until my fingers could feel the heat being generated). That edge will last forever and if feels/looks like glass. Remember, shortcuts only make you money if you're pumping stuff out on an assembly line. Making money through hand crafting requires perfection in hand crafting -
Yep, that was probably your problem. Get yourself a poly mallet or maul. For low price quality, I'd say Barry King. For the best, get a Bearmaul. The original problem I was describing with the metal is actually from where you grip the tool. A lot of times I'll get some transfer to my hand, especially on a new tool.
-
That doesn't look bad for the price. The primary "problems" you're pointing out will be found on virtually any hide in those areas. The material around the edges gets marked up at the plant when processing the leather. Also, the edges are weaker many times and tend to show more wrinkles. The fold is simply because it's lightweight leather and was rolled up at some point. That should work out by smoothing it. As long as the majority of the inside of your leather is clean and without flaws, you should be fine, especially for wallets. Now, for briefcases, keep in mind that they aren't necessarily small projects and will use up a lot of leather. You may or may not be able to get one out of this piece. Just make sure you arrange your parts around the more serious flaws. Every hide you purchase will have some scrap that's not the best, just work around it and save those pieces for practice work.
-
I'm not real familiar with thread sizes. I figured out what I needed by looking through a lot of the sewing topics to see what people were using. That said, you know the size you need already, just not the number that corresponds to it. I was happy with "The Thread Exchange" for my stuff and they may be able to help you narrow down what you need. If you look through my Etsy page, everything there was done with 207 bonded nylon as a size/type reference for you. I do plan on getting a smaller size that will be better for wallet inserts. I know nothing about left vs. right twist either, so I can't help you there. I know I don't have twisting issues at all. You can dye it, but it's probably not the same as dying linen. From my experience, I still have to make sure I don't get my dye on it when I'm doing white thread, but I haven't attempted a solid and even dying of it. I have tried waxing with beeswax and it seemed to bind up a bit and not really do anything.
-
6 hours shouldn't cause mold itself, but if there are mold spores in the leather already and it's wet in the open air, then that will promote the growth. The fact that you left it in the basement overnight could be a clue. Where in your basement? Do you have moisture issues in there? I leave work in my basement all the time, since that's where my shop is, but it's also dry and finished with no moisture issues. Also, leaving it outside to dry is allowing particles that are outside to get to it while it's still wet. As far as time in between working - if you're not working on it, seal it up and put it away. It's not re-wetting it that causes mold, but having to recase all the time can effect your work. The key to my comment above was putting it in the fridge. The fridge is what keeps it from getting mold when it's wet. It's also completely possible that these specs are actually a chemical reaction with the steel in your tools. Actually, it's usually more of a rub off that gets on your hands and then transfers to the leather when you touch it while wet. Either way, if you suspect mold, you gotta clean it and KILL it. Lemon juice works well for the metal spots (dab it and let dry, don't rub at all), but to kill the mold, you'll want to mix it with vinegar.
-
I'm not sure of the metric conversion, but 1/4" or 5/16" tends to work well for it. If you have a micrometer you can check it pretty easily. With the heavy leather you're using it should be a nice fit. I'm pulling those sizes from memory by the way. I'll have to double check my punch size when I get home since I just grabbed the best one for each scenario and set them aside (guitar straps are my primary order). From there, I like a 1/2" slot ending in another small hole. The small hole at the end of the slot is CRITICAL to prevent tear out. Many people forget this step. It doesn't have to be huge, but it's gotta be there. Also, keep in mind that with thicker leather, it's a little harder to get the strap on the button at first. This is a GOOD thing, especially when they have no intention of using strap locks. The thickness of the leather makes it more rigid, and the rigid nature keeps it from pulling around the strap button. One of the primary reasons for strap locks is that those nylon and light leather straps are soft enough that they fold around the button. That's also why they have smaller holes than the strap button post, so that they hold it tighter as they form around it.
-
first question is how heavy is your leather? If it's lightweight, you'll want an undersized hole to maintain contact on the guitar. The other question is if the customer plans on using straplocks. If so, what kind - each brand will require a different size hole. If they don't use them but might in the future, make a hole big enough to fit the largest of the popular choices, since they'll all do their job that way.
-
There's the root of the problem that I was going to point out as well. The other added benefit to this, no re-casing, which will allow you to keep a maintained moisture level and improve your tooling overall. I have a few pieces that were put in the fridge for casing around May or so. Ended up not needing them at the time, but still go grab a piece here and there with perfect results.
-
I use a stylus I got from Ed "BearMan". It's awesome and doesn't tear paper at all because it's turned down to a fine point and then rounded at the tip, allowing smooth action and good detail. Using a pen, you risk getting ink on your leather. A good stylus is critical because if you can't transfer a fine detail, then you'll have a hard time tooling it. Those ball point stylus are not very helpful for detailed lines. Oh yeah, and this one is super comfortable - as is everything he makes. Really easy to hold it and work things for a long time, especially if you have any arthritis-like issues
-
Ditto Dwight. Get the fuzzy off to begin with (my same speech for the use of gum trag). Then when you slick it as I do, you'll have a smooth surface. At this point, slicking isn't for holding it down, it's for smoothing things just like when you burnish your edges. Depending on how bad the back is, I'll use 220, 400 wet dry, or just slick it. Other times I have to shave some fuzz off first.
-
Y-Knot Lace. I'm sorry to hear that about Springfield. I don't need details since they've always been good to me. Sucks that you had a bad experience though.
-
That would be one HUGE strap for me!!!! Luckily they've always been able to sneak a measurement of the current strap. It's that arm measurement that gets pretty tricky sometimes. I had one that was for his little girl's birthday. I took he length measurement and adjusted my daughter's nylon strap to match, then slapped it on her to measure that way. My daughter's a bit older, but she's TINY and build like a girl half her age. Once again, I got lucky and came out perfect.
- 15 replies
-
- chancey77 custom leather
- chancey77
- (and 4 more)
-

Stitch First Or Burnish Edges First?
Cyberthrasher replied to Andrew Chee's topic in How Do I Do That?
Yeah, what Dwight said I've been bitten by the white thread part in the past. Doesn't make for a happy day. -

Burnish Edges Without Beveling First?
Cyberthrasher replied to countryalltheway's topic in How Do I Do That?
not that it can't be done, but burnishing a square edge is more likely to result in a mushroomed edge, where your square corner folds over and gives a pretty poor look. -
wrap a rag/cloth around a small block of wood. Splash a little dye on it. Rub the block over your piece, which will then only apply dye to the high spots and not inside your tooling.
-
Definitely. Angelus does have a broader range of colors though, so that's a good place to start. Myself, I use Fiebing's Pro Oil primarily, but as I need strange colors that i think will be popular, Angelus to the rescue. To the original poster - I'm not sure if Angelus has a dye prep, but I know Fiebings has their "Deglazer" product. Honestly, save yourself the money and just use Denatured Alcohol available in any household paint isle.
-
I've found that a lot of customers can't seem to find their shoulder/collar bone....so I tell them to measure to the armpit. That ENSURES that they'll give me a measurement I can work with. A lot of times, I end up using the measurement they gave me and mixing that with the total length, then combining that with my knowledge of what type of music they like to play (it eventually comes up when working with them) in order to gauge they're playing height. All of that combined gives me a pretty good baseline to know where the artwork will need to be, especially when considering how much some people move around. Even if the artwork is below the shoulder, if it's too high then you risk having it spend a lot of time over the shoulder anyway as they move around and raise the neck up and down. I've even had some who were ordering straps as presents for their family and were able to get the overall length, but not the arm measurement. So, that's where a lot of that information comes into play. So far I've nailed it every time
- 15 replies
-
- chancey77 custom leather
- chancey77
- (and 4 more)
-
You know, somehow I never considered making my own note stamps.... yet another project I need to make some time for.
-
Nothing to it but practice practice practice This one I posted was actually my first order, so I was still pretty new. Before that, it was just a couple of personal items for myself and my wife, and LOTS of garbage practice.
-
I don't know, but we're leather workers. Not trying to get into a debate, just stating my feelings here. Put a laser etched piece up next to a tooled piece and see which one brings more profit and respect from the customer.


