chancey77
-
Posts
1,313 -
Joined
-
Last visited
Content Type
Profiles
Forums
Events
Blogs
Gallery
Store
Everything posted by chancey77
-
HERE YOU GO A JPEG EXAMPLE OF SOMETHING YOU CAN EASILY DO BY HAND.

-
IT IS WYO SHEEN IN THE UK. At least the closest thing...I have been told Neat Lac is no longer made, anything being stocked is ol stock and if you live some where near that has it and use it often, you should stock pile it.....I could be wrong, this may be a rumor, but it is what I have been told.
-

The "Real" kindle cover - Front cover
chancey77 commented on Cyberthrasher's gallery image in Our Leatherwork Galleries
 SWEET ALLEN!!!!!!!!
 -
APRIL CHALLENGE POSTED SCROLL DOWN TO SPECIAL EVENTS,CONTESTS AND CLASSES:) THIS MONTHS CHALLENGE TIKI MADNESS!
-
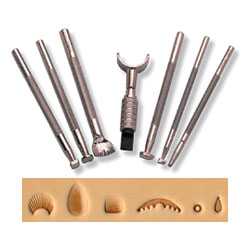
OK SO HERE IS THIS MONTHS CHALLENGE; TIKI MADNESS! Design or borrow a Tiki mask or full body, design Orchids or some other Flowers or TREES around it. Rules; 1. YOU MUST ONLY USE 4 tools chosen from the LUCKY 7 tool Kit supplied from Tandy, you may not have the "KIT" but look at the picture and you may have something very similar or exactly what is supplied in the kit. SWIVEL KNIFE BEVELER VEINER PEAR SHADER SEEDER BACKGROUNDER CAMOUFLAGE TOOL CHOOSE ONLY 4 OF THE 7! NOT CONSIDERED TOOLS: COMPUTER HAMMER DIVIDERS STRAIGHT EDGES STYLUS / PENCIL PAPERS / PLASTIC SHEETS IF YOU JUST WANT TO MAKE A WALL HANGER THAT IS COOL...BUT I WELCOME MAKING SOMETHING ELSE USEFUL AS WELL. MOTORCYCLE SEAT,BAG,BOOK COVER,BELT,COASTERS,KEY RING,COIN POUCH,SHOES,CATCH ALL FOR KEYS AND ASSORTED STUFF BY THE DOOR,BAR SIGN,...WHATEVER! DESIGNS ARE NOT ONLY LIMITED TO TIKI AND FLOWERS/TREES, YOU CAN ADD ANY OTHER ELEMENT YOU WISH, AS LONG AS THOSE 2 ELEMENTS ARE INCLUDED. LIKE A BEACH SCENE/ TIKI PARTY, BUT YOU CAN ONLY USE 4 OF THE 7 TOOLS PROVIDED IN THE KIT! HAVE FUN!!!!!!!!
-
hahahahahahaha To busy to post it up! I will today! I put out an Email to Twin Oaks to see if he had come up with an idea so I could post it up, I was hoping for a reply, but Sundays are always dead days here on the LWF. Everyone is at church and spending time with the family mostly, maybe I will get a reply later today:) Patience Grasshopper:)
-
Iphone Case/wallet
chancey77 replied to chancey77's topic in Purses, Wallets, Belts and Miscellaneous Pocket Items
Here is one with holes...it just depends on how big your holes are... as far as ending without going all the way around...you just finish the last x loop and stick the lace into the underside of 4-5 X's and pull it through and cut the end...easy as pie.
-
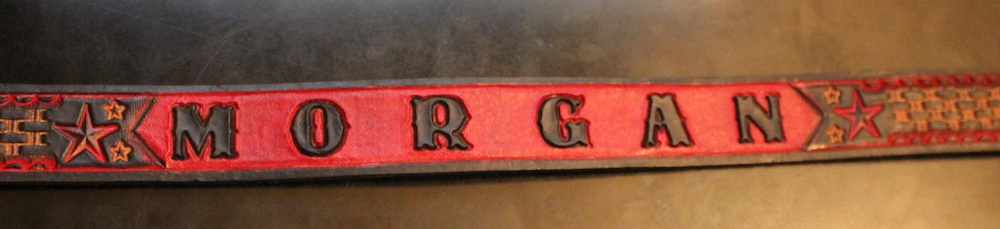
It is a lot of work to pound that background with the tool you are using...I do it all the time! It takes doing it a lot to get it perfect...but you are killing it and the belts look great! The thing you did to the 718 is called inverted carving:) You backgrounded what normally would be the main picture...Inverted Carving:) Here is my sons belt...same color scheme. The background I used here is A885. You used A888 or should have, there is a much smaller one for very small stuff like the inside of an A. A888-2...it is a real time sucker and that is why I almost always now use the A855. But I do like the look and still use the A888 from time to time! I do use that A888 to outline a lot of stuff and also use it for inverted backgrounds:) It is pretty standard. After you use the A885 like I did re-stamp your letters to give the nice impression you originally had before you started backgrounding. Don't use the pebble backgrounder to surround letters it always looks messy. Like in the first pic you did...(It would be ok if you would have done it all the way through the background of the letters but you only did around each letter and it looks a bit uneven) I think you learned that lesson and tried something else...which is looking good! Just Re-Stamp the Letters after backgrounding. Color the letters black first and then add the red...black doesn't cover over red very well for some reason if you get red on the letters by accident but if it is black first it still may discolor, but hit it with black again and it will be all good! Remember; If it aint fun it aint worth doing! And you can always give them my number....hahahahaha Just kidding! Keep up the good work! My stuff has flaws and isn't always perfect the day it is maybe I'll get hit by a bus or something better! All we can do is learn something new everyday and do the best we could...cause to people who can't do anything for themselves our flaws are their white whale! I used to work for this lady in NY who's husband was a surgon and wouldn't even change a lightbulb or fix the chain on the toilet! So I know most people are just not mechanically inclined(even surgeons)...and that is ok to! I need their money to feed my kids! Until then we are all just humans...at least until the Robots and LASERS TAKE OVER!!!!!!!!!! hahahahaha

-
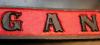
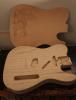
The Next Victim! Vintage Tele Wrap And Tool!
chancey77 replied to chancey77's topic in Musical Instruments
That is pretty funny grasshopper:) I mean Domino:) It aint done yet:) hhahahaha -
The Next Victim! Vintage Tele Wrap And Tool!
chancey77 replied to chancey77's topic in Musical Instruments
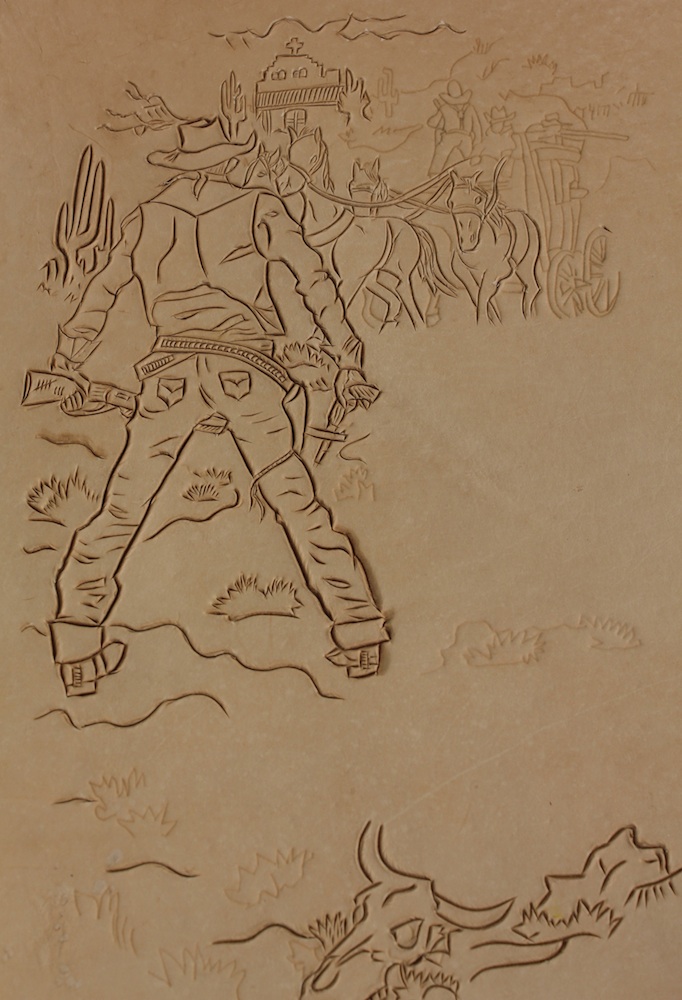
WOOHOOO!!!!!!!!!! I got the Body tonight!!!!!!!!!! I can see this thing is really going to come together fast...just as soon as I have all the holes marked properly for the bridge, pickups and tone control plate... But at least now I have my shapes and art limits... It is still going to take quite a while before it is finished because I am really taking my time with the scenes. Some of the stuff is so incredibly small and I am working with a straight blade...I need to go ahead and make my other knife angled for the corners... But I am amazed even with a straight hollow ground just how small I can get:)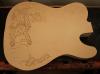

-
The Next Victim! Vintage Tele Wrap And Tool!
chancey77 replied to chancey77's topic in Musical Instruments
OK DAY 1 CARVING:) I just got started:) This is the front bottom and Left area....the main body. More riders will be coming from the right soon. Still waiting on the body to arrive so just over where it looks like the cow skull horn isn't finished is actually where the volume and tone selector is going to be fitting in:)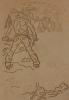
-
Oh Syl! We still Luv YA!
-
First Seat - On The Superglide
chancey77 replied to WayOutWatty's topic in Motorcycles and Biker Gear
That seat looks like it is wearing VERY NICLY! I like the dash cover...the break up of skulls in frames is pretty hot! F'N SWEET! -
LOOKS GREAT!!!!!!!! Did you use the spray I gave you or the wax? Looks like the spray. She would be very happy...that is a great marker for what sounded like a great lost member of the family...RIP MIMMI! hahahaha ok......don't worry you will find out tomorrow! Get a good nights sleep! No Faces!
-
I have an idea for ya! So you are playing around quite a bit with lace work at the moment...so:.. Just make a replica very thin piece of leather for the bottom lining and after you put your snaps on the top skin apply your under side and lace it all together:) No skin contact with any metals...a little more work, but it will solve your problem. And you get to practice your TLS! Or hand stitch it together...but you know my vote is LACE ALWAYS! A tip if you're going to attempt it this way...when you are cutting the bottom piece of leather go ahead and roll it over together because it will stick out further than the top piece and cause an uncomfortable wrinkle and cause your holes to slide and you will have problems lacing it together...so just use your hand punch and hand punch the holes ;so go ahead and cut it as if was being worn. And then use some textile glue and glue them together before you lace it. Are you pickin up what I'm puttin down??? It is more work...but....The end justifies the means! I have some other ideas to but I think that is the way to go....for this particular problem! And you don't have to always do it the hard way, just for those folks allergic to metals!
-
Iphone Case/wallet
chancey77 replied to chancey77's topic in Purses, Wallets, Belts and Miscellaneous Pocket Items
Just like the double you just follow the instructions here and you will have it in 5 seconds! Instead of just going through the X you push through the loop before so 2 in the front and 1 on the back side and that makes a 3 stitch loop:) http://www.kingsmerecrafts.com/page97.html -
Iphone Case/wallet
chancey77 replied to chancey77's topic in Purses, Wallets, Belts and Miscellaneous Pocket Items
It was easy! I just mixed some dyes until they where the way I liked it. Yellow Dye Base. Add a drop of blue until i came up with a count i could multiply into a jar size. I didn't make it from scratch, but mixing colors to come up with something original is always fun:) -
hahahahah OMG!!!!!!!!!! JUST KIDDING!!!! Or AM I:::::EVLLHR!
-
Iphone Case/wallet
chancey77 posted a topic in Purses, Wallets, Belts and Miscellaneous Pocket Items
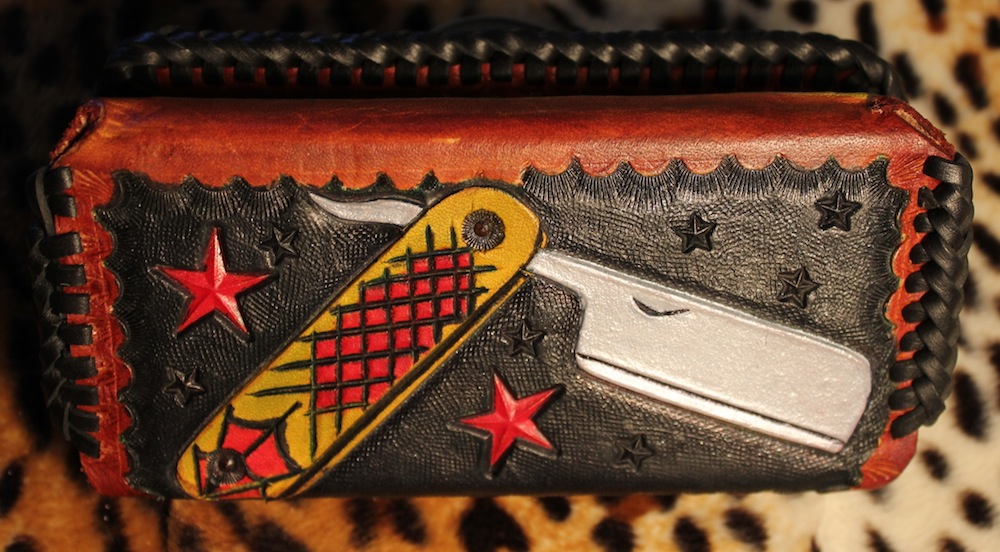
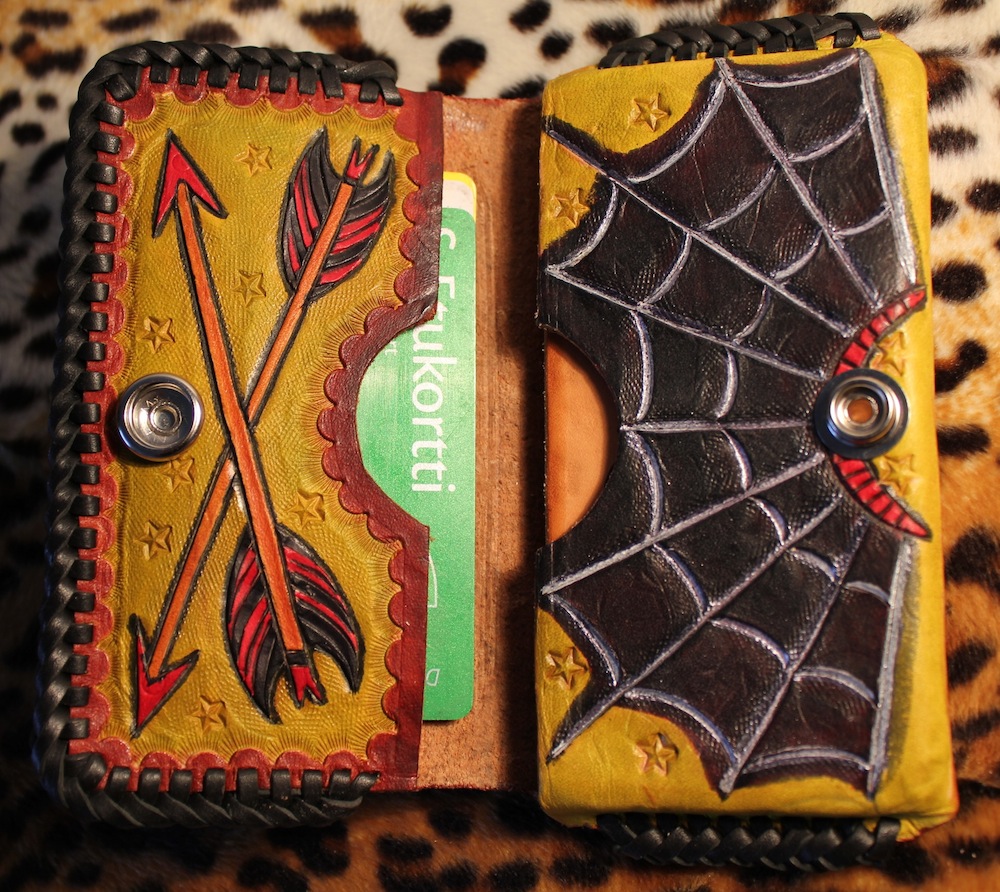
Client wanted an Iphone case and wallet so this is what I did:) Panther Head original artwork by me and some of my signature works the straight razor and arrows! And some spider webs to catch his calls::: hahahahahaha ROLFLMAO! Triple Loop Stitched and I had to add a snap I was hoping I wouldn't have to, but if where any wider it wouldn't slide right into any pocket and it needed it to stay shut better with a bunch of cards stuffed into it. So there it is! I made the lime green dye...I was very happy with the contrast between Red Brown blues red black dyes and the lime green it look s pretty hot! I did use a slight bit of silver paint in the web and blade, but the rest is all dye! I always loved that Mopar Lime Green! Now I have made a sweet batch! And I gave some to PL01 as well when we met a few days ago! So enjoy PAUL:) That is some home brew!!!!!!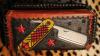
-
Ya I see you liked my backgrounds/ border Liners:) hahaha J/K looks great dude! Finally some pics up very nice!!!
-
I was wondering when someone will ask for a bunny rabbit seat! hahahahha
-
1 more day before I throw down the axe on the next months challenge! I wish more folks would join in and vote right now we are at 4 tools average from the lucky 7 kit. 1 More DAY! 1 More DAY1 More DAY1 More DAY1 More DAY1 More DAY!
-
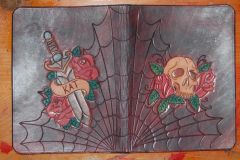
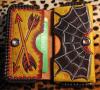
Molded Iphone Case/ Wallet Back side
chancey77 commented on chancey77's gallery image in Our Leatherwork Galleries
 Thanks Jimbob! I made my own lime green stain for this one! I dig it!
 -
From the album: Chancey77 Custom Leather
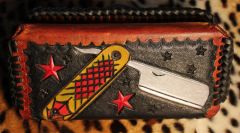
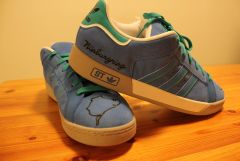
SOME SHOES FOR A RACE CAR DRIVER CLIENT OF MINE. TRACK RECORD HOLDER AT NÜRBÜRGRING.© Chancey77©2012
-
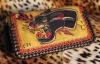
From the album: Chancey77 Custom Leather
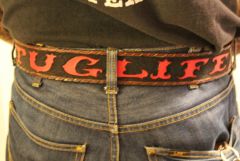
One of my best customers has been working on a Tug Boat for the last 12 years and asked me to make him this belt to go along with a zippo case and wallet I made him last month....© chancey77©2012