bruce johnson
-
Posts
4,401 -
Joined
-
Last visited
Content Type
Profiles
Forums
Events
Blogs
Gallery
Store
Everything posted by bruce johnson
-
Kevin, I haven't used the black mauls because everyone who has won't give them up. I am kind of recalling that Gore tools used to sell them or something like them too?? I haven't used the stamping sticks but a lot of those old guys did. I haven't been around anyone who used them, just don't have the experience. I got started with a Maul-master, enough said there. I got a couple straight ones from Barry, and then a couple tapered ones from Wayne after I tried them at a show. I like them all for different things.
-
These are one of those things that going to a show and trying them out is a plus. For me the biggest difference between a tapered maul and a straight maul is how high you need to hold your elbow to have the head hit the stamp squarely. The issue comes into play with heavier mauls and when you have had shoulder problems. With the straight mauls I need to hold my elbow up some. With the tapereds I can pretty much rest it at my side with the height of my chair and surface. I have some of Barry's and some of Wayne's. Like Hidepounder said, the handles are different. I can kind of "ring" Barry's with a my thumb and first two finger and let them rock. Barry's mauls are more neutrally weighted. I like them for walking stamps and backgrounding. Wayne's are more head heavy and the handle works a bit better for me to grip and put a little more force behind the deadfall effect. I prefer them for single impression stamps like larger baskets and geometrics. There is some difference in the head material between them, but not enough to be a factor for me.
-

How do I sharpen the blade on splitting machine?
bruce johnson replied to ruthless's topic in Leather Tools
That is a fact, says Bruce, someone who is pretty careful and doesn't follow the Stohlman diagrams of pushing a stone into any edge as illustrated on page 4 of the tool book. One of my pals accidentally had his finger hanging over the edge of a stone and sliced the end off when he got a little close to the edge. I keep my fingers behind the cutting edge. and work the stone back to me for shaping. That works well for me. However a bit more caution is warranted after that. A guy might want to be careful replacing the blade into the splitter. Maybe watch the edge and not accidentally brush a finger over it while watching the bolt holes line up. I am healing up nicely but have a flat spot on the end of a finger. -
Ok, you asked, you got it. The first powered machine I ordered was a 440. At that time it was the lowest priced machine. I was pretty ignorant and didn't ask the right questions. I was buying based on price only, and out of a rapidly escalating need to get things done. The capacity of the machine is not the question, but the throat plate has teeth to help feed the material and hold it in place and keep it from kicking forward. The biggest issue I had was these teeth made marks on lined things that would not rub out. Especially going around corners they would really eat up the lining. I called up Ron and explained my needs better. He agreed that I needed a different machine to be happy. If I had explained better instead of just buying it all would have been avoided I am sure. Another shameless plug for Ferdco. Ron offered to exchange the head out for an Adler 205-64 for what I recall was not much to boot on the deal. I was not sure and called Vernon Weaver (one of the real bright spots of that bunch). Vernon told me to get the Adler head and and if I didn't like it, he would make me a profit selling the whole setup to him. The Adler was everything Ron and Vernon said it was. Not to totally bash the 440 and its other clones, but I'd look for something different for the caliber of work you are doing. I know guys who use them and have smoothed down the teeth on the plate, but for the extra bucks, even a regular priced soldier in the current clone war would be a better choice to me.
-
Not leather but sorta related...an adjustable snap.
bruce johnson replied to Snap's topic in Suppliers
Just a bump here to let everyone know that the Rollersnaps are available at special pricing in the "Marketplace" section. For those of us that got to use some of the samples last summer, the couple I used have worked out well for me. The link to Marketplace is here - Rollersnaps . Check them out. -
This is not a show special pricing or anything, but McDonald's has $3 value meals. Today I got a double cheeseburger, fries, and drink for $3. Friday I got the tacklebox at Popeyes - shrimp, fries, and biscuit for around $4, drink not included. They were both good. I am just happy to see no chicken eaters here, although the KFC coleslaw rocks as a side. Another suggestion is O-rings at BK dipped in buffalo sauce. OFF TOPIC - Steve M, I am really happy with the Adler 205 I bought used from Ferdco, as well as the 2000 and 1245. They sold me on their service when they overnighted a part to me, and one of the repair guys (Rick?) offered to call me at 5:00 a.m. their time to talk me through installing it before I had to leave for work. BACK ON TOPIC - To get this thread back on the fast food track - the bacon egg and cheese toasters at Sonic with tater-tots and a lime-ade (plain, not cherry) is a good start to the day. If you ask for extra bacon they generally don't charge. Be careful of their styrofoam cups though. They are pretty thin and brittle. You can run a thumb through and have a cold wet lime-ade leg.
-
Doug, Like Gordon said, Sheridan LO has good strainers. They sell some from Bill Bean that I like a lot. On some of the longer saddles I have had Bill cut me some special. I just got a mix from him of long and XLs.
-
Bob, Every once in a while I get lucky. My favorite draw gauge is a Sauerbier. I read somewhere Henry Sauerbier made swords during the civil war. Recently I got a Latta pattern draw gauge with the frame having the 1881 patent date and a CSO bar in it with the Harrison address. Probably a put together deal, and was a good bargaining point. A week later we are in Clovis at an antique store. In the first case I look at, there is the front frame of an HFO Latta (no handle) with the cherriest HFO bar I have seen. I couldn't get my $15 paid fast enough. I get it home and took the blade out. The HFO imprint is clearly visible on the blade when I get it out of the frame. The bar and the handle match now. I stuck a Buchman blade in it, and that HFO blade is a keeper not a user.
-
Josh, I buy a good quality binder from the office supply stores and then drill out the rivets that hold the binder clip inplace. Use a small bit that will drill out the rivet and not eat the binder clip. I prefer the cobalt bits for this. I cut the plastic off and save the stiffeners and sandwich them between the cover and liner to stiffen them. I normally use 7/8 for the cover. I line with 2/3 or 3/4 commercial oak from Siegels. It oils up to a nice color. I use an acrylic finish (Leathersheen) and have no bleeding problems with the oil and no waterspotting.
-
Rob Yeah, you came out alright. Some of those tools could bring $55 or better by themselves. Here's a link to a site that has the history on some of the companies who made them - Old Tool makers . By the way. It is HF Osborne and CS Osborne. Seems like I have run onto a fair amount of draw gauges lately and got some good buys, but rarely any hand tools still useable.
-
Rob, Sometimes what looks like rust will come off with a little WD40 and fine steel wool. I use a soft wire wheel if need be and follow that up with the loose sewn cloth wheels. Looks like you've got some goodies there. Any maker's names on them?
-
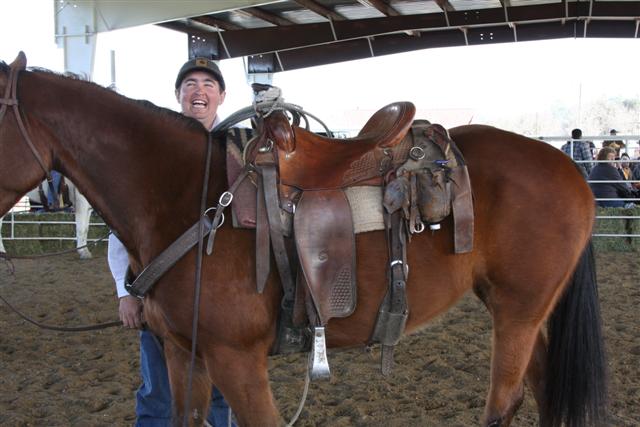
Doug, I am with Keith. I would scoop out in front of the cantle and make it pretty level more of the way forward. I leave my ground work mostly full in the middle of the cantle and transition to make a curve rather than an abrupt angle. I usually try to get my flattish spot starting at the cantle corners. I carry it forward to pretty near the back stirrup slot if I can. I make the front rise come up from there. I tend to like a little flatter seat with a narrower pinched front rise than some guys for a general using saddle. Attaching a couple pictures that kind of show the seat profile I go for. The roughout is the first customer ordered saddle I did. The other one is a few years ago. Rundi shot this picture at a sale, I would like to think the saddle seat is the reason he is smiling.


-
Dang buddy, between your saddle shop apprenticeship and cowboying apprenticeship, you've run into some bad luck. Where are these places at so someone else doesn't jump into the same puddle?
-
Barra, There hasn't been anything released yet. If it is like last year, he really didn't start to finalize much class wise until after the Wickenburg show, which is going on right now. If you haven't been, it is a good show with a lot of vendors. Worthwhile to spend the better part of a day at the Don King Museum. Nice to visit Barry King's shop and see how tools are made. Tom Balding has a bit and spur shop around the corner, and it is interesting too. A couple of social deals - Kings on Thurs night and Sheridan Leather Outfitters on Fri night. The unorganized socials are at the Mint (across from Kings downtown) and the Holiday Inn.
-
I am with Barra. There is something kind of cool to think you are using something for sure that is over a hundred years old, and it still is tight. I had a lapse yesterday morning. I realized the dichotomy of using a neon orange plastic handle screwdriver to set the blades on Hansen and Randall splitters. I got a $5 wooden slab handled screwdriver at an antique store out of guilt. It looked better laying next to them this morning.
-
Problem sewing Tandy Skirting leather, Any ideas?
bruce johnson replied to Vaquero's topic in Sewing Leather
Not to divert this into a discussion of whose leather is best but here is my experience. Usually I have a pretty good idea if there is rawhide in it when I cut it and the round knife rises up out of the cut or the draw gauge hits the wall. I guess I have cut more rawhide in domestic leather than the imports I've cut. Some I have salvaged by oiling it before I go to sewing. As far as the urine smell, he did a series of articles in ShopTalk on some of the Mexican and Argentine tanneries a few years ago. Apparently there is a tree in central America that imparts this odor into the leather, and some tanneries use it and some don't. Whether someone is really using urine, don't know. I don't really lump all the import vegtans together. I have not had that smell in anything I have used. I had some really great tooling sides from Teneria for a while. Some fell off in the heavier weights though. I have likewise had some outstanding Argentine sides too. I liked leather from two US tanneries that closed, and what I am getting now is closest to either of them that I can find. -
Clay, Very cool, or warm as the case may be. Rundi likes them too, but said I can't make any unless we move up to where the arctic blasts come through. That ain't likely. We both remember growing up in it.
-
I am not seeing any different format on my end here. I'll alert someone more computer literate and see if they can help you out. We aims to please.
-
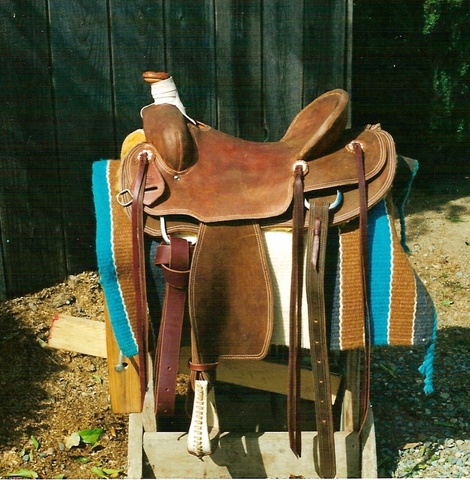
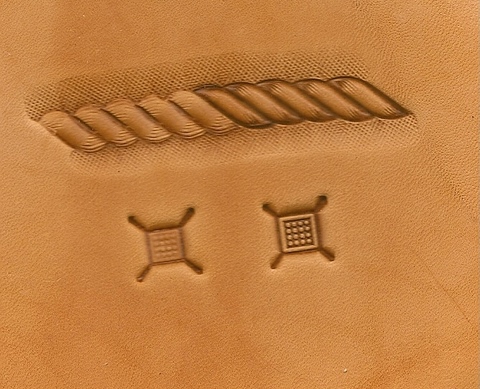
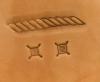
Doug, Both of the stamps on my scan came from Barry King. Edit - Clarification - Both of the stamps on the right side came from Barry King. I had him make me up the rope stamp, the waffle stamp is his regular ol' order it and get it.
-
I think it has been pretty well discussed that low end stamps serve a purpose and fill a niche. For me they have let me try some different patterns with minimal outlay. I could run a $5 triweave and see that I don't like it much in my hands. The walking tools tend to be more forgiving and can be cleaned up easier. For me where the quality crosses the line is on set stamps - baskets, geometrics, borders, etc. You only get one hit and the impression is what it is.
-
I got in on the tail end of the Tandy X-1, and I think still have part of a quart left. The LF manager who told me about it said it was one of their better products and slower movers. Originally it was put out by Drake's. At some point Tandy or TLF got the rights and I don't know if the formula was the same. Many of these chemicals have changed formulas a few times in the past. Changing formulas is nothing new. X-1 seems to be a colored finish. It gives a mellow finish with medium tan to light brown highlights. I am not sure if it is an acrylic or what kind of base for sure. It works out good for a finish on vegtan liners that you don't want to oil, but want them to color up some. It highlights crease lines. It was kind of an all-in-one product.
-
Josh, Not JW, but the roughout gives you a little better grip and keeps you from sliding around quite as much as a smooth out saddle. It also shows scratches less. JW, Another one with a great stamp job. What's going to be next, a triweave? Seems like you have mastered all the others so far.
-
And another question..
bruce johnson replied to CharlieR's topic in Saddle Identification, Restoration & Repair
Charlie, I usually quit oiling when I think it "needs one more good coat". I can't claim this is an original idea, a really old guy told me that once and it stuck with me. Old men are generally wise. I would leave it sit for a few days now and then come back and look at it. I like the Williams. Seems like it gives me a better feel without getting sticky. Let it sit a day and it really buffs up to a pretty mellow finish. -
Bubba, It isn't stealing or we'd all be in jail. One of my customers was sitting in the shop several years ago and complaining about powder getting on his watch and wallet when he put them in the well of the can. He asked me how come rope cans didn't have a pocket. Ummm, they did after that night. About a month later someone asked for a strap with a hoofpick pocket, and that was easy enough. This was about the same time that the catalog guys were selling the powder holders that hung off the back dee ring. Pretty unhandy to have it flopping around back there and maybe catching your leg on it getting across. I just stuck one down to the strap. Some of the first ones went to Texas and Oklahoma with some guys who were out here for the spring rodeos. That fall, Casey told me the outfit in Vinita OK was trying the powder pockets on straps, and when we went to the NFR a few guys were selling them.
-
I get them from Jerry Van Amburg at www.vanamburgleathers.com.