.jpg.d60258221c476480a6e073a8805645bb.jpg)


bruce johnson
-
Posts
4,401 -
Joined
-
Last visited
Content Type
Profiles
Forums
Events
Blogs
Gallery
Store
Everything posted by bruce johnson
-
 Even though this thread is getting close to 2 years old, it is still a real valid discussion of different viewpoints. I think that Dusty did a good job of explaining different factors that afffect how a rider and saddle interact with a horse. The bottom line goes back to selecting a saddle that will not interfere with that to start with on the bottom side. I am not interested in a custom fit saddle for one horse at one point in time, I am looking at saddles that don't get in the way. They don't all work for different horses. We are dealing with some inexperienced riders and someone needs to give them guidance. Otherwise they are getting advice from the feedstore, an Ebay description, operaters at Valley Vet, and the guy with the trailer load of unmarked saddles at the auction. The examples of buying backpacks is valid, but you are going to strap it on and make sure it doesn't pinch or bind before you head out. Who is more qualified to do that with a saddle, a saddle maker or a 20 year old guy stacking feed? I overheard this conversation at a feedstore a few years ago. Someone obviously pretty green was looking at saddles. They had a decent good selection and some were marked full quarter horse and others semi quarter horse bars. The feedstore saddle expert told her that the QH bars fit quarter horses and the semi QH bars fit paints and appaloosas because they are mostly half quarter horses, you know. Yep good sound advice there. With quality and sizes all over the scale on some of these saddles, the novice needs some direction. Just because Buck's or Ray's or whoevers Wade fits horses well doesn't mean than the $500 Wade on Ebay does. Another factor is that the tree can have the specs that will work, and a saddlemaker's riggings, blocking, and seat postion can change all of that. Another argument for a lot of this seems to be that riders trade horses and never trade saddles so why worry about how one fits. The other misconception is that riders with a few horses will only own one saddle at a time. I really don't see that either. A lot of pretty good horsemen get by with two saddles. One that might fit their immature backed colts pretty well and another for the mature horses. It isn't rocket science and they recognize the need for both. Bob, sounds like we grew up in the same area. I have had Price McClauchlins and Ryons back in the day. The Prices are kind of a blast from the past, I don't think I have seen one out here in 25 years that I recall. I think that connection when he was in Illinois probably helped get that area going for him. I see a few Ryons now and again. The only caveat I would give is that even though they were well made saddles, they can be 30 years old easy enough. The used saddles really need to be gone over with a fine tooth comb. Screws can come loose, riggings weak, worn sheepskin, and leathers over the bars. That can double up the price of some of them pretty fast.
 -
Justin, I like your analogy. I had a dog like that once too. That said, there are a ton of different ways to do things. You are doing it right, ask questions about how and why and this is the place to do it. Everybody has a reason for what they do, and it works for them. Most generally you find that even though it may start out different, when it is said and done the results end up working for that guy. Pick and choose, try it and see what works for you. It is only leather and we eat beef everyday. I do it to ensure a continuing supply of leather.
-
CRAZY Question - how to re-attach 3-ring binder spine
bruce johnson replied to equiss's topic in Hardware and Accessories
I drill out the old rivets with a drill press and a bit small enough to go down inside without drilling out the stem on the clip the rivet goes through. I reattach them with Chicago screws or conchos for the great majority. On some Chicago screws I cover them with a thin layer of leather. I have done some photoalbums where they didn't want anything exposed. On those I used a star rivet through a backer that was sewn to the cover. I have 8/32 machine screws from 3/8 to 3/4" to get the right length for the weights of leather. -
Looking for a used cylinder arm machine
bruce johnson replied to Double U Leather's topic in Leather Sewing Machines
Doug. The stirrup plate will have two raised ridges on either side of the slot. The top of these ridges will be rounded over front to back. The rounding over is a smaller radius than the cylinder arm itself. By raising it up and going over a smaller radius those corners will stay hooked better and roll over easier. Also you just have the width of the ridge to the left of the slot pushing the gusset leather over instead of the distance from the end of the cylinder arm to the slot. -
Harry, For what it is worth, I don' think it is just you. I have had hell trying to set belt snaps for the last couple years. Something seemed to have changed. I never had problems before that when I had the wholesale orders thank God. Sometimes I will have to set the female side 4-5 times to get one that would hold. I have 5 or 6 setters and about that many anvils to play with. Everytime I thought I had the right combination, the next one wouldn't hold. I accidentally got the combination before Christmas. I picked up the glove setter and used it to set belt snaps. Dead on sticky fit. That pleasing crisp snap when it goes in and and out. I am not sure if the snaps changed, but this is working for me and I am not one to argue with success.
-
Looking for a used cylinder arm machine
bruce johnson replied to Double U Leather's topic in Leather Sewing Machines
To make the sharp corners on gussets easier you either need a machine that has a small cylinder or one that can be fitted with a stirrup plate. I have done them on a Tippmann Boss, Adler 205, and Ferdco 2000. If all you need a cylinder arm for is briefcases and your flatbed is doing everything else, a used Tippmann may be the most economical. They'll rebuild them if they wear and warranty them like new for not much money. I sure had good luck with mine. Otherwise you are getting up into the short arm machines at $2200 or a little better for an Artisan 3000. You might find the right used machine someplace too. -
Carefully. It is pretty easy to enlarge the hole and increase the size. I use things with the right radius so when I put wrap a piece of wet-dry around it the radius matches the curve of the bottom of the blade. Mostly I use nails of different sizes or small screwdrivers. I strop on an edge of oiled skirting with again different radii to match the curve. I rub my compound on the edge and pull away. Be careful on sharpening and stropping you don't end up running into the opposite cutting edge. I really like to use bisonettes, but they require some care sharpening.
-
For dies - Big Sky Die & Tool - !-800-282-4759 Texas Custom Die - 1-888-755-9025 I have dies from both and they are good. For a clicker - Tippmann, the Mach III (might be called something else) model are both relatively lower cost. Once in a while you can hit a deal on a used big clicker, but they weigh a ton and require some power. I use a 20 ton shop press with steel plates and a cutting board. For what I do it works fine.
-
It was probably in regards to plugging inlays. Basically you take the piece you cut out for the inlay and split it down a bit and narrow it up to account for the thickness of the inlay material. You put this behind the inlay to raise it up to the level of the surrounding leather. It makes a really clean level look. The downside of plugging inlays is that hair-on and some more fragile exotics can be abraded if they are up to that level. It can be a problem with belts and spur straps. As a general rule I don't plug belts and straps, but do plug things like photoalbums.
-
Edging troubles
bruce johnson replied to Lace's topic in Dyes, Antiques, Stains, Glues, Waxes, Finishes and Conditioners.
There are a few mixes that people make up to add some stiffening to the edges so the fibers will bond and lay. Some common mixes are acrylics like Leathersheen mixed with leather balm or similar, leather balm and Resolene, and other mixes. I have pretty good results with diluted Elmer's glue. Once there is some stiffening some of these leathers will burnish alright. Others will not, but will stiffen up enough to sand the edges and smooth them down. If I am going to dye an edge I'll do it before any of these. Sometimes you have to go back and redye after slicking or usually after sanding. I finish with either an acrylic over the top once it is smooth or paraffin wax. -
Darryl, Once it goes through and is received, your name will change to a blue color on the board, and under your name in the left side when you post it will say "Contributing Member". You should also get a paypal receipt. Kate wrote an actual program to piece back together those threads that looked like a garbled cyber Humpty Dumpty. Johanna and Kate then ran the broken threads through it one at a time to restore them. Because of the arctic blast in ND a couple weeks ago, Clay was able to to spend some quality time by the heat at his keyboard putting them back in their respective sections. Even though they all deserve a nice trip to someplace tropical, the donations all go to maintain and enhance the forum.
-
Ummmmmm, no I missed that Johanna. I'm sure this won't be the only one of the resurrected Marketplace postings we need to watch out for huh.
-
Billyjoe, I can appreciate Ryan's point about prices in the for sale section. I am usually not a strict "rules guy", but it is in the guidelines at the top of the Marketplace section to have some kind of pricing. I have some interest in some of what you are selling too. Are you selling these all as a set or individually? Thanks,
-
In early December I needed some more for Christmas orders and Smith Bros backordered me. I ended up and got a couple from Kings and four from Callaway Ropes in Dublin, TX to get me through. It sounds like the reason SB was out was Callaway had just ordered about 75 in. She was very easy to deal with and I'd sure order from her again. A couple days before Christmas SB sent me the backorder, so I expect they've got them again. If you just need a couple and they're out again, I've got black 4 rope cans right now.
-
New member with too many questions. . .
bruce johnson replied to Newfman's topic in General Saddlery Discussion
I'll address your question on bars first. The terms QH, semiQH mean nothing between tree makers. One treemakers specs are not the same as the next. There are no standards in tree making. You are fitting two different types of horses and will have to have a way to decide what widths and angles you want. Dennis Lane's card system is in my mind the easiest. Then you have to have a tree maker who can understand what you want and or go with whatever way they are comfortable taking descriptions or measurements. There is nothing magical about a Wade tree fitting any more variety of horses than any other tree style. It all comes down to width, angle, and rock. These have nothing (or minimal) to do with the top side. Most production tree makers shoot for a middle of the road type horse. I think it would be a stretch to expect the same Bowden tree to fit a mustang and WB, but it might work. Materials. The kit I bought several years ago seemed like a decent deal. The tree was basic, but one of the better Bowdens I have seen. The two sides of leather were long and skinny and neither one deep enough to cut a seat without getting into some real crap and butcher cuts. It takes me 2-1/2 sides on most saddles anyway. The strainer cover was the thinnest chap I have seen with 2 brands on it. The hardware was fair and the stirrups were decent for what they were. I would never buy or recommend a kit again. Once I got past the big two treemakers, my trees run from $275 up to $600. Three sides of leather - $450-575. Woolskin - $65. Decent hardware - $100 plus. Stirrups - Monels are less expensive than my time to cover tinbounds - $120-200. Glue, oil, dye, conditioner, finish - you've got to buy some quantity you may never use the rest of - $100. Side of latigo - Almost as cheap to buy a side as two latigos and then another to cut lugs - $130. Rivets, nails, thread - again you have to buy minimums - $75. I've probably forgot something here too. Tools - The biggest thing is a drawdown stand with a strap. You can make it or buy it. You can make one probably for $100 or buy one as nice or basic as you want. You won't find much use for it afterwards than as a saddle stand or blanket rack. I'd think that using the minimum number of bottom line Osborne tools - knives, rivet sets, pliers, spikes, etc., you would still have $300-400 minimum, and plan on spending some time sharpening every one with an edge when you get it. How to do it - Nothing beats the experience of a good teacher. The books and videos aren't all complete. That said, the books by the Stohlmans - $150 or so and Harry Adams book - around $100. For videos for a first time - Jeremiah Watt's are the most complete and about $400. -
Laptop/briefcase
bruce johnson replied to Elton Joorisity's topic in Satchels, Luggage and Briefcases
I know what you mean about the shedding. A few of the belts I've inlayed and plugged look like mulehide under the seat belt zone. I hear you about the buck-off - That could be embarassing. You know pard, I bet they could sew that ear back on...... -
Miniature Bronc Belts
bruce johnson replied to Casey Jordan's topic in Purses, Wallets, Belts and Miscellaneous Pocket Items
Casey, Those are waaaay cool. I could see one of those in a display with a mini saddle easy enough. I wonder if they'd fit Wilbur's monkey. (A few will understand that. What was his name, "Whiplash"?) -
Aaron, Welcome and feel free to ask away. Where abouts in NC Illinois?
-
Laptop/briefcase
bruce johnson replied to Elton Joorisity's topic in Satchels, Luggage and Briefcases
Elton, Very cool use of the hide. Are the gussets hide too? The whole thing is outstanding. Great work amigo. I like your Stamey line also. "Don't forget to stay loose". -
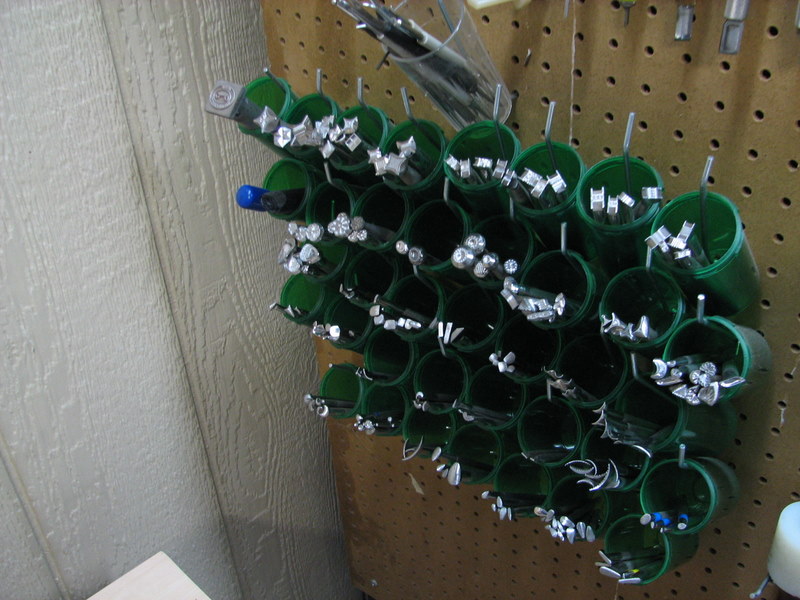
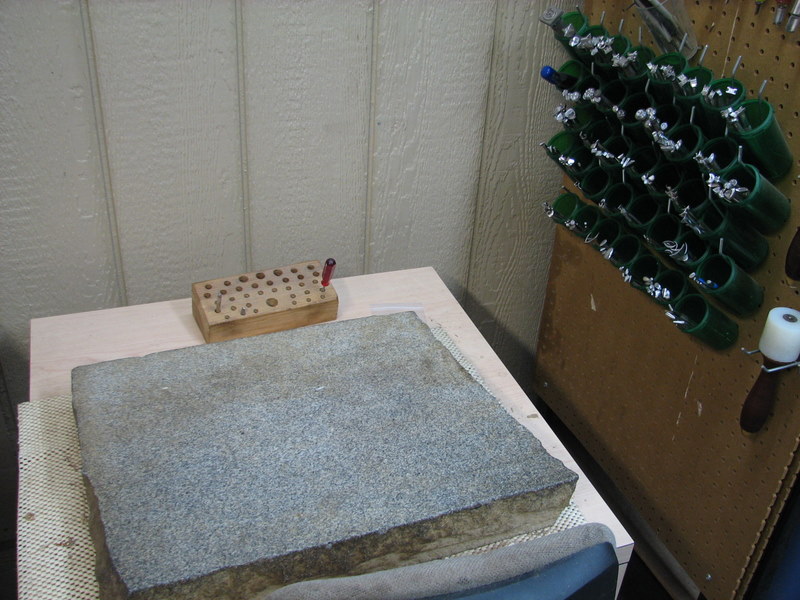
I've organized my stamps a few ways, and this has been the easiest for me right now. I used to use old fence post sections with the holes drilled in them. They were cut to fit inside metal tool boxes. It made it handy to keep to keep them upright. That was about it. At that time I was getting a lot of old tool sets and had a lot of stamps. I tried to organize them by type. Problem was I'd get some new ones and have to shift everything around. Then you'd forget to put one back and then there wouldn't be a hole for it. A lot of people can make it work, I can't. It would be easier now that I downsized my stamps. I am attaching some pictures of what I've been doing for the last few years. The stamps are organized by type into individual cups. I drilled a small hole in the bottom and then bent some pegboard hooks to feed up from the bottom and hold them at an angle. When I am sitting the stamps all face out to me so I can see the heads pretty well. Originally I used small plastic juice cups to store them, but the clear color of the cup blended in with the silver finish of the stamps and made it kind of hard to pick them out. The green cups are actually pill vials and the green background makes it easier to see the stamps. The pegboard is to the right of my stamping rock and also holds the swivel knives, mauls, and push beaders and ticklers. In front of the rock is a small wooden block that holds a couple swivel knives and about 20 or so stamps for the ones seeing action on that pattern. As far as setting up beforehand. Sometimes I'll pull out what I know I need and have them ready. Other times I'll pull them as I go. I keep them in the wooden rack until I'm done though. A tip for angling the wooden block - Drill all your holes first in a square block. Then prop up the back upper edge and run it through a band saw - cutting the bottom off at an angle.

-
I'm so confused............
bruce johnson replied to CharlieR's topic in Saddle Identification, Restoration & Repair
Charlie, If the color change is from washing all the grunge off and some of the oil came too, all I can say is good job on that part. That is what I look for and it takes some effort to get there. From that stage I apply something to help restore. I kind of wing it depending on how the leather feels and looks. A kind of routine is a light coat of neatsfoot oil or olive oil and let it even out for a day or so. Maybe some more then depending on how it looks and feels. I like to use a paste over that too. One of my favorites is Hide Rejuvenater from TLF. I also like Williams Australian Saddle Dressing (not Feibing's Aussie). Light coats and keep in a warm room for a day between applications. The Williams buffs up pretty nice as is. If you want a finish, I like a light application of TanKote. -
Harvey, Been through northern Illinois (seems like a lot). Mostly blacker mud up there. The cover resembles the mud we see up here to about the 1000 foot elevation. Since it is raining today, I can tell you that with some degree of certainty. Higher than that and it seems to get more reddish. That said, I found the write up on page 32, and unlike some of the other articles, this one actually made it all on one page instead of having snippets scatttered throughout the journal like bread crumbs. The finish was neatsfoot oil followed by Tandy EcoFlow Gel in saddle tan. The final finish was Tan Cote. I like the way the color printed on page 32 better than the cover.
-
Sheridan show?
bruce johnson replied to TrooperChuck's topic in Special Events, Contests and Classes
Timely here, I talked to David at the LCSJ earlier about this. He is hoping with his other responsibilities to have something on the Sherdian show schedule in about three weeks. To add to the numbered list above. #4 - get there a day or two early and allow some time to leisurely wander through the Don King Museum, visit Barry King's shop, and Sheridan Leather Outfitters. #5 - I would recommend taking the spouse along. Someone needs to drive back from the King reception or a social gathering at the Mint. -
I think rubber is too "grabby" for cutting and punching for the most part. I use HDPE for cutting and LDPE for punching.
-
Mike, You are looking at the wrong tool. You are describing an angled or straight channeler. They originally were used by boot makers and harness makers with a sharp blade to cut a slit to sew in. The slit was then glued closed to make a hidden stitch. Seems like $30-60 buys most of them. For what you are looking to do, you want a stitch groover. There are a few styles with guides - Bob Douglas makes a unique one, Jeremiah Watt and Osborne make one like a compass with a loop type blade, and TLF makes one with an "L" shaped blade. I like to use one for straps and skirts that is an old shoemakers pattern with a wooden handle and a fence. It has a loop blade and will cut a nice narrow groove as deep as I choose to go. For free hand stitch grooves, some people call them a patent leather tools or gum tool. Jeremiah sells one that is nice. Bob Douglas usually has some on hand.