bruce johnson
-
Posts
4,401 -
Joined
-
Last visited
Content Type
Profiles
Forums
Events
Blogs
Gallery
Store
Everything posted by bruce johnson
-
Some silver suppliers carry copper rivets with silver clad caps. Hansen's Silver have them engraved in plated and overlay, but only sell directly to wholesale. They are not all that pricey. You can dome them up with a rivet domer and it doesn't affect the engraving noticeably.
-

Picking Out A First Sewing Machine
bruce johnson replied to DougVL's topic in Leather Sewing Machines
Doug, Good points and going back to your original post - the more commonly available used machines will sew leather on some scale. It is a different deal sewing veg tan vs. garment leather and I think that is the dividing line between readily available cheap machines. The average hobbyist may be doing some chaps or garment leather work and those Singers in several models will sure enough work. Once you get into carving on vegtan - belts, checkbooks, planners, sheaths, etc - the number of used lower cost machines drops. This seems to be the most common application that most of the people asking on this forum are doing. I'd expect that is why you got some of the repsonses you did. The Adler flatbeds come to mind as not being all that rare and doing the job, and sometimes can be bought pretty right. Condition is the key, and parts are a little pricey sometimes. Get into much heavier and the bigger Adlers, Singer 7s, needle and awl machines, and those oldies are the used machines that fit. The problem is finding one and finding parts and advice. I may be wrong here, but I think the closest industrial sewing machine repair guy with any reputation is 80 miles away from me. There may be other trading boards, but Ferdco seems like it is one of the more visited ones. That's how I got my Adler sold - lots of calls the first week and I took the offer from the guy who would pick it up. Still most of the stuff listed there is not cheap for the casual user. When I was trading up from the Boss to a powered machine I called Ferdco from the ad in the back of Western Horseman and got a 440 for no other reason than it was the cheapest powered machine sold. It was not the right machine for me - starting with the speed, and the feeding mechanism. I just called and ordered it - didn't know enough to ask the right questions. When it wasn't doing what I needed a machine for, you are right with the first post- I was ready to appreciate a better one. I called Ron at Ferdco and got my first lesson. That was long enough ago, that hobbyists just didn't buy leather machines from dealers to any extent. When someone called a dealer, they already had experience and knew what they wanted. Ron took a lot of time and went over machine types, feed, speed, thread size, and tables with me. He offered to trade the 440 head for a used Adler 205-64 head, sent along a smaller pulley for the motor (servos were pricey then, not $150 or whatever they are now), and made the deal work for both of us. I appreciated that and remain a loyal customer. I asked him why someone hadn't written an article on sewing machine basics for someone like me in LCSJ. It had been offered and declined. The journal is kind of funny about suppliers or dealers writing articles, or mention of some specifics by some authors. It is a business decision for them, they don't want to offend other advertisers. As far as a wiki-type deal on sewing machines - great. I'd sure like to see it. As it stands right now, this forum is probably as close as it gets - dealers and users, full time makers and hobbyists. Wiz, I don't know of anyone who has bought the Singer 550, but would be interested. The local sewing machine and vaccum shop had one set up a couple years ago. The owner had me sit down and run it. It did sew some pretty hard skirting leather, and seemed to be happy doing it. The limiting factor is probably thread size. -
Question On Rebuilding Older Saddle Tree
bruce johnson replied to Priam1's topic in Saddle Supplies, Tools & Trees
I'd recommend using it as a decorator piece. I saw a picture recently of an old high back saddle tree used a book rack. They set them in at a slant in the channel between the bars from fork to cantle. You can also run the fork through a bandsaw just above the bars. Screw it down to a board from the back with the horn up and make a coat/hat/bridle rack. I guess I am saying I wouldn't build on it. -
Picking Out A First Sewing Machine
bruce johnson replied to DougVL's topic in Leather Sewing Machines
Doug, I can agree with some of your premise - learn how the machine works and you can troubleshoot a lot of things yourself. My background is almost exactly what Art described. I started off with the romance of hand sewing everything. I started getting some orders, handsewed more to the point of tendonitis. Orders started coming and I needed a machine. At that time I had no experience with a sewing machine other than old metal well built home machines. They would not get the job done for what I needed - even a checkbook was pushing the limits. At that time a machine that could do most of what I needed was $5000. With no background in heavy machines, for me to go buy a used one was like someone who had never driven a car and only seen pictures to go to a car trader's lot. The Boss stitcher was out and at $1600 (then with no accessories) was the only thing in my budget. I figured out from that how a machine works - things like "OK that thread makes a loop there at the needle as it pulls up - neat, and that hook thing catches it". Then "by magic that thread goes all the way around the bobbin and pops up the other side". A few repairs and putting it together out of time taught me timing. I moved up through a shortlived ownership of a 440 and on to a used Adler 205. Motorized brought some new experience, it was a good solid machine but eventually I needed something with a different feed system and accesssory availability. Still the next machine up to do what I needed was a $5000 investment. At that point I was confident enough that I looked for a good used machine. They had some wear or wanted $4000 for them. I opted to drive on the top of the tread and bought new for another $1000. A couple years later Artisan brought out the 3000 - motorized machine that had capacity and under $2000. That machine probably more than anything I have seen in my relatively short time in the leather business revolutionized things. It made sewing available at half the cost or less and several people had something they could justify. In the meantime, the generation of old timers is passing. Several of the old machines have been orphaned and parts aren't available even if a guy is handy with them. The shoe and general repair shops closed 15-20 years ago, the manufacturing trade is all but gone on any scale. Several of the used machines I see have been sitting idle for 20 years in somebody's garage or shed. Some may not have even been working when the old guy even shut the doors the last time. They would take some serious work to get them back to reliable. The hobbiest/second income guy usually doesn't have that kind of time or inclination to deal with it when they can buy a machine ready to go for a little over $2000. -
Chris, I don't like straight beeswax for edges. The advantage for me is that beewax seems to burnish up darker than paraffin. I suspect that is due to being stickier and making more friction and heat. The edges seem like they are more prone to "crack" on working gear or bends in things like checkobboks and albums. Paraffin edges don't darken as much, but get slicker/shinier and have more flexibility for me. If I am doing dyed edges I usually use straight paraffin. To get the best of both worlds I mix them for undyed edges and that seems to work. I take a pyrex measuring cup and put it directly on a burner over really low heat. We.ve got one of those smooth top stoves. I stick in about half beewax and half paraffin and let it melt slowly with a fire extinguisher close by. I do it really low and slow, takes maybe 15 minutes, and haven't had a problem other than boredom. once it is all melted I pour it off into cupcake papers in a muffin pan. I am not sure why we even have supcake papers. In six years I have never seen a cupcake in this house. After a few hours when it is hard and set, Peel the paper off. One warning. Last winter I got the idea to mix some dye into the wax mix while I was melting it. Kind of make some dyed wax like those boot and shoe guys buy. Upon cooling it separated and the dye flew over the kitchen when I peeled the paper off the first one. I put the rest of them back in the cup and slowly melted them and boiled off the dye solvent. In retrospect, a fire would have been hard to justify vs. just throwing it away and quitting while I was only a little bit behind. I did get all the solvent boiled off with slow heat, about an hour of wasted time, and constant watching. It made a nice looking dark wax. In side by side tests, nobody can tell any difference between the regular wax and the dyed wax. No difference at all, and I am adding this only to keep someone else from repeating my failed experiment.
-
"the Custom Conflict"
bruce johnson replied to Johanna's topic in Choosing the Right Saddle for the horse(s)
I'd probably disagree with some of what was said in that blanket statement. It could be that 95% of the saddles sold are made in trees from 3 major saddle tree companies. They are sold to the production saddle shops, and some of them do call their higher end saddles "custom" saddles because the buyer can choose the seat color, tooling pattern, silver styles, whatever. They may very well be building on the same tree as their $1500 plain brown wrapper models. When you get to handmakers of saddles like most of who are here - fewer are using those trees to any extent. They are the ones using the handmade or higher end production trees. -
Brad, My suspicions here. Cletus Hulling was a big time horse trader and I am pretty sure that is where he was at - not too far from St Louis. Many folks may find it hard to believe but at one time there were some great cutting horses and trainers in Illinois, Indiana, and Ohio. I was at his place once, and it was kind of overwhelming. You needed a calf horse, cutter, bulldogging horse, pleasure horse, whatever - the only limiting factor was your money and ability. When I was a kid too, Price McClaughlin saddles were pretty popular in that area. I had heard for years that Price McClaughlin was at Cletus Hullings for a while. A few years ago, ShopTalk had an article on Price McClaughlin and that confirmed it. There is a better than average chance the saddle might have been made when he was there in Illinois.
-
A mild polishing compound on a felt wheel, felt dremel points, and maybe a mild wire brush is what I use.
-
I've got a 31-20 I picked up a couple years ago without a table. I never have set it up on one yet. I put it on the bench and handwheel it for little putzy repairs with thin thread. I have tried it with #92 thread and it hung up underneath a lot, so thread size is a consideration. I am going to get around to setting it up right when I run out of wallet interiors and have to start making my own.
-
Tim, I don't have a set price. It ranges from $300 on up depending on a few things. If they have lugs and a simple lace pattern then it tends to be the $300 or so range. If the lace pattern is more complex - more time = more money, usually another $25 - $50. If they have pocketed bars, then they have to be sewn back. That adds another $75 or so. Usually that stitching is pretty old anyway, so I resew all the stitch lines by hand. I can pretty well give an estimate based on eyeballing these things. The wild cards I hold out and let them know about are the plugs. If the skirts are curled or the plugs are shrunk back from the edge, they will need to be replaced to sew back. The skirts might need to be wet, flattened, dried and reconditioned before you plug them back. Add in the cost of the plugs and that can tack on another $100 plus easy enough. Most of the time I replace strings on saddles with them when I reline too. A few tips I have been given and pass along. Before you try to pull the woolskin, take a stitching groover and run it over the top stitching a couple times. That will weaken it enough that when you pull the woolskin, the stitches will pull through with the woolskin and there should be very few left to pick. The loop blade type groovers or a freehand stitch groover ("gum tool")work well for this. Picking stitches is a pain. Another tip is to resew with a round needle, old guys (generally wise) tell me it will follow the old needle hole better than a chisel point needle.
-
Taking The "slick" Out Of A Slick Seat Western Saddle
bruce johnson replied to Go2Tex's topic in General Saddlery Discussion
Brent, Likewise my condolences on the loss of your lime tree. I understand the obligatory use in gin and tonics and squeezed over carne asada and carnitas. I also have found that two or three wedges squeezed and dropped into a Sprite will make a limeade similar to Sonic, except I can actually make a good burger to go with it. The guy I talked to that buffed the seat said he used a Black and Decker sander with the triangular head thing. Said it was just the ticket for the points and edges. -
Taking The "slick" Out Of A Slick Seat Western Saddle
bruce johnson replied to Go2Tex's topic in General Saddlery Discussion
First off, Brent you need to post a picture. We don't see enough pictures of your work. Glad to see you have wintered well. As far as the seat, other than the buffing you suggested, I am not sure of much else to do. I have seen a couple slick seats where they outlined a smooth out seat in the shape where you'd lay an inlay. There was a bead line around it to make it look like it belonged there and then buffed inside that line. It looked pretty cool I thought. When it burnishes up and slicks, just buff it again. A bronc saddle maker told me they get more mileage out of swells by making them smooth out and buffing than roughout. -
Knife Knut, Thanks for resurrecting this post and the link. I would appreciate your thoughts on a middle ground. When I worked in the packing plant, I had a smooth steel and another smooth steel we used wet/dry to put some minor grooves in. It was not nearly as aggressive as the grooved ones commercially available. On my straight knives I use a steel sometimes. I have never really found a comfortable or effective stroke with a round knife and usually strop or use a hard felt wheel on those.
-
Why Is Woolskin Put On The Underside Of A Western Saddle?
bruce johnson replied to GrampaJoel's topic in Saddle Construction
Troy, Was sewing the woolskin on by hand as much fun for you as my first couple were? Made me appreciate a machine more when I got it. Now I even cringe when I have to resew pocketed bars or riggings. Joel, I am going to agree with everyone who said woolskins help hold blankets. I am sure historically they got started because they were the best source of cushioning available too. I rode a saddle back in the day called an "Innovater". It had a slick bottom and that was the era of the carpet pads. Might have been the tree, rigging, the pad, or the horse but it rolled all over and nothing stayed in place. This was western pleasure show ring stuff. You hear about the cavalry guys dismounting, airing the back, resetting blankets, and leading a mile every so many too. Makes me sort of wonder how those saddles really worked. -
Chris, I don't see a Randall Krebs on ebay, what's the link? The CSO looks like some things are not there. Topcat, It sounds like if you are paying top dollar, you know what you are looking for and want a really good one. Darcy gave you a connection to a reputable source. A couple other sources who refurbish and will tell you the straight scoop on what they have are Bob Douglas (307 737-2222) and Keith Pommer (605 372-4523).
-
Thanks for the tips, but in my case I need both accounts. I carry my laptop to work and my wife does her computer time at home in the afternoon. It is worth it for the frustration factor she was dealing with. Other than an occasional bouquet, best money I've spent in a while.
-
Philip, If they are telling you that you have to have wholesale license, that makes me think it is a Horseshoe Brand (Jeremiah Watt) stamp from Weavers. If so - you can order directly from Jeremiah Watt without the wholesale number. Here is his website and link to his contact info - Jeremiah Watt/Horseshoe Brand tools .
-
If you're looking for diamonds in the rough, pretty much most of the desirable makers mark(ed) their stamps other than some McMillens. The Craftools are far and away the most common finds in estate and yard sales for the reason they sell/sold the most. Other ones are CraftJapan and some other Asian stamps. I have some that are sure good ones. Other ones to look for are McMillens (may or may not be marked), Hackbarth, Don King, Woodruff, Russell, Fay, and a few more oldies whose names escape me. Newer makers are Gore, Barry King, Wayne Jueschke, Bob Beard, Check Smith, and some other new makers. It is sure possible to find these in estate sales from someone. Every once in a while you will hear about someone finding a big set of good old tools someplace. About any of the good ones will bring $15 and the right ones up to $150. That just comes from seeing them and getting a feel for what is desirable and what someone else will pay.
-
Ann, I've done a few of these replacements. As far as the buckstitching. Once you fit up the binding you can mark your line and then take it off and punch the slits and lace it before the final assembly. Even if it originally went through the seat leather, your stitch line will catch it anyway. I start with my binding being about 8 oz or so. I leave it full back to the area where the rope will start to be formed and then skive it down to about 5 oz or so. I form it in tight to the depressions between the ropes. I start with my fingers and finish with a tool to really seat it. My favorite tool for the this is a deer antler spike. I punch my lacing slits when it is pretty dry and then pull it down tight.
-
What I was trying to say in that post was there is a sweat pattern with the cinch sweat pattern laying directly behind the elbow. The saddle is sitting about maybe 4" behind where that sweat pattern is. Where the saddle is sitting now (uncinched) is where I would probably place it and pull it to start with. JW pointed out what I thought I was seeing too. The swell fork rigging appears to be more forward of what I would call a full double. The swell fork saddle is cinched down in that same place right behind the elbow. Because the rigging on that one is more forward on the tree, the bar tips are back off the shoulders. If you place a 3/4 rigged saddle with the cinch in the same place as the full, there is going to be more bar in front of that, and that appears to be up over the shoulders or at least into them.
-
Huntet, From your earlier reply, Nope wasn't me who said you had mule bars. I didn't see that reply. I think the fact that you can feel something on one side and not the other, you have a nice picture of a single dry spot corresponding to that area, and you have already shared it with 9000 people might sort of get their attention. I would think Teskeys would at least want to see it. I understand them not wanting to carte blanche give a full refund, but I'd think they might want to at least fix it if there is a problem. Edit - Now that these pictures are up, I see some placement things I'd probably do differently too. I think that saddle appears to be sitting too far forward in some of the pictures. Where I expect the bar tips to be on that swell fork is a few inches behind where I expect they are with the Wade in some of those pictures. There is one picture (3rd one)that shows a sweat pattern where the saddle is sitting what appears to behind that about the width of the cinch. It looks like that is about where the saddle wants to settle, but again your hands are on it and we are looking at pictures. Sometimes the pictures when they are moving can make things look like they are sitting differently in different phases of a stride too. Again though, if one side of the saddle is different underneath than the other, that needs to be addressed.
-
Under that area from your description, it might be the gullet liner wasn't skived very well on that side or a skirt plug isn't fit in there right. That can leave a ridge, and I've seen better than a $1395 Teskey that had one side skived and one not. If it is something you can feel on one side and not the other, that would be reason enough to send it back I'd think. If it is yours now, somebody will need to drop the skirts and see what is causing whatever you are feeling. As the wool packs, it will be a bigger problem.
-
Another thing I am wondering is a 1-1/2 pad is pretty thick and with new woolskin over that, the saddle may not be pulling down as much either.
-
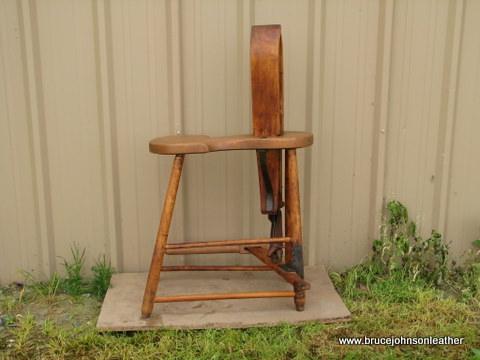
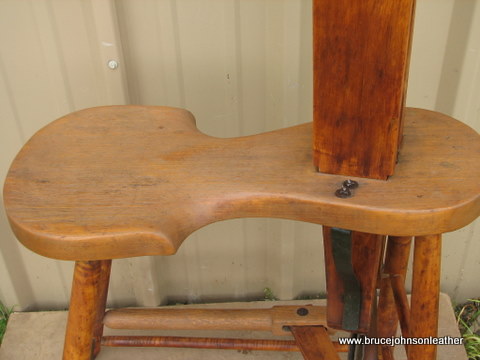
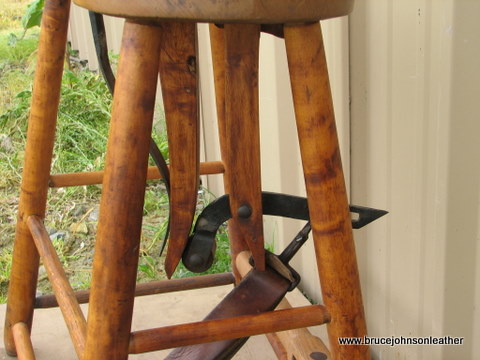
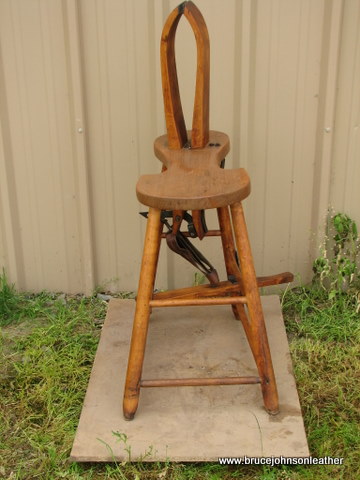
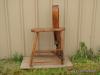
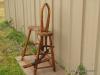
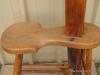
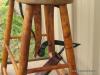
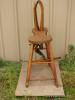
I recently had the opportunity to buy an old stitching horse from the original owner’s grandson. I got it yesterday and put it back together. The original owner was Charles Collins. Mr. Collins was born in Texas in 1879 and moved 1895. He worked for several of the top saddle shops of the day – DE Walker (Of Visalia fame), PB Lady, Frazier, Frank Meanea, Victor Marden, Jepson, and Burkhard and Son. These were the real top tier shops and innovators of the times. He opened his own shop in Globe, AZ in 1914. He moved to Prescott in 1936, and back to Globe in 1941. He continued the shop there until at least 1956. He died in 1962 and according to his grandson was building right up to the end. . In a few places I have read he was described as an authority on cowboy history and lore – another of my interests. It is written that he was friends with Zane Grey. He bought the ranch that Zane Grey’s cabin was on, but did not personally know him. He did correspond with J Frank Dobie, Ross Santee, and Walt Coburn. I got the stitching horse yesterday and got it put back together. It is rock solid, and works well. My other horse is a left footer, so this one will take a little getting used to. It is a little higher and the contour and shape of the seat is a dead-on perfect fit. I am proud and honored to have it.
-
What Is This Tool And What Is It Used For ?
bruce johnson replied to aldunc's topic in Leather Tools
Paul Krause or one of the other bootmakers might have a better idea than me. I have seen similar tools in shops that boot makers used to cut and rasp pegs inside shoes and boots from pegged construction.