shtoink
-
Posts
545 -
Joined
-
Last visited
Content Type
Profiles
Forums
Events
Blogs
Gallery
Store
Everything posted by shtoink
-
This is the cheapskate in me suggesting this, but I have seen many leather weight lifting belts at second hand shops. Most just sit until there is a 99 cent sale of some sort. I've even seen some that were unfinished veg-tanned leather that would probably take some tooling. It'd be a cheap way of getting your hardware and pattern as long as you don't feel bad about tearing an old one apart in the process.
-
Aside from the short list of the guys in here that do up burnishers and mauls to sell. I'm skeptical that one exists. At least not commercially. I'd start with a message to one of them to see if they'd be willing to take on the project and hopefully, you get what you're looking for.
-

How Do You Get That "leather" Texture On Tooling Leather?
shtoink replied to Blakebcg's topic in How Do I Do That?
The act of flexing and bending the leather brings about a bit of change to the texture of the surface. There are a few types of leather, such as patent, that have a surface coating designed to be flat and smooth on purpose. Some will have a pebbling effect or be very soft, but it depends on the type of leather, too. It may start out very smooth looking, but as you work with it, the texture can/will change. It probably isn't something you need to stress over. -
Unless you have full control over the speed of the spindle, I'd say that a router wouldn't be a good choice. I know they tend to have rather high RPMs and you'd more than likely end up burning your edges. At the speeds a typical router spins, there is only a fraction of a second between 'smooth & shiny' and 'burnt to hell.' A drill press, and to some extent rotary tools, allow for lower RPMs, so they are more forgiving in that department. I have heard of people scavenging the motor and speed controller from old treadmills to repurpose them in some way. They are usually cheap or free, have a decent amount of torque, and all you'd need to do is relocate the necessary bits into a new housing so you can make it do your bidding. That is, if you are up to making a dedicated burnishing station for you workshop/garage and you are willing to tear into old exercise equipment that you found on the side of the road someplace. Just a thought...
-
Looking pretty good for a 20 year break! On a side note, I think you have a finger shaped smudge on your camera lens. There is a consistent positioned blurry spot in every one of your pictures.
-
Why else?

-
I have been following the development of this thread and thinking the exact same thing. I actually have some duplicates and such of some of my tools that have been waiting to be adopted out to a new home that will give them the proper love they deserve. Since I am making my own swivel knives now, I have ended up with extra adjustable ones from Craftool that will need new owners, too. I was actually thinking that if the tools were mixed in with other things, they might be less likely to get slapped with the higher tax rate. Maybe have it as a care package of sorts with tools as the bonus.
-
 I love the simplicity! Proportion, lines, edges, everything. It all comes together in a clean and elegant way. Sometimes it's nice to see something that doesn't look like it's in a constant state of motion.
 -
There's more to it than that, but this isn't the place to get into that area of discussion. This was, however, my first try at doing anything with titanium, so the drill bit was a sacrifice in the quest of knowledge. It looks like I hadn't mentioned anything in this thread, but did in a another, about sourcing some carbide tooling for super cheap. Destroying one or two drill bits in an effort to learn how to work with titanium is quite a bit different than making it a regular activity and specialized tools were quickly added to a shopping list. Practical or not, it's still an experiment to see if it could be done and was only one subsection of the overall goal in the process of taking this project from it's initial design phase to a very stable and usable product. Haven't you ever done something just to see if it could be done? That should probably exclude things that happen while alcohol is involved, though. I think it might be necessary to point out that I am not making titanium a regular thing to be worked with and I have zero intention of making blades from titanium, either. It came up because it was presented as a challenge from a friend and fit into the goal I had put for my self, overall. This isn't a business for me, so I have the luxury of not needing to stress over many of the struggles that I have encountered along the way. It's an excellent learning experience that will allow me to take a small scale project, capable of being dealt with by one person, and scale it up to larger, more complex projects so that a better idea of how to handle 'snags' that come up during each phase of the project. I do appreciate the input, as it does give me the opportunity to see things from a different perspective. This has actually had the result of me taking into account aspects that I would, otherwise, might never had even thought to consider.
-
It didn't take me very long on this, but I think the results were very pleasing. It turns out that 0.127" drill rod is available and it is very conceivable to make new blades from scratch. I was able to take measurements from the existing one that I have here and make a reasonable facsimile of it. It seems that I was able to get pretty close considering the renders below. The other issue I saw was that these blades are difficult to sharpen and strop when they need to be as there are no jigs that will fit them. I was thinking about this one while driving and the idea to make an adapter to fit an existing sharpening jig would be the easier route. Why reinvent the wheel, right? It would hold the blade and slide into the post of the jig sold by Tandy. When the set screw was tightened, it would pinch the adapter against the blade and hold it all in place. My first iteration had me thinking of using a two piece design and it was difficult to come up with a way to keep the parts together. It bugged me and led me to keep thinking about it. It occurred to me that I could do it with a single piece and a couple of steps of machining. This is my render of the quick little model I did up of the handle and blade. Here is the cutaway showing how the adapter would fit in the post. The cut and hole sits right under the setscrew and allows a portion of the adapter to flex and pinch against the shank of the swivel cutter blade. This a cutaway showing what it would look like with the blade inserted into the adapter.
-
What Can I Do With 200 1.5" Leather Circles.
shtoink replied to billymac814's topic in Leatherwork Conversation
^This! Key chains are pretty common place and unless you have some really cool ones, they will possibly just get passe over. You might have to include them as free gifts with purchase to get rid of all 200 of them. I still think the Othello: Leather Edition or even Checker: Leather Edition would be awesome. Yeah... Yeah.. I know what opinions are like. With the checkers, you could use a border stamp and matting stamp to give it a pattern similar to the plastic ones. -
Here are a couple pictures I took of the one I have. It's pretty simple, really. Two components, that's it. The blade isn't anything special, and a quick measurement put it at 0.127" in diameter. While looking at the shank on the blade, I noticed that there isn't any special polishing or anything done to it. It looks to have been cut off with a big shear and a little bit of grinding to deburr the edge.
-
Funny thing.... I actually acquired one in a bundle of tools I scored at a second hand store. There was a some oddball stuff tossed in it, but the bulk was some very nice 60s era tools from Craftool and RBS. The blade doesn't have any special retention mechanism at all. It's just a smooth metal shank inserted into the end of the handle. I'll try to get some time to take a few pictures and see what I can come up with.
-
Not sure if there is anyone that still has any spares on these blades, but I have actually thought about giving a shot at seeing if one could make their own with no special tools. My idea is to locate some annealed drill rod of the appropriate diameter so that it fits in the end of the handle, give it a bend like the original, put a pair of bevels on it, harden it, sharpen it up, and put it to use. Seems easy enough in theory. Ideally, it could be done with a sharpening jig, a torch, and a vice or pliers maybe.
-
What Can I Do With 200 1.5" Leather Circles.
shtoink replied to billymac814's topic in Leatherwork Conversation
One side is black already, so paint the other side white and do up some sets of Othello: Leather Edition. You could make up a board for each set and then sell them. -
Quivers And Archery Arm Protectors
shtoink replied to Sherkhan1962's topic in Archery Quivers and Bow Cases
I agree that that's the way it's supposed to be in the diagram you have. I have some beefy forearms, not quite like Popeye, but close, which makes my stance a bit altered. It actually puts more of the upper area of my forearm at risk for string bites. I've also seen plenty of the kids get snagged with the shorter style guards, so we provide these for them and it eliminates the issue completely. I've had kids whose arrow never left the string because it got snagged on the arm guard. When you are dealing with about 20 or so kids, most of which are 12 and under, there's bigger things to have them focusing on besides a slight change in position of their elbow which they may not even be able tell the difference of at this point anyway. It is something that gets addressed as they get older, but when they are younger, you still want them to at least enjoy the activity. After getting bit by the string on a 60+ lb bow several times, you start to keep an eye out for those potential issues. As far as the pronunciation of my name, it like a 'sh' sound attached to a 'toink' sound. Smush them together with no pause in between. It's kinda like a springy noise, really. Your response made me chuckle and you're not alone on the confusion. There's been plenty of permutations on actually pronouncing it, so no worries. -
Quivers And Archery Arm Protectors
shtoink replied to Sherkhan1962's topic in Archery Quivers and Bow Cases
It wasn't apparent until you posted a picture with your arm in the arm guard in the thread where you provide that pattern for it, but there is a small flap that sticks out towards the elbow that will be the source for interference with the string. It was an issue that a number of kids in my 4H group ran into when another leader had a project for them to make their own arm guards. That little bit that sticks out is free to pull away from the arm and be a place for the string to snag on. Since there is a slight difference in how everyone's posture is when shooting, it can be an issue for some but not others. From the looks of the image you uploaded, it may have happened to you already. That also puts your arm at risk of getting smacked with the string. I guess the point I am trying to make is that it's a good idea to eliminate anything that could possibly snag as you have no idea of the stance of the person that will actually be wearing it. Sort of a 'better safe than sorry' sort of thing. This isn't a criticism of the arm guard, just an observation of part of the design for something that could potentially be an issue for those who decide to use your pattern. I actually like the design and execution and it's not something I have seen done before. -
I think it involves floating a couple of drops of oil based pigment in a bin of water and dipping it. There are plenty of takes on the process, but the idea is usually very similar. You want the colors to marble on the surface of your item. I found a video that outlines the process I am talking about pretty well. I wouldn't start with the leather submerged in water, though. You could float your colors and then dip your item and pull it out at different angles to change the pattern of the marbling. Mind you, I have not actually tried this out on any leather personally, but the theory is that it should work. I would recommend experimentation with scraps first.
-
I recently got a new macro lens, so I decided to try and get some better shots of the difference between these two ceramic blades. Just click the picture to open up a full size view.
-
Here's a couple of pictures of the 7/32" drill bit that I was using to make the very first hole in the titanium. As you can clearly see, it suffered from some pretty extreme temperatures and the debris that failed to clear only added to the sever abrasion of the tip. The leading edge along the flute is worn down to the relief that was ground into the side to reduce friction induced heat. This all happened during lower speeds, too. It was cutting reasonably well at first, but the poor heat conducting properties of titanium trapped that heat once the bit was about 1/3" into the barrel blank. Those same poor heat conducting properties are the very reason I am experimenting with it, though. It makes it feel warm in your hand instead of cold for an extended time like other metals. I need to dig up the other one that was broken off in a bit of drill rod that's pictured above. It's a #53 in my drill index. Not that many people here are going to be digging holes into titanium, but it was a reasonable pretense for testing out the new Canon L glass we just picked up. I love macro shots, so I hope you enjoy seeing them as much as I did taking them.
-
With the recent price increase of new stamps at Tandy to 9.99, the inflation is much closer to 40x. That's just insane!
-
Conway Twitty's Gretsch 6122 Round Up (Just A Piece Of History)
shtoink replied to chancey77's topic in Musical Instruments
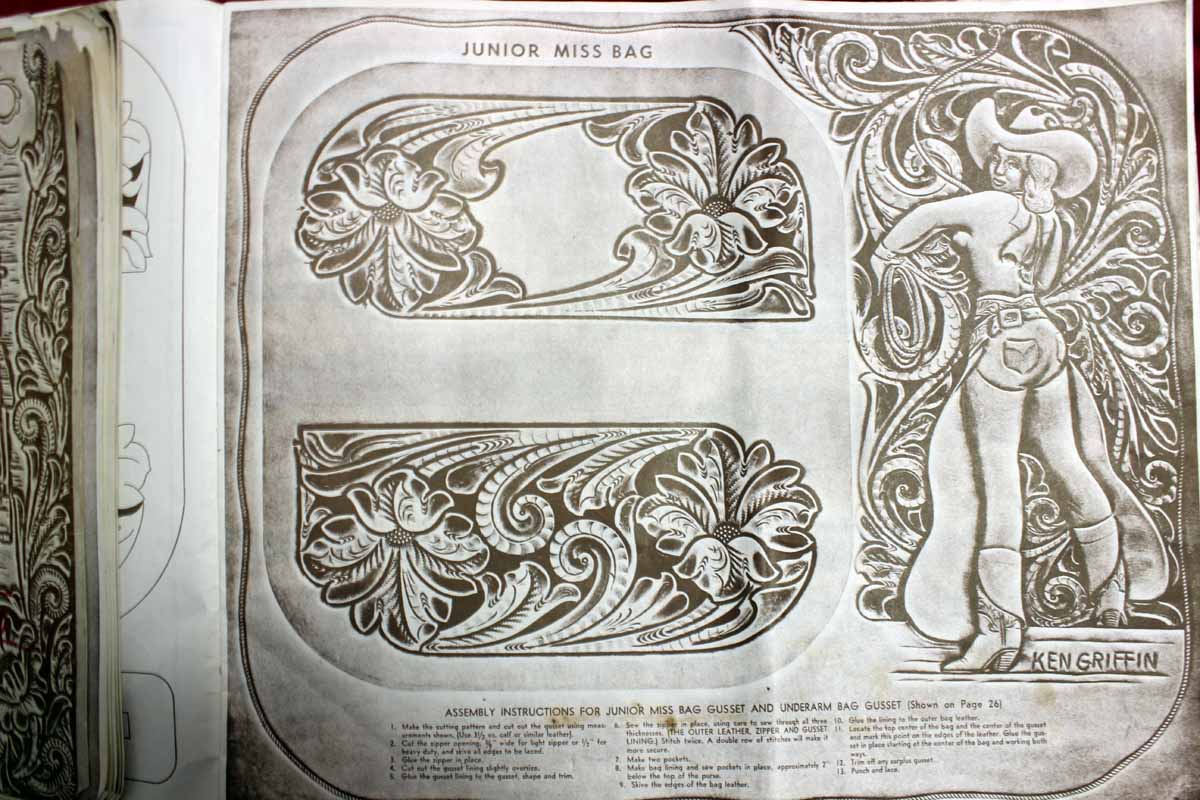
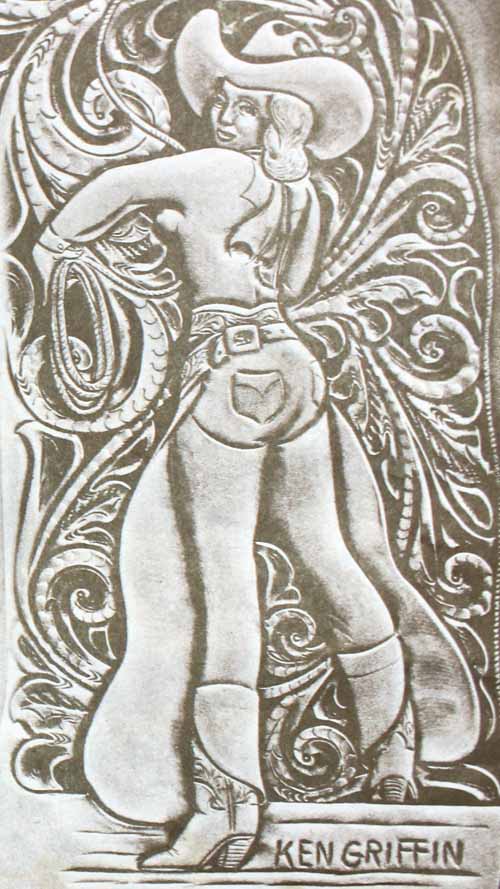
I would argue that the carving and all of the lettering on the back was done by the same person. Looking at the spacing, shape, and overall feel of the letting, they seem consistent. It seems as though it's possible that the artist knew that his wife's nickname was Mick and just added that to the bottom of the carving he copied from Ken Griffin's book. It's very likely that Nicholas was either very new or knew that his guitar would be seen by many to sign it that way at the bottom. I'm leaning more towards the former than the latter due to the uncentered look of the signature block. Also taking into account that he has no makers mark or specific signature that is much shorter than his entire name nearly running off of one edge despite laying down lines to aid in keeping the lettering straight. The other thing that makes me think this artist was rather new was the level of detail that he was even able to duplicate from the original image in Ken Griffin's book. Comparing those two images, you can see a great deal more detail in the face and clothing in Ken's versus Nicholas's carving. It's even possible that he just traced it right from the page in that book onto the leather when you think about just how big that book actually is. The dimensions of the paperback book are 15"x18", so it does seem conceivable. I can't offer up any other information about the guitar other than knowing it's a 1957 Gretsch Roundup 6130 solid body electric. The copyright in my book is 1952 and I found a picture of an original carving by Ken done in 1951 over on ClayB's blog. This means that there was at least some time for the book to be in circulation before the guitar was even made or decorated. -
Conway Twitty's Gretsch 6122 Round Up (Just A Piece Of History)
shtoink replied to chancey77's topic in Musical Instruments
I found this on page 11 of "Ken Griffen's Scrap Book." Anyone else see a similarity? Here's a close up
-
The thing is, stabilizing wood plasticizes it. This process is done in an extreme vacuum to pull out any air within the wood to be replaced with acrylic. While this does have the result of making the wood highly resistant to cracking, humidity changes, and the like, it also removes all the properties of wood that I chose it for in the first place. It makes the wood heavier, colder to the touch, and is generally unnecessary on the much denser, oily woods that I am using. The thing is, I have done my best to actually work around the slight fluctuation in dimensions from humidity in my design. This is also part of the reason that I have not immediately jumped into selling them, too, since I have some long term testing that needs to be conducted and evaluated.
-
One of the materials I have been experimenting with besides wood has been titanium. The reason being, it is a poor heat conductor and light weight. This means that it will feel warm in your hand in a very short time. The one really big shortcoming is that it's not the easiest to machine with HSS tooling. It can be done, but it requires frequent breaks to cool and resharpen the tooling. This link below is my first cut into a bar of titanium and it got hot enough to ignite the oil I was using for cutting fluid. The chips were coming off glowing white and somewhere in the neighborhood of 2000 °F. I clearly had my speed a bit too high and have since not had chips come off that hot. http://s7.photobucket.com/albums/y285/shtoink/?action=view¤t=cutting_titanium.mp4 The other solution is to get some Tungsten Carbide tools to do the job, but the downside is that it's not a cheap option, but that's why I spent a good deal of time trolling around ebay for low-cost deals. That's what the following picture is about. I managed to score some carbide drill bits, spiral fluted taps, and a couple reamers. The taps and the bigger reamer are HSS, but will be used gently. If I had purchased all of this at retail, it'd probably be in the neighborhood of $300, but I'm a cheapskate and I have about 1/4 of that or less into them. This is partially related to the process of making the swivel knives in the sense that it really helps to have the proper tools to do the job once in a while.