shtoink
-
Posts
545 -
Joined
-
Last visited
Content Type
Profiles
Forums
Events
Blogs
Gallery
Store
Everything posted by shtoink
-
I stumbled onto an interesting thread over at The Home Shop Machinist that was dedicated to home brew tools and such. The main reason being that I have an interest in that sort of thing and thought I might be able to get a few ideas for future use. While digging through the nearly 200 page thread, I ran across this post. It was clearly made by someone frustrated with pushing a sewing awl through leather with their bare hands. I thought it might be something that could be appreciated and even replicated by those of you in the same boat here.
-
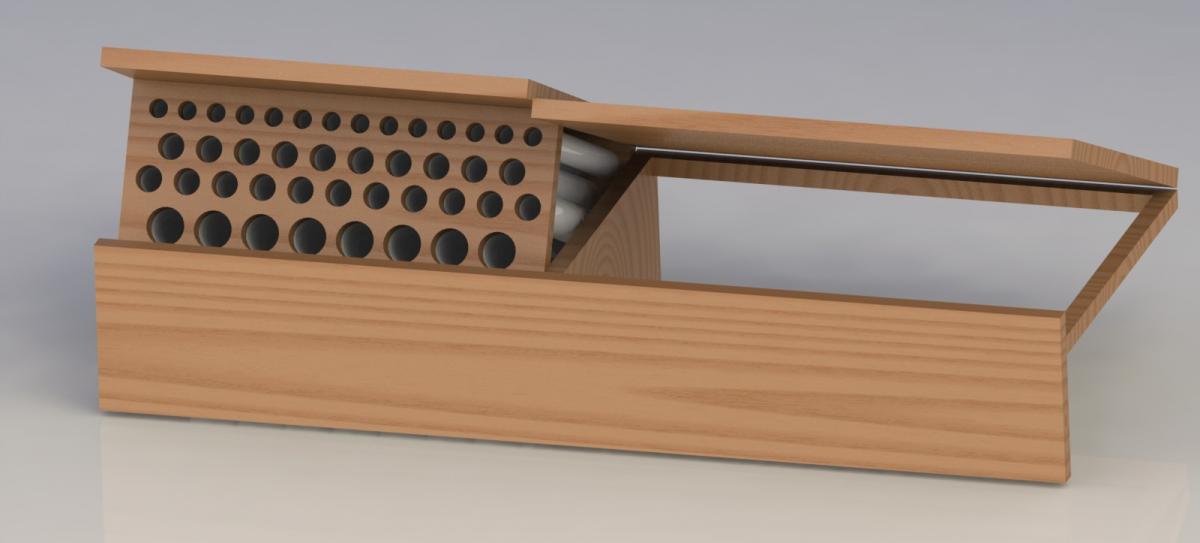
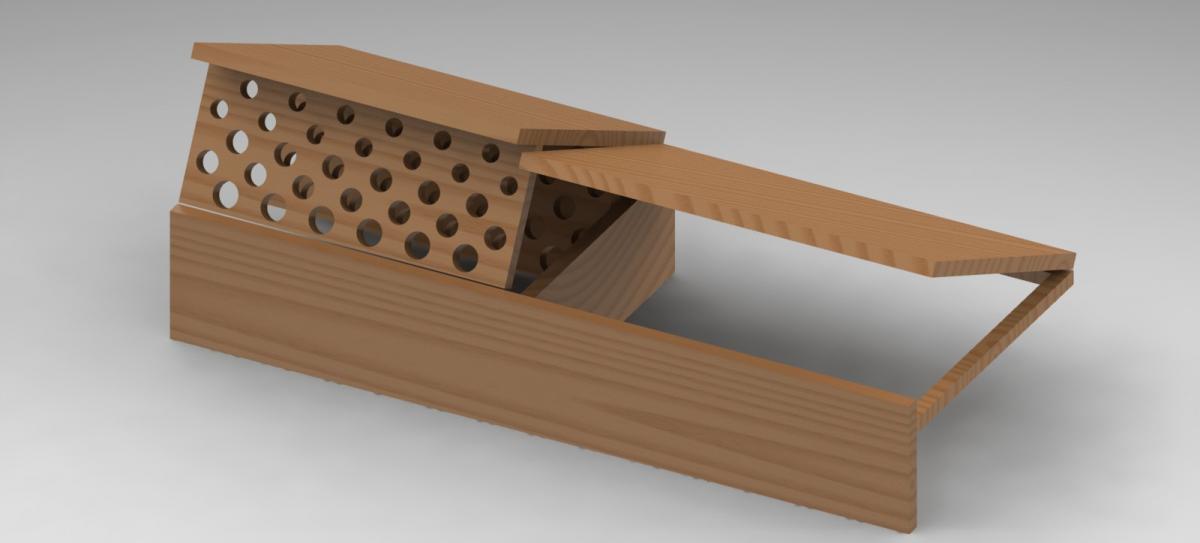
After quite a bit of searching around through the multitude of hinge types, I managed to find what I think might be the ideal solution. The hardest part was trying to find a hinge type without knowing what that type is called. Ugh.... So, for the side with the punch block, I wanted it to pivot a certain way and the hinge needed to take up very little space. I was thinking that a chunk of piano hinge might to the trick, but I'd end up having to put screws right into the walls of the case. The problem with that is that the case walls aren't very think and it might fail prematurely. Here's what I think might work... Hinge 1 and Hinge 2 For the side that'll have the strap and lift to allow access to the space below, I need a different style. I think a quadrant style hinge might work well, since it won't be carrying a heavy load like the side loaded with a bunch of punches/stamps. Although, I may end up using a section of Velcro so it can hinge, but also be removable if the need arises. The trick now is to source the hinges for a reasonable price and in the correct size. I'm not excited about dropping upwards of $30 or so for a pair of hinges that you'll never even see. I thinking much cheaper than that.
-
I have used the Evapo Rust with excellent results. I had anticipated that it wouldn't work all that well, but I was blown away. I put it through its paces by testing everything in it. I did find that you really want the item to be completely submerged in the liquid or you'll end up with a blackened line right where the item is exposed. It's also not very reusable. What I mean is that it it has a certain amount of iron oxide that it'll react with per unit of volume and once it's done, it's done. You just dump it down the drain and pour in more. It took bluing off very fast, but that's because it's also a form of iron oxide. Oddly, I also found that fruit flies like to die in it for some strange reason.
-
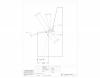
I was in the chat room not too long ago and we were talking about some of the finer points of this modification. One of the things that came about was the possibility of getting some small(ish) diameter plastic tubing bundled together to hold the tools. I did a little research and located some cheap plastic tubing of 1/2', 3/8", and 1/4" that just needs to be cut to the required length. Here's what I came up with after taking real life measurements of the tubes. I think it looks pretty good, so far. I still need to figure out exactly how I am going to get them all to stay in place, but I do have a couple ideas on that one already. The added bonus is that it increased the number of tools it'll hold from 33 to 43 by doing it this way.

-
Agreed! Fire Bad!

-
I think you just answered one of your questions right there. Reading through this, I kept wondering what the temperatures needed to be for the beeswax and the pitch mixture. I knew that beeswax had a relatively low melting temperature, but had no clue on the pitch ( I did assume it to be higher, though). When you described the condition of the pitch lining, it really seemed like it was cooling too fast to produce the desired results. Maybe something along the lines of an insulating blanket wrapped around it to prevent the rapid heat loss or immersed on another double boiler or similat heat bath to help keep the pitch viscosity low. It might be possible to find a liquid to use with your double boiler that reaches I high enough temp to deal with the pitch. An off hand guess would be an oil, like peanut or vegetable, but care would need to be taken to keep you from getting burned or the whole mess from catching fire. There are things that can be mixed into water to raise the boiling point, but I don't know if there would be anything that would bring it high enough to deal with the pitch or what it might be without a bit more researching. No idea if these might be viable options, but it does seem cleat that the pitch is cooling too fast for you to get the results you want and preventing that somehow might be trick.
-
The added bonus, the seat will smell like cedar AND leather. That sounds like great combination to me. I wonder if that's and "Old Spice" smell already....
-
That was an odd little trick that was passed on to me after I was issued my first beret that refused to take proper shape.
-
Glad to hear it. Also happy to hear that it was an easy fix.
-
That's a great idea! I have to admit that I may have eventually stumbled onto that idea, but only after trying out a half dozen other ideas that didn't work first. I seem to have an affinity for doing things the hard way.
-
A block wood and some time with a belt sander maybe? You may need to hit some thrift shops, otherwise. It looks like the edge of the brim may have been rolled with a AAA battery, too.
-
Tomorrow will be Revenge of the 5TH!
-

How To Make Leather Blue, Orange, Yellow, Green?
shtoink replied to leatherorpleather's topic in How Do I Do That?
It's difficult to say without a bit more info. Though, I may just lack the experience needed. -
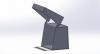
I know that the mapping of the wood texture isn't quite right, but I wasn't aiming for realistic with this. I was getting an idea of how the hinges, the locking mechanism, and everything else will all fit together. I was thinking that it might be easier, and lighter, to construct the punch block from a few thin pieces of plywood rather than a solid block of wood. This means that I don't need drill press, but I will need to potentially place some tubes into those holes so the punches don't fail to align properly when inserting them. I may end up just getting a block of wood and borrowing access to a drill press if it becomes too much of a hassle.
-
I'll definitely be keeping the updated with progress pictures as the project moves along. If there are any idea that anyone might add, this is certainly the stage that they should be suggested. I'm still not 100% solid on how I'll be doing the locking mechanism for the punch holder or if I might need to account for any other tools/details that have yet to mention.
-
The part with the "U" shape and rollers along the left is the mouth piece, the angle makes it difficult to see, though. Multiple pictures at different angles would have help in that regard. It's pretty hard to do decent searching while on my phone, but I did find a guide for bit and spur types here.
-
I'm glad that you like the idea, Mike2. I was pretty sure there were people out there that might not want to transport their entire collection of tools if they didn't have to. This seemed like a simple and neat idea to solve that problem. What I think is great is that it's a standard sized student clarinet case. I have seen quie a few of them around without an instrument inside. They can be found in music shops and junk stores alike. I would recommend that anyone wishing to make a similar toolbox keep an eye out the older style case and make sure it has a minimum, or no, plastic in it's construction. I didn't get an opportunity to check out many other instrument cases, but this one wasn't too difficult to pull out the support system for the clarinet. It would make sense to keep an eye out for that, as the more difficult it would be to remove the guts and modify, the work that will be involved in converting it. I realized early on that it would be difficult to carry around just about any toolbox that has a granite/marble slab hiding inside. It'd be the equivalent of purposely putting bricks in you backpack, purse, or briefcase. I worked on the assumption that there is a great deal of variance in the types and sizes of slab one might have and it would be far easier to just have it carried separately, if it needed to be brought along at all.
-
I am using the exact same version of Firefox and not experiencing that issue. The first thing that comes to mind is either some issue with an add-on / plug-in that may be installed with your Firefox, or some strange popup blocking behavior that was added accidentally. It could also be malware. You can't ever seem escape the possibility of that one, but it certainly isn't my first guess in your case based on what you said. I'd say that giving a look at your installed add-ons to see what you have and then maybe running Firefox is safe mode to see how it behaves. This should let you see if it might be add-on related. If it works properly, then it's just a matter of figuring out the offending add-on.
-
Ink To Leather
shtoink replied to Kevin King's topic in Purses, Wallets, Belts and Miscellaneous Pocket Items
Umm... That looks to be a very true statement... Is your neighborhood free of any stray critters after that? -
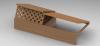
Since I can't ever seem to turn off my brain, I find it interesting to see what it comes up with when I let it have some freedom now and then. The last time it was inspired by a very cool toolbox design that I have mostly worked out over here. This time I had discovered an old, but cool looking clarinet case for less than a five spot. I wasn't completely convinced that I should get it, but it seemed very likely that I could turn it into something else if I did. I walked around the store while holding on to it and ultimately decided that I'd spent more money on worse ideas and brought it home with me. The idea of turning it into a small toolbox for leather tools started to grow and I kept staring into it trying to envision how it would all be laid out. It was difficult to do that until I pulled out the felt cover insert that was meant to hold the clarinet parts. After that, it seemed like everything fell into place in an instant. I got some paper and sketched a rough idea of the layout while the ideas were flowing. After that, it was just a matter of hacking up some bits of cardboard to mock up the ideas, test, and adjust as needed with the actual tools that might be in it. This is what I came up with... The idea is to have one section that will fit a #4 Garland rawhide mallet and a few other various bits and the other area divided up to hold punches, modeling tools, a few swivel knives and a good number of other small tools with handles. The area with the swivel knives and modeling tools will have loop type straps to hold them all to that panel, which is also a lid for the area below it. With the lid lifted, you can see that it has a fair amount of space and keeps the contents relatively captive. The section next to it will have the punches, and the exact count is 33. That doesn't mean there isn't room to toss in a couple more, but that's about all that will realistically fit there. The idea I have for the part that hold the punches is that it will be hinged and lift up much like you see in the picture. I plan to have it lock in both the open and closed positions. This will keep them accessible while open, but also keep them from spilling out everywhere while closed. Here, you can see that it was originally intended to carry a few music books. This seems to be a great place to carry any pattern books you might have that will fit, or risk being folded to fit in it. All in all, I think it looks good and shouldn't be too difficult to make the necessary parts from a few bits of thin plywood. Maybe someone else in here will be inspired to cook up one of their own.
-
Welcome! You came to the right place... There's incredibly friendly and helpful people and a very large collection of information here that spans the entire spectrum of leather working. The hardest part is not being overwhelmed when trying to take it all in.
-
So, there's something wrong with using brute force...? Man, I must be doing nearly everything wrong.
-
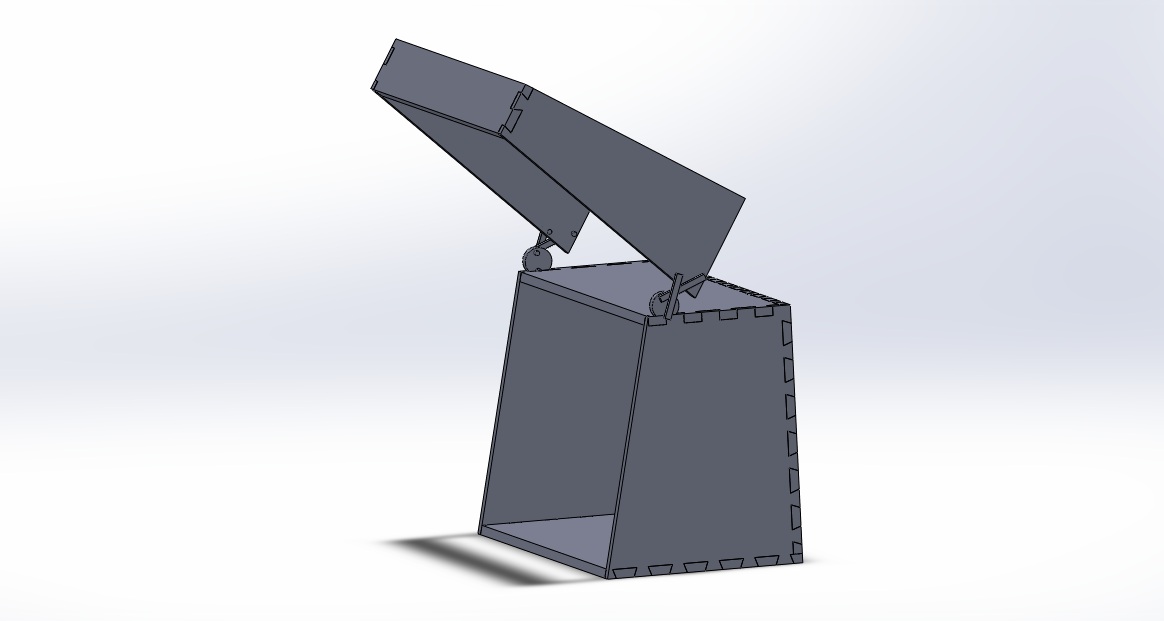
I thought that a shot of the virtual progress might be fun. It's clearly not finished, but it's not a bad start. Also, I can generate 2D plans to for those who might want them. As you can see, I decided to make use of a whole lot of dovetailing, however that can be skipped and whatever joinery you prefer can be used. It'll be a chore, but I may actually have to modify those dovetails later on in lieu of the possibility to have some laser cut parts ordered to assemble at home. That'll be the easier solution for those that don't have the tools are skills needed to make one up from scratch, but still want to have one to assemble. Hmm... I'll have to think a minute on that one...
-
I could be wrong, but this seems to be one finger short. From what I have learned, the two finger draw is very highly discouraged due to control over the arrow during draw, holding, and release.
-
So, while winding down in the evenings, I have been working out some of the details for what would be needed to make the exterior of the toolbox. I started with a 14x14x24 box and might work up from there. I still have no idea what to add to the inside, though. I was thinking of having some various storage options that could be added in as needed to suit the person making it. Some help on those will still be needed. Here's some of the measurements I have so far. There's actually more progress on the toolbox than this, but I needed to work out exactly where the different parts were going to line up and such. I thought this was pretty interesting.