shtoink
-
Posts
545 -
Joined
-
Last visited
Content Type
Profiles
Forums
Events
Blogs
Gallery
Store
Everything posted by shtoink
-
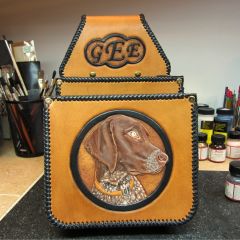
It might be the coloring on the leather, lighting, or something else, but it looks more like a Red Tail Hawk. It's bang-on, too! Looks all dangerous and might bite you if you get too close. Here's a Red Tail Hawk picture just so you guys don't think I'm nuts...
-
I suppose that this isn't exactly a tool, rather more of a tool storage solution, but I hope it is well received nonetheless. I seem to really enjoy the tool aspect of leather more than working with the leather, but we all have our strong suits. While I was digging around the Internet for whatever reason, I ran across a very (to me) done by one of my favorite woodworkers, Matthias Wandel. It was specifically about the four bar linkage hinge for his toolbox made by Würth. It started to see if I could find and further information on the topic, because it seemed like a great idea. I also knew that there were plenty of handy people in here who enjoy making their own stuff and a leather tool specific solution was the first thing that popped in my head. Mainly due to the fact that there really isn't any sort of solutions for the leather tools that isn't stupidly expensive or completely custom.On Matthias's own site, he has a video and a series of images of similar toolboxes made by a couple guys who live in Brazil that were inspired by the Würth toolbox. It doesn't provide any plans, but it seems like if those of you who were interested in making your own might have enough technical expertise that that detail wouldn't be a hindrance. There is a bunch of images that provide clear a clear view of all the internals of both toolboxes and how they function, too. It also occurred to me that I might not have enough experience with leather tools to know what the layout for the inside might actually need. Maybe one for the bench might need to be bigger than one that you plan to travel to shows or classes with. Maybe some tools will require a specific retention device because each manufacturer has a slightly different take on it. Maybe the larger one could have castors on one side to make it like a rolling suitcase and easier to transport. Maybe there should be more than just two sizes and some kind of modularity. The big reason for the post is to put the information out there for those who might be interested in making their own that wouldn't have ordinarily have stumbled onto it and to maybe spark some ideas on what should go inside the toolbox. I've also been needing a storage solution for my own tools.
-
Boy, was I off by a wide margin. My apologies. I had something far different in mind. I agree that making your own would be quite a bit cheaper. The bonus is that it'll have customizations that you want. I'm thinking that a decent motor, some pulleys and, a pair of pillow blocks, and an arbor, and you'll be in business. I also think that it'd even possible to build your burnisher and use it to turn your wood chunk right on it. I still a speed controller would be a good feature, but that's just me.
-
Not sure that this is a safe route. Unless you had a speed controller to bring the RPM's way down, you'll run the risk of it detonating in your face. The irregular nature of wood combined with very high RPM's in a large ( 7"-10") diameter disk is a recipe for disaster. I had a good friend share a story about a place he worked. One of the machine shop rules was that with the 15" grinder, it needed to be started and let run for 15 minutes before being considered safe to use. It was isolated in the shop and nobody was allowed near it until after the 15 minute mark. The general consensus with the younger guys was that it was a stupid rule to follow until the one day that it detonated in that warm-up period and punched a hole in the cinder-block wall behind it. Granted, a buffer isn't the same thing as a 12" grinder, but the type of danger is. I hate to sound like Chicken Little about the safety aspect, but I'd hate it even more to find out someone got injured, or even killed, from an over RPM'd wooden burnishing wheel. Just keep the RPM's down and the 80 MPH wood chunks from flying into your face.
-
Simply amazing!
-
AAARRRrrrrr..... That's an appropriate response to indicate my approval, yes?
-
Since it'll be a decorative item, maybe you can get away with stitching through half the thickness of the leather with a curved needle. You could then reenforce the stitching with a shot of wood glue afterwards. This is just a stab here, so I have no idea if this is a good option or not, but if the leather is sufficiently thick enough, the stitch might not need to come all the way through the leather. I certainly wouldn't suggest it for anything that would need to support any weight, but for something going into your hair or in your sweater, it's probably not an issue.
-
I, too, was very confused on this very topic. I looked all around in here and all sorts of other forums with no concrete or usable results, I was left with nothing more than rumors and more questions. Tired of all the controversy and confusion on the subject, I decided to purchase a Tandy ceramic blade for the express purpose of testing out this exact thing. I took pictures and outlined the results of my findings here. I also did my best to find a method to rectify the rough surface condition of the blades with cheap and easily obtainable materials. I hope you find the information there helpful.
-
I would be inclined to think that it may have been laser engraved with the consistency of the background texture. Also looking at the very precise symmetry and curvature on the outside of the design, it looks computer controlled. If you follow that up with looking at the areas that are beveled within the pattern, there is some inconsistency to the curves and the level of beveling. It's subtle, but still not quite the same as the exterior of the pattern. Specifically the spirals near the top of each leg. The texture of the background looks like the grain was removed from the surface, but it does not look like it was done by hand sanding or a dremel type tool. Taking all that into account, it looks like it was most likely laser engraved with other aspects added in afterwards. This isn't to say that there aren't those who could pull this off, just that it was the most likely.
-
It would make sense that the reptile and aquatic creature hides would need different processing than mammals, but I don't actually know. What I would suggest is maybe seeing if your library has any book on the topic and work from there. A quick search yielded this book, but I am sure that it isn't the only one. What I also saw my searching was references to tanning kits meant specifically for reptiles. Hopefully this puts you on the track.
-
Well, if it isn't worth overdoing, is it worth doing at all?
-
Maybe a little bit of time with the grinder would fixed the outer dimensions, then flatten those points on the crosshatching with a file, and you'd be set.
-
According to me sources, the only one getting after it in the hive is the queen? Did this whole bee thing make anyone else think of ?You know, since the bee communicate through dancing... Maybe it's just me with my off-beat sense of humor.
-
The answer might not be with another stamp added to your collection. I have seen some amazing detail created with a sculpting tool. This will allow you to get subtle transitions on your mask without the need to mash things down into the background. There are a great deal of post in here, but this one and this one were what I found the quickest, and they do a good job of explaining what I mean. The first one even has a tutorial within the thread. The good news is, you can probably get away with a spoon from the kitchen or go to your local art-and-crafts store and pick up some cheap modeling tools meant for sculpting clay until you have the opportunity to locate a proper set meant for leather. The rounded end of a stick, bolt, or nail could even suffice, it's limited to your imagination. This way, you can get your current job done without having to disrupt your work flow much and it can be done for little to no monetary investment.
-
Welcome to the forums... There seem to be a few of us from Washington on here. It's always nice to see others on here from the same area you are in. To be fair, I am rather biased about this state, specifically the western side of the mountains. I have been to a number of other places, and while they are beautiful in their own ways and nice to visit, there is nothing quite like being up here in the Puget Sound area. We get teased about the number of rainy days a year we have up here, but I'll take weeks of mildly wet days with a light rain over hurricanes, tornadoes, flash floods, or extreme humidity any day. I try not letting the crippling fear of a long overdue earthquake looming over the region keep me down, though. On the leather side of things, I'm elated to see someone else joining in on the fun from the same area I am. Unlike most other mediums, you seldom end up where you started with leather. There's just so much you can do with it.
-
You might've even done something like this... It's worth mentioning that the head from that bolt was removed shortly after those pictures were taken so that it didn't present any issues when chucked in the drill, though.
-
I wish you had posted your sketches before you started cutting into your leather, I might been able to save you hours of squinting and guessing. Judging from the larger versions of the logo, it looks to be a single piston engine with wings. I did some searching and found these: This is a link to a listing for a pin that sold on ebay and the link directly to the image The attached image was found in this forum, but the ends of the wings are clipped for some reason. It might be a metal sign of some sort. This image isn't the biggest. It seems they still exist, but the logo has certainly changed since then. I can't read the page, so I have no idea if they have a historical section that might yield a better image.

-
The question still remains, is there any damage to the integrity of the leather? Leather items that have been subjected to long term exposure can/will experience a breakdown of the fibers within it. Essentially, the mold is digesting leather and there is a permanent damage to it. It's hard to tell from the pictures, so I only mention this as a possibility. I have had leather items that just fell into pieces after being cleaned up, which is why I bring it up. Once cleaned up, if there is any permanent damage to the leather, the surface will be dimpled and have almost an orange peel look where the mold used to reside. If this is the case, they would be a good candidate for becoming the patterns of a new bag.
-
 Just... Wow!
 -
I can't help but to be amazed at the flexibility and versatility of your talent. From where I sit, it seems to border on limitless. I totally understand. I find myself into a project and completely forget to take the time to get any photos of the progress. I get into a zone and loose track of everything else, it seems. It's not always a project that's planned either, sometimes it's a repair job that ends up taking a particularly clever solution to fix, but might not ever be seen when finished. This might work. Maybe a decent quality webcam that can be set to snap shots at a set interval or something. Mounting it above the the workspace might be good, but it'd probably be better to do multiple angles simultaneously to get some of the details that my fat head would most likely end up being in the way of a good deal of the time.
-
A horse... Sorry, I couldn't resist...
-
I was able to scare up a 3 part series on making a Native American drum. I will say that these are far from the best of quality in filming and video quality, but they do contain a good deal of information on some of the variations on the details of construction. You pretty much get to see a drum built in real time. It's done very much in an uncut, documentary style. He mentions different materials that are typical for use with these types of drums. I found that is from the Alaska region that is of a better quality that contains similar information and building styles, but more detail. It covers making the frame and proper drum skin tension before it's dry.I am sure there are more, but your search might have to become more specific. I hope this helps on your endeavors.
-
My apologies in advance for not having pictures just yet, but my 0.127" drill rod came in today and I couldn't resist getting a little time in experimenting with these blades. I'll have pictures soon. I didn't do anything fancy and just eyeballed it. I didn't bother with heat treatment or even a decent polish to the bevels since it was just my first shot to see how close I could get. I cut a chunk, bent it, and hit it wth a grinding wheel and it turned out a whole lot better than I thought it would for a first try shooting from the hip. The bevels are ever so slightly off and I found out the bend needs to be a bit more specific, but it fits in the handle and spins just as freely as the original one. Not entirely a complete success, but also not a complete failure. Despite a short list of things that I need to make adjustments to in making them, it turned out a whole lot better for a first try. I think that once I get the handle in the kinks and a nice jig to make it consistent, I should be able to do up a batch to get some testing done on them.
-
Is there much of a market for these blades? I did requisition some 0.127" stock to test my ability to make these blades, but with the original poster's question, it got to wondering if there was much of a demand for them. I see complete knives show up on ebay once in a while, but the condition is not always the best. I know they still have a loyal following, despite not having been made in quite some time, and that there is very little possibility that NOS blades are even available anymore.
-

Need Some Advice On Tools And Leather! Please :)
shtoink replied to Buddytink's topic in Getting Started
I'd give this thread a read, since it covers exactly what you are asking, but I'd also keep in mind that there absolutely no need to go out and get everything you think you might need all at one time. You can dig around at thrift shops, flea markets, estate sales, garage sales, and the like for used tools or just get some new ones as you need them. I would refrain from using a metal hammer to pound on your stamps with, since I don't see a rawhide mallet in your list. The metal hammer will mushroom the end of your punches. The list of tools you will want/need will be based on what projects you plan on doing. Also, you might have one idea when you start and find something else that'll interest you shortly after that.