


shtoink
-
Posts
545 -
Joined
-
Last visited
Content Type
Profiles
Forums
Events
Blogs
Gallery
Store
Everything posted by shtoink
-
Small Scissors Sheath
shtoink replied to Basically Bob's topic in Purses, Wallets, Belts and Miscellaneous Pocket Items
I'm really enjoying the simplicity of the design. I'm more of a utilitarian kind of guy in many ways, so this one seems a bit more kindred to me. -
I completely forgot about Apoxie Sculpt. I remember reading about it after running across a guy's blog that builds custom props and such. It does get very hard and is easily reshaped through the usual mechanical means. i.e. sanding, cutting, filing, and so on...
-
Wish I had the spare cash and space to get one of those. I'm not sure I would call it white, though. It looks more of an bone, eggshell, light taupe, beige, or maybe even an ecru.
-
Sounds sort of like this stuff called Sugru... I know that Sugru has been mentioned in the forum before as well as many other places. I have yet to try it personally, but the common response seems to be overwhelmingly positive.
-
Don't thank me... It's from ClayB's blog, I only remember reading the blog entry a while back.
-
Not exactly sure why this wasn't mentioned yet. It's a simple method and a lot less guilt is involved when it gets dull to toss and make a new one.
-
The Latest Barstool...da Bears!
shtoink replied to immiketoo's topic in Furniture: Inlays and Upholstery
What constitutes "a bunch" and will you still have any sanity left after all that lacing? I'm pretty sure you've already given up on the idea of having fingertips at this point Seriously though, those are some great looking stools. -
How Do I Get Gorilla Glue Off Sneakers Without Staining Leather?
shtoink replied to JimmyS1985's topic in How Do I Do That?
There really isn't much in the way of good news that I have for you. Here's what I found about Gorilla Glue. It's a polyurethane based glue that is activated by water/moisture, but once completely cured is unaffected by most solvents and certainly unaffected by water. The FAQ section on the manufacturer's website states this "Cured glue can be removed with a chisel, scraper or sandpaper." This translates to a mechanical method of removal and if you do manage to find a solvent capable of dissolving this stuff, it'll probably be very effective a destroying everything else close to the glue in the process. This is just one example of many that I found with similar issues when using Gorilla Glue. This stuff is insane! I've used it many, many times, and I have yet to come away from a project without getting this stuff on my hands. It has a high potential to get into and on to everything nearby you and your work area. It's a giant pain to clean up and once it's there, it's there to stay. It does have a slow cure time, so intermediate cleaning during the process can happen without the need for feeling rushed. That way, damage to you and your surroundings can be kept to a minimum. That doesn't really help in in this case, unfortunately. One of the tips that I have heard before is to use something like an oil based product (olive oil, petroleum jelly, baby oil) on the areas you do not want the glue to stick. When it has cured completely, it just breaks off and you can easily clean up the other stuff you used. Sadly, this doesn't help you out on your current problem, either. For the issue with the glue stuck to the leather, you are going to have to scrape and peel that stuff off, all the while, trying not to pull off the top layer of leather or cutting any holes in it. If the leather soaked any of the glue into, then the chances are very low of removing it without damage. There is a very good reason professionals charge what they do for this type of job. It takes a good deal of planning and each step needs to happen very carefully along the way. -
The Latest Barstool...da Bears!
shtoink replied to immiketoo's topic in Furniture: Inlays and Upholstery
That blue is intense! It's no wonder you've been quiet for so long with all that lacing... How many stools have you done so far? -
Probably because it's a serial number and not a model number. I did see a model 151W2 with a serial number starting with W, but there isn't much else to go on. I found a 108W7 that also had a W prefixed serial, too. The thing is, these are 7 and 8 digit serials, and the the one above is 6, possibly making it a bit earlier. Maybe it was meant for running the hem on a pant leg or something. It does seem incredibly different from anything else I could dig up. Depending on the price, maybe it'd be worth getting it and restoring. Hard to say...
-
Leather Trinkets.
shtoink replied to Samar's topic in Purses, Wallets, Belts and Miscellaneous Pocket Items
The first belt makes me think of some of the work by H. R. Giger or maybe one of those crazy background textures from the Doom video game series. -
I'd pay attention to what this guy is saying, I think he might know a thing or two about bending leather to his will.
-
I read that in Leonard Nimoy's voice...
-
I've heard from a couple different places that it is supposedly some of the nicest leather you can find and reasonably durable when compared to other sources. I did a bit of digging for sources to back the info up, as I couldn't remember exactly where I had heard it and here is what I found with a quick search: The FAQ page at Human Leather. <-- These guys make items exclusively from legally obtained human leather. A tongue-n-cheek article, but it talks about some of the things that have been made from human leather. The Wikipedia page on Anthropodermic bibliopegy, which is the use of human leather for the purpose of binding books. It seems that PETA doesn't have much of an issue with using humans for leather, though. It may seem macabre and a bit foreign for most people,but we are looking back on history with a different set of societal values. All things considered, the use of human leather for making a saddle seems quite plausible. On a side note, it'd be interesting to know how well tattoos come through in the final product. Some people have some really ornate artwork and I had read about traditionally tattooed Japanese skins being preserved in such a manner.
-
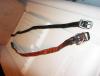
I have been looking closer at the image of the two collars together and something kept bugging me about the darker one. The buckle looked oddly familiar, but it just dawned on me why. It's a from a brand called Circle T and I have the same collar for my dog. He a big puller and has gotten his collar wet. I'd like to call BS on using the darker collar as a comparison for "not stretching" under similar conditions, because my dog stretched his out. It stretched out enough that I had to use my punch to put a new hole in it so it'd stay on him. I know this doesn't really help with the whole "how to prevent stretching" thing, but I felt it might give you a bit of reassurance that you are on the right track and that you just got stuck with a crappy end-user as one of your clients. Too bad there isn't screen process to help prevent unwanted, accidental exposure to jerks. How I wish for such a thing... A guy can dream, can't he.
-
I'll agree that it isn't OCD, but I would also chalk it up as a learning experience. This is your first pair and you are building a new set of skills. Just remember, we learn more from our mistakes than we do from our successes. Chances are pretty good that you'll be on your 5th set and still find things you want to do differently with the next ones. No worries though, it looks like you are off to a great start as a cobbler. I just worry what your wife has in mind for you to make her now that you are on a roll. After you get the all trimmed and sanded to the final shape you want, there's only going to be one last major hurdle... Breaking them in!
-
Back Pack Completed!
shtoink replied to FaireLeatherFriend's topic in Purses, Wallets, Belts and Miscellaneous Pocket Items
There's a huge amount of detail in every aspect of that thing. It's hard to believe that this is your first backpack. -
I do believe that you can get sections of hide that have been compressed and are meant the soles of shoes/sandals. They are more dense than regular veg-tanned leather, so maybe that isn't what you want for the foot bed, though. Just don't forget to show us some progress pictures. It'd be cruel to leave us hanging like that.
-
Small Shoulder Bag
shtoink replied to Matt Alsaker's topic in Purses, Wallets, Belts and Miscellaneous Pocket Items
It has a sultry, bronze accent, of course.... -
Dig the user name, it's one of my favorite blogs. I'm also digging the sandals. I'm not very big on them personally, but that has a lot to do with having crazy Hobbit feet, though. The progress looks great and I am very curious to see the rest of the progress. On a side note, if it were me, I would run a couple of stitches between each of the tail pairs of your straps on the underside. It'd add an extra bit of reinforcement to them in case the glue ever decides to give out. Totally optional, but I can imagine how disappointing it'd be to take them out for a test drive and get a strap two popped loose after all the hard work put into them. I can't remember when it was, but there was another guy here who made some flip-flops and mentioned something about protecting the leading edge of the toe from delaminating by having the top layer extend down and under the rubber layer. It was skived down to an appropriate thickness first so as not to mess up the layers. The only reason I mention it is because you are using cork and it might have the potential for being a weak spot. They are ultimately YOUR sandals and you seem to be on the right track. If it's one thing I excel at, it's over thinking things, so bear that in mind.
-
The short answer, Yes there is. The long answer, depends highly on what type and how much work you want to put into it as. I do hate to sound vague about it, but it's quickly turns into one of those, "Which one is best?" debates and it really does depend on what you have in mind and how much work you want to put into it. The options can range from improvised to , or just about any spot in between. It's totally up to you.
-
I have been struggling with how to best describe making the accordion. I want, so badly, to be able to explain effectively, but I'm finding it quite difficult with only using words. I'm a very visual kind of person, so I do best with making hand/arm gestures, drawing pictures, and the like. Those tend to really fall flat with text, so I'll do my best. Just bear with me. Ferg has it right, though. It'll be more complicated by hand and watching a video showing how will probably be your best bet. The reason it'll be much more difficult by hand is that there will be a bunch of different parts that need to stay lined up or out of the way while you're sewing them. Not impossible, just not easy. Especially if you're just starting out. As far as finding a video, I am not doing so well with my searches. I think my Center may be misaligned, as I am not having any luck searching for videos on how they are made. The accordion part is just one continuous piece that gets folded and stitched over the end of each baffle that makes up the division between each section. I may not have found any videos, but I did find a couple of external sources that have some pictures on how they are done. One over at Ash Designs and one over at Little Quack's Crafts. I know these aren't perfect, but I hope they point you in the right direction.
-
Yup! I actually got a dozen of some small flanged ones for less that $6. They only came in a pack of a dozen, but I'll save the rest for another project later. I have about 100 or so various sized bearings waiting for different, yet known projects. They don't take up much room, so I don't mind the extras. Besides, you never know when you'll find a use for them.
-
Actuating the pneumatic pistons by pressing down and releasing on the block... Having the block return and stay by pressing down until it clicked... You have no idea how hard I just geeked out on that one alone! Just imaging the sound of tiny pneumatic pistons in action was enough to bring a smile to my face. *click-click* *PSSsssssskt* But it's be in stereo, because there'd be two of them working in unison. I had so many fantastic what-if ideas swirl through my head. It was like imagining a tiny Transformer with all sorts of gadgetry all concealed up inside. Maybe even like of of those super cool pencil cases from Japan with all sorts of compartments and swiveling or sliding-out doodads that are activated by buttons of push-releases. Whew! I almost hurt myself there...
-
I have been watching this thread with great intrigue and had an idea, all of the sudden... I may just be cutting on the wrong side of the branch with this one, as this is nowhere near anything I have any expertise in, but here goes. What if you made a small patch that was slightly larger than the hole you wanted to be closing on the end of the drawer pull and then came up onto it like you did in the above picture? What I mean is, if there was a similarly patterned plug for your hole, you closed off your stitching and cinched it all down, it might blend in and even have sufficient friction to keep it all in place. This is very likely to be a complete wild card, so take it with the proper prescription of iodized sodium. It was just an idea that seemed feasible to my limited understanding.
