


shtoink
-
Posts
545 -
Joined
-
Last visited
Content Type
Profiles
Forums
Events
Blogs
Gallery
Store
Everything posted by shtoink
-
The attention to detail is incredible. This clearly falls into an heirloom quality tool category.
-
black widow Griff punziert2
shtoink commented on Geronimo's gallery image in Gallery- Our Leatherwork
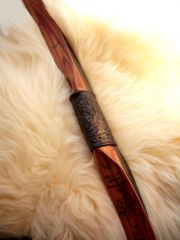 That's a sweet looking bow. I have a "Greybark" SAII and love the way it shoots. I may have to do something like that for my grip, too. It sure makes it look good.
 -
Found 'em where?
-
First Breast Collar, Nothing Too Fancy
shtoink replied to firetoad's topic in Saddle & Tack Maker Gallery
Looks like that was time well spent. It turned out very well, nice work. -
I had to look up what Perspex actually was. I knew it was some form of plastic, but it's also known by several other brand names. The biggest reason for looking it up though was to see what types of solvents it will react with. Here is what I found. It seems that CA glues will work, but then you need to consider absorption into the leather. Thinner glues will soak in faster than the thick, more gel-like variety. I guess it just depends on how big it'll be. Di- or trichloromethane could be used to melt the surface of the plastic to make it tacky, but that's probably going to be risky and unreliable. It sound like a medium to medium-thick viscosity CA glue might be your best bet for a picture frame. I have hag good luck with the stuff from Gorilla Glue. Not the expanding stuff, but the Gorilla branded super glue. There's a ton of brands, so it's your call on what you use.
-
Patent Infringement: Shotgun Concho Dog Collar
shtoink replied to HellcatLeathers's topic in Patterns and Templates
It'd be the type of work to be proud of if you were going for a badge in the Boy Scouts. Reminds me of the stuff the kids made in 4H. -
My First 3 Knife Sheaths.
shtoink replied to Bobby hdflame's topic in Gun Holsters, Rifle Slings and Knife Sheathes
Which version of the M9 are those? Looks like one of those could be a Phrobis III. I have one of the Phrobis III M9 bayonets, before Buck took over the contract and company. The contract was later picked up by Ontario and then later someone else. I forget all the history behind it, but at one point I remember you could pick up a Buck version in the store that was identical to the Phrobis just with Buck markings. It's a great blade, too. Nice job one the sheaths, too. -
From the album: SolidWorks Renders
After working on the H&S Swivel Cutter, it occurred to me that there would be a need to sharpen that blade and not much existed to make that task very easy. I came up with the idea for an adapter to hold the blade for the Swivel Cutter in a jig meant for those blades that fit Tandy knives. I still need to make it and test it out, but the theory seems solid. -

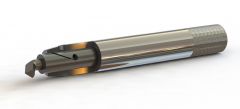
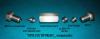
From the album: SolidWorks Renders
This was for trying to reverse engineer the blade for the old H&S Swivel Cutter. I got close on my first attempt, but it still needs work before I call it good. The model turned out pretty good, though. -
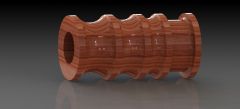
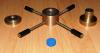
From the album: SolidWorks Renders
This was a 2" burnishing arbor that I hammered out in SolidWorks to see how it might look. Is was after a conversation in the chat that I decided to model this up. I think it turned out pretty well and I just might make one up on the lathe. -
I concur, toluene is some nasty stuff. Just take a look at that link. Should make those using the barge cement really think twice about dismissing any warnings on the label.
-
What Airbrush To Buy?
shtoink replied to ShawnM76's topic in Dyes, Antiques, Stains, Glues, Waxes, Finishes and Conditioners.
I know that Art has talked about the airbrushes from Veda, specifically the WD 180, in a couple of other threads. He had good things to say about them and that he was able to get three of them for less that what he'd have paid for a similar Iwata. -
Looking For The Help Of Someone With A Lathe...!
shtoink replied to ItsJustNC's topic in Leatherwork Conversation
It certainly is! That was why I tossed the idea of a used one to test to destruction. It's been shown that we learn more from our failures than successes. -
Patent Infringement: Shotgun Concho Dog Collar
shtoink replied to HellcatLeathers's topic in Patterns and Templates
I did a few minutes of searching and found these... Mind you, they may, or may not actually be the same person referenced above. I found nothing useful search with "Grizzly Collars" USPTO <-- patent information Wyoming Inventors <-- patent information MyLife.com <--- a people search for the same same, city, and state listed in the patent information Etsy.com <-- a very empty etsy page.. Change.org <-- some petition he signed This is all public information and was found with a simple search. -
What I am hearing is that it probably won't be easy to change the color on this leather then... Or am I misunderstanding something?
-
The big issue is that they are already a relatively dark blue color and your only options are going to be darker. You may be able to shift the color some, but only to something along the lines of a color that mixes with blue. i.e. purples, ugly browns, dark greens, and black. It's an additive color process. Putting a layer of paint on it won't be anything more than a layer of paint that will wear off and expose the color underneath. What you'll end up needing is an actual dye meant for use on leather, but if it'll be use in a car, you'll need to worry about colorfastness. Exposure to UV will lighten the color. There have been other dyes that are meant for use on shirts for tie-dyeing that seem to produce very good, colorfast results. I wish I had better new for you. Hopefully someone else with more information on the topic than I will be able to add to this.
-
I did a little bit of research on the topic of presses for the leather tip. I ran across was couple references, but mostly it was from places that sold a press and not about the "hows and whys." The only other thing I found was information on different styles of tip shapers. I think that had to do with the large number of tips that come without any preformed shape. I also found out that there is some form of hardness measurement used to classify the tip for whatever purpose you desire. Not sure if it's a standard durometer or some other measurement type, though. Here are two of the different presses that I found. Both of these are from the same place, but that type one seems to have an unreasonably high price tag on it. They sell it though the site for about $75, but it looks like a bunch of common stainless steel parts from a hardware store with a bit of rework done. If I ever get a chance to make one of these up, at least I'll know who to send it to for testing...
-
I wonder if they are wet formed into a tip-shaped form? It seems like having the circular blank wetted and pressed would compact the fibers as well giving it the right shape. No clue on this one, I was just making a guess. Nice job on that, by the way. A great idea, too.
-
Looking For The Help Of Someone With A Lathe...!
shtoink replied to ItsJustNC's topic in Leatherwork Conversation
I would agree Leela Valley Leather. It seems very unlikely that the cake beater would hold up to the abuse of being bogged down by the act burnishing. It'd be better option to get a cheap rotary tool from Harbor Freight, or somewhere similar, and use some of those Dremel burnishers from Bear Man. I might even be possible to make the burnisher yourself on the rotary tool, too. Maybe a cheap mixer from a second hand store to test until destruction might give an idea of how much abuse it can take. Just a few thoughts. I'd hate to see you throw away money on an unknown without knowing the risks. -
Ooops, I completely forgot about that...
-
I can't help but think that having a positive and a negative mold to clamp the leather between would be even better. It works pretty well for other wet forming, why not a hat? It'd just be the time invested in making the molds and then you can make them very consistently.
-
What a completely simple and elegant solution! It kicks the leather right off the tool with lifting action. I have my doubts that I would have ever come up with the idea. I was still thinking about some form that replicated a sewing foot. This... This just blows that away. Thank you very much for sharing it.
-
Custom Molle Knife Sheath
shtoink replied to Blazin's topic in Gun Holsters, Rifle Slings and Knife Sheathes
Is someone a fan of the Halo series? -
Well, it's Semi-Gloss, of course!
-
No arguments from me on that one, but I'd wager that getting the needle out of the leather is a whole lot easier than getting in there.

