shtoink
-
Posts
545 -
Joined
-
Last visited
Content Type
Profiles
Forums
Events
Blogs
Gallery
Store
Everything posted by shtoink
-
Super nice work, as usual. It's always bitter-sweet looking at pictures of your work. On one hand, I really enjoy to supreme level of care and quality, but on the other I find discouraging and that the possibility exists I may never reach that skill level. At least, not without quiting my day job, first... Just so you know, that didn't translate very well for me and I fear I may not be the only one. It could be my browser or something, but thought it was worth the mention.
-
 That entire park is incredible! There's a great documentary about it that covers a great deal of information and gives some really great shots, too. I almost mistook it for Rainier from the thumbnail, though.
 -
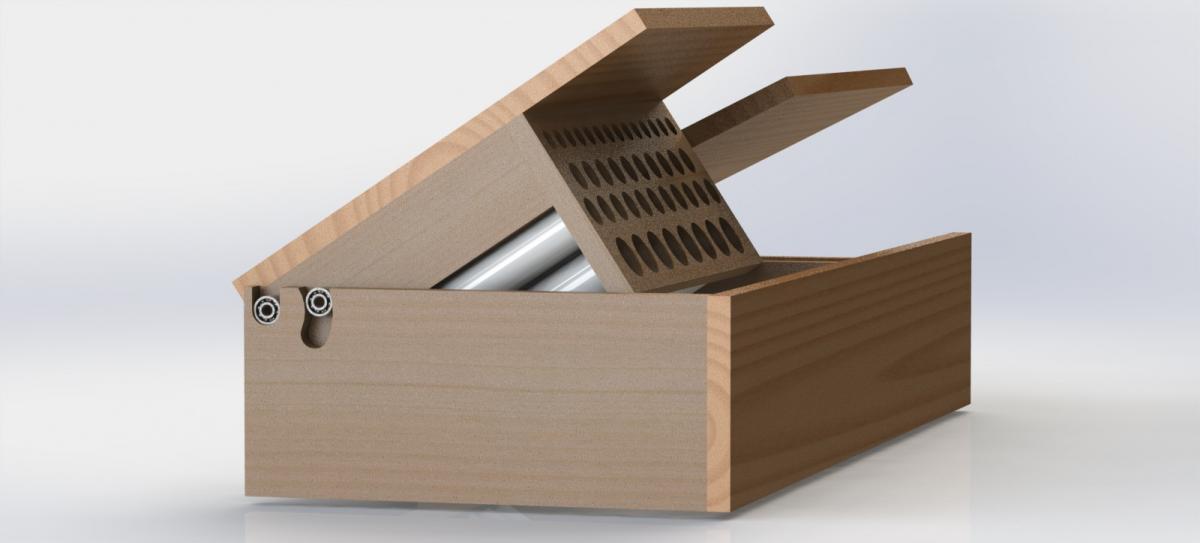
I just wanted to add to this a bit more. It had to take a short trip to the back burner while I took care of some school related stuff. I had finally come up with exactly how I wanted to do the hinges and it turned out to be far simpler, and cheaper, than I originally anticipated. As it turns out, I didn't need to locate ant fancy hinges that would demolish my budget. All I needed was to integrate some ball bearings into a trunnion style of hinge. It's one of those instances where several sentences trying to explain would still leave you confused, so I present you with a couple pictures worth a bunch of words. The bearing sizes are not critical, and the don't really even need to match, but that'd help in the long run when trying to line all your stuff up. The main thing to take away from this is that the bearings be small enough to fit within the thickness of the wood chosen and large enough to be able to support the weight of a full rack of tools. I would recommend sealed ones and not the generic, unshielded type in my renders. I did decide on using some 1/4" thick oak and will be cutting bits and pieces as needed from the stock I chose. I also plan on tacking the insert into the case with small brads, so they are less visible, too. Another thing worth noting is that I have also worked out how I want to raise and lower the tool rack, too. It'll be something similar to the lift mechanism for those old Tonka dump trucks from way back-when. The idea is to have it lift the rack and then lock into position to keep the tools accessible. This will eliminate the need to keep opening and closing it when working from your toolbox.

-
What if it's a modified stamp for just that purpose? Not sure if it's even a thing, but it does seem feasible to have a stamp that has a curved surface with the design you want for just cases. It'd take a good tool maker to pull off getting the design across a curved surface, but it might also be a procedure thing. Not being someone who makes stamps, I don't know the specifics. It may be easier to make the stamp and then heat it enough for it to bend, bend it across one direction, then quench and heat treat as needed. Bending along one direction would allow for it to fit better inside those odd curves a bit better than a stamp meant for a flat surface. I can't rule out that I am completely wrong on the entire thing, either. It was just an off-the-cuff idea that didn't seem impossible.
-
I'm sure that by now, you guys have noticed these really cool looking images that showed up in the banner today. They are the works of one of our newest members, Punctured Artefact, and are exquisite examples of tattooed leather. That's a topic that has been brought up here many times and there was never really a satisfactory answer or even many examples of it. I'm thinking that might not be an issue anymore. Here's the kicker, our mystery member is very active on their own sight, in their own DeviantArt page, has uploaded images here, but left us with only a tease of what's going on. On one hand I want to scold them for such a dirty and underhanded maneuver as tossing us images with no posts or explanations, but on the other hand, they are so well executed that It makes me almost forget about the teasing that just happened. If I were to guess, I'd say that it isn't tattooing in the traditional sense with a tattoo gun and a little cup of ink. More likely, it's with some of these since they have all the right qualities for long term enjoyment of your artwork. At any rate, I am anxious to find out if there will be more to come and that maybe we'll even get some questions answered.
-

My Best Satchel So Far...
shtoink replied to lightningad's topic in Satchels, Luggage and Briefcases
I do believe that High-Fives are in order... -
About Vacuum Forming
shtoink replied to Dwight's topic in Gun Holsters, Rifle Slings and Knife Sheathes
The four port junction allows flow back through the pump and is very likely the source of your air leak. The red handled valve looks to be a primary release to me and the way you would vent the bag to atmospheric pressure when taking it all apart. It you inserted a second valve between your filter and four port junction, you'd have a way to seal off your bag and keep everything else the same. It seems that everything else is working for you, so it doesn't make sense to change it all. -
Have you thought about making some door stops by adhering a few into a stack and shaping?
-
Someone else may be able to chime in with more details on the topic, but I believe that it might have to do with the cut of leather, tannery, and potentially a couple other things. Cut of Leather: The location on the animal the leather you made the collar from is important. The belly is one of the most notorious locations for leather that will stretch, whereas higher up along the back and across the butt have a tighter grain structure. Horse butt is on the verge of indestructible and not cheap. I don't have any links handy, but I think there was a couple posts a while back about what sections of the hide are best used for what kind of product. Bottom line, avoid the belly for things that cannot benefit from stretching. Save that stuff for the tiny dogs. Tannery: Not all tanneries are created equal and neither is the leather they produce. Some of the tanneries that tan from cows here in the U.S. tend to have higher prices, but it becomes clear where that money went when the leather you receive is fantastic. This will take a bit of research, as it comes to what's available in your area or if you want to pay for shipping on sides of hides. There is plenty of information in here on what the reputable places to order online from are as well as details on what to be looking for in a side. Tandy typically caters to the beginner to intermediate and will usually have leather at prices to cater to that. I'm not saying that it's a good or bad thing, it just is what it is. Other Stuff: Lengthwise stitching a few thinner layers together might net you a stronger collar with the same thickness. It'll just take you a bit longer to sew up. Casing and compressing the leather with a roller press will make it much more dense, but at the cost of flexibility and potential comfort to the animal. There might be a happy medium in there and the only way to find it is to test it out. Maybe it was the dog or the owner that was the issue. It's difficult to know what will happen to your collars out in the wild. Maybe you need to make a couple and test to destruction. Hook one end up to a cinder block, tie off the other, and drop it out a window. You can make before and after measurements to see what the difference in length is, if it survives, and then maybe repeat for different locations on the hide to see what areas will work for your needs. This way you can designate the "Roughness Level" that the collar can survive, separate into known grades based on hide location, and sell accordingly. You get to use the whole side, happy customers, and your dogs can have a comfy collar that is graded for their level of destructiveness. Win, Win. I hope this helps, as some of this sort of evolved as I was typing.
-
I'm glad you like it. It was something that just popped into my head while reading your post and thinking about the process you used while typing up a reply. There are some other possibilities for padding/vibration damping. There's some grippy gel stuff that is typically used for keeping your cell phone, and similar items, from sliding about on your dashboard. They are cheap, relatively thin, easy to locate, and you can cut to shape as needed. The other benefit is that they shouldn't compress over time like a closed cell foam would. Besides, gels are extremely effective at damping out high-frequency vibrations. I'd check the local dollar stores or similar such places that sell that sort of thing. The stuff I am thinking of is about 1/8" thick and transparent, but may have some fancy colors added to it. Since it'll be buried under a sewing machine, being bright red or pink won't be much of a concern. Another alternative is to maybe use something like that asphalt based weather seal. It comes in big rolls for cheap, has an aluminum backing on one side, adhesive on the other side, and cuts into the desires shapes and sizes easily. I've heard of car audio guys using this very product as a much cheaper alternative to DynaMat. Granted, the DynaMat is about 3 times thicker and slightly better and damping vibrations, but it's also about 30 times the price for the same square footage.The only concern that comes to mind is it making a mess in the long term with repeated heat/cold cycles. I could just be being overly cautious, too.
-
I'm liking the way it all turned out. Really clean looking job with cutting out those tabs for supporting the machine while keeping it all flush with the table. This may be a bit on the crazy side, but what about lining the interior surface of the cutout for the sewing machine with a wool felt to act as "dust seal", so to speak. It's help take up any bit of slack with the machines position in the hole and keep bits of stuff (fluff, thread, needles, and so on) from making their way into the groove between the table and the deck of the sewing machine. It would mean that you'd need to take care when dropping the machine in the hole so as to not knock the felt loose, but it does seem feasible and potentially a decent idea. It would give you the opportunity to felt the tabs for protection of the underside of the machine, too.
-
They look quite impressive! It's hard to discern from the pictures, how many are there in total?
-
I'm not sure if it's the time of the year or if it's a shift towards a different medium for sharing information and pictures, but you are right that it is a bit slow as of late. I think that some of the people in here are "seasonal regulars" and tend to be in here more when the weather outside isn't as pleasant. I know that I find it very difficult to keep my mind on my concentration on my schoolwork when the sun is shining and my kids are enjoying their summer break. I wish I had enough skills to offer up anything other than an opinion on the wallet. I would think that long term usage would cause that small bit along the "bridge" at the bottom to come unrolled, so stitching it would probably be the best route. I have worn out plenty of wallets, and that area is one of the first to come unglued and start tearing away. Mind you, these were commercially made, mass production style and not a custom, hand made ones like you'd see in here.
-
I was digging around for examples with the pin vice. One from Amazon and somewhere else and another It seems like these should be able to be sourced in about the right size. They are also pretty simple enough to be made, too. It's essentially a metal rod with some slits cut into one tapered end and some threads to allow a collar to cinch down on the fingers formed by the slits. This should point you in the right direction.
-
You might look at pin vices. There are roughly the size you want and should be able to shove one into a haft of some sort.
-
I wonder if holes in time have been causing uneven, ragged holes. Sorta like miniature, momentary back holes tearing at the fabric of space, time, and the edge of your leather. It all sounds so very dangerous now...
-
I was recently checking out some other blogs that were non-leather related and ran across one describing a DIY light box setup. The pictures from the guys light box are incredible and thought that it'd be worth sharing here to provide some ideas for those of you still trying to get yours to work well. The guy has some shots of 1/32 scale models that are simply amazing.
-
I have two of those.... They like to "help" out at time, as well. I had a wooden swivel knife that had been recently finsihed get chewed up by them the one time. We were out running errands and had to run into someplace for a few minutes, so I left it up on the dash of the car. Rather close to the windshield, I might add, so it took a bit of work to get to it. I suspect it was the bigger one that originally pulled it down and then they shared the new "toy" after that point. I was not very happy about that incident, to say the least. It's a good thing that it was only bookmark and not a big project you were working on for someone.


-
That's pretty slick! It's possible that it could have been for other tools, but I suppose that's not as important it being able your leather tools.
-
Remember, it must always be clockwise! Anti-clockwise rotations will have adverse effects on the space-time continuum. You can watch just about any science fiction for reference. Mucking about with space-time tends cause to damage to the timeline and serious plot holes. It generally best to just avoid it, altogether.
-
Ok, now that quarter really helps! It seems small enough that you might be able to cinch it up on a can of beer. Nice work and how did you get the rawhide to stay put? I was kinda wondering about that when I saw the first image among other stages where normal practice for saddle making gets tossed right out the window.
-
RBS was the name of the line of tools Stohlman was involved with prior to Craftool. In fact, the same factory making the early Craftool stamps were making the RBS stamps, too. WyomingSlick is the man that has the most data on the topic. I did some searching and this is what I found... http://leatherworker.net/forum/index.php?showtopic=32567 http://leatherworker.net/forum/index.php?showtopic=40440 http://leatherworker.net/forum/index.php?showtopic=37956entry235440 http://leatherworker.net/forum/index.php?showtopic=30730&st=0&p=204732entry204732 http://www.ebay.com/gds/The-Other-Leathercraft-Stamping-Tools/10000000002193815/g.html And one more that isn't directly from WyomingSlick, but it's about half way down the page. http://pslac.org/iilg/background.htm I hope this answers your questions.
-
Is there something you can place next to it to aid in getting a sense of the scale? Perhaps a soda can. It does look small, though. Is the pommel a custom cast of some kind and how hard was it to find appropriately scaled hardware?
-
If it ain't overkill, it ain't worth doing. Go big, or go home, right?
-
Local is the key word here! There's a very good reason that shipping is not cheap on these things...