


shtoink
-
Posts
545 -
Joined
-
Last visited
Content Type
Profiles
Forums
Events
Blogs
Gallery
Store
Everything posted by shtoink
-
If you are needing a source for binders, check to see if there is a Goodwill nearby. I know that pretty much limits this advice to here in the lower 48, but that is what I am familiar with. I wouldn't be surprised at other second-hand shops having a similar stockpile. I have been to many of these stores all over my state, and neighboring states when the occasion occurs, and they have plenty of the 3-ring binders for $0.99 or less. Considering you are ultimately pulling these binders apart to use just the 3-ringy part, as long as it functions and is obtained cheaply, does it matter what the cover looked like? Especially when you look at the cost of new one and that you are still experimenting. I hope this helps open up a couple possibilities for you.
-
The only thing I can add to the above is to be careful with the Dremel. The speeds at which it can spin cause you to ride really hard against the line that exists between successfully burnishing your edges and rediscovering fire. It's not that it's really hard to do, but definitely practice on some scrap pieces first. Unless you are some kind of Dremel-Ninja, the only thing the Dremel is fantastic at is speeding up the rate at which you screw things up. There's a reason those things come with a little package of 100 cut-off wheels, that's enough for about 5-10 projects.
-

Skull Handbag
shtoink replied to Urban Goth's topic in Purses, Wallets, Belts and Miscellaneous Pocket Items
Same here! I'm scratching my head as to how I missed this thread in all the time I spent digging around in the older stuff... -
They are, but they're butted up really close to the edge of the pink layer. I almost didn't see it, it was so close. If you check the third picture, you can see it. I imagine that a fence was use to keep the distance proper. It also makes me even more convinced that the pink edging was glued and possibly hammered flat before the second layer of black.
-
It's actually sewn in multiple steps. The one black strip that will become the outside has the pink edging sewn on face-to-face and is then pulled around to the back. It's typical to have glue it down to keep it in place until the second strip of black gets sewn down over top of it. I wish I knew the proper name for this edge treatment, since it would have made finding pictures to describing how it's done much easier. Here's what I found, though... Rolled edge <-- the arrow pointing to the leather wrapped edge is what I'm talking about. This page on a sewing blog shows a similar process about halfway down. I hope it helps make sense out of what I was describing.
-
TXAG's suggestion isn't far off, but also doesn't address the whole problem. That part in bold is what sticks out to me.The testing with a different browser helps you identify where the problem might be, and the based on what you said, I'd wager that they are symptoms to a larger problem. It could be any number of things from something rather innocuous like annoying browser plugins that got installed with something else, to more serious issues with a virus(s) that tagged along with something else that got installed or downloaded. There are free tools like SpyBot Seek and Destroy, and AVGFree that can really help with fixing/preventing this sort of thing. This isn't the best place to discuss tech support for your computer, but the tools I mentioned above should help you get started. While my diagnosis isn't guaranteed, I would certainly look into it just in case. It's incredibly easy to end up with a virus and spyware installed on your computer. It's a constant battle.
-
I'd give craigslist and local garage sales a try before eBay. Both of the former options can be local and you have a better chance of getting decent tools without feeling like you need to seek out some Preparation-H and Tuck's Pads. The deals may not pop up super frequently, but they do come up. There's also nothing wrong with using the ones that you have until you feel like you've outgrown them or really need to add some variety to your tools. It's worth noting that there are plenty of guys that have done some wonderful work with tools made from nails, bolts, and anything else handy, because buying the best paints and brushes won't make you a better painter. That's just my take on it, but this is certainly a place where DIY remains a common theme.
-
It stays round for the same reasons that a tooled piece of leather doesn't spontaneously pop back to a smooth surface. Once the leather is cased properly, it behaves a lot like clay. Instead of being forced into various shapes with different tooling, it's forced into a round shape and when it dries, it stays that way as long as no other large forces are involved.
-
Thank you oltoot, I knew that there were some details missing...
-
I'm surprised that no one else has answered this... I'm not sure if it's the only way, but I do know of one tool that is meant for just that type of thing. It's called a rein-rounder. It's effectively a piece of metal, or some other hard material, that has a series of increasingly smaller holes in a line in it. They typically have two halves that are bisected along the series of holes so that material can be placed in it that is not round that you desire to be so. You work your strip of leather back and forth through the holes until the desired size is reached. I'm certain that I am leaving out a few important details, but the link above can at least show you what they look like and you might be able to find out some more details on how they work. The only other option I can think of is to make your own lace and then run one of those curved edge trimming tools that I can remember the name of before coffee has kicked in. That method doesn't compress the leather and may leave it weaker than you want, so there's that. Hopefully this points you in the right direction. I know that rein rounders can be expensive to purchase so if your are handy with tools, you might be able to experiment in the garage/shop with your drill press and some hardwood to see if it'll do you want until you decide to purchase one. Considering you are in here asking stuff, DIY doesn't seem like that far fetched of an assumption.
-
I guess you'd better... Beat it
-
I guess there is a good use for all those ugly leather jackets from the 80's...
-
A few shots of test fits and such A quick mock up with freshly cut pieces A couple shots of gluing parts together. I love these 90 degree clamps!
-
Surrealism.
shtoink replied to Samar's topic in Purses, Wallets, Belts and Miscellaneous Pocket Items
Just in case you were among those that missed this bit of info, like me. I was completely side tracked by the pictures and overlooked the artist that inspired our friend Caulker. Tomasz Alen Kopera has a website and is very talented and prolific surrealist. -
 Looks to be a very straight forward design and flexible. Simple, easy to build, and easy to modify to suit your needs.
 -
Another member here by the name Samar has some truly amazing work. One of their more recent projects included some really cool look texture on a belt that made me think of those deep crags found in bark like the image you included above. As for how... I can only guess. I'd imagine that it involved something along the lines of some cuts with a swivel knife followed up with some shaping and coloring. You'd need to see if Samar is willing to share the technique or analyze the pictures in the linked post and experiment until you have what you like. I know this isn't the most complete answer, but I hope you find it helpful.
-
I'm not a fan of replying to my own posts, but since there is a limited window to edit posts, I have no other choice. I have almost all of the pieces cut out and started to mock up the final form. A few test fits and fine tuning. Still no pictures, but I didn't think a bundle cut up wood chunks was very interesting. I need to locate my 90 degree angle clamps so I can have nice and square sides while waiting for the glue to dry. I also need to cut out my template for drilling the holes into the front of the block that'll hold all the punches. That should prove very fun and serious test of my patience and sanity. I need to ponder bit more on the final choices for the bearings and how the lift mechanism will work. I'm leaning more towards using 2 instead of 4 bearings and finding a simpler way to get the punch holder to lock in the open position. So far, the mockup with the wood I cut out has highlighted only one error. Fingers are crossed that it stays that way.
-
My first guess would be a laser engraving. I do know that the focus and power output of the laser can both be adjusted to get slightly different effects. I am certain the a fair bit of testing was done on scraps before that piece was done. I could be wrong and it was done by some other method, but with the level of consistency of the pattern, it seems unlikely that it would be anything other than laser engraving.
-
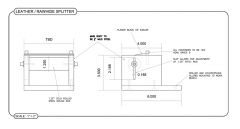
I was actually working on cutting out the pieces for it just the other day. Between finals for school, family, and holiday related stuff, I just didn't have much in the way of spare time. I'm also one who likes to analyze several possibilities at each step before committing to the next one. I don't have pictures just yet, but should have some as soon as I have the bulk of the parts cut out. I opted for 0.25" thick oak and printed out diagrams with all the measurements required. I am pleasantly surprised that this was inquired about.
-
Before getting into using SolidWorks I had been trying to teach myself on another cad package. It's called Medusa4 and they have a completely free version for personal use a boat-load tutorials and help on the site. They even offer a Commerial-for-Personal feature where you be considered being free for use until your plans need to printed off, which they do for about $15 each time. They aren't very well known like AutoCad or some others, but they offer a comprehensive package for free. It, too, is overkill, but can be used for far more.
-
Looking a little closer, it seems that SketchUp is no longer owned by Google, and it's nearly $600 for the Pro license. I haven't followed it very closely, so I hadn't realized that it changed ownership. I may fade out into obscurity since the transition in the way people can use it, but that purely speculation. I apologize for any mix up. My personal area of experience is with SolidWorks, so a large group of other programs just have no appeal for me. I know that there a quite a few different cad packages put there and they all seem to have their following. Also, I make no arguments for any one being better than another for a given task. I did think that using SolidWorks' feature set for making patterns was a clever idea. Especially when you can get an idea of the the final shape before ever cutting anything out.
-
Will you need to silence the arrows for hunting purposes? If that's the case, then you'll need to line the first few inches of the opening of the quiver with some fleece and it'll need to be as close to the fletching on the arrows as possible to maximize the effect of silencing the arrow rattle. I know that there are quite a few pictures of examples to be found online with a quick image search. Hope that helps
-
I have heard mention of cad software being used for doing up patterns before. I'd say that SolidWorks is beyond overkill, but if you are familiar with it and have, then go for it. I could imagine that the sheet metal modeling features in SolidWorks might be pretty handy at constructing a project. You'd be able to get a good idea of the final design and flatten it all out at the end, too. On the cheaper end of the spectrum is Google's SketchUp. It's pretty intuitive, free, and there are tons of tutorials for you to get started.
-
I like how it turned out, good work.
-
64 oz removable flask cover with handle
shtoink commented on Crystal's gallery image in Our Leatherwork Galleries
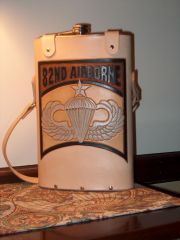 C-130 rollin' down the strip, Some 82nd Airborne on a one way trip...