


shtoink
-
Posts
545 -
Joined
-
Last visited
Content Type
Profiles
Forums
Events
Blogs
Gallery
Store
Everything posted by shtoink
-
 I had to think on this one a little bit, but, to be honest, my first thought was the oxalic acid. After reading the results from that I started to ponder what the solution the pigment is actually suspended in. A couple minutes of searching got me this... Quoted from that page: "...the ink is based on propanol, butanol, and diacetone alcohols..." "Sharpie ink that has dried for more than several hours can be removed with acetone and other ketones and esters, such as ethyl acetate, but acetone and other organic solvents may damage the surface of a material." Since it was bare veg-tan, it'll readily absorb the sharpie ink just as it would water, so it's safe to assume that it has gone further than just the surface. My thoughts are that using acetone may actually cause the pigment to dissolve and spread further unless you can find a way to get it wet and then a way to pull the solvent and the pigment out of the leather. That lead to this train of thought, but I have nothing more than theory at this point. If you have the entire piece whetted down like it was being cased, the application of acetone will not cause the pigment to readily spread through the leather as it would when dry. The fibers surrounding the effected area would already be saturated with water, so the acetone would be contained, so to speak. The next step would be to add acetone to the top of the area with the ink, wait a couple seconds and apply dry paper towels to pull out your dissolved pigment. Rubbing would be bad, as it'll most likely just drive the pigment further into the leather. If you have read this far, I would highly suggest testing out the whole thing on some scrap. recreate your accident and then proceed with the steps outlined above. I know that pure acetone can be attained from a beauty supply store that deal with nails and is sold as a nail polish remover. I must stress that this is just theory, as I don't have any acetone on hand to test this theory out with. Also, if any part of this sounds hair-brained to those with more practical experience with this sort of thing, please do not hesitate to speak up. The whole idea is based on preventing the acetone from making the mess spread further by containing it with the water and the action of pulling the dissolved pigment out of the leather with dry paper towels. Acetone, for those not familiar, is very good at causing plastics to melt, finishes to dissolve, and brain cells to die. It's quite flammable and the vapors from it smell awful. Use this in a well ventilated area. It will also be very likely to strip all the oils from your leather and dry it out, so reintroducing oils with something like neatsfoot will be necessary.
 -
Well, I stand corrected... I think I was thrown off about the scale with the first image. After that, I sort of locked in on one thought and prevented anything else from entering.
-
I should also mention that if you are having issues skiving thin leather thinner, that a sanding drum bit and a dremel will do a really nice job without hacking holes right through it.
-
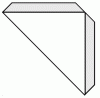
Here is what I had in mind. The image I attached should make it a bit clearer than my wordy explanation. Hopefully the image I quickly hacked together will do the job I need it to. If you cut out one just like the image and one of just the triangle, you'll have all the parts you need. The greyed tabs are what you would skive paper thin and fold over to be glued down to the triangle that will make the back side of the bookmark. If you get something thin and that the glue will not stick to, like a piece of wax paper or a very thin cutting board, you can place that between your layers of leather. To aid in the folded flaps staying the shape you want them to be, you can use a small hand roller to flatten a crease into it prior to placing everything in position. It will also help to use the same roller to apply pressure when gluing it up. That pressure helps with making a good glue joint. As for the type of glue, you can use the Tandy Leather Weld, but I personally find that TiteBond III works the best for applications such as this. It becomes highly water resistant when dry, which most of the other HPVA type glues do not. Since it isn't a bag or holding any weight, simply using glue instead of sewing it should be sufficient. This should also reduce any extra bulk near the edges aiding in dislodging the bookmark when it's a backpack, purse, or something similar. Defeats the purpose of having the bookmark if it keeps falling out, right?
-
Tandy is the only one I know of. I generally avoid even leaving the house on Black Friday. Far too many crazed weirdos out there taking unnecessary risks for my taste.
-
I think it's time to let the cat out of the bag. I have been working at trying my hand out on a start-to-finish design process. I set myself up with some design limitations and goals in mind and the results look very promising. I had very specific reasons for going about things the way I did and I will explain that later. I also had to identify and overcome a number of problems as the came up. Things that dealt with limitations of the chosen materials or oversights in tolerances of internal parts. Some my other troubles came about due to finding proper ways to organize my steps in machining or finding a certain tool that does the job more efficiently. Since I am just one person and this is a personal project done on my free time, it won't be a matter of taking requests and making them my the hundreds. This is just my attempts at finding a current issue with an existing tool available and finding a possible solution. As a student with a Mechanical Engineering program, it's all about learning. This was the reason I was trying to enlist the help of others for advice or preferences as the provided certain details that I may need to focus on over others. In an effort to keep from being to typically long winded about things, I'll provide some pictures and a general overview of my goals and what has happened up to this point. I wanted to design a new knife out of a different material that would be both beautiful to look at and pleasing to work with. What I saw with the currently available swivel knives is that they are all metal and are usually heavily knurled for grip. This knurling can be aggressive and uncomfortable to the hand and the other issue is hand fatigue. That was a huge point for me. As I had asked around and one of the most common things that came up was hands getting tired after prolonged use and cold from the metal (some metals more than others). Aluminum and Brass will pull the heat from your hand quickly and if you have even the slightest hint of arthritis, it's going to aggravate it. Aside from the aluminum, the other commonly used metals are pretty heavy and many will equate the weight of an object to its level of quality. It's something that has to be put aside, as the weight of a swivel knife has no bearing on how well it will cut. Your hand is the driving force and a heavier knife means more work your hand needs to do to keep it moving and stable. What I came up with is a common material that we have been using for a very long time, but I chose to use it in a new way. Wood. Specifically exotic hard wood, but still wood. The idea is that it will be lighter than the metal, feel nice in the hand, be lovely to look at, and reduce hand fatigue. The trick is getting it to survive the machining process and become a usable tool. One of the major problems has been the barrels splitting when cutting them or inserting the bearings. This led me to try out different species of woods and I am sticking to those very tight grain structures that aren't brittle. The first two images are of the first functional prototype. The third image is of what was usable from the second prototype that broke and parts built to create a third prototype. These two are made from the same African Blackwood, which accounts for their similarity, and are out in the wild undergoing long term testing that I just don't have the expertise to do. The third picture was taken before I replaced the setscrews with nicer, more professional looking ones. The next two images are of a shorter version (2") made from Bacote and the bigger one made from Snakewood (2.25"). From the testing so far, the feedback has shown that these knives perform phenomenally well and are a joy to use. Also, reduced hand fatigue, which translates to longer times being able to cut leather without your hands paying the price. Just click the images to open up a full size picture. Functional Prototype 1 (P1): Functional Prototype 2/3 (P2/3): Barrels for further prototypes: New barrels and P2/3 for comparison: At this point I am just sharing what has transpired. I have still been testing out different lengths and diameters, but there is a limit to the minimum diameter I can make based on the limitations of the materials used and the size of the bearings I am using. This means that about 0.5" on the barrel is the smallest i can go. I may do up some blueprints with dimensions and notes for those that feel like making your own, but that'll be later. I will probably be making a few to sell, however I want to work the last few bugs and optimize the production process without a reduction in the level of quality before I hit that point. If I don't, they'll need to sell for far more than I think they should to cover the time I spend machining the internal parts. The post did get lengthy, and I am sorry for that. I actually left out a great deal of the boring details and failed experiments I made in the process. Feel free to chime in with your thoughts, but I mainly wanted to further explain the purpose of my original post and share some eye candy.
-
Spanish To English - Translation Please
shtoink replied to DebHop's topic in All About Us and Off Topic
I hate to burst your bubble, but that's actually a myth and sales of the Chevy Nova were quite good south of the border. There are actually several lists of car names that didn't translate well to other languages or just sounded ridiculous to everyone but those that were making it. I did take some time to dig up two of them. (here and here) -
You can have that added in for free when you order 100 units in China. I couldn't resist...
-
As someone who finds it interesting to find new and unexpected uses for things, I want to share a very plentiful source for patterns for carving designs. I hadn't seen anyone mention the Dover publication before, but had seen a couple mentions of coloring books in general. The Dover Publications company is one particular company that produces some of the most amazing coloring books. They have a wide range of categories, from fantasy to historical, and from flora to fauna, and the level of detail is just the right balance for working it into leather carving. If you follow the link above, you can see some examples of the books they provide. As I had said earlier, I know that coloring books had been mentioned for carving/tooling patterns, but the quality and variety is so consistently good with these guys that it merited being mentioned in a separate topic. Funny thing is, I have found a quite a few of these books through second hand shops and the bulk of them are not even colored in.
-
I believe it is a guidon holster. They are used for parades or extended carrying of flags and guidons. There are quite a few different variations on it, but they all to pretty much the same job. An example can be seen here.
-
If you'd like, I might be able to do up the pattern I have in mind for you. It might make what I was talking about a little clearer, too.
-
Not that I have made one of these, but it still looks to be a little too thick to me. The other thing I notice is that it isn't flat over the whole surface and the corners allow for it to be snagged out of the book, which might account for it not sitting right on the corner. If it were me, I would try to find a way to get the edges to over lap and use glue to secure it. Have it made from one slightly larger triangle and one slightly smaller one, skive the outer edges of the larger one, roll them over to the back and glue them down to the smaller one, and use some sort of press or roller to flatten it all out. Doing it this way eliminates the seam, which adds bulk to the outer edge and can dislodge the bookmark. Using a thin, plastic cutting board will allow you to flatten it out and it won't stick. It shouldn't be experiencing any real stresses that would overcome a glued joint. Getting the seam very close to the edge of the leather means those are very weak spots where the leather might fail and it can fall apart. Once again, this is me and not the only way to do this.
-
It's actually kind of interesting in this area. Since we have this large body of water in the middle of the state, a great deal of uneven terrain, and no straight roads longer than a few miles, we have our own method of describing distance. We will describe it as taking an hour or two hours to drive somewhere, even though it's only 10 to 15 miles away as the crow flies. The distance from my location to Seattle is only about 15 miles or so, but there's this body of water called the Puget Sound between us. I've had had phone support from people in the Midwest and the South that describe some service center or store being really close when they check their computer. Drive time is even longer if you live on one of the many islands and require a ferry to get to your destination. You need to time your travels with the ferry schedule. They have no idea what it's like up here. The only other place that might be similar is areas around the Great Lakes. I wouldn't change a thing, though.
-
Recent Projects
shtoink replied to Chief31794's topic in Purses, Wallets, Belts and Miscellaneous Pocket Items
How do you deal inside of the snaps with the cases for phones? Do you have a way to cover the back of the snap to keep it from scratching at the phone? -
The only issue I can see is that there is a potential for damage to your gear with the strap retainer on the inside of the bag. If you think of the many ways in which this bag will sit throughout it's life, flat on the side is one of them and it will possibly position that metal nipple in such a way that it can be a source for damage to a laptop screen. This is also a possibility if you are carrying it on your shoulder and it gets pressed between you and something else. If it were meant to carry the generic shoulder bag type things, the strap retention for the internal straps would not even be an issue. Having those used inside a case meant specifically for a laptop looks to put your laptop at risk from the bag. I could be completely wrong, since the angle the second picture that shows the inside doesn't allow for you to see the just where that metal nipple will press against the opposite side. It does look like it will land about 15% to 20% of the way down and right into the laptop that looks to be in that pocket. Maybe a simple loop of leather to keep the strap captive would be enough. Once again, I could be wrong, as I'm still working on my coffee as I type this, but if the idea is to protect the laptop when in transit, it's something to think about. I must also say that I really like the bag, so don't take the above as anything other than me bringing a small detail to your attention. It looks well thought out and nicely executed.
-
It's sort of part of Port Orchard. Like a suburb, so to speak. Not really a clear line where one starts and the other ends. It's good to see some other people from the wet half of the state.
-
Dyeing Leather Lacquered Boots And A Wax Finish.
shtoink replied to koolio's topic in How Do I Do That?
Found the thread in question... Looks like it was slightly more than a month ago. -
The plus side is that there isn't any of the stink you get with vinegar and steel wool method. You also don't need to wait for weeks or filter out the excess rust, oily residue, and other gunk that comes along with the vinegar and steel wool.
-
Are you planning on modeling it after the paniers available for bikes commercially? I don't have any, but thought it might help in others being able narrow down the type of bag you are aiming for.
-
I don't know why I never thought of using Excel... I have used Excel to do some pretty sophisticated things and I feel so silly not thinking about using it to generate a custom shape like that. Thanks for the suggestion.
-
It might be worth locating some desiccant packets to keep away any moisture.
-
There is an enzyme based pet cleaner that I have used for our dogs. It does an excellent job, smells like vanilla, is pet friendly, and pretty cheap, too. I don't know if other places carry it, but it can be found at Walmart for certain. The idea is that the urine is actually broken down into other, non-smelly, substances by the enzyme. I don't know how, or if, other similar products will work, but I can tell you that I swear by that very one that I linked to. I've used it in the cars, the kitchen, all sorts of places. I've even used in the washing machine to get rid of dog related accidents on the dog blankets. It has worked well every time. I have tried several other enzyme cleaners, but everything else either didn't stand up to the task or choked me out with horrible perfumey stink. This stuff has a mild vanilla smell that dissipates to... well, nothing. Hopefully it works, if you try it. I suppose anything is better than having your bag smell like a yak urinal. *shudders*
-
I have seen a ruler like tool that is made by Fiskars. Unfortunately, I can't find it on their site anymore, so I don't know how availability will be for you. I did find an online art supply store that at least had it and you can see what it looks like. I have one and had actually thought about using it for a guide to cut the edges of my leather patterns with, but the stitches sound cool, too.
-
Covering A Desert Canteen With Leather & Lacing It - Aligning Holes
shtoink replied to Marietje's topic in How Do I Do That?
Would you mind a little more clarification on this? I can see the tracing of the canteen, but do you mean increasing the radius of the traced circle by 6mm for the final pattern? Wouldn't it be easier to measure the diameter of the canteen, then add 12mm (or about 1/2") to that measurement, and then multiply by pi (3.14 and some change) to get the circumference of the new circle you want? I am just thinking of the difficulty of trying to measure the circumference of a drawn circle directly. I ask because I can see measuring the circumference from the canteen being done easily,but it just seems rather fiddly to try to hold a tape measure and get to to match a drawn circle to get a measurement that way. -
HA! I read the topic for the thread and the fisrt thing that came to mind was someone that was venting about issues with their boss (employer) and not Boss (sewing machine.) So, when I started reading the first line, I was totally confused. I thought that maybe they had a impossibly horrible boss and needed to get some guidance on how to deal with it. It wasn't until I got to the part about tension that things started to set in that it probably wasn't about an employer but possibly about a sewing machine. Clearly I needed to reread it. I realize that this doesn't have anything helpful contained within, but I thought it was rather amusing and still worth sharing...
