Widget
-
Posts
81 -
Joined
-
Last visited
Content Type
Profiles
Forums
Events
Blogs
Gallery
Store
Everything posted by Widget
-
Carved belt
Widget replied to WyattEarp's topic in Purses, Wallets, Belts and Miscellaneous Pocket Items
Love it! Is that from a printed pattern/template or did you freehand it? If it's from a pattern, could you let me know which one/where you got it? Thanks! -
I just use my index finger and a lot of patience to make sure I get the soap just on the edge, and I try to do an initial "work in" by hand before using canvas or a wood slicker. As for discoloration, you can buy Fiebing's SS in a white paste that does the same job as the yellow and doesn't discolor anything. http://springfieldleather.com/Saddle-Soap-White-3-5oz Good luck!
-
FWIW anything that I buy that's larger than a standard letter sheet can hold at 100% I take to Kinkos and have them print on 100lb stock on a large format printer. I usually have 3 copies printed: 1 to cut, 1 to make a cutting mistake on (inevitable with me), 1 to keep at full so I can easily see any instructions, etc., in the margins. Usually costs $10 for those three copies and (for me) beats the pants off of printing multiple sheets, taping them up to the kitchen window to see better to line them up, then having to paste them onto poster board or bag stiffener if I want to keep them around for awhile. Also, nearly every pattern I've bought has a scale mark on it somewhere, either 1 cm or 1 inch. Just make sure to measure that for accuracy before trying to line up the rest of the parts. Good luck!
-
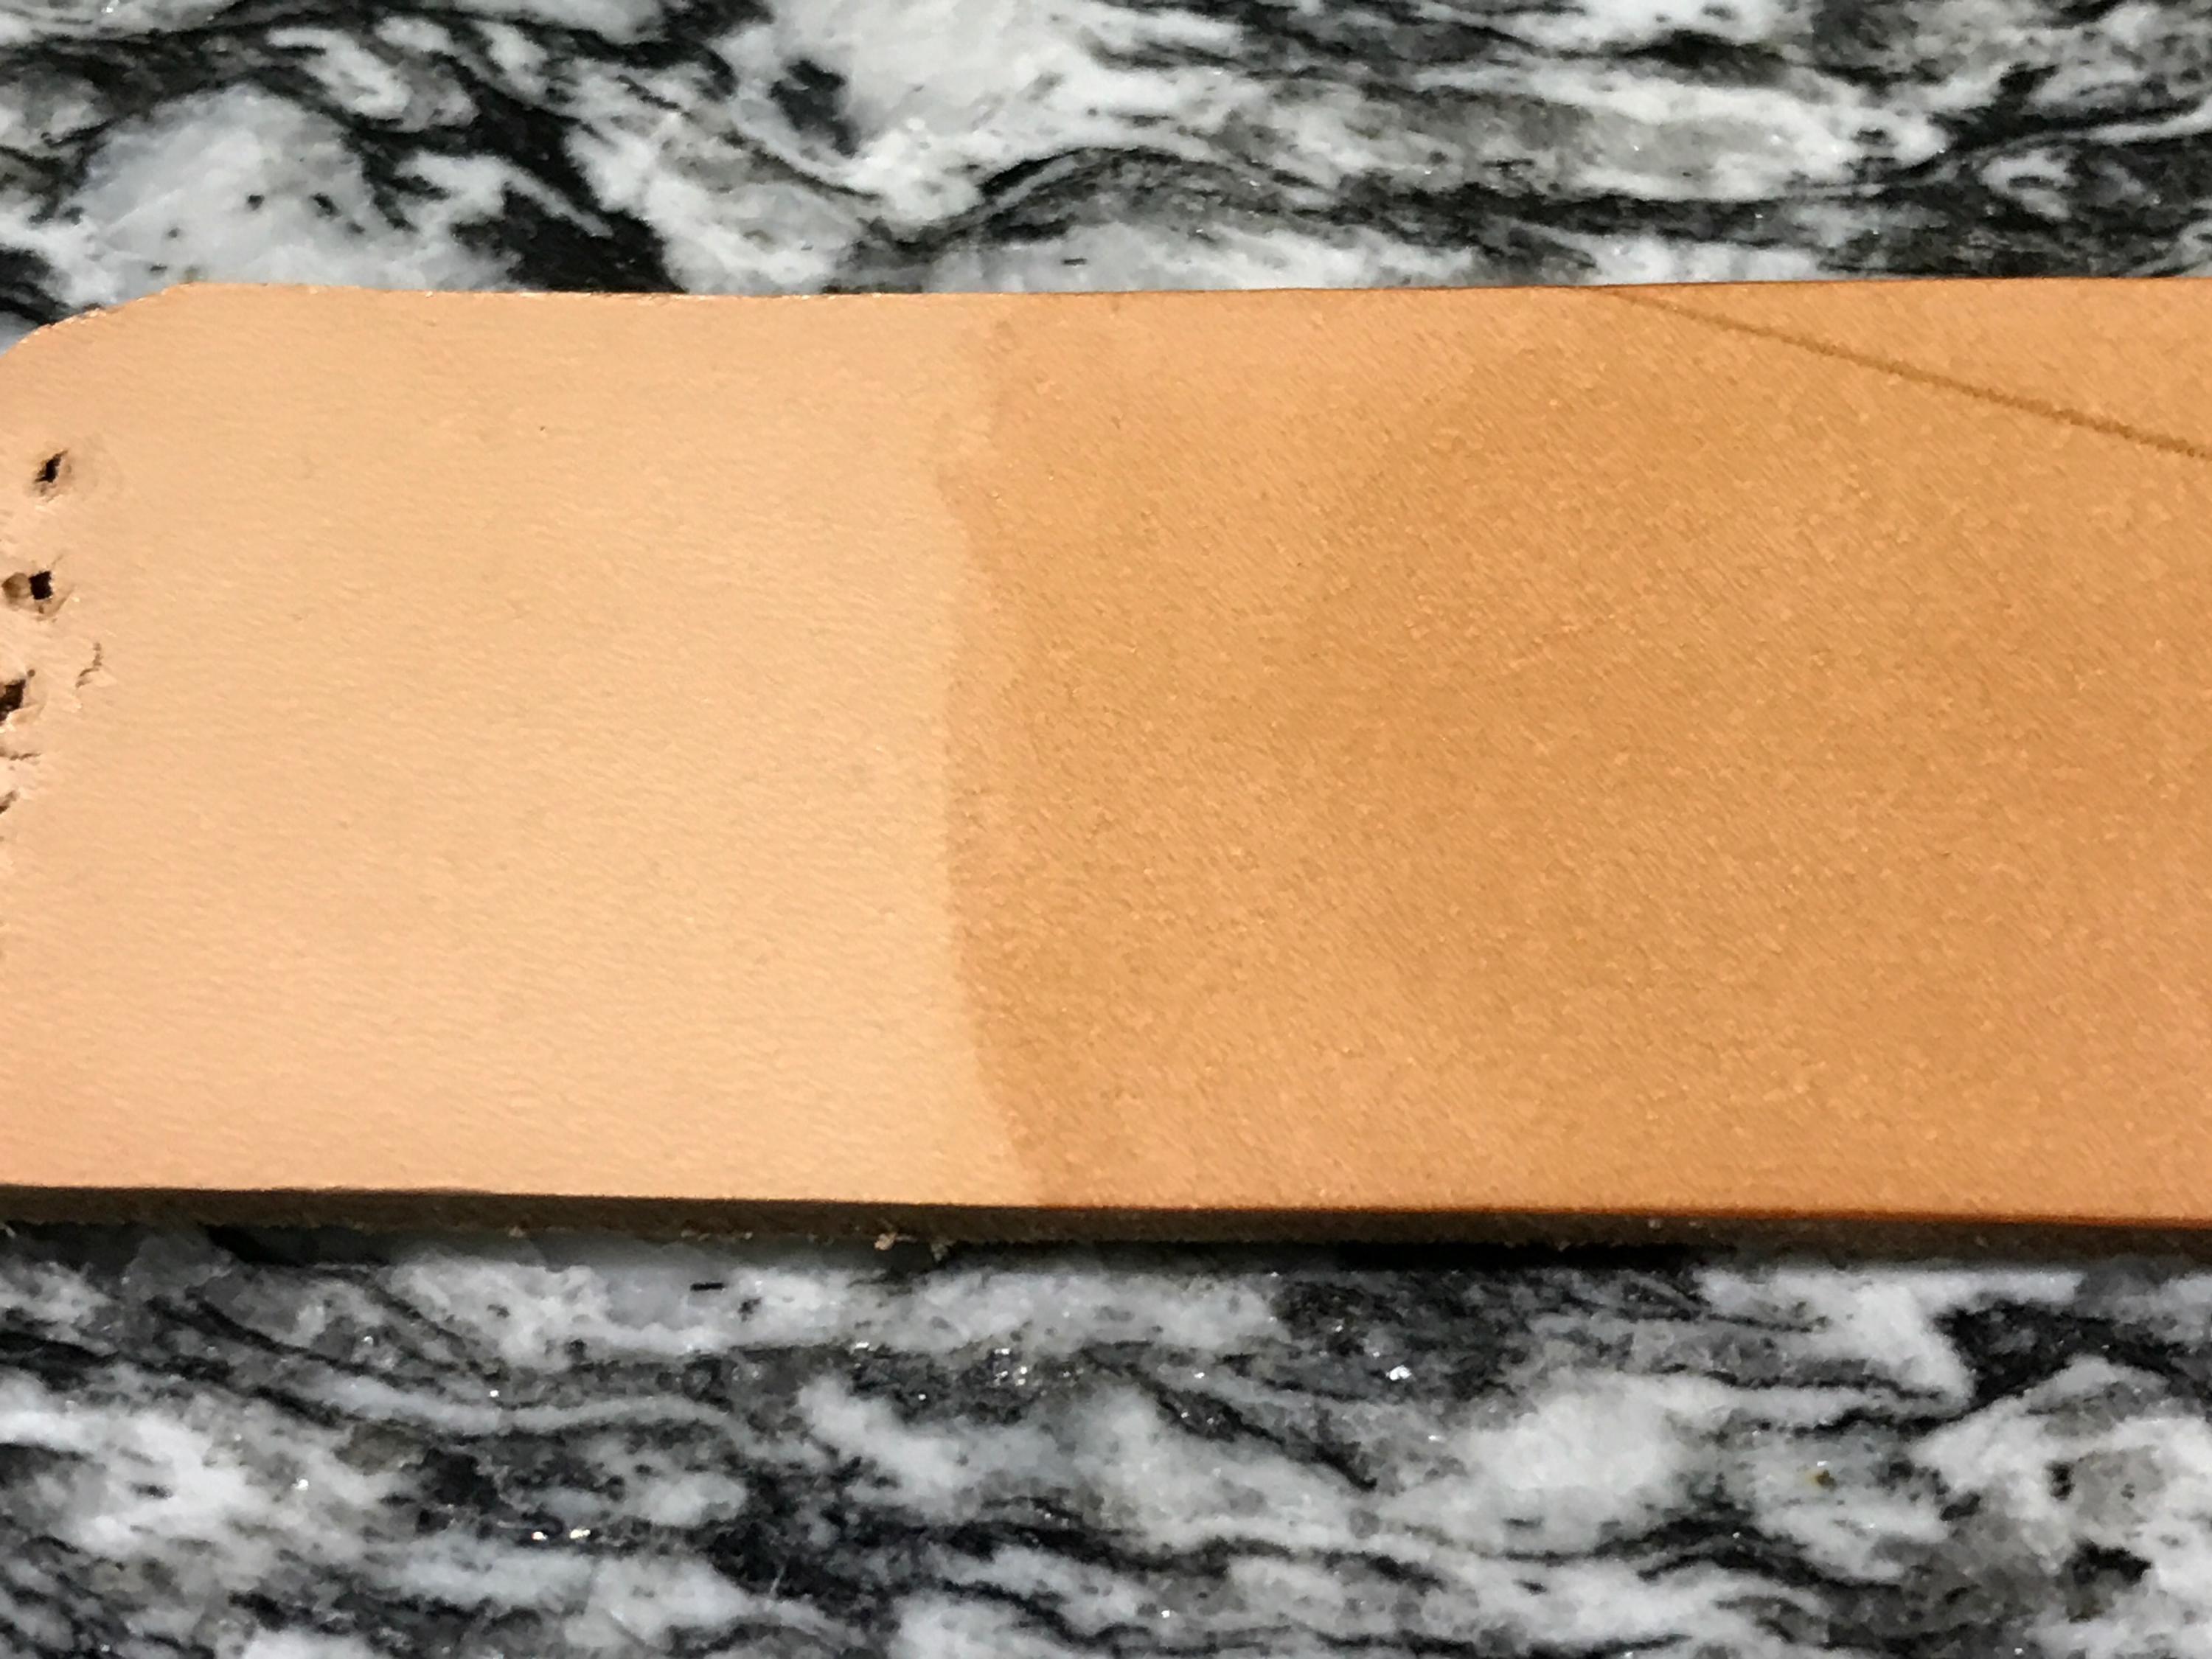
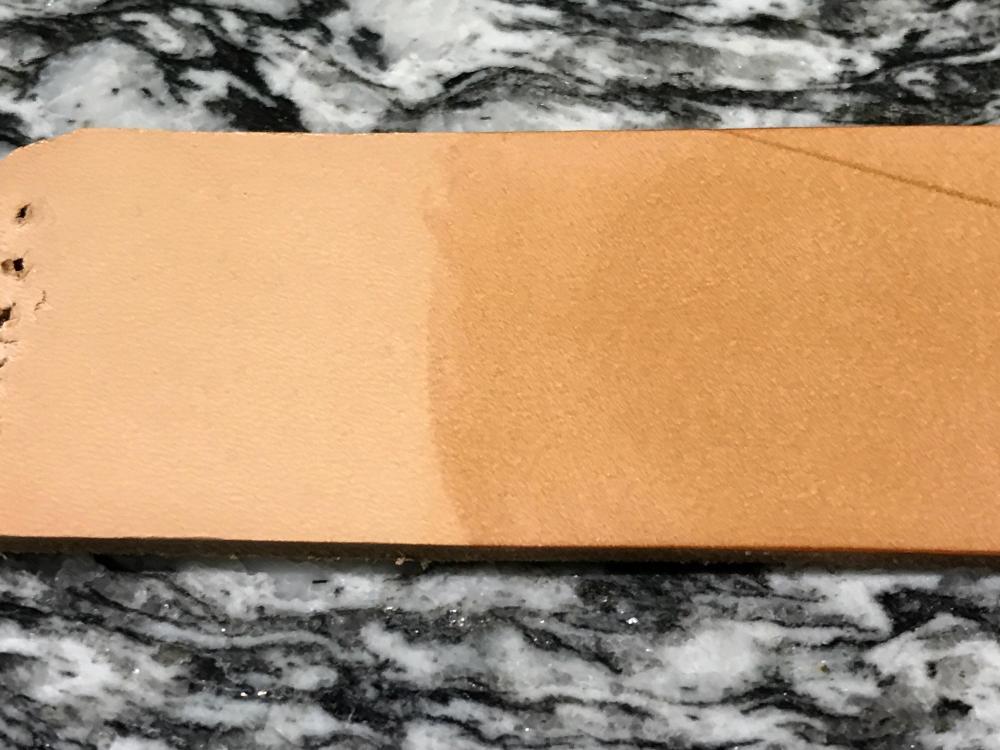
Hey everyone, recently ran low on carnauba creme so I ordered a new bottle which came today. It is branded with the newer style Fiebing's logo (my last bottle was the older style), and the creme seems totally different that what I was expecting. The "old" creme I have always looked a bit ivory colored to me, this is more plain white, and the smell is different. I always thought the old smelled slightly of clay or even play-doh, this new stuff just smells like chemical. You can see a sample of it rubbed in, left a few seconds, buffed back out on the scrap in the photo. Plain is left, treated is right. It has the same sheen as I'm used to but the finish feels more "waxy" (which I know is stupid since carnauba is a wax) but it feels more like candle wax that's been rubbed over an edge for instance. So, all this to say, has anyone else experienced this? Am I just nuts? Did I just get a bum bottle?
-
When doing just edges (like prior to stitching, etc.) I've become completely addicted to using the basting tape type stuff that Tandy and Springfield sell. I've not had any problems with it holding through stitching, etc. The only drawback I've found is that it does gum up the stitching chisel or awl and needles a little bit as they pass through, but it's easy enough to get off with some soap and water.
-
Sorry for the confusion. In my posting too late at night I misspoke...I meant to ask between a whip stitch (sailors call it an overhand stitch) or saddle stitch? My gut told me saddle, and you've all confirmed it. Thanks for your input!
-
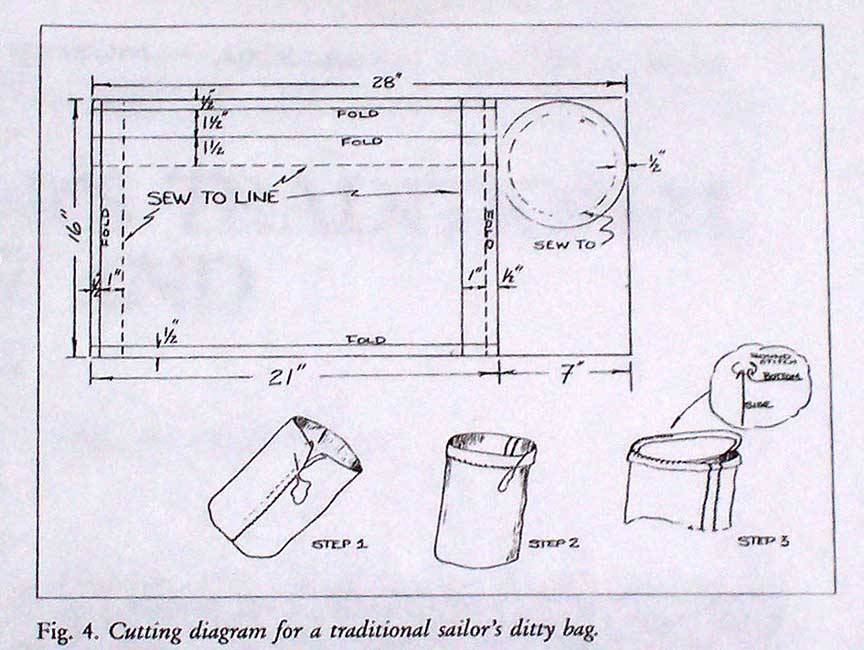
Good evening all, So, I'm making a traditional sailor's ditty bag in a non-traditional way :-) These are usually made of sail canvas, but I decided to try to make one out of some upholstery leather I had lying around. My question is, when it comes to the bottom of the bag, which stitch would be stronger, a running stitch or a saddle stitch? It's being sewn inside-out, so when inverted, neither stitch will be seen, it's really a matter of strength. This is a rough diagram of what I'm doing (look at the pic in the lower right.) Any thoughts?
-
FWIW, I've used Resolene, Resolene cut 50/50 with water, and Super Sheen. I've used sponges, daubers, old t-shirts, and sprays (I do not have an airbrush so I tried the ones you get from Home Depot, the name of which eludes me at the moment, but it's a glass container that you screw onto a can of propellant). I will say between the two, I get the best results from Super Sheen, even though I don't any Tandy dyes (I always use Fiebing's dyes). I've found the keys for me are 1) very, very, very thin coats, buffed out after they're dry. You can always add another coat, taking away, well... and 2) most importantly, make sure the dye/stain/hi-lighter, is DRY DRY DRY. For me, that means in the humid east coast summer, I let the dye dry at least three days before I even think about coating the top. Then I'll buff the snot out of it until the rag comes clean before laying on the first coat. All of that said, unless I need something to be super duper weather resistant, I'm happier with 2 light coats of Tan Kote on top. PS The other advice about oiling leather before the first coat of dye is spot on too...especially if you're using an alcohol dye...I've forgotten to oil a piece and had the finish crack off because the skin of the grain got too dry...
-
Check your inbox...I sent you one.
-
I used a very generous amount of carnauba wax on some really stiff horse hide one time to loosen it up some. It wasn't a huge difference but it did help...?
-
FWIW, I find it helpful on corners to use a wing divider set at the same distance as the groover first to set up a "path" to help the groover follow. Also, I've been working on my patience lately, and have started grooving in two passes. The first very light, removing very little material, then a 2nd time removing a little more. I think that helps my grooves stay neater as I'm not pushing real hard on the tool around corners, etc. Also, I have a hard time with this style groover: http://www.tandyleather.com/en/product/craftool-adjustable-groover I have completely switched to using only this kind. I feel like the blade in line with handle helps me out a lot. http://www.tandyleather.com/en/product/pro-stitching-groover-set
-
I may be really misunderstanding what you're after...but if not, give block dying a try. There's a good tutorial here (and you can see the finished result in the first 5 seconds of the video so if it's not what you're after, no time wasted).
-
Simple.......yet......simple....
Widget replied to dfrensdorff's topic in Gun Holsters, Rifle Slings and Knife Sheathes
Looks great! Sometimes, simple is best! -
For a first try in carving, they look really good. To my eye, it looks like the beveling may have been done while the leather was too wet or that you just need to work on "walking" the tool across the leather (faster taps with less force might help). I still struggle with that a lot. Watch some of Bruce Cheaney's videos on YouTube, he's phenomenal at the western-style tooling and you can learn a lot about beveling by watching him. Also, I would include some decorative cuts on the bottom left example. They worked well in your top right example. I've never done roses so I can't comment on where/how/if you'd do decorative cuts on the petals. Fantastic job!
-
Don't dilute the Fiebings with water. Depending on what you're using it's either alcohol based (spirit dye) or oil based (Pro Oil is the name they use for it.). They (Fiebing's) makes their own product for it. http://shop.fiebing.com/c/leathercraft_dyes_dye-reducer. To 2nd PNJ's suggestion, I've bought that pattern from leatherworker.net and while I haven't actually made one yet, the pattern is solid and a good starting point, and it's only a few bucks. Good luck!
-
I Want To Make A Journal And Line It With Pigskin Suede
Widget replied to tanda4's topic in How Do I Do That?
I'd say yes as well... -
Mia, do you have any trouble with the painters tape pulling any dye/stain/antique off the front side when you do this? Doug, I'll check out that forum right now. Thanks for the link...
-
Hi all, Ok...I need to know...how do you get a crisp line of dye on the edge of a piece? Here's my background...I follow Bob Park's tutorial on edge finishing to the letter (THANKS BOB!) with the exception that everything is "hand done." In other words, I don't have a bench grinder so I'm just using my hands with the denim as the final step. Anyway...when I've done the soap and burnish and it's time to dye, I just have a heck of a time keeping a steady enough hand to not invariably get a bit too much dye somewhere, which makes my edges not perfect enough for me. I've tried using a dauber, a sponge, and a q-tip. I'm not rushing. I guess it's a good thing I'm not a surgeon. Maybe it's the 7 cups of coffee a day? What tool/material do you use to apply the dye so you get a clean edge? Does anyone have experience with an edge roller? Are they worth the money? Any thoughts and suggestions are more than welcome... -Widget
-
Really great work! Thanks for sharing.
-
Hey guys, Have never lined anything before and need some advice before I start. I'm planning on a guitar strap with light stamping and 4 star conchos, lined on the back in pigskin. Here are my specific questions: 1) Do I do anything other than contact cement and saddle stitch to attach the pigskin? 2) How do I finish edges on the strap? Should I do all of that before attaching the lining? How would I bevel once the lining in attached? 3) What am I missing? Thanks for any advice! -Widget
-
Trinity Knot Notebook
Widget replied to Bob Blea's topic in Purses, Wallets, Belts and Miscellaneous Pocket Items
This is absolutely beautiful. Fantastic job with the E-whatever tool matting. I've never been able to get it to look that even and uniform. I also really like the use of the geometric tool along the spine. The carving is splendid and beautiful. -
Horse Head Key Fobs
Widget replied to aoetken's topic in Purses, Wallets, Belts and Miscellaneous Pocket Items
Those look really great. Congrats on being able to reverse engineer from the original. I love the tan one as well in the lower right. Great job once again. -
Tandy Oak Leaf Vs Hermann Oak
Widget replied to Leprechaunleather's topic in Leatherwork Conversation
I can't speak for wepeveryone, only what I notice.... I find the hermann oak to be superior for a few reasons: 1. I think it carves a lot better. With the same swivel knife, I get better cut control etc. on the hermann oak. I feel like there's more drag on the Tandy, tho that could just be because I'm not that good at carving. 2. I find it easier to get an even dye job on the hermann. Using good dye, like firings pro oil, i get a more even look on the hermann oak. 3. This may be truly lack of experience or even a bad piece....I don't buy a lot of leather in quantity. Not even a little bit. I've onlh bought in the past year one side of Tandy and one of hermann...but I find that the weight of the hermann oak is more "realistic" than the Tandy. By that I mean, the 4/5 oz side I bought of the Tandy felt awful thin. Closer to 2/3 oz. Again, that could just be me not buying a lot of quantity. This is all anecdotal, and of course, your mileage may vary. Let me know what you find, I'm interested in other perspectives.