


toxo
-
Posts
2,263 -
Joined
-
Last visited
Content Type
Profiles
Forums
Events
Blogs
Gallery
Store
Everything posted by toxo
-
LOL. I think you might be my bruvver from another muvver. I'm the same. I read these posts and I almost talk myself into NEEDING one. I have to pull myself up and remind myself that I've not long talked myself into NEEDING a £1500 clicker press to do that job and don't talk to me about the lack of space.
-
Had it awhile now but never used it much. What's the best wheels and compounds for polishing leather and maybe burnishing edges. Thanks peeps.
-
My brain is too logical for all this stuff. Now I know there are times when being pedantic does matter but I make bags and I don't think any of the industrial threads is gonna break in the normal use of a bag. So my first consideration when thinking about thread is the colour and how it contrasts or not with the rest of the bag. I have quite a few cones of thread and most of em have no label. So once I've decided on the colour I'll take a needle of a size that I think will work, I'll put some thread through it and hold the thread at 45 degrees. If the needle rushes down I'll go down a size. If it doesn't want to go at all or sluggishly I'll go up a size.
-
Welcome from the UK. Every day's a school day here and there are many teachers to learn from.
-
Good job and welcome. That buckle looks like it could hold the Titanic.
-
I'm really reluctant to rain on your parade but in the interest of knowledge.... If you have a screw thread in the back of your stamp, clamp it in a hole at the bottom of your arbor press or put it in the chuck on a drill press or failing all else, a pair of mole grips. This will give you some accuracy when lining up. Using a blowlamp, heat the stamp to around 100degrees F , it'll only take about 30 seconds. Check with a digital thermometer. Place your leather/foil in the right place and press the stamp for less than 1 second.
-
Forget the best sewing machines and skivers, I envy the people with SPACE. I've almost finished moving my "shop" from one bedroom to another. I'll take some pics when I've shoehorned everything in.
-
I think I see it. The thing is, all the swing away models have to have a massive capstone and bush system to negate any sag. Your model, if using a sliding system would seem to avoid all that and make the build much easier with less headache. Of course whatever other uses you have in mind will be a factor
-
Was thinking about that. Wouldn't a slide away drawer be simpler? maybe like the old fashioned slide projectors where you could load one side whilst pressing the other? You could have a veritable production line going.
-
Wow! I remember when I was young enough to take on projects like that. As usual, you've minded your work, paying attention to detail in a way that I can't seem to do. Can't wait to see it working in anger. Very well done my friend.
-
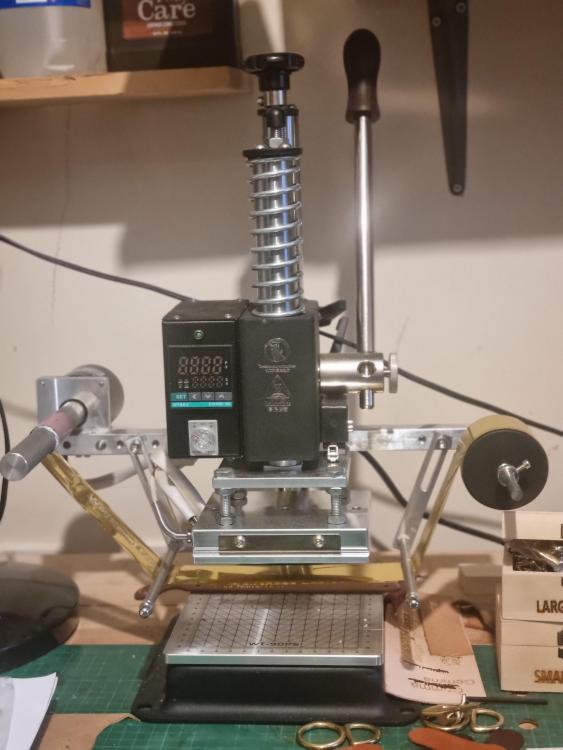
This is my recent Chinese machine and I love it. It has the bigger platform, it has a dual heating pad, the bottom one has the cutout for the T slot letters and just slides out leaving the top pad for makers stamps etc with the 5mm screw thread. The thing that makes it nice to use more than all that however is the foil system. If you look at the left hand side you can see a small motor. When you pull the handle down that motor advances the foil ready for the next one BUT you can adjust that motor to advance just the right amount according to the width of your stamp so there's no wastage
-
Thanks Bob. I wish space wasn't so tight but it looks like there's a few interested so it won't be a steal anyway.
-
Just came up for sale over here. Any good?
-
You can't generalise like that about gussets. Sometimes a "gusset" will go down either side of a bag, sometimes it will go down one side, across the bottom and up the other side or down the front across the bottom and up the other side depending on what you're calling the front. If there are curves involved the thickness of the leather will be a factor. I'd be very wary about cutting a gusset short. If in doubt leave it long and cut afterward. I think the safest way is to use basting tape all around the perimeter, stick your gusset and cut to length but if I'm machine sewing I'll still start at each end toward the middle.
-
Gluing VegTan Leather to Polypropylene Plastic
toxo replied to PAMuzzle's topic in How Do I Do That?
Not to influence your thinking but aircraft and boats have been riveted together for quite a while now. -
If hand stitching, counting the holes on each piece will work perfectly. If machining however, there is the possibility of stretching the gusset depending on the severity of the curve. If doing a repeat pattern where the length of the gusset is already known, stretching is still possible and I would advise sewing from each end so any stretch will be worked out in the middle.
-
Oh! You've got one as well!
-
Gluing VegTan Leather to Polypropylene Plastic
toxo replied to PAMuzzle's topic in How Do I Do That?
A rivet in each corner is sure to work. -
Love it!
-
Well done! We need new toys just like kids do. Just remember they're not automatic and the smallest detail can get in the way. Looking forward to seeing what you turn out. (No pressure and you haven't got it yet.)
-
My pet peeve is my poltergeist. It makes sure I spend half my life searching for stuff I don't find until I'm looking for something else.
-
A good hack is hanging some ice cube bags in front of the fan.
-
What's the pattern? someone might have one or be able to help.
-
If being ultra picky there's no reason why this technique can't be used when machine sewing. Just leave enough thread to put a needle on.
-
The two on the left I consider to be skivers not bevellers but then I don't work with thick leather. When using my bell skiver and there are any bits missed I find the French skiver to be excellent and quick for the clean up. With the side arms it's impossible to dig in as long as you're working on the flat.
