


grumpyold
-
Posts
55 -
Joined
-
Last visited
Content Type
Profiles
Forums
Events
Blogs
Gallery
Store
Everything posted by grumpyold
-

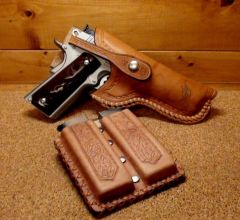
Pancake Holster
grumpyold replied to grumpyold's topic in Gun Holsters, Rifle Slings and Knife Sheathes
I guess my description went off the rails a bit. A better way of saying would be full back panel and full matching front panel. I've seen lots of holsters done with a back panel with belt slots etc., and a molded pocket that's just basically a pocket for the pistol, think Alien type holsters. -
I've searched through all the posts and have not found what I'm looking for. I want to try my hand at a pancake holster, outside waist band for my 1911. I've found lots of info here and else where on the net that shows how to make patterns and illustrates how to make the holster start to finish. These holster are all very nice and the info was informative, just one problem, when wet molded to the pistol shape protrudes out the face and back. I'd like to have the back stay flat and all the shape out the front. I realize I can wet mold the front panel around the pistol before hand, but all these, I saw, are not full double panel., I'm thinking that there has to be some way to figure out how much extra dimension to add to the front panel so once stitch up the front panel will form an open pocket that when I go to mold it the back can be laid flat and the pocket bulging out the front can then be molded. I'm stuck on trying to figure out how much extra to add to the front panel. Hope someone has done this or can share some ideas. Thank you.
-
45 Holster Black /white Stitching
grumpyold replied to TRADERnel's topic in Gun Holsters, Rifle Slings and Knife Sheathes
Nice job. Check out Maine Thread they have a large assortment of thread colours to choose from. . -
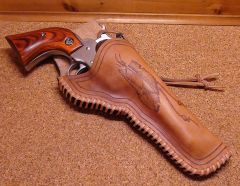
How does the gun hang? Belt loop looks narrow for a gun of that weight. Tooling looks great.
-
Better Way To Do A Belt Loop?
grumpyold replied to oscar621's topic in Gun Holsters, Rifle Slings and Knife Sheathes
I've found that if the grip of the gun lines up with the top of the belt loop, or slightly below, it allows the holster to cant a little away from your body. This gives some room to get a full grip on the gun without your body or belt loop interfering. I make my holsters from 9 Oz plus leather so their stiff enough to keep their shape without being reinforced..All my holster are for field carry and I've tried all kinds of heights and find this works best for me. I want quick access to the firearm, but also don't want it hooking on every tree I walk pass, and this setup works for me and everyone I've made holster for.. -
I had a couple holsters, that due to poor casing process, I didn't like the final product. I've used the holster a lot and several people have thought they looked great. Sometimes I believe we become over hard on ourselves if the end project doesn't meet our expectations.
-
I do lots of pyrography on leather. I use mink oil paste to finish projects as it is the product I found darkens the leather the least. If you use a product that darks the leather you will have to adjust how dark you burn the design, other wise the detail will disappear. Doodle on scrap piece of leather you will use for the project and then apply finish, you should be able to see how much darker you need to burn.
-
If you are talking about a single temp tool I would stay away from it. Use a multi-temp tool for best results.
-
I do pyrography on lots of surfaces, paper, wood, leather, canvas etc.. I use a Razortip. Burning leather is all about temperature. I start at a low temperature to do layout, then as I fill in the piece I go back and keep working the shading. I suggest using a scrap pieces to get your temperature ranges you would like to use. When you start to work a project keep a scrap piece handy. Before putting tip to your project run it across the scrap to pull of some heat from the tip to eliminate the chance of small burn marks. Also keep your tip clean, leather dirties the tip quickly. When you do your practise work on scraps try the product you plan on finishing with. I use mink oil paste on most of my work. Depending on what you use you my find you need to darken your overall burn so as not to loose the detail in the burn if the finish darkens the leather.
-
 Thank you. Still need more practise.
 -
Well said. I forget where I read it but basically the quote was "Don't want wear on your firearms, don't take them out of the box!"
-
I use this for holsters etc.. Works great. I like the stitching to stand out, and have used as heavy as .50. Normally use .40, .45. Tough stuff! Lots of colors to choose from.
-
Check out Maine Thread www.mainethread.com. I've been using their cord for a while, great selection of colors and sizes.
-
 Really nice, I have a lot to learn.
 -
Vinegaroon tutorial
grumpyold replied to scooby's topic in Dyes, Antiques, Stains, Glues, Waxes, Finishes and Conditioners.
Does all tooling would have to be done before dying? -
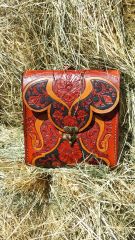
From the album: STUFF
-
From the album: STUFF
-
From the album: STUFF
-
Agree. We're on well water and use bottled water for drinking. I always use the bottled water for my leather work. Never tried the well water, but have heard and read enough to not want to try it.
-
Problem solved. Tried several pieces and put them in a plastic contain out of the light and all came out just fine. Thank you Hidepounder (Bobby). I will keep the fluorescent lights in mind too BDAZ (Bob), thank you.
-
Skulls & Roses On A Western Rig?
grumpyold replied to Josh Ashman's topic in Gun Holsters, Rifle Slings and Knife Sheathes
I'm a big fan of traditional work, it's always nice when done well, but designs out side the box get my attention and always stand out. -
I'm trying it at this time. I never thought about sunburn being the problem. I had read of this in some place at some time previously, never thought of it. This very well may be the problem as I have just moved from a work room in our basement to my freshly finished loft above the garage. No natural light in the basement to lots of light coming in through windows everywhere. I will know shortly.
-
Hidepounder; Thank you for the quick reply. I will retry using your info. The method I was using has been fine in the past but from rereading the information I can understand that I'm wetting the leather but not truly casing it. Once again thank you and I'll see what happens.
-
I case my leather in the manor described except I don't bag it. I put it in a plastic container of water until the bubbles just about stop and lay it out over night. The last two holsters I have done I have had them discolor (best way I can describe it) and have never had this before. See post in How Do I do That- Discolor Problem for pictures. I've played around with pieces of this hide and every time I case the pieces I end up with the same thing, dark and light areas. I'm starting to think it's the hide. Any input or comments would be great, as this one has me stumped.
-
We use PL500 on construction jobs. Once it sets up good luck ever getting it apart. I've used it to adhere leather on several items and it worked great.