TomSwede
-
Posts
2,653 -
Joined
-
Last visited
Content Type
Profiles
Forums
Events
Blogs
Gallery
Store
Everything posted by TomSwede
-
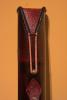
If this is the first time you carve on something this big I got hand it to you, it looks great. First time carving on something big can be a very humbling experience. Not easy to "spin the leather around the knife" I'd say. Elegant looking case, I really like the rich and warm tone the leather has. Tom
-
Well, skull holster done
TomSwede replied to Tina's topic in Gun Holsters, Rifle Slings and Knife Sheathes
Oh this is great! I was just dead tired from harvesting in the 'ol mill yesterday and finished off the day by laying in the bed with Bruce Grants braiding book thinking about the two needled mexican and how expensive lacing is:-0 This one looks fabulous and is just my style. You got everything packed up really neat and tied in with that two tone braid. Now you got my mind set even more into a cowboy set I've been thinking about! Great work as usually, sys! Tom -
Very nice looking spur straps Johnny!! The black background is nice and makes it pop out more. I like those buckles, sweet and simple! Tom
-
Very nice looking straps! Constrictor strap seems quite fitting considering it goes around your neck (wich is usually what you end up with when you play with one). Tom
-
Congratulations David! Those seats looks very fine and crisp so well deserved ribbons! Tom
-
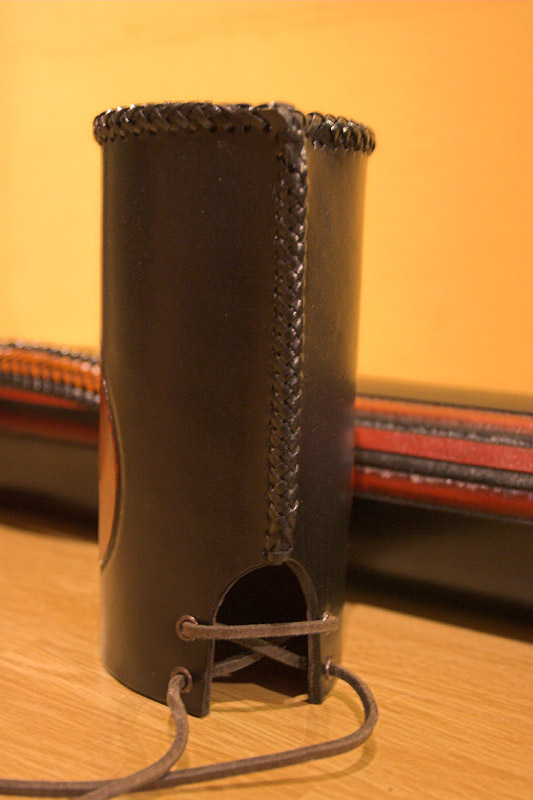
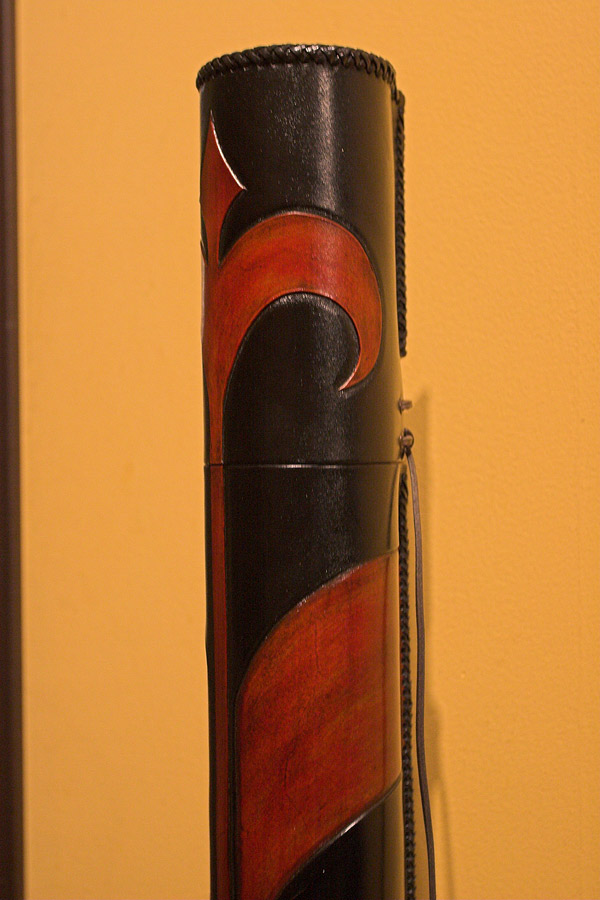
Here is three more. First two is just to show the design and shape of this cap. I think the first one's function is easy to spot. I explained to you about the cell foam padding. I have now used a pvc fakeleather fabric sewn as a sock as interior/lining. It's just hanging down in there (these tubes are non-profit and development platforms and portfolio work really). The liner is about half the thickness of that foam padding but much more nice looking AND provides a good doze of friction when you use it to line the inside of the cap too. That gives the same thickness as the foam and that make a good line up for those caps. I also thought about having a distraction to lure the eye away from whatever glith there is between cap and body and for the first cap you can see I went out on a limb and just had a blasting fun time with it. I seriously don't recommend that sort of play if you don't fee like wasting hours but I do like the outcome of it, only I should have used wider black lace or perhaps better skipped having the braided string going all the way up on top. The second cap I choose a timesaving solution and just took some experience from my bracers and implied the corsette type cap. I like that one but it needs some more enhancing before releasing to a customer. For instance at the body part, there is a gap in the back between leather and tube. The lining does stretch down there but I think it can be done neater. I had a sudden change in deadline so only two weeks from build start to finish if memory serves me right. One more thing that might be of importance, I think the cap has to extend fairly long way down onto the tube, firstly for a good hugging fit and secondly adding more friction. Theese caps is wetformed to the tube so they're pretty solid when you take them off. I did try that shaking on the black tube without tightening the string aswell and gotta tell you it takes some above normal force to shake the tube of even when I held it with my fingertips at the top. There's probably alot of solutions to make other types of nice cap fastenings one can use for this cap type. One straight off my mind would be if the tube is not too long to put a handle riveted to the side of the cap and fasten the other side of the handle to the main body with som sort of good looking snap or whatever type of quick fastening there is available. Dunno if this would look good but like I said if the handle looks good..it draws attention from an area we'd rather like to have invisible. That is the essence of those caps Hope I made myself understandable and didn't miss anything obvious. I'll be glad to try to answer any questions, that is also a way of learning more..and sharing. Tom

-
One of the guys responsible for my love of mexican basketweave, Hi David! So I rounded up three pis for this post that shows how it lines up. The two first shows that there is not 100% exact wich is nearly impossible to get (I think) with a fold over, flesh to flesh tube. There is a spacing in the back that have to be filled with something that would make the cap hug the tube. That's why I did like I did on third pic, not as neat but has it's own charm and hugs the tube over the lace closing points. I used square lace wich just fits the eyelets so they're pretty tight locked when tying the knot. This last cap I tried by holding the cap and shake the tube downwards and all I got was a tiny glitch where cap meets tube. Still I did recommend the guys to seal with something if they ever were gona ship with flight or so. It was not made for bulletproof action but rather elegance.

-
Oh , thank you very much John!!! That'll be the day!!! The lacing is more about patience:-) I sit in my couch, one eye on telly and one on the needle to avoid neck stress + the couch is soft so I can move the tube around with out denting it. I really need to head of to my regular job now but I'm back om subject when I return home tonite and try to dig up some shots of the friction cap and whatever info I have on it, as you allready noticed it is not the easiest thing to make it fully align and I'm not 100% there with the design. Best regards Tom
-
Hand saw scabbard
TomSwede replied to Steveg's topic in Gun Holsters, Rifle Slings and Knife Sheathes
Cool scabbard! Looks like a chilifruit with the red colour. Lucky guys work for you. Tom -
Great looking case John!! Is that a koi fish motif? Very generous of you to share some of the problems you had. I use 2 layers of thin foam (the type used under laminated floor tiling)around the inner plastic tube for my rod tubes so I use the measurent with the wrapped innertube from start. Should I get shrinking probs or a tad too narrow cutting I can remove from those foam layer as a fail safe. I lace my tubes in the back (folded over, flesh to flesh) and then slide onto the plastic inner wich make things very critical with those measurements but I also like the foams ability to work as a cushioning to make the leather less sensitive to indents when loading in and out of cars and whatever handling they are put through. I have also used the plastic tube to make a kind of friction lock to the top cap to streamline the design more ( the idea is to make the tube look like one single piece since I don't have pockets or rivets to it). I really like the way you put the lace over the attachments for handles and stuff. A really great piece of art from you again!! Thanks for sharing! Tom
-
I have some space on my right underarm left (that sounds strange) so I was thinking it'd be cool to tattoo them all Well having a strip may be simpler after all. Good idea! Tom
-
Wonderful colour combo and that elephant is so very nice. Clean nice lacing as usual! Tom
-
Stamped riflesling
TomSwede replied to TomSwede's topic in Gun Holsters, Rifle Slings and Knife Sheathes
Thank you very much Collins! Hopefully as I get more projects going I'll be doing more varied stuff than those bracers I just plowed through. I still have some orders fpr bracers that will prolly come through. Nope, you're not the only one but most of that time goes to LW I think;-) but it's a good idea and I have some samples like this but not strip style so gunna cut a few strips to get ideas flowing in another direction but I do have a problem with poor imagination when I sit like that at my workbench. Without orders and a bit of press my mind has a tendency to turn blank (well, it usually is just like that;-) Darryl aka Sodapop thought out this border design wich really came from a beautiful rifle scabbard when someone was trying to figure the design out. Needless to say Darryl has the groover you mentioned;-) What you say about "seeing a canvas in my minds eye" is also a prob for me. I just don't have any visions to guide me for stamping patterns but that will prolly come when I get used to the tools and be more familiar with using them, A leads to B, B leads to C and so on.... I have those visions when doing bracers and nowadays a new bracer design most often gives itself and I just have to sit down and try to get it onto paper from that vision to make the transfer for leather. I hope we get a debriefing of those pressure tested ideas later on. I was going to post this one in qritiques board really but bad habit had me putting it into show off. Did same thing with last bracers set too. Critiques can really propell things forward so I always try to embrace it. I think now those strips i cased a while ago is ready for some stamping action so I'm gonna leave this topic for now with another very good quote: "ya just helped me make my work better and me, more knowledgable - thanks" Tom -
both of you and have a fine day of celebration! Tom
-
Great stuff Deneken! The flap on the last purse really cught me on and love the plastron. Clever use of the stamps makes it looks just fantastic Nice and rich colours too. Tom
-
Hello and welcome heyskippy! You're on the right track signing up here. Study around and read threads and you'll get now more about the tools. If yopu have old punches/stamps I bet they're better than the cheaper ones we buy today. take the pic of your tools and post it to get help with identifying them and their use. If you have a Tandys store or other local leather store, check their scrapbin for thicker vegetable tan natural leather to test tooling on, they're just bits and pieces that the dealer has not much use of and they sell it cheap. Don't be shy to ask any questions here, the atmosphere is very open and friendly! The board is highly addictive too. I have people asking me for some type of bags to have in their precious old american cars like first aid kit or toolbox matched to the interior of their cars that tour competitions here. So off course you can match things to your car. Door sides would be really cool with lots of tooling. Tom
-
Got me on this one Roger! The bike is very beautiful and you've added just the right touch to it. It is soooo nice to see one of those seats mounted and themed with the bike. You nailed this one down really well. Love that celtic suncross and I sure think you've seen I like to play with silver too. Is it dye or acrylic, the dye I use is soo fantastic too work with. Oh if I had the time to try a seat... Tom
-
burnishing
TomSwede replied to rootbear's topic in Dyes, Antiques, Stains, Glues, Waxes, Finishes and Conditioners.
Using fabric for a strap I think people using this method jut puts the rag in their hand and draw the strap/belt thorough it but this was not what I meant to say, just came to my mind. To me it seems like burnishing sorta happens when a few factors collide, right moisture, friction/temperature or sumting. I am getting better at slicking but have yet to learn the physics behind it. I've been most happy with results when I only used water. I've also heard that not using gum-trag will make the edge more prone to crack later on but have no validation to this saying. It didn't come from this board. Sanding the edges is a good idea, I think the edges I get from my edge bevelers looks...not too amusing. Tom -
Stamped riflesling
TomSwede replied to TomSwede's topic in Gun Holsters, Rifle Slings and Knife Sheathes
Oh thanks alot Alex. Now I blush!! Tom -
Very nice, simple yet elegant! So is that paper that you have folded and attached with lace or sumting. Hard to tell from the small pic. I like the wrap around lace..what did I say...simple yet elegant. Tom
-
has anyone ever seen a spider figure craft tool stamp?
TomSwede replied to DarkDreamsLeather's topic in Stamping
Hi hi I've seen a Spider figure behind a stamp........................ You prolly have seen our beloved member Spiders custom made makers mark stamp. Head over to his profile and look through his posts and see again if that is the one you have seen, if so he had his made by Jeff Mosby I think. If that's not the one you saw there maybe is a commercially available stamp. That's the best I can do for you now. Good luck and sorry about the bad joke, no pun intended! Tom -
Stamped riflesling
TomSwede replied to TomSwede's topic in Gun Holsters, Rifle Slings and Knife Sheathes
Thanks Bruce! Delivered "eye to eye" with my customer this morning and his facial expression was enough to let me know it landed good and solid in his heart. When selling to Swedes one can actually lower the garde a bit because slings like this is highly unlikely too see, especially stamped ones. Often they are too narrow and digs in to shoulders and the buckles are good quality but ugly and just clamped without a thought at all to the outside and really would poke any eye in here. I should have taken a pic of his original sling to show all in here. It was as customer put it "a very fine handcrafted piece but digs into my shoulder can you attach a fine looking piece of leather to make it wider" I replied that I won't crossbreed my work with that one but I'll make you a new one from scratch instead. Funny thing is that his original one had a machined stitched felt type liner and still it eats on his shoulder.. hmm now I put my set of buckles on the inside (to not disturb the stamped outside), they are beautiful to look at (a tad to wide really) and as far I can tell they wont bother his shoulder but I told him to use the sling and check out this for certain before I proceed with another one with this type of buckle setup (yes, it is a bit of a testpiece). I also set up the buckles so that they can swivel a little bit with the bodys motion in case they do touch the shoulder, the buckle is rounded smooth and quite flat so no sharp corners. So good to get any criticism cause the only remark I'd get over here is maybe over the pricetags from people who can't appreciate the time and work behind. Thanks Craftsman! I like the stylus too. I use the new one from Tandys wich actually has a quite nice touch with the leather. The answer to your question is in my reply to SteveB! Oh STEVEB!! About the stitching you mentioned first. I did use groover design because I wanted to leave an opening for stitching later on. My customer were not sure if he wanted to go with or without a liner but leaned towards going without and I just don't really like to stitch. Rather do a mexican basketweave but it takes more time and lace is expensive so that comes down to customers wallet. Finally, I don't have an edger I like so go after and sanding would be nice but costs time. The edge they produce looks very strange especially with this smaller one it seems but I might need more practice with it aswell.' Tom -
Stamped riflesling
TomSwede replied to TomSwede's topic in Gun Holsters, Rifle Slings and Knife Sheathes
Thank SteveB! Good pointers, think your right in all of them. I have a long thread with my agony over that guided groover and I did go over it one more time and grooving harder to smooth things out. My supplier carry only one size of the groover blades so I'm gonna try harder to keep things straight on the first groover run for next one. Oh rivets, I can get one size smaller and several above this one and a bag of those eats half my budget after getting a hide and still lots of tools on my needlist sooo..prioritys got me here but you're right smaller would be better. You got my eyes open now to the single tri-weave. I actually set out to tri-weave all the surface but thought it looked good with the single row and still do but I see what you mean, I like the idea of a pear shader pattern. It can look darn good with the antiquing too. The way it is now is still better than going all over with the tri-weave so glad I didn't do that but next time I'm gunna try remember this pointer and think the design over once again when I make a sudden change in the midst off anything. Not very experienced with stamping so good advice is useful. I know your wild stamping (and colouring) allways had a huge impact on me. Love it. The border thing was up for discussion a while ago when someone had seen a rifle scabbard with cool border and wanted to know how it was done. Sodapop came up with a test piece where he used the groover and laid the grooverlines with just enough space to fit his mule foot punch in between them so that is how I did it. At the narrow ends it accidentally happened so that the mulefoot fitted perfectly in the middle so I just flipped it the other way around. Oh, I used the overstitchers biggest wheel in between the grooves to mark out the points to put down the mules foot but it didn't match up all that well that I had hoped for but that is not noticed until you really study at detail level. Hope that I made some sense here otherwise poke my eye bout it and I do some pics instead. Thanks for some good pointers and observations, it's a good thing to jog the brain once in a while and break down composition and details. Stamping is a discipline of its own and doing stuff for my heavy metal customers makes no practice with it so I'm thrilled to finally getting use for my stamps. I could have skipped half of them and got more rivets but sometimes you just don't know what to prioritize and Murphys law is allways there to set you in the right direction;-) Tom -
Oh that is really nice and clean! Good design and details. Just gotta love this one, the indian head tops it off so great. Tom
-
Greetings and welcome Steve! Sure is a nice and solid heritage you have! Cases and boxes interest me personally so glad to have you here, hope we get to see some pics of your shop too. I'm sure you can make great contributions to this great place aswell as pick up something aswell. Tom