Uwe
-
Posts
2,221 -
Joined
-
Last visited
Content Type
Profiles
Forums
Events
Blogs
Gallery
Store
Everything posted by Uwe
-

Another Is This Sewing Machine Right For Me Question Adler 467
Uwe replied to kawliga's topic in Leather Sewing Machines
I have a strong feeling that you cannot test and verify the Adler 467's oiling system without power. Even with power, it took a wizard-level expert (Eric/Gottaknow) to figure out what was wrong with Venator's machine oiling system and then fix it. Perhaps I should change my previous statement to "An Adler 467 is ONLY a good starting point if it is cheap AND works perfectly (and Eric is a close, personal friend of yours) ". -
Another Is This Sewing Machine Right For Me Question Adler 467
Uwe replied to kawliga's topic in Leather Sewing Machines
The servo motors are a commodity and available from various vendors. Buy it from a vendor that gives you a warm fuzzy feeling when you interact with them. The vendors advertising in the banner ads at the top help pay to keep this site running, so they deserve a shot at your business. The simplest, cheapest and quite capable servo motor is the FESM550 style motor, made by Feiyue and sold under various brands and name variations (Family Sew, etc.) , usually in the $130-$150 price range. I have one of these installed on my Adler 67 machine I'm selling - (I just made a sewing demo video with this setup.) The Adler 467 is an evolution of the Adler 67 I used in the video, using a bigger bobbin and the complicated lubrication system, among various other design changes. Sewing specs and capabilities didn't change much from the Adler 67 through the 467 and beyond, but convenience features and complexity sure did. Old-and-simple is often better than new-and-complex when it comes to these machines, especially for hobbyists. Factory settings are a different story. Personally I feel the Adler 67/167/267 are much preferable to the later Adler models 467 and beyond, with the Adler 267 being my personal favorite in that Adler line (and I don't even own one yet, haha!) For Adler parts, it really depends on what you need and whether you want original or aftermarket parts. Commodities like presser feet, feed dogs, bobbins and such are available online from a multitude of vendors. Some vendors have a good online presence to find parts and compare specs prices - unfortunately several of the banner vendors are NOT in that group. I buy some parts directly for a manufacturer in China (Kwok Hing) and I also sell a few Adler goodies in my ebay store (see my signature below). Things like hooks (usually Hirose brand) are available form our banner vendors and online from good-reputation stores like Sharp Sewing on ebay. An original Adler hook will likely cost more than what you paid for the whole machine in the first place. No matter which machine you start with, it's an adventure (and a money sink). The Adler 467 is a good starting point, especially if you get it cheap and it's in good condition. -
I made little sewing demo video (partially in the hopes of it helping sell my Chandler/Adler 67-GK373 + FESM-550 servo motor setup.) The video may be useful to others who are wanting to use french seams. I'm just practicing on vinyl before I use them on my leather bags, but they're starting to turn out pretty nice. Here you go:
-
Another Is This Sewing Machine Right For Me Question Adler 467
Uwe replied to kawliga's topic in Leather Sewing Machines
Read the pinned post Called "Adler 467 for Venator" at the top of this section for a detailed case study on this type of machine. They're good machines if they're set up right. Other machines are a little simpler in design which helps figuring out how it all works. The Adler 467 has a complex lubrication system that challenges even trained technicians. If you're planning to have your wife learn on this machine, plan to toss whatever motor/controller it comes with and "invest" in a $150-ish servo motor. You and your wife will be much happier. Being able to go slow while learning is very important, I think. -
211G Presser Foot Sticks In Up Position...
Uwe replied to Skylark53's topic in Leather Sewing Machines
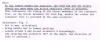
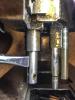
There's a chance that it's not the presser bar at all that's causing the apparent tightness/binding at the upper end of the presser bar manual lift movement. Ther are lots of parts moving when you manually lift the presser bar. Make sure it really is the presser bar that's causing the bind. Try to get some close-up photos posted here so we can see what it all looks like in real life. None of the folks who have these machines in front of them seem to participate in this thread. Assuming it is the presser bar that's actually causing the trouble, it seems to me that in order to remove it you'll have to loosen anything that clamps or otherwise holds on to the bar. Then the bar should slide freely up and down - it may need a little twisting motion and some extra lubrication. Then you "just" pull it all the way out the top. Obviously you'll have to remove the presser foot and screw, too. The bars are just that, very smooth straight bars. Don't put burrs on it with sharp plier and such. I tried this on my SInger 111W155 just now because I wanted to know. I didn't actually remove my presser bar all the way but it slides up and down somewhat freely after loosening three screws. There's nothing that keeps it form getting pulled all the way out the top except my fear of not being able to get it back in, haha. I actually DID remove the presser bar on My Adler 205 to replace a broken lifter bracket. The 205 is a VERY different machine, but same principle - loosen all the clamping bits and pull the bar out the top. Your 211G has a very different housing design and you probably have to remove the face cover first, but I suspect the internals haven't changed all that much. If your presser bar is truly bent, it may not want to slide through the bushings which are fairly tight fits on my machine. Don't force it or you may mess up the bushings in the process. Ask yourself if you can live with the bar binding a little during manual lift and be just fine while you sew. The little annoyance may not be worth the effort of removing a presser bar that is truly bent. Depending on how precious your machine is and your level of daredevilness, you may have to cut off the bottom end of the bent bar with a grinder, then file and sand down the cut burrs in order to pull it out. If the presser bar comes out easily in one piece it probably wasn't bent in the first place and likely not the cause of the lift binding. I took some picture of my machine as I was loosening the presser bar. Inserting the screwdriver in the slot and giving it a little twisting motion greatly improving its willingness to slide up and down. Don't expect the picture to closely match what your machine looks like - I just documented the general process. On my machine the three screws are either freely accessible or through an access hole. I had to lift the presser bar a little to line up the screw with the access hole. Here are the pictures, hoping they help: This block makes sure the presser bar doesn't twist as it move up and down: The spring arm presses down on this block push the presser bar down: This block allows you to manually lift the presser bar (and via linkages during normal sewing) This picture shows how I inserted the screwdriver in the foot mounting slot to give the bar a little twisting motion as I pushed it up or down.


-
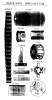
Wow, she cleaned up very nicely and makes a beautiful, long stitch on a big stack of leather. Does your machine actually have reverse via the stitch length lever? Those backstitches look perfect! Just based on those pictures, I'd say you have a winner and survivor on your hands - congratulations! The numbers in the third picture sure look a lot like "Kl 20 No 2" to me (Klasse 20 Nummer 2). Also, the second to last picture has the part stamped with 20122, which corresponds nicely with Adler 20 part diagram's part number of 20 00 122 0 (All those extra 0's wouldn't fit on the part anyway, haha). I'm ready to go "All in" (in poker terms) that this is an Adler 20. As far as the feed dog height goes, it looks locked down to me, too. That pin that goes right through the center of it all prevents you from adjusting the feed dog lift arm position on the shaft, which would adjust how high the feed dog moves during the cycle. I don't see that silver lock pin in any of the parts diagrams, so it may have been added afterwards to make SURE the feed dog height never changes. Without that pin, it would be easy to adjust the lift arm position for the feed dog height. Many machine's service instructions direct you to adjust the feed dog height so that the full height of the teeth is exposed above the throat plate while it transports. Is yours far off from that? That feed dog itself doesn't look like a super complicated part. You could perhaps have one custom made by a machinist with a height that suits you. Or file down an existing feed dog if you have extras.
-
After fussing with the safety clutch on my Singer 111W155 for two days to get it to work properly, I decided to make a video to share some of the things I learned in the process. I have three similar machines, the Singer 111W155, a Consew 255, and a Tacsew T1563 (which is a Juki 563 clone) All these have similar safety clutches, but they are different in some aspects. Both Juki and Consew are adjustable in how much force it takes to trip the clutch. The Singer 111W155 safety clutch (at least the one I have) is not adjustable and mine takes a LOT of force to trigger it. I thought it was totally seized up but it really just takes a lot of force to trigger. I had removed the Singer safety clutch to clean it properly (overnight oil bath, three rounds in the ultrasonic cleaning spa.) I still could not trigger it inside the machine, but it does trip if I use a pair of pliers. So it works properly, it just takes a lot of force. Remember, don't mess with your timing belt unless you have to. Mine was flexible enough to slide off the cog wheel - yours may not. Don't force it and don't call me if you rip, tear or otherwise ruin your timing belt. Installing a new timing belt is a major pain from what I've heard and I haven't even done it yet. In any case, here's the video on safety clutches:
-
Thanks for all the positive feedback, guys! I just bought a Juki 563 class machine (a Tacsew T1563) that I'm working on. I'll probably make a stitch length balancing video with that machine over the next month or so (once I figure out how to actually do it). Not sure if the Consew machines have the exact same reverse mechanism, though. The hook is a brand new hook as it arrived in the Hirose box. I had just installed it. I noticed the slight blue color on the tip, too, but I can't say why that is. Perhaps it' s due to a special heat treatment they do to the tip of the hook at the factory. Hirose seems to enjoy a pretty good reputation as a hook maker, so I hope it's okay. Time will tell. The hook was only $35, not a huge investment, and the new hook was big improvement over the old one.
-
Show & Tell: Needle Feed Platform For Durkopp Adler 205-370
Uwe replied to Uwe's topic in Leather Sewing Machines
I had noticed that guide in one of other posts. It's a neat and unusual edge guide solution. It seems to me like that style edge guide would not interfere with installing the needle feed platform (I'm pretty sure that it would interfere with installing the flatbed table attachment, however.) But I'm quite certain that you would not be able to USE that style edge guide while the needle feed platform is installed. The guide wouldn't be able to flip up and into position. In order to use an edge guide with the needle feed platform installed you'd need a suspending edge guide that comes down from above (like the KG-867). A suspending style edge guide would work with both the needle feed platform and the flatbed table attachment. -
Some machines have parts with numbers stamped/cast right on them. This might be a way to determine brand. Look for parts with numbers on it that are likely original to the machine (not that shuttle race) and compare the numbers to the Adler 20 or Singer 7 parts diagrams. Hopefully, you'll find enough matches to tell you with a degree of confidence whether you have an Adler or Singer (or a mix like 90% Adler with 10% Singer spare parts).
-
I don't think it matters a great deal exactly which grease you use (oil is a different story). I'm using Tri-Flow brand clear grease which I got on Amazon, mainly because it's all synthetic, clear, and doesn't stain my clothes (Tri-Flow also makes good synthetic oil for sewing machines.) My Chandler/Adler 67 machine had reddish-brown grease packed inside the hook gear casing (you can see it in my Adler 67 hook timing video) Eric (gottaknow), our resident experts who maintains a factory full of machines, uses regular white lithium grease on machines in his factory.
-
Now that you have the machine in front of you, take a bunch of detailed pictures and post them here, particularly stuff with numbers or other identifying marks on it. I'm still voting for Adler due to the shape of the head. Often parts are interchangeable between brands and models, so they may have installed a Singer race at some point because it was available and cheap. Does this machine really have two needles and shuttles? I think there was a lot of customization going on back then, too. If you owned a factory and needed a few dozen machines to perform a special sewing operation, Singer or Adler would just build a small custom batch for you, a variation based on an existing mainstream model. There's usually no documentation for those custom-built machines. All you can hope for is figuring out what mainstream model it's related to and try to find parts that route.
-
Well, "Bantam manually operated machine" really narrows it down, doesn't it? Do you have any pictures? Do you have any links to what you saw online that you liked? Personally, I've never even heard of a Bantam machine before. Share with us what you know about it.
-
Mystery Vintage Singer Sewing Machine With Top+Bottom Feed
Uwe replied to Uwe's topic in Leather Sewing Machines
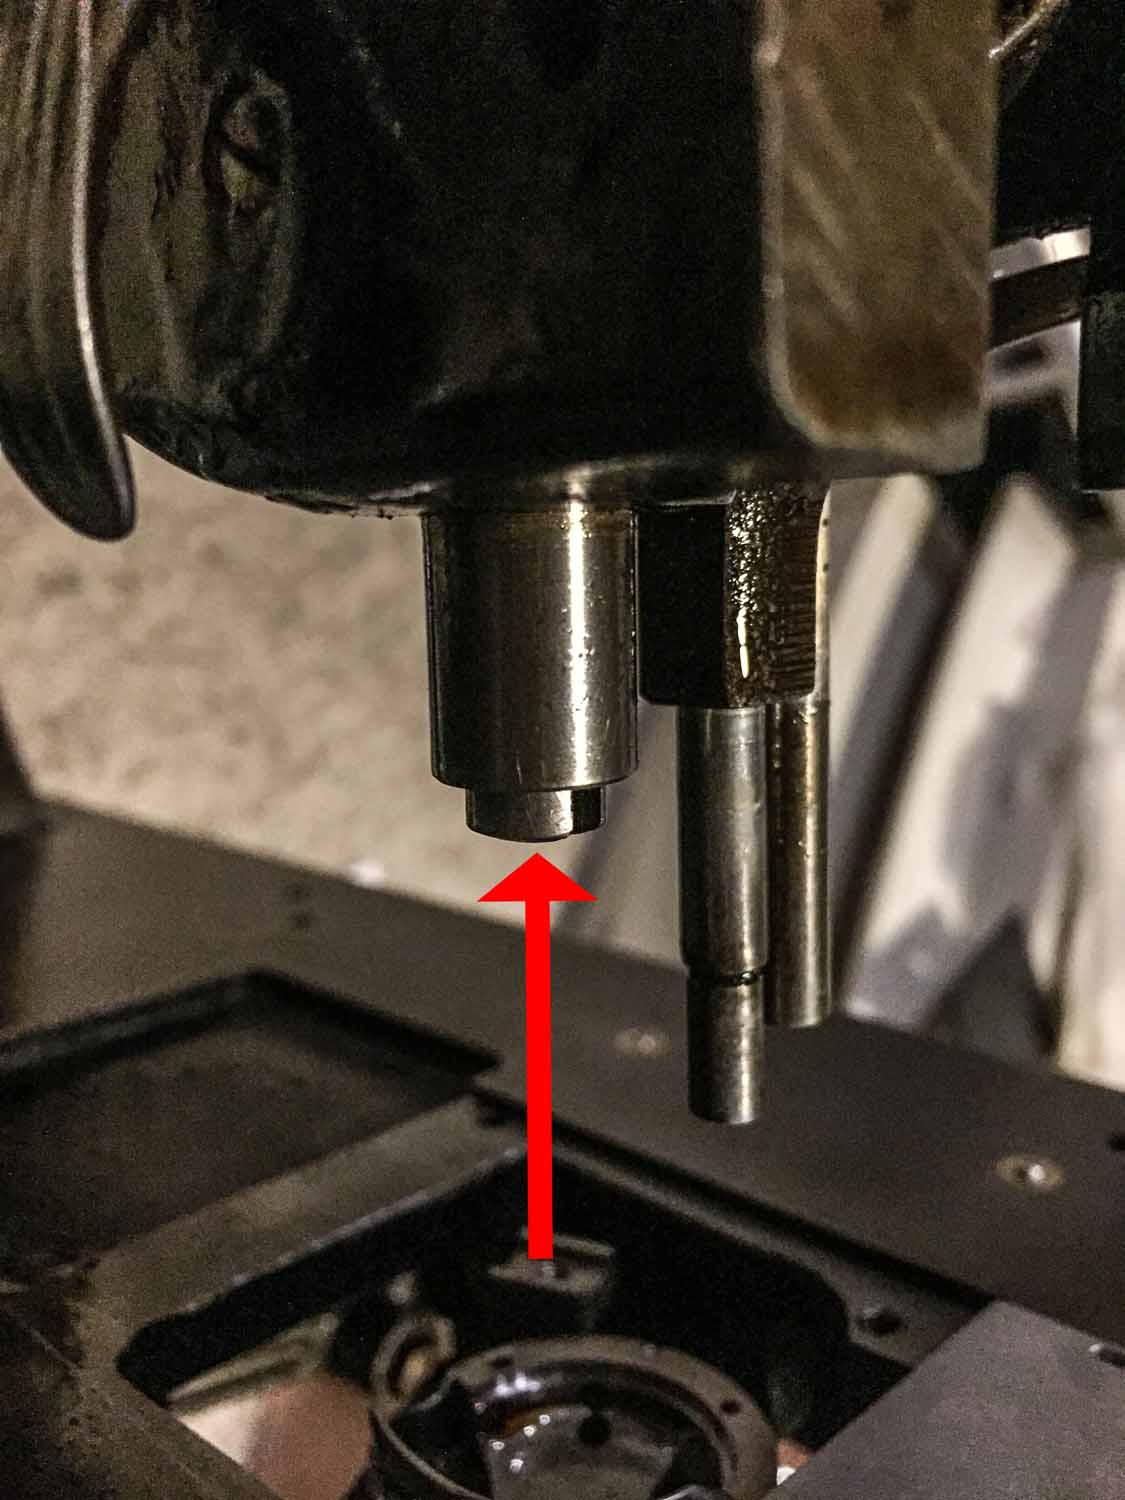
Schmetz has a handy needle size chart that shows how Singer needle sizes match up with modern Nm sizes: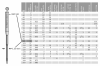
-
Mystery Vintage Singer Sewing Machine With Top+Bottom Feed
Uwe replied to Uwe's topic in Leather Sewing Machines
Compound feed means the material is moved three ways at the same time: Top Foot + Bottom Feed Dog + Needle The Singer 111W155 has proper compound feed. On the Singer 16-188, only the Top Foot + Bottom feed dog move the material. The needle does not help move the material. The Singer 16-188 takes needles of type 16x63 (fabric) or 16x64 (leather). The needles are available in Europe from CollegeSewing in the U.K. , but the available sizes seem to be limited. The machine can use needles from size 14-25, but I've only seen needles for sale in a few select sizes, up to size 22. -
Cylinder arm machines in good working condition tend to command a significantly higher price than similar flatbed machines. If you can get this one going, good for you. Just keep an eye out for when this project machine might become more of a burden than a bargain.
-
To post pictures of a machine that was pulled from the smoldering remains of a factory fire after they lifted the massive H-beam that had fallen on the machine, click the "More Reply Options" button in the lower right. It will then show you options to upload picture files.
-
This just gets better with every post. Now I want to see what a machine looks like after surviving an event hot enough to melt the timing belt.
-
You don't have the old belt anymore to confirm length and tooth count? Now I want to see some picture of how a walking foot machine gets converted to a wheel feed.
-
So, tew45, is the belt you received 25 3/8" long with 41 teeth or not? If it is the size and tooth count matches the part number you need, but it's four inches too long for your machine, then something else is wrong. Does the belt that's currently in your machine have 41 teeth or not?
-
Who knows what's going on in warehouses across the country. I'm sure parts get mismarked or put in the wrong bin a lot. Without pictures of what tew45 actually has, I'm just going by information that's available online. Are the parts manual diagrams I linked to for the 153W100 and the 153W104 not correct? Because they surely show different timing belts.
-
Often the machine itself is cheap, but if it's not local the shipping may be an arm and a leg. We really need to know where you're located at (Tennessee, Tasmania, or Tanzania?) to give more meaningful answers.
-
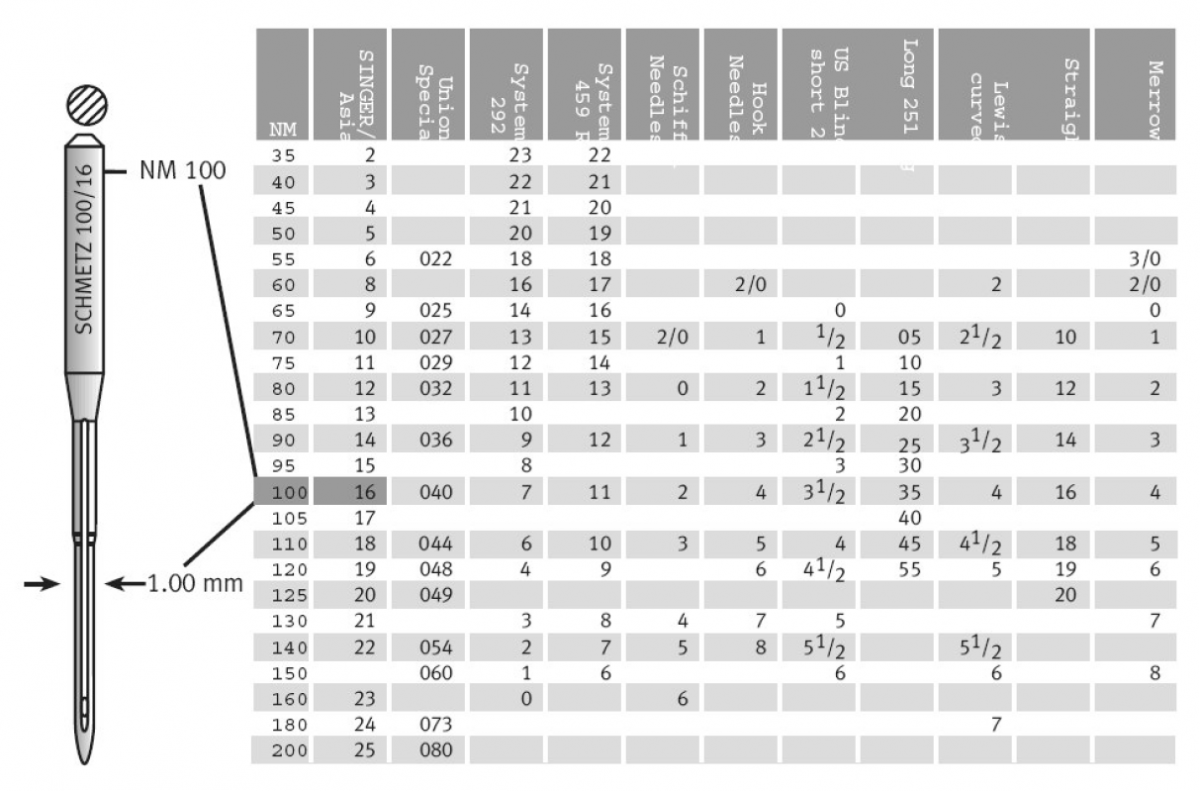
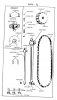
The Singer 153 has several sub-models and they use different timing belts. Saying a part fits a Singer 153 model isn't really enough information. You need to know which sub-model they're talking about. According to the Singer Model List, the 153W101 is the same a 153W100 but with alternating presser feet. So the 153W100 should be the right Singer 153 sub-model to choose parts from for everything except the alternating presser foot bits. The parts list reference at UniversalSewing.com has a Parts List for the Singer 153W100 which shows the timing belt as part number 235003 which runs $37 at CollegeSewing.com in the U.K. but is probably available from U.S. vendors as well: The timing belt #224195 you got is the one that goes with the Singer 153W104:
-
Ouch, sorry to hear about the untimely demise of your hook. I'm not really familiar with the 206RB, and I don't even know if the 206RB's use an identical hook between the various versions RB1-RB5. Chances are you have to go through the hook timing procedure to get things aligned properly after you install the new hook. Personally, I want to see a picture of a broken hook, not to embarrass you, but to learn and see what actually breaks on a hook when it breaks.
-
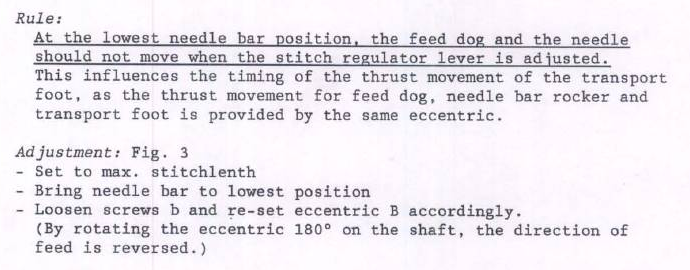
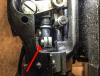
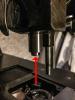
Make sure you spend some quality time with the Durkopp Adler 267 Service Manual. The tightness/binding/rubbing may be caused elsewhere in the system, nowhere near the hook or needle. I had one machine where if I set the foot lift to the max, the wing screw was slightly touching the housing, causing a tight spot during the cycle. Sometimes a machine that's been used on one setting for very long time builds up crud or dried oil varnish at the end of rods etc., causing increased friction or apparent binding if you change the settings. Oil every spot that needs oiling. Clean and oil any open moving surfaces that touch. Remove the motor drive belt from the hand wheel and loosen the foot pressure spring all the way for testing - there is some normal increased pressure as you compress the spring up during the cycle. Without spring pressure the handwheel should turn easily without "tight" spots - if not, keep looking. Inspect and clean the gears if needed - perhaps something is stuck in the teeth that gets squeezed with every turn. I'd visually inspect all of the moving parts I can see (top/bottom/inside) as you turn the wheel. Look for things touching that shouldn't. Since the feed mechanism is not quite right and not "centered" properly to give equal forward/backward stitches, that's a good point to start. According to the manual, with the needle in the lowest position and flipping the stitch length lever all the way up and down, there should be NO forward/backward movement of needle/feet/feed-dog. If things move in that needle position your forward/backward stitch length will not match. Page 9 of the service manual has this section on how to adjust: Eventually, you'll want to go methodically through most of the service manual front to back in sequence and check any applicable "rules" of the manual against your actual machine. Adjust things that don't match the rules.