Uwe
-
Posts
2,221 -
Joined
-
Last visited
Content Type
Profiles
Forums
Events
Blogs
Gallery
Store
Everything posted by Uwe
-
I think I can safely take "repair ringworm infested horse blankets" off my list of things to try.
-

Difference Between Consew 206Rb-4 And 206Rb-5
Uwe replied to sfmiaw's topic in Leather Sewing Machines
Am I the only one who wishes somebody would post a photo to show what they're talking about? -
Don't take it personal. Most people click on the topic because the title doesn't say much in itself, to find out you're asking about specific advice on a machine they've never even heard of (the Wimsew brand). The Pfaff is a well respected original, well known and broadly discussed class of machines. Good quality and expensive parts. Same general benefits/drawbacks as any other walking foot flatbed machine in the same class. The Wimsew appears to be a local clone brand, which is why nobody outside of the UK know much about it, including me. There are lots of past discussion in these forums already on the relative merits of flatbed versus cylinder arm machines. Some folks grow weary of answering variations on the same questions over and over again. Not your fault, I'm just stating a fact. Do a Google search like "site:leatherworker.net flatbed or cylinder arm" to find out what people have already said about the topic. Then, if you have specific questions, post it with a meaningful, descriptive topic title. Also, search for make and model of the original brand that a particular clone is based on to find relevant information. The folks who make Wimsew will be able to tell you which machines it's based on, or do a Google image search to find machines that look identical, save for the nameplate (originals are names like Pfaff, Adler, Durkopp, Juki, Singer, etc.) It may take you less time than I just spent composing this reply and it will get you much better response rates and more meaningful information.
-
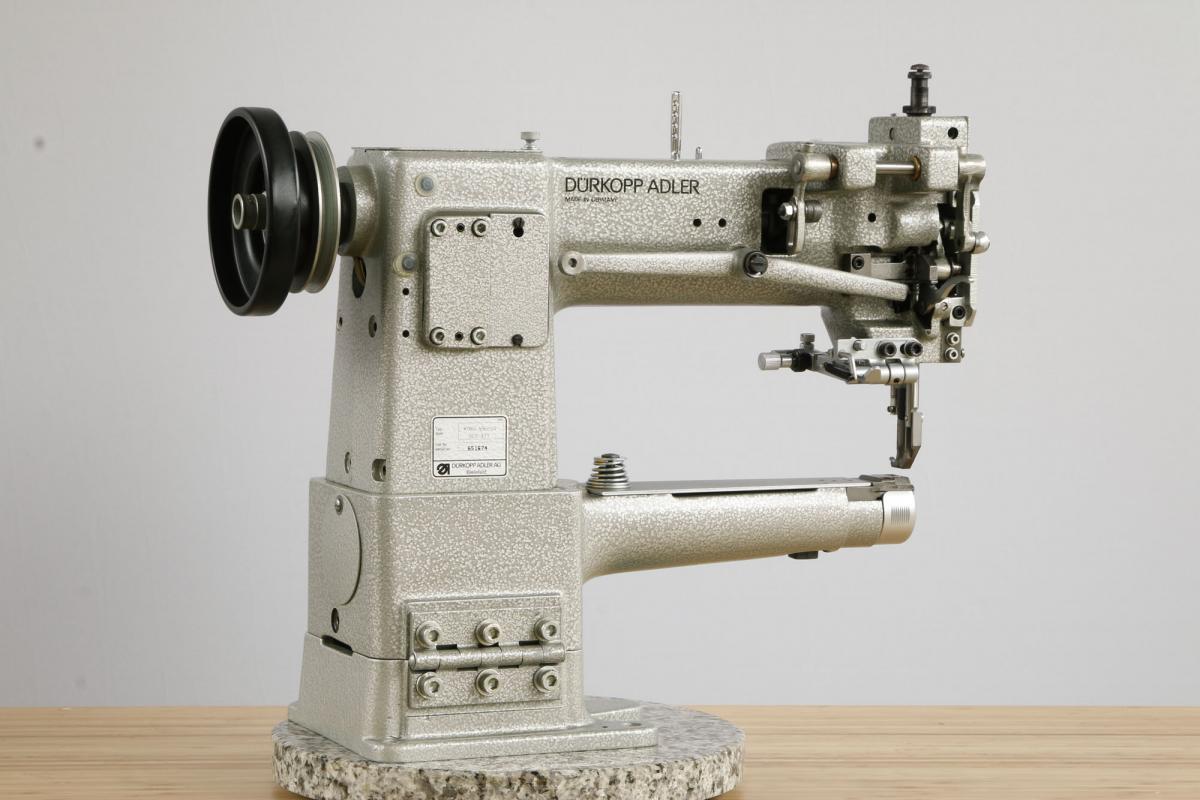
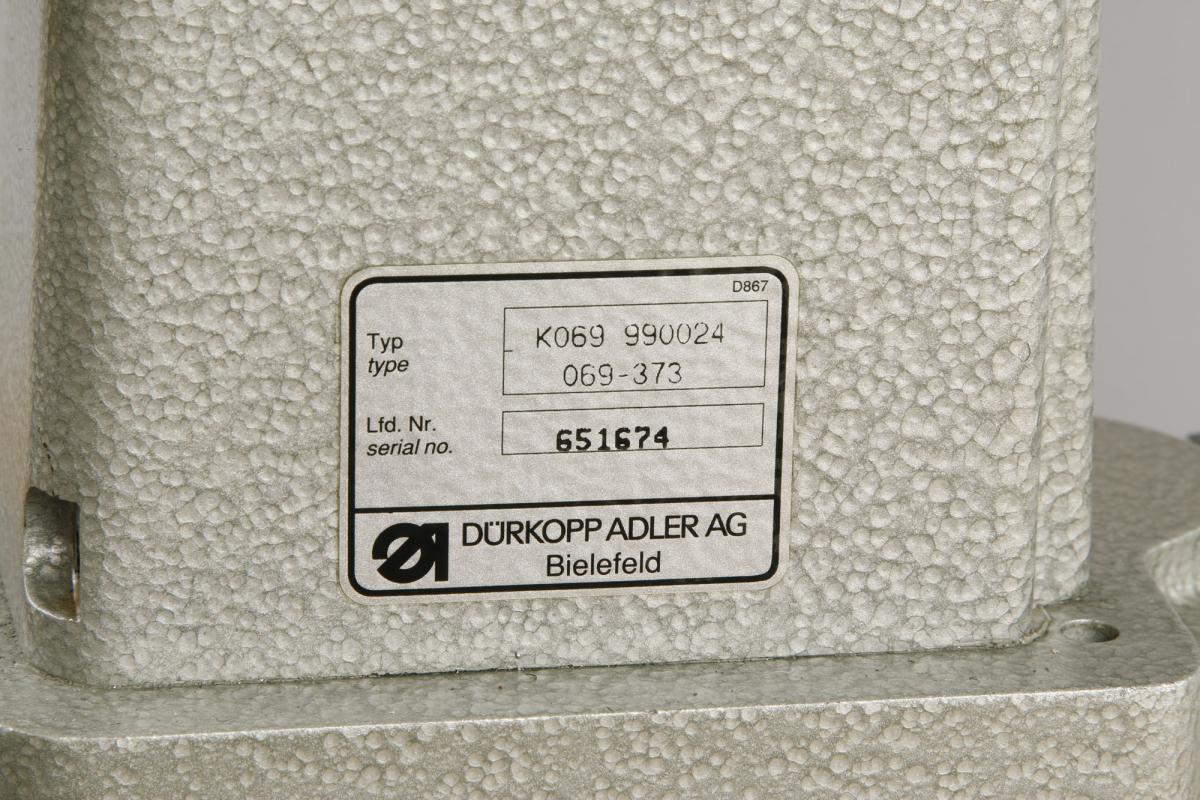
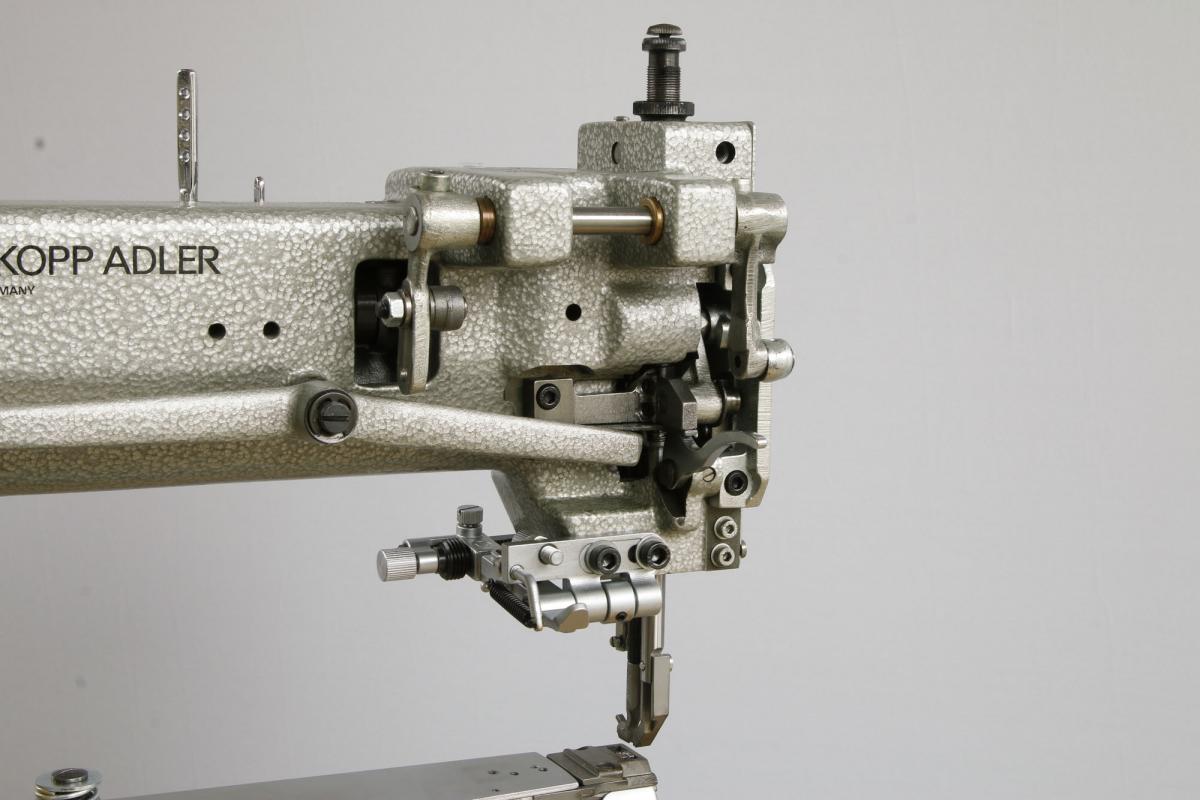
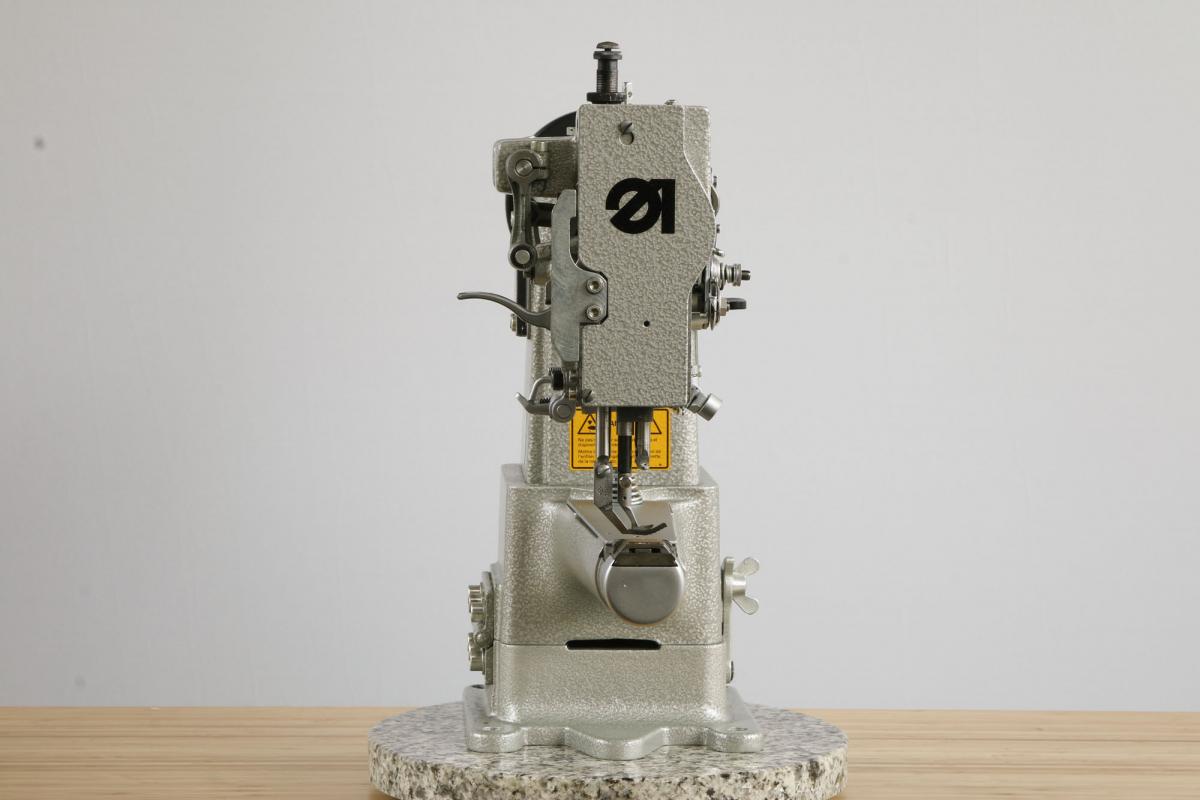
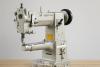
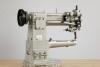
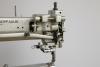
I am somewhat reluctantly putting my Durkopp Adler 69-373 up for sale. I'm reluctant because I know I will never put my hands on a nicer example than this one. Some of you may know that I spend considerably more time working ON sewing machines than I do actually sewing things with them. The "problem" with this machine is that there is absolutely nothing to work on because it is totally pristine. I'm rather afraid to accidentally put a scratch on it. I has seen perhaps an hour or two worth of actual demo and test sewing over its entire life, and it's been cared for by a small group of LW members since it was new. I've mainly used it to design and test-fit a flatbed table attachment for this class of machine. I installed a swing-down guide on it using existing mounting holes. Price for the head is a firm $2,000. (It's also on Ebay, but for a higher price due to various fees associated with that channel). I'm located just outside of Detroit and I'd really rather not risk shipping this machine, but if you insist I can build a custom padded plywood shipping box for it. Packing+Shipping runs a flat $175 within the continental US. Weight of the head is 63 lbs. Packaged up and ready to ship it will be close to 75 lbs. Manuals: Durkopp Adler 69-373 User Manual Durkopp Adler 69-373 Service Manual I have a full gallery of photos posted here: http://proofs.uwe.net/sewing Here are few samples from that gallery:
-
Show & Tell: Thumb Controller For Needle Positioning
Uwe replied to Uwe's topic in Leather Sewing Machines
I'm just the nerdy little kid at the science fair where most people shake their heads as they walk past the display and only a few pause to nod in appreciation. The project is really about solving the engineering puzzle of building a programmable, computer controlled motor drive system from scratch to learn how these technologies work. I enjoy solving engineering puzzles like others enjoy reaching the next level in Candy Crush Saga. I'm not expecting other leatherworkers to actually do this. I wanted to show a practical application of an Arduino based controller for powerful stepper motors with fingertip control. It's mainly a contribution to encourage folks in the Arduino and Maker community. I also wanted to have a functional motor drive system that behaves exactly the way I want it to with precision and power, and to be able to teach it new tricks with just a few lines of software code. It's not marketable for various reasons. It's also not adaptable to make the current crop of servo motors (let alone clutch motors) behave like this. It's not a DIY project for the masses, but rather for the very geeky few. I pieced things together from various sources, including Arduino Sketch software code snippets to interpret the rotary dial's grey-code signals. The hardware was sourced from my local music store, Ebay, Amazon, Adafruit, etc. I'll do a more detailed write-up and video with parts lists and software code over the next week or two. -
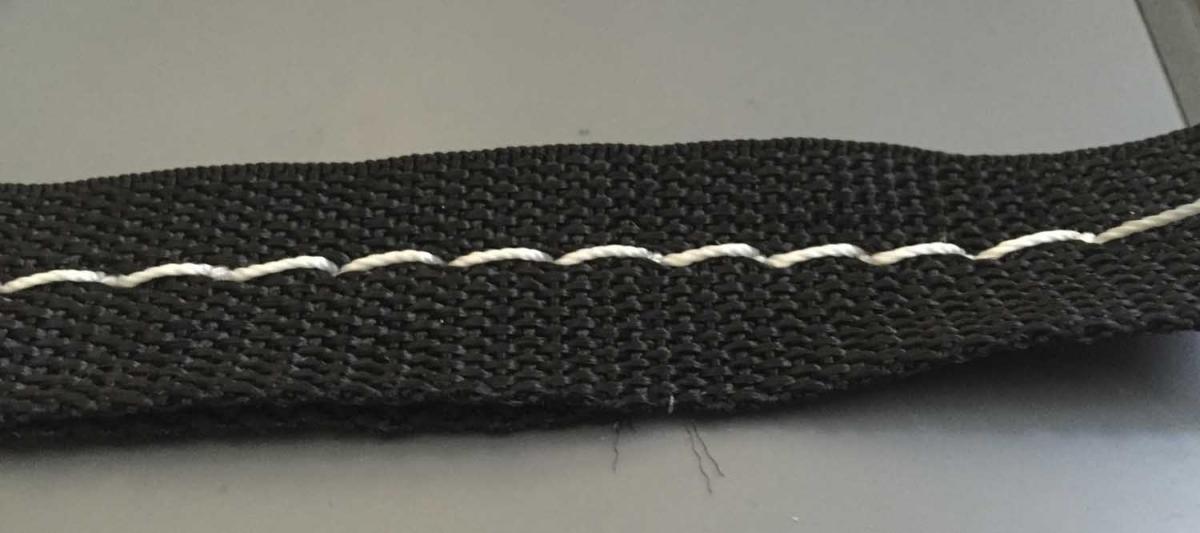
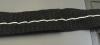
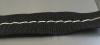
When People talk about ounce weight (e.g. 5 oz.) here, they really are referring to the thickness of the leather. The weight of leather and fabric is not a direct comparison. 5oz leather weight/thickness equals about 2mm of thickness. I had some nylon strap material laying around that is roughly the same thickness are your fabric at about 1.1 mm, which I wouldn't classify as "thin fabric". I sewed it on my Adler 205-370 both single and double layer, using a size 27/250Nm sharp point needle and #415 bonded polyester thread. It worked out okay, actually. That seam is unlikely to let go anytime soon. I'm going to revert to my usual "Just try it!" approach to giving advice. Here's what it looks like. Double layer in the left side of the picture, single layer towards the right. Top View: Bottom View:
-
Can you? Maybe. Should You? Probably not. A 441 class machine is not the right tool for the task. Even if it were, trying to sew thin fabric with #346 thread may be an exercise in futility. It probably won't look right because the fabric is too thin to bury/hide the thick knot.
-
Source For 206Rb5? (Should I Consider A Different Machine?)
Uwe replied to Dougster's topic in Leather Sewing Machines
Go for it! Those are really nice machines. Coming across an nice used machine locally is a lucky break. -
The flatbed bed size of the Durkopp 239 looks to be a standard industrial bed size and should be the same as the Consew 225. The hinges can be found online at College Sewing in the UK : https://www.college-sewing.co.uk/229-58052-RUBBER-HINGE-ASSEMBLY-JUKI-DDL There are slight variations in the rubber part of the euro-style hinges. It's perhaps best to get the hinges first and then make your cutout fit them. The hole locations where the metal hinge part plug into in the back of the machines bed should also be standard. For my table I plugged the hinges with rubber part into the back of the machine and took precise measurements to get the hinge pocket locations and depth just right in the cutout. Don't expect to get it right the first time. I recommend using cheap plywood for testing before you cut precious wood. Once it fits one machine, it should fit all the others with the same bed size. In order to separate the pedal from the table, you'll need to get a servo motor that has discrete parts (Motor/Controller/Speed-Input) . This way you can extend wires to make a flexible electric connection between the pedal speed input and the motor controller, instead of the usual rigid mechanical link, similar to this:
-
Show & Tell: Thumb Controller For Needle Positioning
Uwe replied to Uwe's topic in Leather Sewing Machines
That sound may be me wheezing. I actually had to turn down the sounds of the original video almost entirely because the step motor makes and infernal racket at slow speeds right now. It's dead quiet when stopped, and has an agreeable hum at high speed, but low speeds are a very disagreeable racket right now. The motor is just clamped to the table top for testing and every slow step it makes acts like a speaker coil with table top pretending to be a sound board. The programming is indeed a big part of how the button (or any part of this motor drive system) behaves. Arduino programming is fun in a very geeky way. I just knew those engineering, math, and computer science degrees would come in handy some day! I plan to add a little touch screen to allow changing parameters and such. I actually LOVE how well the speed pedal works. I'm using a modified Ernie Ball brand musician's sound effect pedal to control speed input: Not exactly cheap at around $70, but it's by far best, most gradual and precise low speed control I've had so far. None of this weird optical gradient hacking, just hundreds of usable, gradual steps of speed input. I initially bought the pedal to control a Variable Frequency Drive controller, but those 3-phase inverter class motors are wicked expensive,huge, and heavy. The pedal works perfectly as an Arduino input device and it's beautifully made, almost carved from solid aluminum. -
I've been wanting to install a retrofit thumb control knob for needle positioning on one of my machines ever since I saw it on that new Adler 969. My Tacsew T1563 made a good candidate to try a few things out, and it actually works! The entire project of installing an Arduino controlled high-torque precision step motor drive is rather complex and I'll post more details later. This video is just about how the thumb control knob works:
-
Advice Buying Leather Sewing Machine
Uwe replied to stormtroopersse's topic in Leather Sewing Machines
We really have no idea whether a particular machine is any good or not by looking at the ebay auction post. Nearly all brands and models of sewing machines that are suitable for leather work have been discussed on this forum before - usually at length. Do a quick basic research on any machine you're considering on this site to see what has been discussed before. It'll take you just a few minutes to decide if it's a desirable kind of machine or not. Use the "site:leatherworker.net make model" template to search. For example, type "site:leatherworker.net adler 69" into the Google search window to see what folks have said about that model of machine before. If nothing pops up, that's also a sign that you're looking at a machine you should avoid. As for individual ebay auctions, you are pretty much on your own. We can't tell you whether or not, or how much to bid at an auction. -
What does "directly through Cobra" actually mean? Are you referring to the "Home of the Cobra" Leather Machine Co. in Los Angeles? Not sure how they relate to the Cobra brand, really, other than being one of the vendors for the brand. Toledo Industrial is "Home of the Cowboy" according to their website, but they're not exactly "directly through Cowboy" either. You're located about as far away as you can get within the continental U.S. from pretty much all of the usual vendor suspects, so anything you buy will need to be shipped. Talk to the vendor candidates and find out how many levels of redirection are involved to get to the source of the brand and "the buck stops here" kind of support.
-
Advice Buying Leather Sewing Machine
Uwe replied to stormtroopersse's topic in Leather Sewing Machines
Check out this Juki Lu-563 - it's one of the cleanest and most honest looking machine on Ebay UK in your price range, I think. The flatbed part has been repainted, but the top looks totally original and very clean. The Juki LU-563 machines are great machines, easy to maintain and adjust, and they have good specs and parts availability. -
Advice Buying Leather Sewing Machine
Uwe replied to stormtroopersse's topic in Leather Sewing Machines
I would approach obviously repainted machines with a healthy dose of caution. I always view machines with crude stickers that say "Adler" (or whatever the brand name is) in the wrong font as a sign of a poor lipstick-on-a-pig type rebuild. That cylinder arm machine falls in that category. I'm also still not sure how Kochs Adler ever allowed authentic machines to leave the factory with their company name misspelled on the type plate. The type plate on the Adler 167-72 says "Kochs Adlernähmaschinen Werke AG" when it should say "Kochs Adler Nähmachinenwerke AG" I would advise against buying a machine on Ebay unless you can inspect it in person to make sure it's in good working condition, or you REALLY trust the seller. Adler machines in general are good machines as long as they're authentic and not worn-out factory zombies with a quick repaint. A machine with lightly/moderately worn original paint is preferable to a machine with questionable re-paint in my mind, because is gives a more authentic picture of the past life of the machine. The Adler 167 (and many other makes/models) came in various subclasses and configurations with varying specs. Read up on the model brochures like the Adler 167 Brochures to make sure the model you're considering is suited for leatherwork. The Adler 167-72 is okay, but not the best version in that model line for leather work (the 167-73 has more desirable specs). Big needles and thread capacity, large stitch length and foot lift are usually a good sign, as are certain model number extensions like -73, -373, -370 for certain Adlers. All three machines in your list are repaints with various issues. I'm not sure any of them are a really great candidate. The whole "which model" topic is quite complex, I'm afraid. -
Effective Way Of Removing Paint From A Flat Bed
Uwe replied to Constabulary's topic in Leather Sewing Machines
Thanks for sharing! I had used a chisel tool similar to this one to chip off the old paint from the flatbed part of a machine a while back. The chisels are nice and narrow to get into tight spots and corners they work great on flat surfaces, not so much on curved surfaces. Looks like it's just about ready for new coat of paint on the flatbed. Do you mask off the little spring balls in the oiling holes to keep paint off them? I was worried about getting paint in there and my last paint project got messy around the oil holes. -
Just turn it over by hand to make stitches until you figure out what's going on. When I make major changes or adjustments I always check everything out first with hand-turned stitches before I even attempt to run it under power. A lot of bad things can happen under motor power that won't happen if you first turn the wheel by hand and observe, listen and feel how the machine works.
-
Does the Twilight Zone Theme play while this is all happening? That exact double stitch length in reverse is just too freaky. Make a video of that. The only real explanation of that would be a stitch length mechanism that's WAY out of adjustment. Is your feed dog movement correct after re-installing the cam? Check feed dog movements without any material and verify they make sense, both forward and reverse. Test sew a piece with NO thread, forward and reverse. If stitch length still changes it's clearly not the thread that's causing it. Does the material slip a little when the needle is above the material? That's the only time it really can slip. Perhaps the outer presser foot is not holding the material down with enough force to keep it from slipping. Thread tension does play into this to some degree. If thread tension is too high it may yank the material towards the needle a little as it's pulling the knot tight and pulls more thread from the spool. If the material is not slipping, perhaps the transport mechanism or linkage is slipping when the going gets tough or reverses. Make sure all the screws and bolts involved in the stitch length mechanism are tight. Does the stitch length lever move when this happens? That level should stay wherever you put it and it should not move as you sew.
-
Something like this Yamata FY5318 setup on CL might be a good candidate in your area. Nice looking garment class machine, table and a servo motor. You should be able to swap heads without major modifications (other than removing the Yamato's oil sump pan, which often just sits in the opening).
-
To make a complete setup, you'll need a tabletop with a suitable cut-out, K-legs with a pedal, a motor, and a belt. Most people who consider buying just a machine head already have a few machines and want to upgrade, or they've built or mixed/matched a few heads and tables and are not intimidated by the task. I wouldn't recommend going that route if it's your first machine. It's not that hard if you're handy and once you've done it a few times, but I can imagine it being very frustrating starting from scratch without a reference point. On the plus side, the industrial tables and motors are interchangeable to a large degree. The whole system is designed for the factory where if a machine fails, the tech stops by and quickly swaps machine heads to keep the worker productive, while the tech works on the faulty head in the shop. Motors are compact and easy to ship, they run about $130-$150 shipped for simple, good servo motors like the FSM-550 series available from the banner vendors. K-legs (or H-legs) are also easy to ship when they're in pieces inside a carton, like an erector set. Those run perhaps $80-$100 shipped. The table tops nowadays are cheap laminated particleboard affairs, but they're big,heavy, awkward and relatively expensive to ship. You're looking at $100-$120 shipped. Make sure you tell the vendor what sewing machine it's for so they know what cutout you need. The belt can come from your local hardware store or automotive parts store. Just about any "3L" type V-Belt will do as long as it's about the right length within a 2"-3" range. Getting the right length can be tricky and you won't know for sure what length you need until you have the table set up, the motor installed and the machine sits in the table. Lucky for me my local non-chain hardware store has a large selection of cheap ($6-$9) belts in 1" increments from under 20" to over 50" in length. I bought one belt at an automotive store and the poor clerk was utterly confounded after I couldn't provide a year and model of my car, and "I need a 3L V-belt between 40-42 inches long" did not compute with him. The total table+motor setup new from scratch runs about $300-$400 shipped. Not exactly cheap if bought separately. Package deals from vendors usually lower that cost to some degree, since everything gets shipped on one pallet. If you have a local-ish industrial sewing machine dealer, you can save a lot on shipping costs and probably get a complete table/motor setup for $200-$250. You can also scan local craigslist for a complete, cheap setup ( I saw a vintage $150 Singer, and a new-ish $350 Yamato with servo motor in your area listings) and then swap out the head and sell the original head again on CL ("Works! Sews everything!") I bought one machine simply because the table was beautiful and the whole setup was only $150. Again, I wouldn't recommend going that route if it's your first machine.
-
That Pfaff 467 is a strange design and you may have a very hard time finding parts for it. The Juki 563 and Adler 167 are very common with lots of parts available, both are very good designs with nearly identical capabilities and comparable quality. My advice would be to avoid the Pfaff and toss a coin between the Adler and the Juki (if they're in similar condition).
-
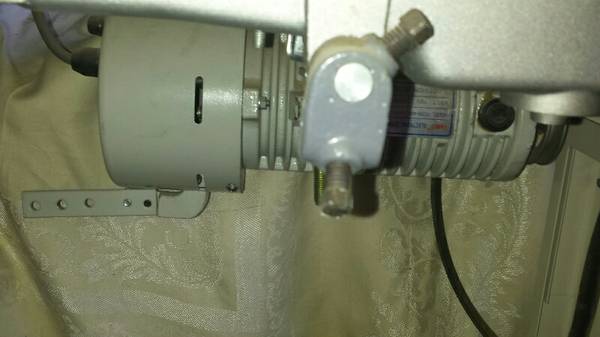
The common naming of the two springs adds to or creates much of the confusion, I think. My topic title doesn't help either, come to think of it. The springs and corresponding adjustment screw really should be referred to as big/major/rough adjustment for the big leaf spring in the back and small/minor/fine/incremental adjustment for the small coil spring because both springs affect foot pressure for both feet. The big beefy leaf spring in the back of the machine provides the big/major/rough pressure. It changes pressure for BOTH feet by about 4 lbs (~2kg) of pressure with each full turn of the adjustment screw on my machine as measured by the scale. The comparatively small and weak coil spring inside the head provides small/minor/fine/incremental adjustments for fine-tuning. It changes pressure for BOTH feet by about 4 oz (~100 g) with each full turn of the adjustment screw. So if either of the feet leave marks, you need to adjust the pressure of the big leaf spring before fiddling with the small adjustment spring. The generally smaller inner foot will show marks before the outer foot mainly because the inner generates a higher pounds per square inch pressure due to the smaller contact surface. Most people can probably safely ignore the fine tuning spring adjustment knob entirely.
-
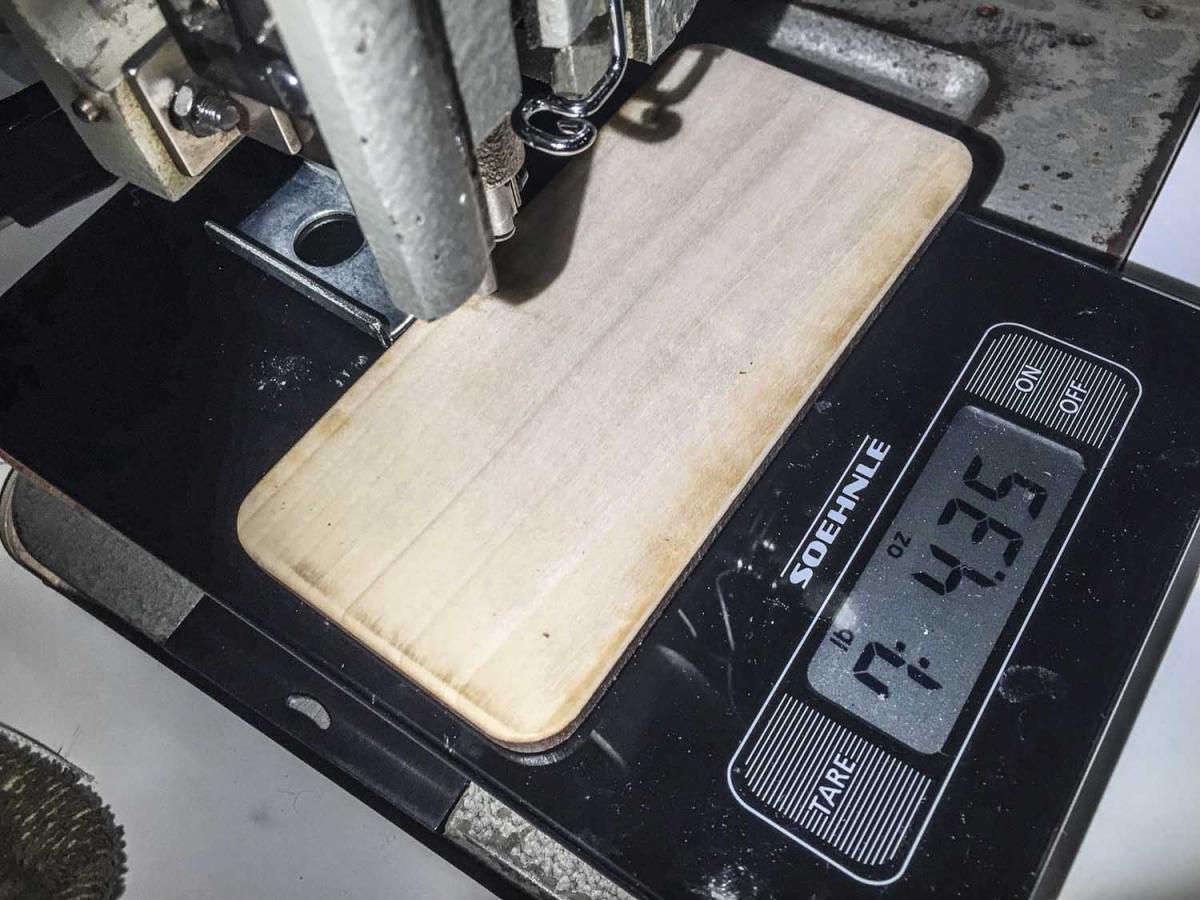
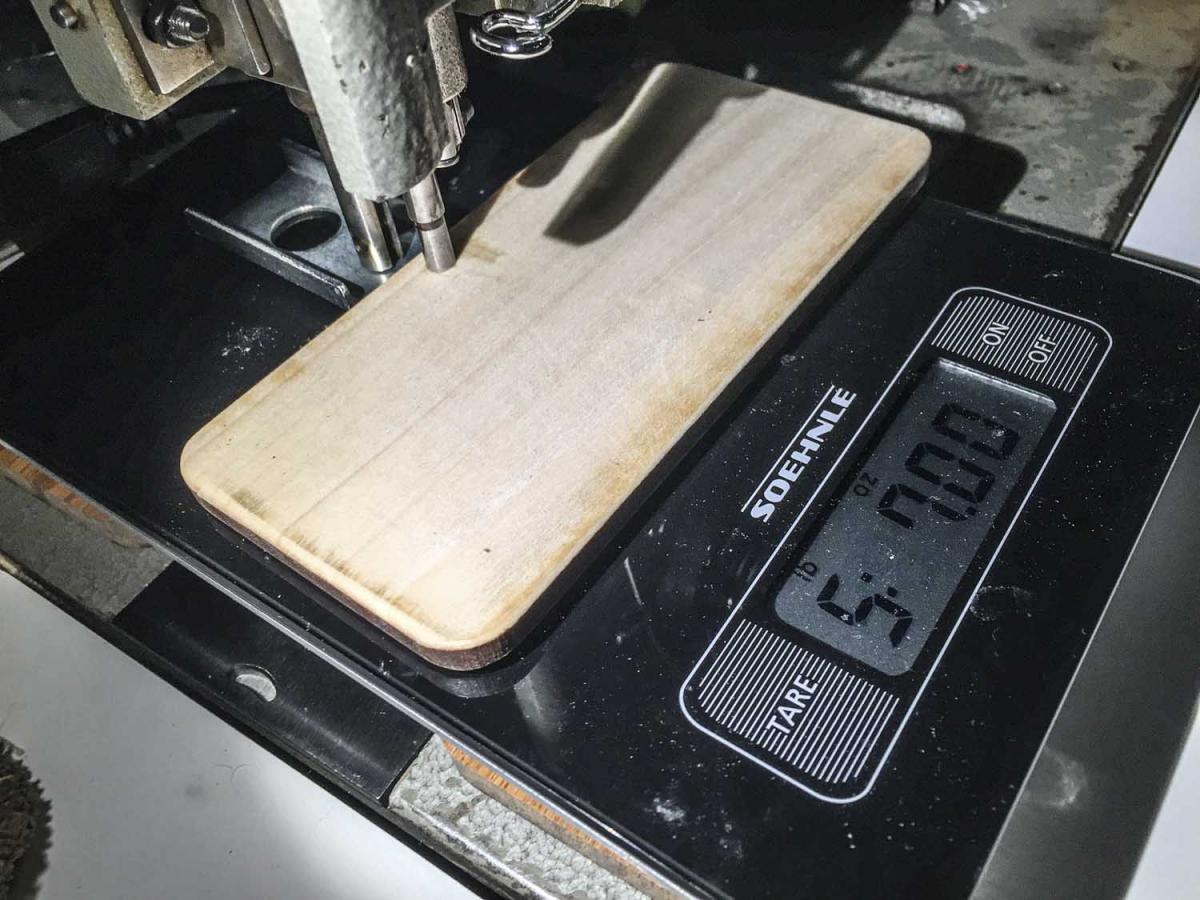
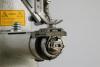
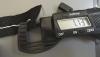
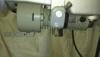
I posted this on another topic in the Sewing Leather sub-forum, but I think it also belongs here since it relates to sewing machines and applies to most walking foot sewing machines. Also to open it up to discussion without hijacking the other topic. Here's my original post (with minor edits): Geek alert! I've been giving this some thought because that foot pressure business has baffled me for a while and the inner foot spring setting never had any noticeable effect no matter how I adjusted it. I've concluded that the inner presser foot spring has only little, incremental effect on how hard the inner presser foot presses down on the leather during the stitch cycle. Changing the spring or cutting a bit off will also have minimal effect. This sounds weird and counterintuitive but the OUTER presser foot spring ALSO determines how hard the INNER foot presses down when outer foot lifts up. The pressure of outer and inner foot are NOT independent of each other, in fact they're closely and quite literally linked. This is because the outer foot actually uses the inner foot as leverage via linkages to lift up, against the spring that controls outer foot pressure. If you remove the inner foot entirely, the outer foot will not lift up at all because it needs the inner foot as leverage to press against the material in order to lift up. I believe the main purpose of the inner presser foot spring is to ADD incremental pressure to the inner foot on top of what the outer foot spring already provides. Adjusting the inner spring will never allow you to lower the inner foot pressure below what the outer spring dictates. I just now did a little experiment to back up my claim with some proof. I put a kitchen scale under my presser feet bars and moved the needle bar up so as not to interfere. I dialed the outer pressure foot spring low enough to get below the 10 lbs weight limit of my scale. I removed the inner presser foot spring adjustment knob entirely, so the inner spring was not pressing down at all. With this setup and the inner foot spring totally out of play the outer foot bar pressed down registering 7.2 lbs: and after turning the wheel a little the inner foot bar pressed down with 5.5 lbs: The difference is likely due to linkage angle and lever lengths, but the two are proportional. If I dial up the outer foot spring pressure, so increases the inner foot pressure (all WITHOUT the inner foot spring involved at all) Adding the inner foot spring control knob and cranking it all the way down for max inner foot spring pressure increased the inner foot pressure an additional 2.5 lbs over the initial value. This is the max the inner spring can ADD to outer spring. The inner foot is also more likely to leave a mark because it has a much smaller footprint than the outer foot and exerts higher force per square inch with the same spring pressure (the skinny high heel of a shoe is more likely to leave a mark than the bigger front of the shoe, but your weight does not change as you walk.) So the small inner foot even at 5.5 lbs is much more likely to leave a mark than the bigger outer foot at 7.2lbs I'd try dialing back the outer foot presser spring until it just barely holds on to the material when you tug on it and see if it makes a difference. Help guide the material with your hands as you sew to allow the machine to move the material easily and consistently with minimal foot pressure. Don't push or pull as it sews, just allow the machine to do the work with minimal force. Sorry about the long and geeky post, but I hope it adds some clarity to this confounding foot pressure business.
-
You can use an online service like http://www.picresize.com/ to resize photos without any image editing program. You need to state a price per for-sale forum rules.
-
Help! How To Relieve Foot Pressure On Consew 206 / Foot Leaves Marks
Uwe replied to MG513's topic in Sewing Leather
Geek alert! I've been giving this some thought because that foot pressure business has baffled me for a while and the inner foot spring setting never had any noticeable effect no matter how I adjusted it. I've concluded that the inner presser foot spring shown in your picture has only little, incremental effect on how hard the inner presser foot presses down on the leather during the stitch cycle. Changing the spring or cutting a bit off will also have minimal effect. This sounds weird and counterintuitive but the OUTER presser foot spring ALSO determines how hard the INNER foot presses down when outer foot lifts up. The pressure of outer and inner foot are NOT independent of each other, in fact they're closely and quite literally linked. This is because the outer foot actually uses the inner foot as leverage via linkages to lift up, against the spring that controls outer foot pressure. If you remove the inner foot entirely, the outer foot will not lift up at all because it needs the inner foot as leverage to press against the material in order to lift up. I believe the main purpose of the inner presser foot spring is to ADD incremental pressure to the inner foot on top of what the outer foot spring already provides. Adjusting the inner spring will never allow you to lower the inner foot pressure below what the outer spring dictates. I just now did a little experiment to back up my claim with some proof. I put a kitchen scale under my presser feet bars and moved the needle bar up so as not to interfere. I dialed the outer pressure foot spring low enough to get below the 10 lbs weight limit of my scale. I removed the inner presser foot spring adjustment knob entirely, so the inner spring was not pressing down at all. With this setup and the inner foot spring totally out of play the outer foot bar pressed down registering 7.2 lbs: and after turning the wheel a little the inner foot bar pressed down with 5.5 lbs: The difference is likely due to linkage angle and lever lengths, but the two are proportional. If I dial up the outer foot spring pressure, so increases the inner foot pressure (all WITHOUT the inner foot spring involved at all) Adding the inner foot spring control knob (the one in your picture) and cranking it all the way down for max inner foot spring pressure increased the inner foot pressure an additional 2.5 lbs over the initial value. This is the max the inner spring can ADD to outer spring. The inner foot is also more likely to leave a mark because it has a much smaller footprint than the outer foot and exerts higher force per square inch with the same spring pressure (the skinny high heel of a shoe is more likely to leave a mark than the bigger front of the shoe, but your weight does not change as you walk.) So the small inner foot even at 5.5 lbs is much more likely to leave a mark than the bigger outer foot at 7.2lbs I'd try dialing back the outer foot presser spring until it just barely holds on to the material when you tug on it and see if it makes a difference. Help guide the material with your hands as you sew to allow the machine to move the material easily and consistently with minimal foot pressure. Don't push or pull as it sews, just allow the machine to do the work with minimal force. Sorry about the long and geeky post, but I hope it adds some clarity to this confounding foot pressure business.