Uwe
-
Posts
2,221 -
Joined
-
Last visited
Content Type
Profiles
Forums
Events
Blogs
Gallery
Store
Everything posted by Uwe
-

Tacsew/juki 563 Hook Timing Problem: Stitch Length Affects Timing
Uwe replied to Uwe's topic in Leather Sewing Machines
This one's a good learning experience because everything that can be out of adjustment actually was. Oddly enough it actually made stitches when turning it over by hand, but it was very obviously not happy. The synchronization was definitely off. I moved the timing belt one tooth and it made a big improvement -no more thread snapping around the hook, and the thread slips through all the openings as it should. The timing belt was quite tight, but with a little sauna treatment from a hair dryer it slid off and on the lower gear without trouble. I made some marks with a pen to be able to tell where it was aligned. The distance between inner and outer presser foot bars was 10.5mm instead of the correct 8.5 mm at "0" stitch length, a pretty big difference. I also noticed that the service instructions for this machine (or Juki LU-563 manual, really) call for hook timing to be adjusted when stitch length is set to 1/8" instead of "0". This is different from all the other machines I've worked on so far. I'm still fighting with getting thread tension to work properly. The replacement thread tension unit I had ordered is really crappy (and I ordered three of these - argh!), although I'm not positive it's the root cause of the thread tension issues. It seems the knot is not pulled tight in time before the inner presser foot advances forward. On my Consew 225 hook/loop video, I could see the knot being pulled tight into the material before the feed dog advanced forward and the knot disappeared behind the feed dog hole. On this one, the still-loose knot disappears behind the feed dog opening and I think this interferes with proper knot-formation. The timing belt may still need a little more tweaking. I'll work on it some more on Sunday, and make some videos to document progress of lack thereof. Gotta get ready for big photo production on Saturday. It's still a work in progress, but it has great potential and I have high hopes for making this machine sew with buttery smoothness. It's actually a really nicely done clone. It cleaned up really well, the parts underneath all look shiny and not worn at all. It seems really well put together overall with good workmanship. Alas, it suffered from serious, fixable adjustment issues that caused its previous owner a great deal of grief, no doubt. -
Video Of New Techsew 5580 Roller Foot Delivered!
Uwe replied to Gregspitz's topic in Leather Sewing Machines
Interesting machine! Post some close-up photos of the roller feet from the other side when you get a chance. I'd like to see how close the needle is to the roller. Do both top and bottom rollers have a rubber-coating? Is this machine just needle feed as the website says or does the bottom roller also help move the material? -
Suggestions For Small Diameter Cylinder Bed Machines?
Uwe replied to Gjallerhorn's topic in Leather Sewing Machines
There are no clones of the latest OEM offerings as far as I know. Only machines of older designs with expired patents generally get the clone treatment, even if the original machines are still in production (e.g. Juki TSC-441). Ron at TechSew should be able to answer questions about the TechSew 2600. Call him to get first hand - if slightly biased - info on their machines. They have some incentive to tell you what the machine can and cannot handle, because they don't want the machines coming back or be warranty nightmares. -
Suggestions For Small Diameter Cylinder Bed Machines?
Uwe replied to Gjallerhorn's topic in Leather Sewing Machines
Since something will have to give on your requirements list anyways, check out the Durkopp Adler 669: It's the closest thing to your spec list I've come across. It will sew 0.4", has a 0.8" foot lift and a thin arm. Price new runs an eye watering $7.6K from Weaver Leather (considerably less if sign up for a business account). Like Henry Ford once said "If you need a machine and don't buy it, you pay for it without getting it." -
Fitting A Nakajima 380 In A New York Apartment
Uwe replied to zacb's topic in Leather Sewing Machines
I'm not actually using this particular setup anymore, it was just a test rig and proof of concept of sorts. The motor is now installed on my Puritan stitcher test bench. The rear-mounted motor was quite feasible and didn't interfere with operating or servicing the machine. It was the most compact while fully functional setup I've had so far.

-
Fitting A Nakajima 380 In A New York Apartment
Uwe replied to zacb's topic in Leather Sewing Machines
I cobbled together a somewhat portable table-top version for this type machine a little while ago:
-
Suggestions For Small Diameter Cylinder Bed Machines?
Uwe replied to Gjallerhorn's topic in Leather Sewing Machines
I think main problem is your requirement of skinny 2" arm with ability to sew 1/2" at the same time. There is no such machine as far as I know. The usual skinny arm suspects of Pfaff 335 and Adler 69 class machines don't sew thick stacks of leather and they have tiny bobbins limited thread size capabilities. I'm having a hard time thinking up a project using 1/2 thick material, 2 1/4" inch diameter and no overlap. Realistically, you are looking at two machines to cover the spectrum of sewing tasks you're looking to do. With a little luck you may find two used clones and stay within your budget. -
Tacsew/juki 563 Hook Timing Problem: Stitch Length Affects Timing
Uwe replied to Uwe's topic in Leather Sewing Machines
I don't quite understand what you mean, Bob. Are you saying the feed dog (and needle) are too far back and need to come forward? I'm not sure that's possible. I took some additional video from a different angle with the throat plate installed. At Max stitch length the feed dog is nearly touching the throat plate opening at the front, so I don't think I can adjust things toward the front. The Max front/back movement does appear to be centered around the 0-length position of the needle. It does seem to me that front/back and up/down movements are not properly timed. It's like the needle+feed-dog start moving backwards too soon. The needle comes up towards the end of the feed movement instead of the middle to meet the hook at the same center position. Here's an extended version of the video with the additional angle added on at the 40-second mark: -
It does seem like you're close to the source for sewing machines, not only for sewing machine factories, but also for lots of used machines from garment factories in China. Of course those used machines will often be well-worn by the time they are decommissioned from a factory. And perhaps it's like Kiwis in Australia. When I was visiting there, locals were complaining that you can't buy decent Kiwis in Australia, because they're exporting all the nice ones and only the scrappy ones show up in local markets. I was talking to folks at http://www.tomsewing.com/ in Xiamen to explore getting my hands on some used Juki TSC-441 machines. Nothing came of it, so I can't rate them, but they seem to be a good source for used industrial sewing machines within a day's trip of Hong Kong. I'd recommend getting a machine that Kwok Hing (http://www.kwokhing.com) makes parts for - they are located right in Hong Kong and they make really nice quality sewing machine accessories.
-
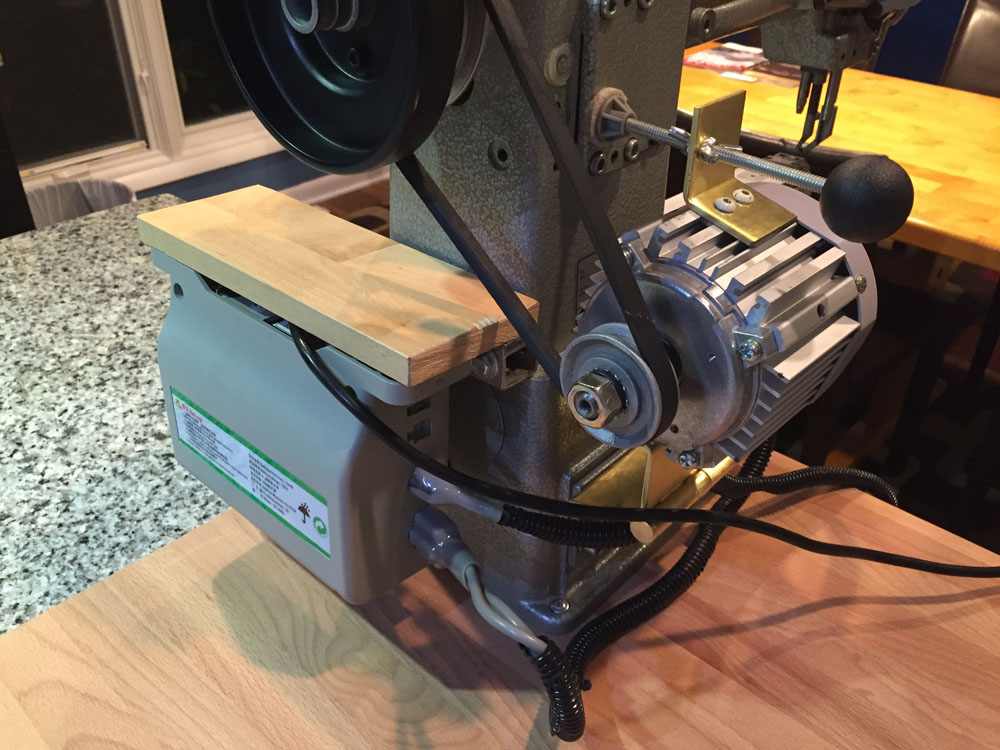
I'm working on my Tacsew T1563 (a Juki 563 clone) and I'm stumped. I adjusted hook timing the way I normally do on this class of machine with stitch length set to zero (or very small). The problem is that hook timing changes as I'm increasing the stitch length. Something else must be off, but I can't quite figure out what. It seems to me the feed dog and needle are too far towards the back by the time the needle gets there. One step I didn't (or rather couldn't) do is verify proper top/bottom shaft synchronization. My machine does not have the usual two opposing arrows on the underside that line up when the thread take-up arm is in the top position to indicate proper top/bottom synchronization via the timing belt. There IS a mark on the shaft collar, but nothing to indicate where it should be pointing to. Is there a way to verify proper top/bottom synchronization without those two opposing arrows? I've not changed the timing belt position on this machine and I'd rather not mess with it unless I have to. The timing belt does look brand new, however, so perhaps whoever replaced didn't quite get the synchronization right. I'm not even sure that a timing belt that's off by a tooth or so could cause this apparent hook timing shift when changing stitch length. Here's what my machine looks like underneath where the arrows normally are. The picture was taken with the thread take-up arm in the top position: Here's a little video of the hook area that hopefully illustrates what I'm talking about:

-
Sounds more like a thread issue then. Perhaps the thread has a rough enough surface or hard/brittle outer layer (either off the spool or after squeezing through tights spots enough times) so that when two opposing jagged edges meet just so inside the hole, the thread gets pulled back up with the ascending thread. Once the thread is pulled back up, there's really nothing in the stitch cycle that pulls it back down again other than the presser foot occasionally and accidentally stomping on it just so. I'm not a thread expert. I've only really sewn with bonded polyester thread so far, which I bought at thethreadexchange.com I have a few old spools that came with machines I've bought. Some of it is in rather rough shape (my black thread looks like it has a dandruff problem!) so I wouldn't want to use it for actual for-sale projects. Thread probably should come with a best-used-by date stamp on it. It may last much longer once it's sewn, but the actual sewing process may require new enough thread that is still limber and hasn't lost it lubricating properties yet. If I were you, I'd buy some nice, high quality new bonded polyester or nylon thread and see if the thread-loop-pull-up problem still happens. Polyester thread is supposed to have improved sunlight resistance properties, otherwise it's nearly identical to nylon. Some threads come pre-lubricated. Thread in itself is a bit of a science and I haven't quite figured it out yet. But new thread has a more-predictable-quality advantage over some old who-knows-what-happened-to-it spool.
-
Wait, are YOU the Leif of the lab? I didn't even look at your name before I posted. Nice blog, by the way, I've been there quite a few times.
-
Nice machine! I had to look it up actually and Leif Labs had a nice photo blog entry on the Consew 289RB-1. That seems like a HUGE bobbin for a post machine. Now I want one - nice going! If the thread "sticks" and gets pulled up with the needle from an already formed stitch, that will definitely mess up that upper stitch loop. The thread needs to easily slide through the needle's eye AND the long needle groove to make a good stitch. When the thread take-up lever is in the top position, the top loop for the previous stitch needs to be tight, otherwise you're doomed. Does this happen only at speed or also when you manually turn a few stitches? It's often hard to tell what's happening at speed. A few options I can think of: 1. The needle may be too small and the thread gets stuck in the long groove of the needle as it goes up. The thread is supposed to easily slide through the needle's eye AND the needle's long groove. I recently read one needle-to-thread size test that said to press the thread into the long groove of the needle - if the thread sticks in the groove, the needle is too small. 2. The thread may need to be lubricated to facilitate sliding through the holes and channels. Perhaps the polyester thread and fabric are sticky to each other or the thread is sticky to the needle. 3. The thread take-up spring setting may also play a role. This spring is supposed to keep the upper thread taught until the needled enters the material again. The spring should come to rest on the adjustable support just as the eye of the needle goes into the material. 4. Make sure the basics for threading and timing are good, and that the needle has the long groove facing away from the hook and the scarf cutout of the needle facing towards the hook. With the needle turned around 180 degrees, the hook may still be able to pick up the thread and make stitches, but the thread will be tight or loose in all the wrong spots and at the wrong time. I made a little close-up video some time ago about the hook area of a Consew 225. What surprised me when I made the video is just how much (and how often) the same section of thread thread gets pulled through the eye of the needle (and through that long groove along the needle). The video also shows how the thread still gets pulled DOWN though the long groove on the left as the needle ascends. For the thread to get pulled back up through the hole to loosen the top loop, it would really need to stick to the RIGHT side of the needle where the scarf is. Not sure how that would happen, actually, unless the material squeezes very tightly around the needle and the thread stick to the needle.
-
Techsew 2700 Safety Clutch And Rotary Hook Question
Uwe replied to jochild's topic in Leather Sewing Machines
First of all, take that friend off your approved borrower list. Sucked-down thread does not put burrs on the hook, but using sharp tools to get the thread out will. You can try to use very fine sandpaper to smooth out the burr. However, you will need to take out the hook to do that properly. You don't want sandpaper grit falling into the bearings and such. New hooks are cheap at around $30-40 on Ebay and perhaps from Techsew directly. The Techsew 2700 is supposed to be a clone similar to the Consew 227, so the Consew 227 manual is what I looked at. I don't quite understand why Techsew does not make their manuals available for download. Perhaps the english in their manuals is just as bad as the Consew version and they're a little embarrassed about it. Here's the relevant section from the manual about how to reset the safety clutch, and it is pretty opaque prose: I made a little video about variations of your type of safety clutch. It may help understand how they work and how you can tell if it's engaged or not: My hook timing video also shows how to check and reset this type of clutch, at the 1:21 mark: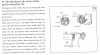
-
No wonder people are confused about bobbins when even the experts get them mixed up. According to the chart, the "L" size bobbin is actually smaller than the "G" size in both dimensions. I give up. Part numbers rule. And what on earth is the point of a XSH bobbin that's 1mm in height? But I actually like this bobbin size chart that you can print to scale and then put your bobbin right on the paper to compare: Bobbin Selection Information.pdf
-
You brought that Adler 467 back to life from cardiac arrest, Eric. Nobody faults the volunteer lifesaver for cracking a rib in the process - it'll heal. Not that you cracked any ribs, really. The point was that the "refurbished" Adler 467 originally arrived at the customer in a state of cardiac arrest and imminent death. The limbs of the machine were still moving but the life-giving fluid (oil) was no longer circulating.
-
The "sewing slow" part is really about the motor and a speed reducer pulley. Servo motors and speed reducers are your friend if you want to sew slow. Any industrial walking foot machine can sew slow with those two. The rest is about how thick of a stack of leather you intend to sew. Proper walking foot with triple top/bottom/needle "unison" feed is pretty much a given. Whatever you do, don't start complaining about the machine marking your leather. Few people care about the marks on the leather when they see the gun in that holster, or the bible in that cover.
-
Johny Cash, apparently: http://www.azlyrics.com/lyrics/johnnycash/folsomprisonblues.html I'm guessing they are getting at the fact that the news about a "refurbished" Adler 467 from Nick-O-Sew is gonna hit you like a freight train. Of course the sample size of "1" in that particular experience is rather small and may not be statistically relevant - "your mileage may vary". But it sure was doozy (or "Duesy" as in Duesenberg?) Oy! All that cultural background for obscure references, it takes a lifetime and then some to catch up, being an import myself. I usually just highlight and then right-click-search-with-google.
-
Since you asked what I think, let me also say that I think descriptive topic titles are helpful. Something like "Thread tension problems in reverse on a Pfaff 38-6" contains considerably more relevant information and gets the right people involved. Before I get lectured on free speech and start another topic derailment, let me point out that of course everybody has constitutional/god-given/human right to start a topic with whatever they choose to say and nobody can make them use descriptive topic titles if they don't feel like it.
-
Remove Old Oil And Rust Without Removing The Paint... Any Ideas
Uwe replied to alexitbe's topic in Leather Sewing Machines
Well in the early days of Coca Cola, just a touch of real cocaine gave Coca Cola the desired medicinal effect and pick-me up. Those days are long gone. I think it's the acids or preservatives that do the cleaning. I remember people experimenting by putting a small piece of red meat in Coca Cola and the meat would be gone/dissolved after just a few days. I'm not dunking/submerging my machine in Coca Cola . I don't want the stuff to get in places I don't want it. It may also dissolve my timing belt, who knows. -
In a properly adjusted machine the bobbin tension should not change significantly when switching from forward to reverse. You should not have to adjust thread tension when switching direction. Adjusting the top tension may only fix the symptom and not the root cause. It's all relative when it comes to thread tension. Either the bobbin tension gets tighter (or binds?) or the top tension gets loose for some reason. I suspect the trouble originates in the bobbin/hook area. The bobbin tension may appear to be tight in reverse for various reasons. Perhaps the thread struggles to wrap around the bobbin, or the bobbin case opener doesn't quite work as well in reverse (or not at all), perhaps a loose screw causes some thread passageway to open or close slightly when changing direction. I'd tilt the machine back and closely observe what's happening underneath as you make a few hand-turned stitches both forward and reverse. I little close-up video with a decent phone camera is worth about 15 postings, in my experience. I'm just guessing at some of these things, I don't have the machine in front of me. As for the take-up spring, the rule I read somewhere is that the spring should rest on the adjustable support and no longer pull on the thread the moment the eye of the needle enters the material. I'm not sure if this is a general rule or if it was a machine specific one. Check the basics, too. Properly threaded? Bobbin spin direction OK? Top thread release works when lifting the presser feet? Needle/thread size a good match? Needle-to-hook timing good?
-
Sold
-
Remove Old Oil And Rust Without Removing The Paint... Any Ideas
Uwe replied to alexitbe's topic in Leather Sewing Machines
Looks great! I'll have to try the Coca Cola approach on my next project. -
I always buy bobbins by original part number. I found it's the most reliable method to get bobbins (and other parts) that REALLY work in your machine. Many sewing machine manufacturers publish no information about their bobbins other than the bobbin's part number. I'm not sure why they're so secretive about that topic. A size "G" bobbin may be the closest match to that part number, and if somebody makes a bobbin that's a close match to a "G" size, the two "close" steps may add up to trouble. The Adler/Chandler 67GK373 Parts List shows the bobbin with part number "068 00 180 0" : Ask your favorite vendor for that part number to get what you really need. I order many small bits and pieces from Sharp Sewing on ebay, one of my personal go-to vendors for these things:


-
Forgive me, Master Eric, but this old padawan is wondering about that 9/32" needle rise figure for hook timing. It seems much higher (3x) than other machines of very similar head design. Is this due to the hook design or larger needle bar stroke?