Uwe
-
Posts
2,221 -
Joined
-
Last visited
Content Type
Profiles
Forums
Events
Blogs
Gallery
Store
Everything posted by Uwe
-

Opinions: Smooth Needle Plate,feed Dog Walking Feet
Uwe replied to llucas's topic in Leather Sewing Machines
In general, to minimize marks on your leather, you want the surfaces touching the leather be as smooth as possible with no sharp edges, have the surfaces be as big as possible to distribute the pressure over a larger area, and have the pressing force be as low as possible while still holding on to the leather and letting the machine make good stitches. No matter what kind of sewing machine you have, it'll take some experimenting with various feet, needle/throat plates and pressure settings. Report back if you find a combination that works well! -
Opinions: Smooth Needle Plate,feed Dog Walking Feet
Uwe replied to llucas's topic in Leather Sewing Machines
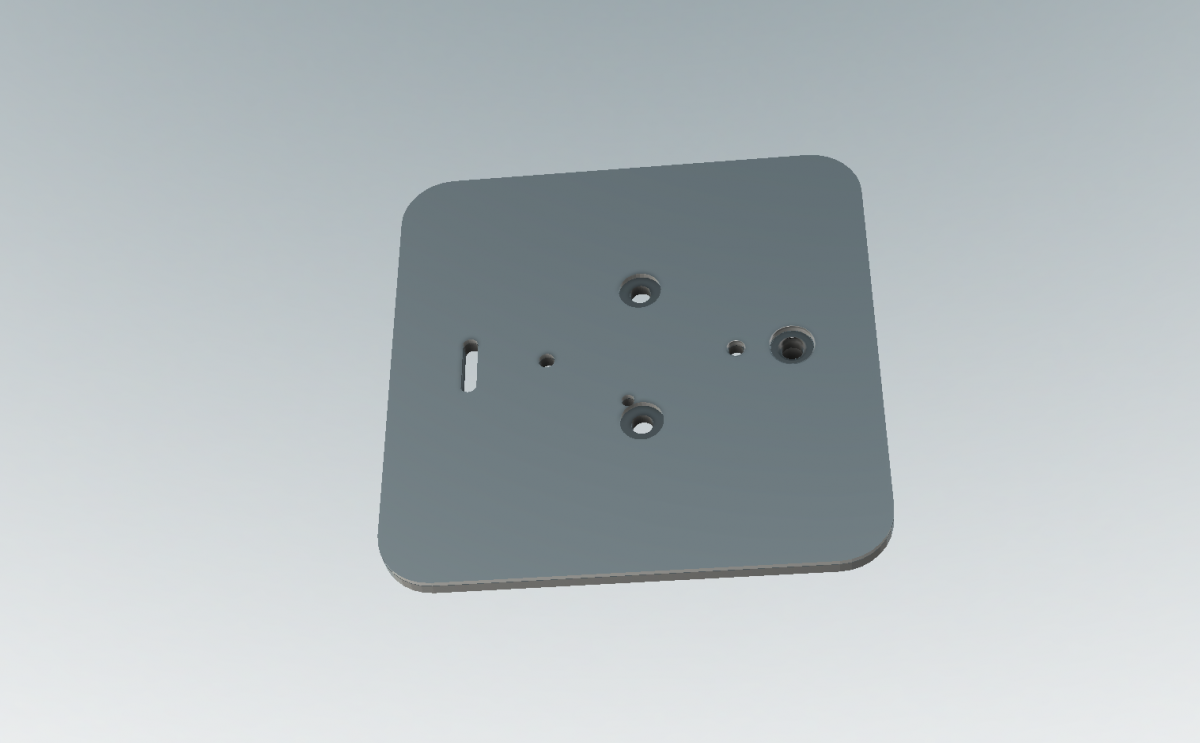
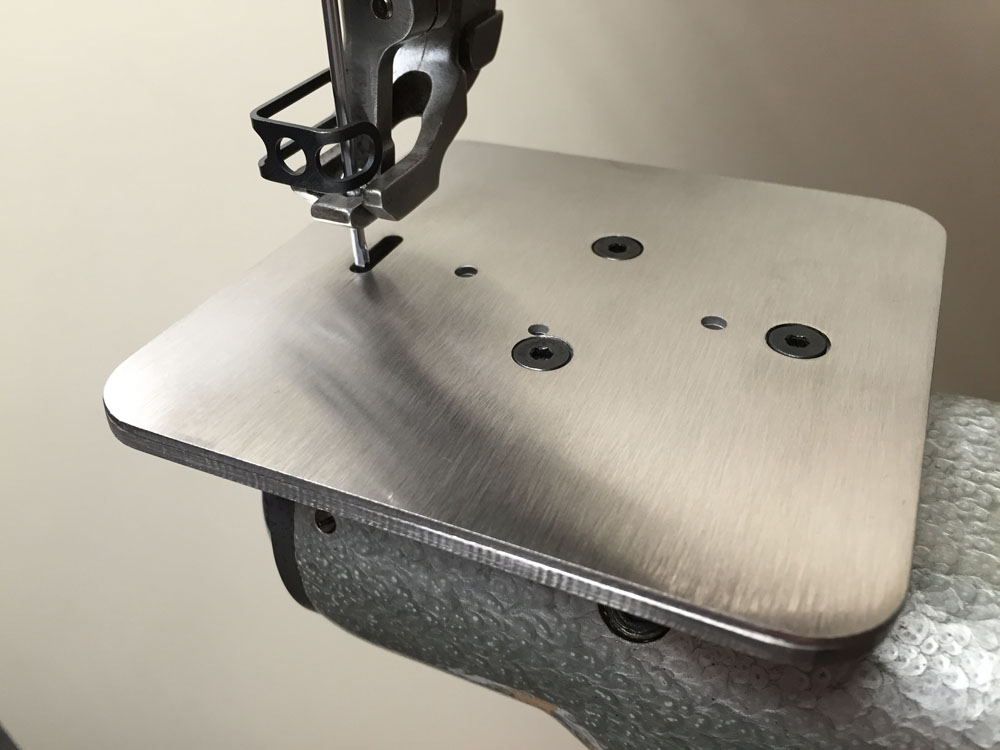
I don't want to make your decision any harder, but your issue prompted me to make yet another alternative, a needle feed throat plate. Sometimes the bottom feed dog mechanism is causing more trouble than helping. Some folks use the 205 as a needle feed machine for certain tasks by "turning off" (i.e. removing) the feed dog. This throat plate enables needle feed mode and provides a small flat work surface which is handy for belts, wallets, and other flat work pieces. You remove the feed dog entirely and the material is moved only by the needle and inner presser foot by dragging it across the very smooth surface. It doesn't entirely eliminate marks, but it's a big improvement for certain tasks on my machine. If you need to get hat SUV up the mountain without leaving ANY tire tracks, you need to hire fifty barefoot sherpas to carry it up there. This may be a good option if you have just one or two layers to deal with. Here are two screenshots from my CAD program and a quick snapshot of my prototype: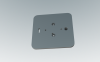


-
So when people say "soak it in kerosene" they mean "spray this kind of stuff all over it", and not "fill a big vat/tub with kerosene and submerge your sewing machine in it"? Maybe my imagination just got a little carried away.
-
You should seriously consider using it as an unrestored historic decorative piece. It would look great as it is in the right setting and your friend would admire your sense of decorating. The problem with gifts often is that the people giving them expect to then see them when they come visit. I personally would not soak it in kerosene (sounds like a very smelly fire hazard,) I'd leave it outside all winter and spray salt water on it occasionally to really get some patina going. Turning it into a shiny AND functional machine may neither be feasible nor in it's best interest.
-
I often visit Miami Sewing for a nice alphabetized sampling of upholstery/leather machines with a brief description and a ballpark figure to go with it. At least you can tell if something is in the hundreds or thousands value wise.That big white one stands out to me but I'm not sure how practical these monsters really are for our kind of leather work. For leather work, a proper walking foot and cylinder arm is desirable, a chain stitch machine not so much (unless it's a precious Puritan, haha!). At theses kind of auctions, it may be good to get three identical machines and then frankenstein one good one. The other two you can put on Craigslist and say "Sews Everything!" and "Works!", just like all the others do.
-
The pictures from inside the switch box want to tell the story about incoming power, except I can't quite make out the incoming wires. It's definitely expecting single phase 220V incoming power - that little transformer diagram seems to want ONE power line that carries 220V against a neutral white. What I can't tell is if the incoming 220V is ONE power wire against a neutral white, or between TWO power wires. This is important. A voltage transformer like the one mentioned earlier may actually provide exactly what the machine is expecting, one power line carrying 220V against a neutral white. A few more pictures would help: show more details of the incoming wires inside the box (is the green/blue/brown the incoming one and are there really only three incoming wires?), open the plug at the end of the power wire and show us which wire is connected to which pole inside that plug.
-
German Language Manual And The Adler 205-374
Uwe replied to llucas's topic in Leather Sewing Machines
There's a separate adjustment for the manual lifting lever - it's supposed to have just a tiny bit of play when not engaged. The clamping block just above the one I loosened in the video adjusts the manual lift lever. The manual lift lever should be able to rotate to the 11 o'clock position to hold the foot in the lifted position and release the upper thread tensioner. If you can't rotate the manual lift lever easily past the 12 o'clock position it's binding - don't force it! You're supposed to be able to engage manual foot lift lever and then release it again by pressing the foot operated lift above the manual lifting position. If you loosen both clamps at the same time and remove the presser foot, you can pull out the presser bar/shaft/rod out the top (watch out for the little spring between the two clamping blocks.) I did just that last week when I replaced the lifting bracket/strip/blade that hooks between the two clamping blocks - it was broken on my machine. I'm guessing the previous owner forced the manual lift when it wasn't properly adjusted. My spring is 120mm (4-3/4") long. It just peeks out the top a few millimeters (tension screw removed) when I have the manual lift lever engaged. If your total spring length is longer, leave the extra piece out. The presser foot is supposed to push down on the material with just enough force to keep it from moving while the needle is above, not clamp down with a ton of force. Excessive force just makes everything work much harder, and leaves marks on your leather. Fabric generally doesn't care how hard you clamp it down, but leather does care. It also matters how thick the material is, but the proportional increase in pressure for thicker material is usually just right. Take the needle out and lower the presser foot on your finger. If it hurts, it's too much force. If you feel it holds your finger in place without hurting, I'd say you're good for a starting point. Adjust as needed. -
German Language Manual And The Adler 205-374
Uwe replied to llucas's topic in Leather Sewing Machines
Technical documentation that originated in english isn't a whole lot better at times. Good technical writing is a lost art. The exact same thing (a cylindrical piece of metal) may be called a rod, bar, or shaft, depending on who's looking at it and where it is. I've translated automotive technical manuals in the 90's and it's hard work. You really need to be an engineer in addition to knowing both languages to do it even remotely justice. If you just look up words in a technical dictionary, you end up with documents that read like the translated sewing machine manuals. -
German Language Manual And The Adler 205-374
Uwe replied to llucas's topic in Leather Sewing Machines
Not sure what you mean by upper foot. The inner feeding foot and outer presser foot perform the same lift relative to each other due to the design of the linking arm. By adjusting lift for one as in the video, you automatically adjust the other. They should always be lifting equal height. -
German Language Manual And The Adler 205-374
Uwe replied to llucas's topic in Leather Sewing Machines
I made a little video about my interpretation of that section in the service manual. It's not a literal interpretation and I took some liberties involving a stack of quarters instead of a proper gauge. The German version of the service manual is a little opaque even to native Germans, haha. It sounds like your clamp that ties the articulating arm to the presser foot shaft might be loose. In any case, here's the video - I hope it helps: -
Video: Installing A Binder Kit On A Durkopp Adler 205-370
Uwe replied to Uwe's topic in Leather Sewing Machines
Yup, my magnetized magnets work way better than the ones that are not magnetized, haha. I agree with you. I updated my youtube videos by adding a note about the hook removal not being necessary. I just wish I'd known six months ago. On the plus side, removing the hook no longer scares me. -
Yes you have to shop around to figure out what works for you. Toledo Bob should have access to the Cowboy line of presser feet, some of which are stainless steel (there are also a few Kwok Hing feet on that page - who knows how they're all connected behind the scenes). I had ordered feet from Weaver, Bob, and Kwok Hing over time to compare notes. Some of the left/right feet are simply sawed-off full feet, which is fine but doesn't appeal to me personally.
-
If the unit truly requires 3-phase input, you could potentially use a variable frequency control box (around $150) to convert (in a minor engineering miracle) plain 110V to 240V 3-phase. I'm experimenting with one of these variable frequency boxes to drive a 3-phase motor.
-
Weaver's presser feet (part numbers 204-22-011-3, 204-22-011-3-R, 204-22-011-3-L) look to be OEM Durkopp Adler feet (not sure about that, actually) and have a price tag to match at $230 a pop retail. I have some of Kwok Hing's Left/Right presser feet (KP205LN, KP205RN) on order and should get them in next week. These also have smooth bottom feet, the quality is VERY nice and they're a more reasonable $89 when I sell them in my ebay store. If you have a company set up you can get a wholesale account with Weaver which lowers cost significantly. You can also order directly from Kwok Hing if you manage to get their attention (shipping cost can be significant, though).
-
The plug itself is not conclusive as to what they actually had or used. They may have 3-phase outlets in the factory, but the control box may expect a 1-phase input. Maybe that's why there is an intermediate little box that looks like the power cable goes to it. That box may be there to re-wire things and switch from 3-phase to 1-phase (which basically means you're not using one of the incoming wires.) Jome, you really need to track down a manual for that control unit. You also need to track down a buddy who's good with electrical stuff and offer him/her a case of beer AFTERWARDS. I've not been able to find a manual online. Without a manual, you won't know how to make the control box do what you need it to do. You also don't really know how it is configured right now. Quite often these control boxes come with a separate display and keypad unit to do the "programming" (setting parameters that determine how it behaves). Your control box has some switches for direct settings for needle position, etc. but it also has that long white connector that looks suspiciously like serial connector for attaching a terminal or display/keyboard. Often in a factory setting, the on-site mechanic will come to set up the control box and then purposely lock out the operator of the machine from changing that setup. Changing out the plug for one that would fit the voltage converter box is easy enough, but before you do that you really need to know what you're doing and what that control box is expecting for input. There should be a sticker or label somewhere that states what the power input should be, similar to the one on the motor. It may be close to where the power cable enters the control box (maybe after the intermediate on/off switch?) Take some more pictures so we can see every surface of the control box (underside too). Also the anything between that plug and the control box (on/off switch, etc.) It's not easy figuring this out remotely without skype and you pointing the camera in real time.
-
Most 2-Needle sewing machines can sew just fine with only one needle installed. No conversion necessary, you simply remove the second needle.
-
Durkopp Adler has an Adler 20 manual and an Adler 20 parts book. Apparently a few parts are interchangeable with Singer Class 7 machines, which may be easier to find.
-
Yup, the squared-off head parts sure make it look more like an Adler 20. The Singer Class 7 has a more swoopy, flowing head design. Not much info on Adler 20 type machines online. Parts may be tricky to find.
-
Looks like a Singer Class 7 type machine to me.
-
US 220V is compatible with the machine/motor you have. You have to either run a 220V circuit to your work area or get a $37 converter that turns 110V into 220V and handles more than 600W of power (the easy choice) . If you're good with electrical stuff you can run the 220V circuit yourself. If you have to pay an electrician to do it, it'll likely be more expensive than what you paid for the machine. Most normal residential and office space electric utility service in the US has two powered wires (usually black) run into the house's circuit breaker box - one on the left side, the other on the right side inside the circuit breaker box. Each powered wire will have 110V against the white neutral wire, but there will be 220V between the two black powered wires. So, for a normal 110V circuit, you need to run just ONE of the black power wires and the white neutral to the outlet. For 220V, you will need to run BOTH black power wires to the box (white/green will be there for safety, but not really required to power the appliance). Personally, I'm running a 220V extension cord (with special plugs) from my electric dryer circuit in my laundry to my workshop area until get around to running a dedicated 220V circuit into my workshop area. At 600W, you're using considerably less power than a typical hair dryer, so nothing to get really freaked out about. The 600W are peak power, too. For normal sewing, you probably use less than 100 Watts of power - and a 220V servo motor should be no different. Your air compressor will use more power than the sewing motor when it kicks in. For an air compressor, you can try something simple and small for around $70. Get it someplace that has a good return policy or rent one to check what size you need. Bigger compressors will have to turn on less frequently. Get a quiet one that doesn't make you jump out of your seat when it turns on. The machine you got is indeed very nice and desirable - good for you! Making it work for you will be worth the effort.
-
That's not a clutch motor. It's actually a very fancy servo motor with needle positioning and all probably all kinds of programmable features - potentially too fancy for a beginner. It needs 220V, same as a typical electric dryer or stove top in the U.S. I'm running my 220V servo motor off the circuit that my clothes dryer is on ( I don't do laundry and sew at the same time :-) All the hook-ups and air cylinders on the back allow the controller to lift the presser foot and perhaps do automatic back-tack (reverse). It'll need compressed air to actually move levers with enough force via air cylinder that push or pull. It's all very nice stuff to have for high volume production work or in a factory, but only if it works and you have the right hook-ups for electric power and compressed air. For the novice leather sewing hobbyist it may be more of a setup and maintenance headache. Sometimes it's easier to remove all that fancy stuff and put it back to simple mode with a normal servo motor. The problem with that is that it's still a lot of work, you're removing stuff you may miss a year down the road, and the machine may no longer have the normal manual levers and connectors since it is all setup for pneumatic operation. If you can post a couple of pictures of the rest of the machine it may help us figure out what approach might be best.
-
Video: Installing A Binder Kit On A Durkopp Adler 205-370
Uwe replied to Uwe's topic in Leather Sewing Machines
And right you are, Glenn! I just checked and simply flipping open the bobbin give access to that screw. D'oh, it' so obvious once you know! I learn something new every day. Of course if you drop that screw you'll still be taking the hook out to retrieve said screw again. Here I was just getting good at taking out that hook assembly! I guess I'll be revising my videos a bit. Thanks for the tip! -
Puritans apparently come in two shank sizes (.086" and .115"), depending on configuration. The big shank awl is indeed a Puritan, just the wrong shank size. I'm contemplating whether I should bother getting a single awl replaced, but for $8.30 per awl, they really ought to send you the right one in the first place.
-
Reverse alone is not worth $750 in my book, other things being equal-ish. For that money you can buy a nice vintage 111 class flatbed to keep this one company.
-
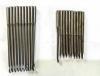
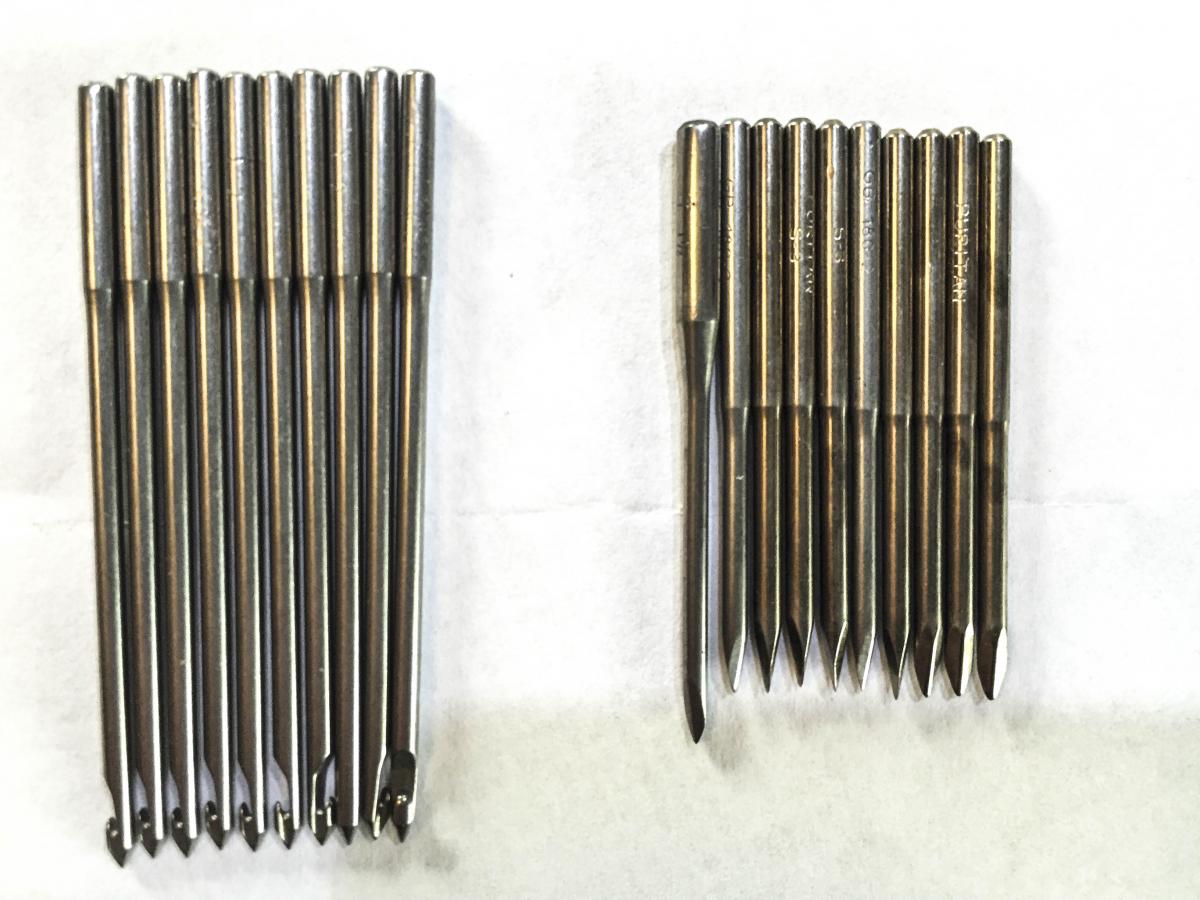
Just wanted to share what $173.30 worth of Puritan needles and awls look like. Extra points if you find the odd one in the bunch.