Uwe
-
Posts
2,221 -
Joined
-
Last visited
Content Type
Profiles
Forums
Events
Blogs
Gallery
Everything posted by Uwe
-
Your mechanic must have been talking about the binder plate used when doing binding operations. That cover plate along with all the attached folder bits actually swivels front to back as you sew to synchronise the folder/binder movement with the presser feet movement. This video shows the moving binder plate on a similar machine. That version of the cover plate has a hole that fits snugly around the guide that sticks up, which moves the binder cover plate synchronized with the feed dog movement. The whole affair pivots around the swivel point on the right end of the arm.
-
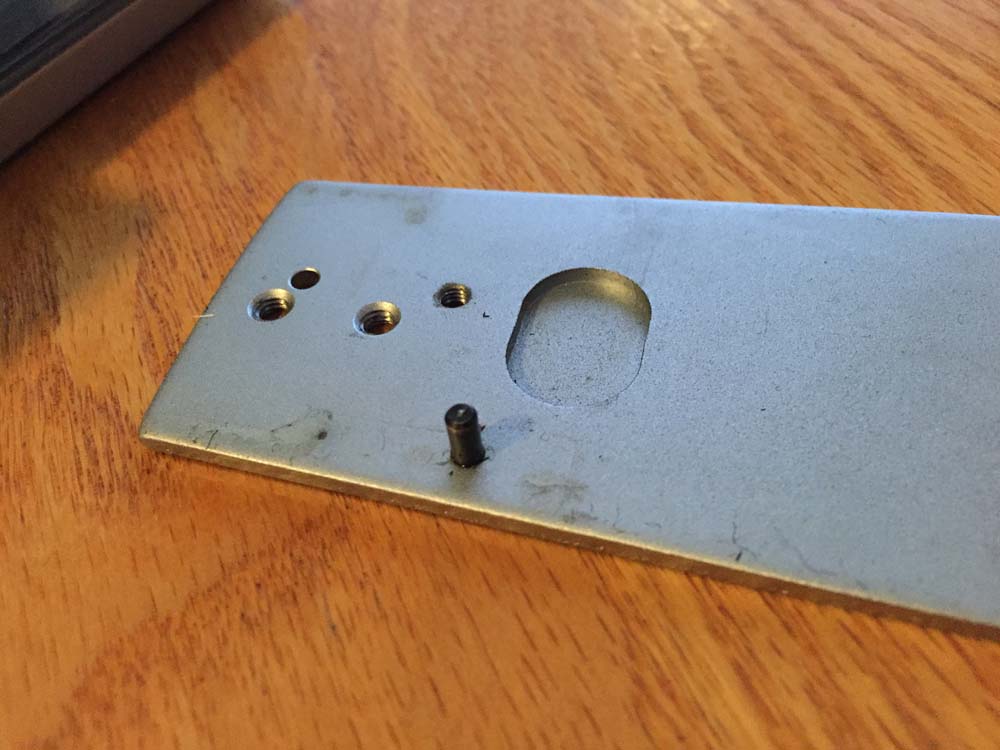
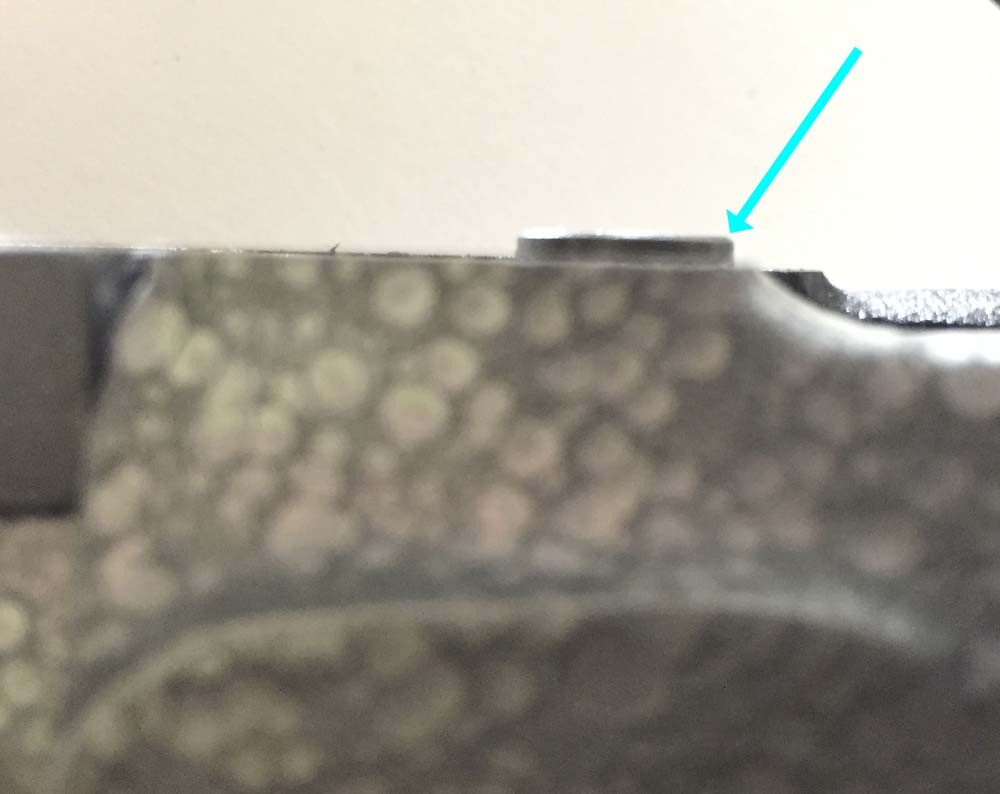
I'm glad you got your pedal connections sorted out. Post some pictures when you get a chance. The cover plate on the Adler 69 cylinder arm has recess cutout on the underside to allow free movement of the swiveling binder connector below. If you replace the cover plate with a plain flat piece of metal, it'll press on the connector and nothing will move. You'll have to either machine a recess (hard), cut a hole (easier, like on the Pfaff 335,) or sandwich two plates together (bottom has a hole, top doesn't). Or you can leave the existing cover plate in place and design something that simply goes on top of it. Here are some photos that show the underside of my Adler 69 arm cover plate with the recess cutout and the part that sticks up above the arm surface that the cover plate rests on:


-
Check out Kwok Hing . They carry some parts for DA 269 machines, like presser feet, needle plate, needle bar etc. Contact them directly for the best price.
-
Judging from your initial pictures it looks like the linkage pulling down the motor's speed control arm was a pretty steep sideways angle to begin with. Lowering the table would have made that worse, pulling nearly horizontal instead of straight down on that speed control arm. You may have to switch things around to make the linkage rods point towards the back on the connecting shaft like in this picture: The little clamp piece on my flatbed table attachment was lucky find of a ready made part that fit perfectly. Any two-piece item designed to clamp onto a 2" pipe is a candidate (I've gone through muffler clamps, audio rigging clamps, etc.) I can't give away all my secrets, but I will state for the record that I live near an IKEA store.
-
I came very close to buying a used sewing machine on Craigslist simply because it was mounted in an electric Kessler table! I wasn't aware they're available new in the States - I spent a fair amount of time trying to track down a supplier for them. $1K is a bit more than I'm willing to spend on a table, I'm afraid.
-
The really cool convertible table setups for cylinder arm machines are only available in Germany, it seems. At least that's where I get my ideas from. Sieck has a few nice examples, like the Adler 69 setup with an arm-attached flatbed: Or how about this Pfaff 335 arrangement with a flatbed slide-in table: None of the above options are available commercially in the US, as far as I know. For your table, it would not be too hard to make an extension that attaches to the existing table and a support leg or two on the left. Once you have a flat surface, you can make a four-legged slide-in table with a suitable cutout for the cylinder arm like the Pfaff 335 example above. This is the concept: My Pfaff 335 flatbed table attachment (thanks for the mention, TinkerTailor!) actually does not fit the Adler 69 because the Adler has a longer arm. I plan to make an Adler 69 version over the next month or so, now that I actually have an Adler 69 in my possession to take measurements. There are some U-shaped table options available in the US like this example from Toledo Industrial below. It would also work with both varieties of flatbed table attachments. I'm not sure if Toledo Ind. sells it separately, though: I've also contemplated hacking this electrically height adjustable BEKANT Ikea table to make a sewing machine stand:
-

Owner & Service Manual For Durkopp Adler 204/205-370
Uwe replied to Uwe's topic in Leather Sewing Machines
I'm glad you got it to work properly all by yourself - that's a big deal! Clearly you're more successful getting to know this machine than the people who sold it to you. -
Owner & Service Manual For Durkopp Adler 204/205-370
Uwe replied to Uwe's topic in Leather Sewing Machines
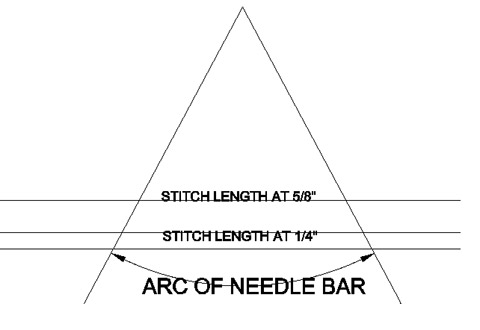
I've not seen a repair manual for the 205-370 machines. It seems unlikely that your machine is broken and needs repair, but it's very likely that it's not properly adjusted to work according to specs. I've not gone through all the adjustments myself yet. I'm contemplating making an how-to video for adjusting the 205-370 once I'm comfortable with making the adjustments. I'd recommend going through the various adjustment chapters in the service manual and check if the machine is in the target settings. No need to loosen screws etc. to simply check current adjustment settings against specs. If one or more of these adjustments are off the target mark, they can have multiple, often interconnected effects. One important adjustment for your stitch length troubles: in the hook timing position with the needle raised 4mm from the very bottom, the feed dog and inner foot should not move at all when flipping the reverse lever up and down. For example, if the feed movement is not "centered" on the hook timing position, it may prevent you from stitching at the maximum stitch length and at the same time introduce an offset that makes forward and backward stitches not match. Reversing into the same holes is a bit dependent on material thickness. My 205-370 happily reverses into the same holes for 10 or more holes in a row when stitching a thin sheet of cardboard without thread. When stitching thick leather with thick thread, the reversing matches only for only a stitch or two if I'm lucky. I have a feeling the FWD/REV stitching may need to be adjusted for a particular material thickness by purposely introducing a slight offset. Even with a perfectly adjusted machine, the maximum stitch length may decrease with increasing material thickness due to the pendulum effect (thanks to JLSleather for posting the nice graphic image below in another topic) Certain things like feed dog height cannot be adjusted on the 205-370, they are simply fixed due to how it's designed/built.
-
I think the stitch length indicator on this version of the 226 is right next to the hand wheel like shown in the photo of a pristine 226 below. The older style 226 had the indicator wheel inside under the top cover (also visible by peeking through the hole in the front). The missing button normally just engages a notch in a disk on the underside to keep a shaft from rotating as you turn the hand wheel to adjust the stitch length. You can stick a screwdriver or something else suitable into hole to engage that notch.
-
I'm glad you were able to figure it out! Clearly the control box knows exactly why it can't provide the needle position function - it just doesn't tell you about it. They must have run out of money programming useful error codes into the control box logic. The only error code the manual mentions is one for power failure - I'm not exactly sure how it will display that particular error code if there's no power.
-
So the control box can at least tell if the sensor is plugged in or not, that's a good sign. With the needle position sensor connected, does the machine keep running past the next needle-down position and make another stitch or two before it gives up, or does it run out of juice before it reaches the next needle-down position? I'd try these debugging steps: Does the motor always stop at the same needle position or does it stop at random positions. If it always stops at the same absolute position, the position calibration is off. If it stops at random positions, the position signal is missing and the motor gives up. While sewing VERY slowly, let go of the pedal shortly before the next needle-down position. Does the machine run past the next needle-down position? Second try while sewing slowly, let go of the pedal shortly AFTER it reaches needle-down position. If it does not continue until the next needle-down, the control board gives up before the next position signal gets sent due to too many rotations without position signal, likely due to speed reduction gearing. If it still runs past the next needle-down, the sensor signal is definitely not working and the gearing is not at fault for the motor giving up too early. After the machine stops, heel the pedal. Does the motor advance to the next needle-UP position? If yes, then only the needle-down sensor signal is not working - needle-up sensor and control box work properly. If no, neither position sensor signals work or control board ignores them. On a side-note: with one of my needle position servo motors, if I had the speed dialed way down, the motor would actually speed up when I let go of the pedal to move to the next needle-down position. That was just too freaky for me to get used to, so I disconnected it. I'm actually not using needle positioning on any of my NPS-enabled motors. Because I sew leather extremely slow at about a stitch per second, my reaction time is plenty fast to stop the needle exactly where I want it and the NPS just seems intrusive to me. But that's just my personal preference. I do have unused position sensors sitting around for testing if need be. My Consew CSM1000 position sensor may be the same design as yours.
-
Cobra 4...presser Foot Marking Leather
Uwe replied to bushpilotmexico's topic in Leather Sewing Machines
That is a pretty strong wedge shape, looks like a door stop! A couple things come to mind: You may have to adjust foot pressure spring as you change to the thicker part. As the material gets thicker, the spring probably gets compressed more and puts more force on the leather surface. Those marks look like high heel marks on a wood floor, change the footwear and make sure it sits flat. Try using a presser foot with a larger bottom surface to distribute the pressure and make sure it sits flat on the top surface of the leather. It may heel or toe into the leather because you're walking a relatively steep grade downhill or uphill. The top surface of the leather is never quite parallel to the needle plate or the bottom of the presser feet with a wedge like that. Build a "ramp" attachment to compensate for the wedge shape of your work piece and make the top surface level. Is that a test piece or an actual part you need to produce? If it's just a test piece, the problem may disappear if you sew a actual work piece with constant thickness (or just the occasional step up or down) and parallel surfaces rather than a continuous wedge shape. -
Hmm, good one. I'd remove the cover on the position sensor next and observe the two spinning disks that block or open the light path for the two optical sensors. The manual says to move the disks by hand to set proper needle down and up positions. Perhaps the disk came loose and only gets dragged along at a certain minimum speed. Make sure the light source LED of the sensor is actually on when the reducer is installed - perhaps it has a flaky electrical connection that fails with just a little more or less pull.
-
So how can the motor stop and the machine keeps going as you say, like a bike that keeps rolling once you stop pedaling? That sounds like there's a one-way clutch or a loose set screws in the system somewhere. Is the handwheel/belt not directly/tightly coupled to the machine? Does the machine keep going but the belt does not move? I'm confused! If the belts are tight and nothing is slipping, the motor will keep driving the machine even after you let go of the pedal, until it receives a sensor signal or gives up. Unplugging the sensor cable from the back of the control box should make the motor work "normal", stopping everything the instant you let go of the pedal, with or without speed reducer installed. We're gonna need a couple photos or a video pretty soon . . .
-
If your "new" machine is a clone of an old design, the spare parts problem is exactly the same. The modern day clone makers don't generally make or stock parts, but expect you to rely on the OEM parts supply channels. A few aftermarket makers (e.g Kwok Hing) produce a limited selection of parts like needle bars, etc. Some models are well supplied with aftermarket parts. Check resellers with a good online presence like College Sewing in the UK see if parts exist for the machine you're considering. If they don't carry it, you're likely out of luck elsewhere as well. The local LW vendor may carry or be able to source parts, but some of their websites haven't quite made the transition into this century yet. As far as "expensive" parts go, an expensive but available part is infinitely more useful than any unavailable part no matter what the price would be. Durkopp Adler appears to have a very robust spare parts organisation in place for their vintage machines. They also did not go through bankruptcy recently like Pfaff did. Nothing like a good bankruptcy and new owner to change your priorities as to what vintage models you're still interested in supporting. Most industrial sewing machines were designed to work hard in a factory setting without breaking constantly. If you don't abuse your machine by trying to make it do things it wasn't designed to do, it will work for long time with routine maintenance. Like a previous poster said, you'll likely end up with one (or more!) dedicated binder machines before too long, especially if you do this for a living or on a regular basis. My advice would be to get a name brand machine (Singer/Pfaff/Juki/Durkopp Adler, etc.) or a well supported/respected clone in good condition, no more than two decades old, with design specs covering the needle and thread sizes and material thickness you plan to use. Whenever you use a machine outside its design specs, trouble is likely imminent. Quite often the design specs, especially for certain cylinder arm machines, are very narrow (e.g. Needle size 110Nm-140Nm, not much wiggle room there) For binding operations you described with compound feed and synchronized, vibrating binders, the Pfaff 335 and Adler 69 class of machines are well supported, proven key players in that field, at least from what I can tell.
-
I think the needle positioner motors are designed to keep running after you let go of the pedal until it receives a signal from the position sensor that it has reached the desired needle position. The motor control boards probably have some safety feature to give up after some time if it fails to receive that position signal. Usually the needle position sensor itself has a little LED that lights up in that "correct" signaling position. If the LED lights up and the motor keep spinning then the signal doesn't make it to the motor control board somehow. Or perhaps the sensor itself is slipping on the hand wheel, never signaling the correct position. The motor will eventually give up spinning if it never gets that correct needle position signal, which may look like it's spinning until it runs out of juice somehow. Trouble shooting steps I would take are: 1. Make sure the sensor is firmly mounted to the handwheel 2. Make sure the position sensor LED lights up in correct position as you turn the handwheel manually 3. Make sure that LED blinks as you sew, every time it reaches the needle down position If the motor spins past the LED lighting up, then the sensor wire connector may not be seated properly. There's also a chance that the motor control board simply gives up before it ever receives the next target needle position signal due to a large speed reducing ratio ( i.e. the control board logic may think "I'm gonna make at most ten more turns and then give up unless I get a position signal"). That might explain why it works properly without a speed reducer (e.g. position signal every five motor turns), but fails if a speed reducer is installed (e.g. position signal every 15 motor turns). This may be a safety feature to make sure the motor fails safely if the needle position fails to report, so as not to keep the motor spinning indefinitely with no pedal input. I'd love to take a look at it in person, but I'm in Texas this week.
-
Page 164 of the US Army sewing machine repair guide describes how to remove the arm shaft and timing belt on a Singer 111W155. It sounds somewhat painful. The Consew 226 is perhaps similar enough to follow those directions. In any case, the procedure is probably not something you want to first-ever attempt on a super important/precious machine.
-
The manual page 11-11 in this Pfaff 1245 instruction manual talks about adjusting the outer presser foot lift. Perhaps the old Pfaff 1245 version has similar adjustments. The concept of these linkages shouldn't have changed dramatically. On some of my machines the amount of outer presser foot lift depends on how much material I have under the feet. Without any material under the feet, the outer presser foot doesn't lift much, if at all (this is probably not right). With some leather under the feet, the outer foot lifts and "walks" as it should. I need to look into that. I'm pretty sure the outer presser foot list is linked to the inner foot, to make sure the outer foot lifts a certain height above whatever the inner foot rests on, no matter how much material is under the feet. I did stumble across a sewing machine repair book series form the '50s recently (also available in PDF format here: http://www.occaphot-ch.com/bernina-startseite/industrie-masch/ ) . Alas, the problem is (although not for me) that they're apparently only available in German. The book series goes into great detail on how different sewing machine technologies and concepts work and how to repair machines.
-
You need to include an actual asking price with these for-sale posts, per LW marketplace rules. Pictures would be really useful, too. Just post them here rather than emailing them about on request.
-
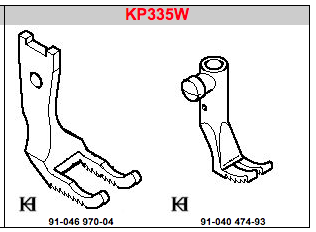
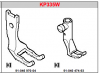
Also check out the Kwok Hing page for the Pfaff 335 for a nice overview of what's available for the Pfaff 335. The regular needle plate and feed dog set come in three sizes - regular, medium and small. The maximum stitch length you can use decreases as the opening in the needle plate gets smaller. Almost any of the presser feet on that page should work for you. The "normal" non-binder setup would include the 91-158 206-034 needle plate and 91-059 229-04 feed dog set: and the KP335W presser feet: For the arm cover plate, you may be able to just remove the guide fingers and threaded bits that are attached now to make it flat with nothing sticking up. The Kwok Hing parts are available from various resellers, or directly from the manufacturer if you get their attention.

-
So is it true that this 335 version does not have needle feed? That would seem very odd indeed. I thought these Pfaff 335 machines all have compound feed, except on most of them the feed dog does not go down while moving forward (it just moves back and forth at the same height unless it's a specific sub-class with that drop feed dog feature)
-
Show & Tell: Table-Top Portable Setup For Adler 69
Uwe replied to Uwe's topic in Leather Sewing Machines
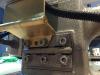
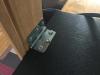
Here are some detail photos of the remote foot pedal. The control box originally had some metal mounting arm sticking out at the top, which I sawed/filed off level with the top of the box. I made the connection wire longer by soldering an extension piece in the middle. The little skateboard roller bearing at the end of the control arm fits nicely on a 5/16" bolt and makes for very smooth pedal movements.


-
Show & Tell: Table-Top Portable Setup For Adler 69
Uwe replied to Uwe's topic in Leather Sewing Machines
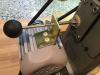
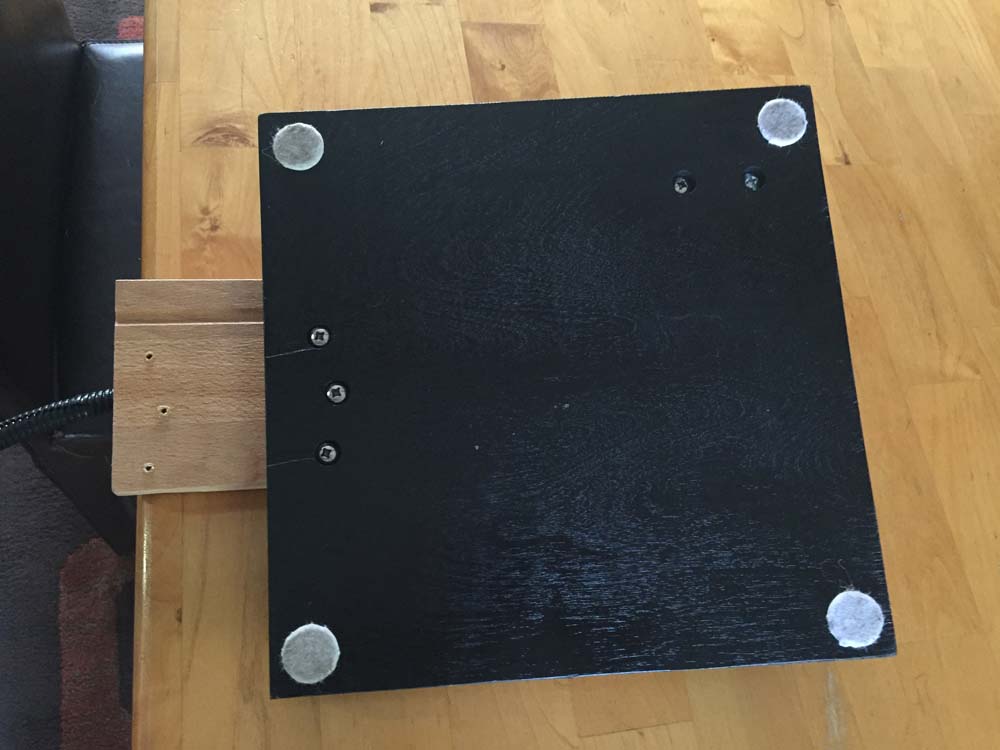
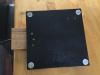
A standard belt-driven bobbin winder does not fit on this compact installation. This is where a stand-alone motorized bobbin winder comes in super handy. There's no leg or foot actuated presser foot lift either, just the manual lever. The final, permanent installation will have a proper foot lift pedal. -
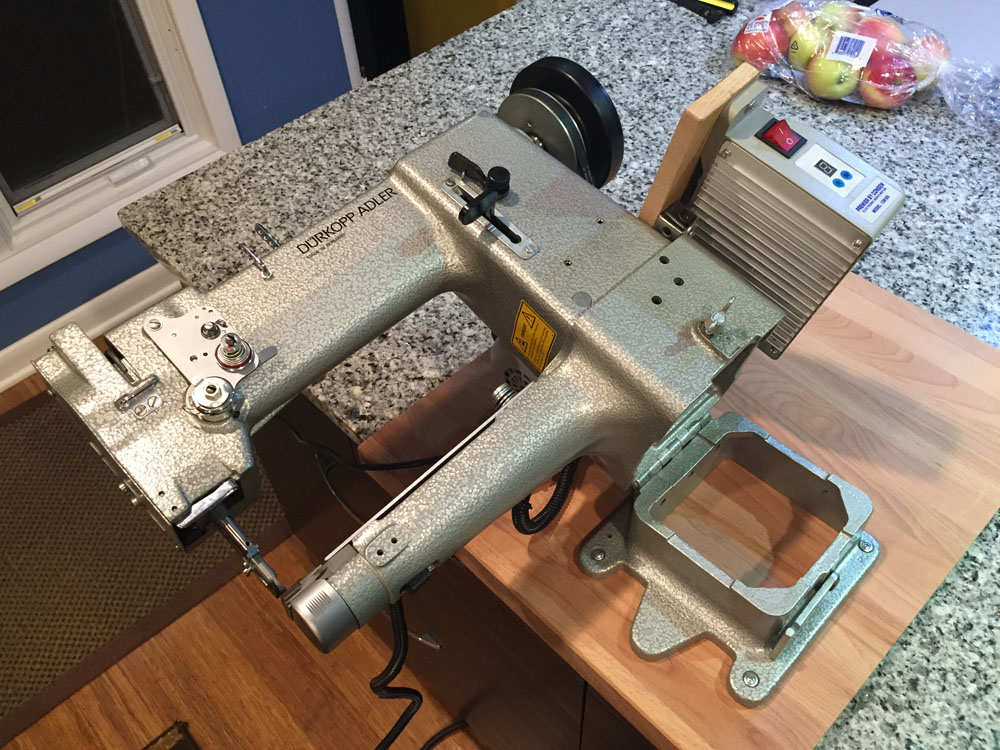
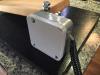
I decided to actually measure my machine's power usage while sewing leather with a Consew CSM 1000 (550W) servo motor. It used between 24-60 watts sewing about 10oz. of soft leather. Here's the quick-and-shaky handheld video:
-
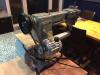
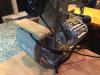
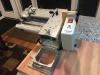
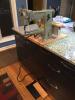
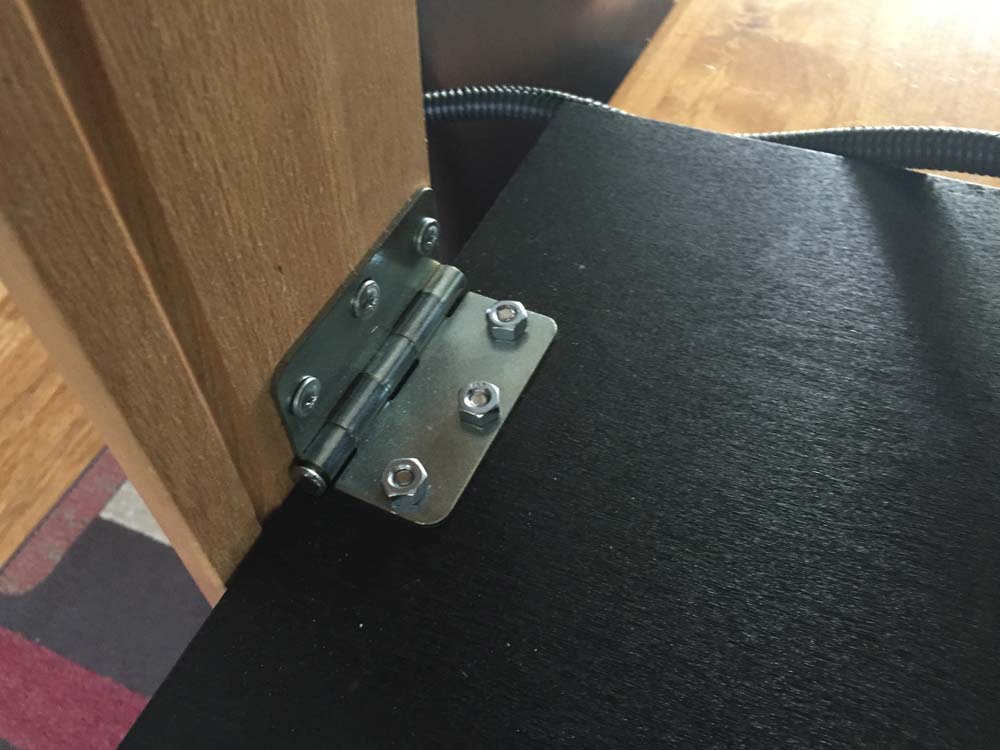
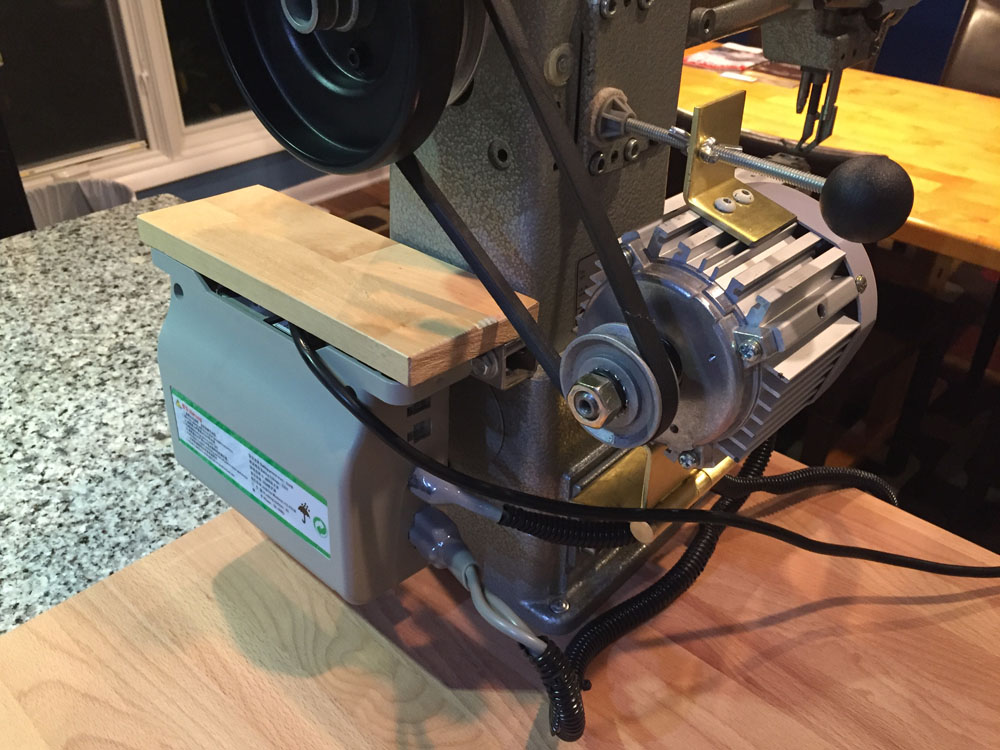
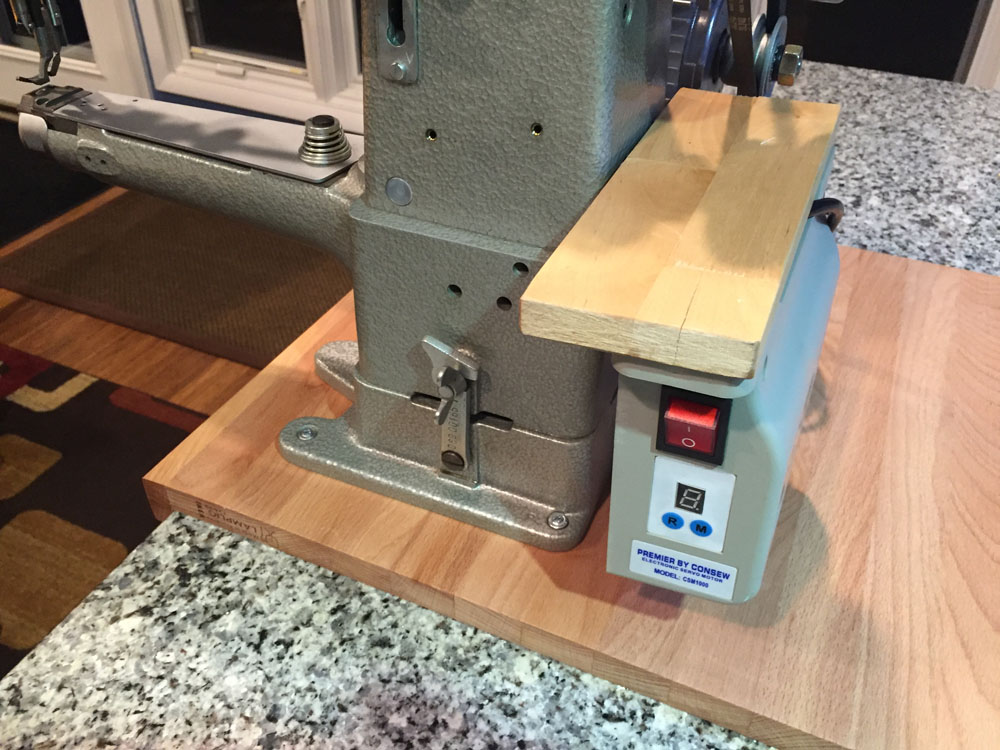
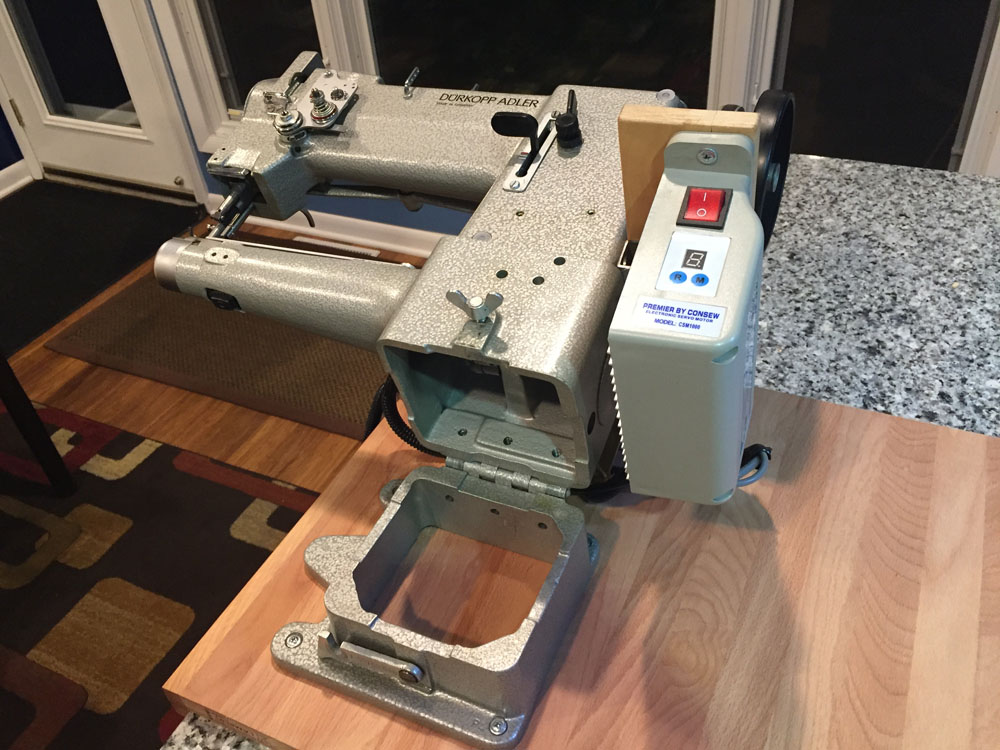
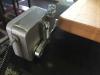
While I'm deciding on a permanent installation for my new Adler 69, I decided to make a portable table-top setup so that I can use the machine while I figure out some other details. I used my Consew CMS 1000 motor where I had previously mounted the pedal mechanism on a separate board. I mounted motor and controller to the Adler 69 using existing bolts and holes. No holes were drilled and no paint was scratched on this pristine machine. A modified door hinge holds the motor and allows easy belt installation and tension adjustments. The mounts still allow tilting the machine back to get access to the internal bits. It wasn't intended to be pretty but it's functional and compact. This approach may work for folks who don't have space for permanent table setups for each machine or need to travel with their machine for some reason. The whole setup is not exactly light-weight, but it weighs no more than my previous Pfaff 335 head by itself. I took the pictures with the machine sitting on my kitchen counter ready to sew, just for fun. I don't plan on actually sewing in my kitchen, but now I could if I wanted to . Here are the pics of the project: