Uwe
-
Posts
2,221 -
Joined
-
Last visited
Content Type
Profiles
Forums
Events
Blogs
Gallery
Store
Everything posted by Uwe
-
Oh dear, I didn't even realize I needed a pedal-driven Landis 1 or 3. This seems like a great option for a machine if you're gonna sew very thick leather without electricity, and they're reasonably priced to boot: This fellow has (or had) a Landis 1 for sale in Oregon ($900) I need a bigger basement.
-
That's the kind of pedaling setup I was thinking of, very cool!
-

Adler 269-373 Or Adler 267 Thread Tension Assembly
Uwe replied to Yanni's topic in Leather Sewing Machines
D'oh! Now I notice this darn thread is nearly two years old - how did this pop back onto my front page for this forum, making me think it's all new? -
Adler 269-373 Or Adler 267 Thread Tension Assembly
Uwe replied to Yanni's topic in Leather Sewing Machines
If you want to get a new pre-tension unit (presumably with bigger tension disks), it's available from AAAsew in Canada (USD $96, search for part number 0221-110154-DAD. Slightly sketchy ordering system, but I've successfully ordered twice from them), or from College Sewing in the UK for 50 pounds (USD $75, world class ordering system) -
Adler 269-373 Or Adler 267 Thread Tension Assembly
Uwe replied to Yanni's topic in Leather Sewing Machines
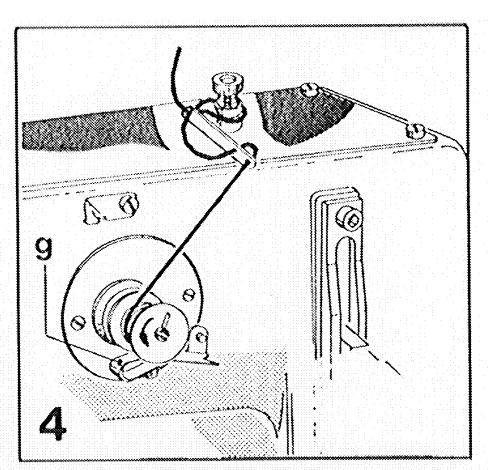
Sometimes it pays to look in the most obvious place: I found an operating instructions document hiding in plain sight at the Durkopp Adler documentation page for the 269 Here's the relevant diagram on how to properly thread the pre-tension unit for the bobbin winder:
-
Adler 269-373 Or Adler 267 Thread Tension Assembly
Uwe replied to Yanni's topic in Leather Sewing Machines
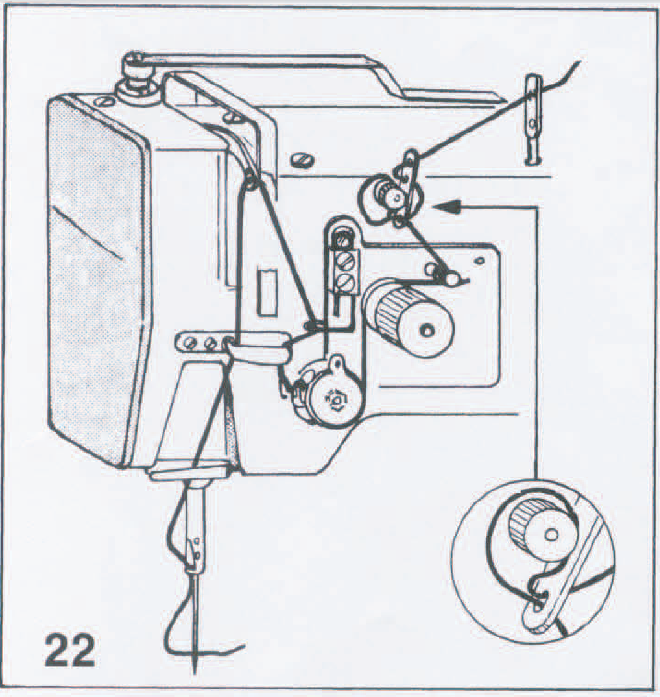
The detail highlighted in your photo looks like it's only used for winding the bobbin and is not in the thread path for normal sewing. I think the description right above from chikitti is the closest to what Adler intended, based on this diagram I found in a 267-373 manual using the same tension device in a different location (and turned around). The tension device in this diagram IS used for sewing. Yours looks very much like the exact same device, just in a different spot and turnaround. Perhaps this diagram helps: I hesitate to even mention this video below about 267 bobbin winding because it kinda shows how NOT to do it, even though he manages to wind a bobbin. The fellow runs that poor machine at full speed with the presser feet just slamming metal to metal - that has got be wrong! At least lift the presser feet up so they don't make contact. He also does not use the threading path intended for the device - but it works for him perhaps because of the larger disks.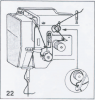
-
I can imagine a pedal driven setup similar to a kids pedal car or a regular bicycle that powers a regular sewing machine via belt pulleys. With the right size belt pulley or gear ratios you can sew nice and slow with plenty of torque and punching power. Most treadle machines will not have the right pulley gearing ratio to provide enough torque for sewing holsters. Of course pedaling while sewing may take a little practice. With the right (i.e. 1:1) gearing it may actually offer a nice synchronicity and needle positioning - pedal down = needle down, or something like that. Servo motors only use noticeable electricity when you press the pedal. Even a 200W weakling of a motor can drive a sewing machine with a speed reducer. Post some pictures of your solution before you totally disconnect from the grid! BTW, I have a 7KW solar system with 55 megawatt-hours produced to date. I feel reasonably guilt-free driving my electric car around town. We're almost net zero, but not quite. Another 10 solar panels should do it, although I'm not planning to live off the grid.
-
Pfaff 335 Manual For Older Version Needed
Uwe replied to CaroCaro's topic in Leather Sewing Machines
Joe (Hockeymender) kindly lent me his copied vintage Pfaff 335 Instruction Book and a set of mechanic's service training instructions pages. I've scanned them into PDFs in the best quality the originals would allow, which is overall quite nice. I also ran text recognition (OCR) on the files, so the PDFs should be text searchable. You can download the Pfaff 335 Instruction Book here: Pfaff 335 Instruction Book (old casting, until the late '90s) The service instructions cover various older Pfaff models: Pfaff Service Instructions (various older models) I'll also try to upload the instruction book to manualslib.com to make it accessible to a larger audience. -
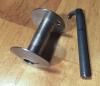
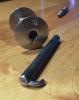
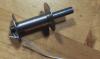
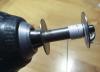
Here's some sourcing info: I bought the video's background music loop at http://melodyloops.com. This particular piece is called Red Book of Nature by Alex Grey. Youtube keeps flagging me for copyright violations if I use "real" music that is copyrighted (e.g. that "Time" piece by Hans Zimmer.) If you like this kind of piano and strings music, check out Ludovico Einaudi, which is the style of music I was looking for. The main parts for this project were sourced on Ebay/Amazon: Buehler 315 RPM Heavy Duty 25 V DC Right Angle Gearhead Motor - 5500 g-cm Torque ($39) FWD/REV momentary switch ($5) Aluminum enclosure box ($13) (a little too small, actually) 24V Power supply ($12) Speed Control unit ($9) Spool stand (handrail mount) ($12) Various bits and pieces came from my local hardware, electronics, and hobby stores. The two-part bobbin holder itself is a combination of a long M4 screw, fender washers, garden hose rubber gaskets, and two pieces of nesting brass tubing (model airplane supply). The tubes slide over the M4 screw and perfectly fill the space between the M4 screw and the inner diameter of the bobbin spool. The drive shaft of the geared motor already has an M4 female thread. So all together about $100 of materials and countless hours of parts research and tinkering. Not exactly cheap but functional and priceless to me. I can't buy an industrial strength motorized large bobbin winder like this anywhere at any price, as far as I know.
-
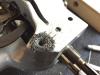
I do have the original Adler bobbin winder that came with the machine that runs off the machine's belt. It does an okay job but not great, despite the fancy cam driven thread guide mechanism. With the large bobbins and 415 thread its hard to get a perfectly wound bobbin on the standard winder and with the thick thread, every winding layer counts. People use stand-alone bobbin winders for various reasons. The build-in ones that wind as you sew never quite appealed to me. I'd rather have a little stash of wound bobbins sitting ready when I start a sewing project. With the thick 415 thread, you end up changing bobbins fairly often. I also have OCD and a perfectly wound bobbin gives me pleasure, lol! I had used a hand drill and made little bobbin hooks to wind bobbins. That worked quite nicely to make perfectly wound bobbins, but it was a pain to hold the drill steady and reverse it if the thread reversed direction before it reached the edge of the bobbin. I had seen commercial motorized bobbin winders for the small bobbins and thin thread, but never one for the big shuttle hook style bobbin. So I decided to make one just because, well, SEWING! Here are some pictures of my little bobbin hook that I used with my hand drill for a while:

-
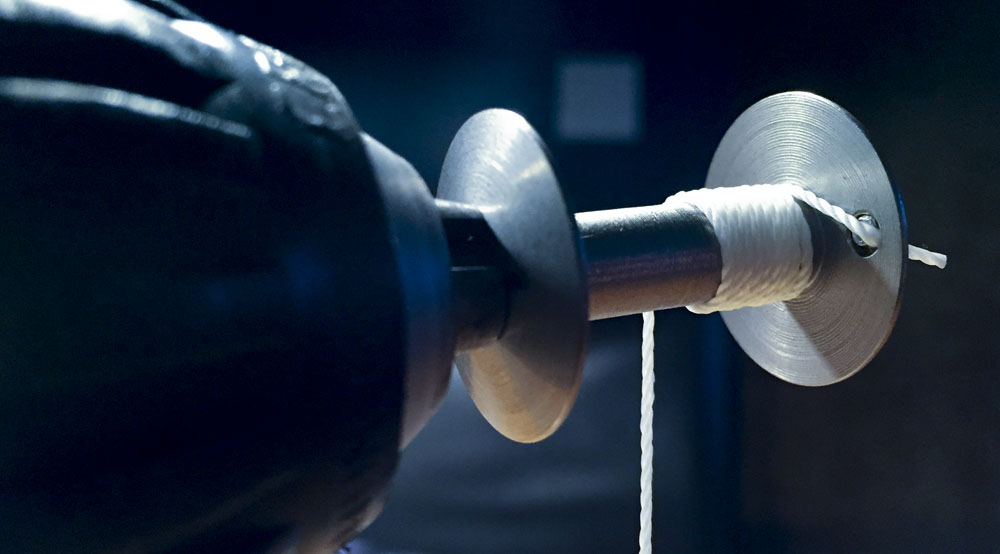
I've been working on this stand-alone motorized bobbin winder for shuttle hook style bobbins for a little while. The project is far enough advanced to do a little show-and-tell. Control box and geared motor runs on harmless 24V DC, has a speed control knob and a forward/reverse switch. For the thread spool stand, I used the approach that Adler uses for the newer models, running the thread through the center and out the bottom - it works quite nicely. The bobbin holder has rubber rings (from my garden hose, haha!) to hold the bobbin and the thread while it's winding. Here's the little video that shows how it works.
-
Somebody asked me if the Consew 225 will sew 6mm (15oz) of hard veg tan leather. I doubted it somewhat but hadn't actually tried. So I installed a 3:1 speed reducer to kick up the torque and punching power and gave it a whirl. It actually did okay with 6mm using size 207 bonded polyester thread top and bobbin, and a size 22 regular point needle (I know, I know - it's not ideal, but it was the largest needle I had on hand). It even fought it's way through 9mm (25oz) of veg tan leather, but that's really abusing the machine in my mind. I tried it out so you don't have to. I would normally reach for my Adler 205 to sew material this thick or hard. Here's the video:
-
Pfaff 335 Manual For Older Version Needed
Uwe replied to CaroCaro's topic in Leather Sewing Machines
Thanks for offering Sonydaze. I have a feeling your '09 manuals are for the new casting white Pfaff 335 models. The manuals that apparently have no online presence at all are for the old casting of the Pfaff 335, about 30 or more years old. I'd like to find hard copies of vintage owner/parts/service manuals from the '80s or earlier for the Pfaff 335 and put them online as PDFs. -
Pfaff 335 Manual For Older Version Needed
Uwe replied to CaroCaro's topic in Leather Sewing Machines
Great info Glenn, thanks! Any chance I can borrow your hardcopy manual to scan it into a PDF file and make it available to others? -
No experience with strap sewing standards, sorry. But if you're looking to do work sewing straps that people's lives depend on, check out SL-Spezial in Germany. They make licensed Durkopp Adler Class 120 strap sewing machines similar to the one shown in the video. If the situation calls for it, I want to be dangling from a strap sewn on their machines.
-
Looks like a design based on the Singer Class 7 type machine. There are many present day variations, some of them listed in this Kaplan Sewing web page.
-
No worries, Eric. You're right, my needle guard didn't do much in the thread loop video (I was concentrating on that damn loop, haha.) I fine-tuned my needle guard and hook distance the way you recommended - I think. This is a close as I can get, I hope you approve:
-
Pfaff 335 Manual For Older Version Needed
Uwe replied to CaroCaro's topic in Leather Sewing Machines
Congratulations! You'll have five or six sewing machines like the rest of us before too long - it's an addiction that has not yet been recognized by the WHO. -
I was experimenting with my newly adjusted Consew 225 and my macro photography gear to make a little video snippet about what's going on under the needle plate with a properly timed hook. In case you've ever wondered what they mean when they say "the hook catches the loop" or "Schleifenhub":
-
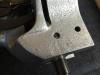
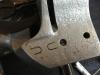
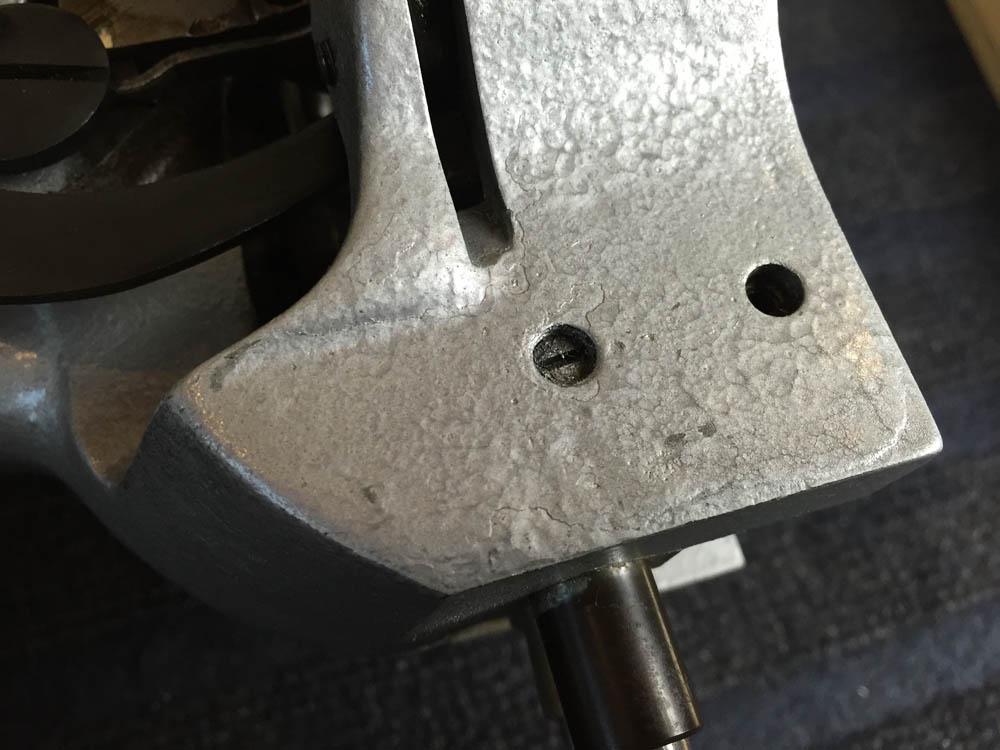
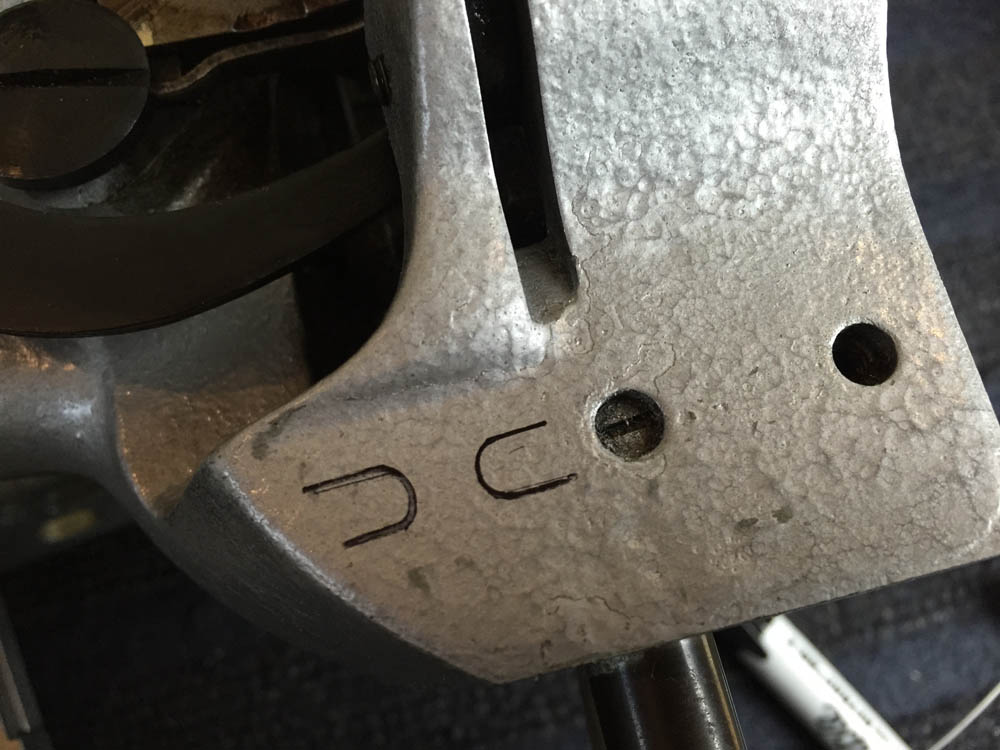
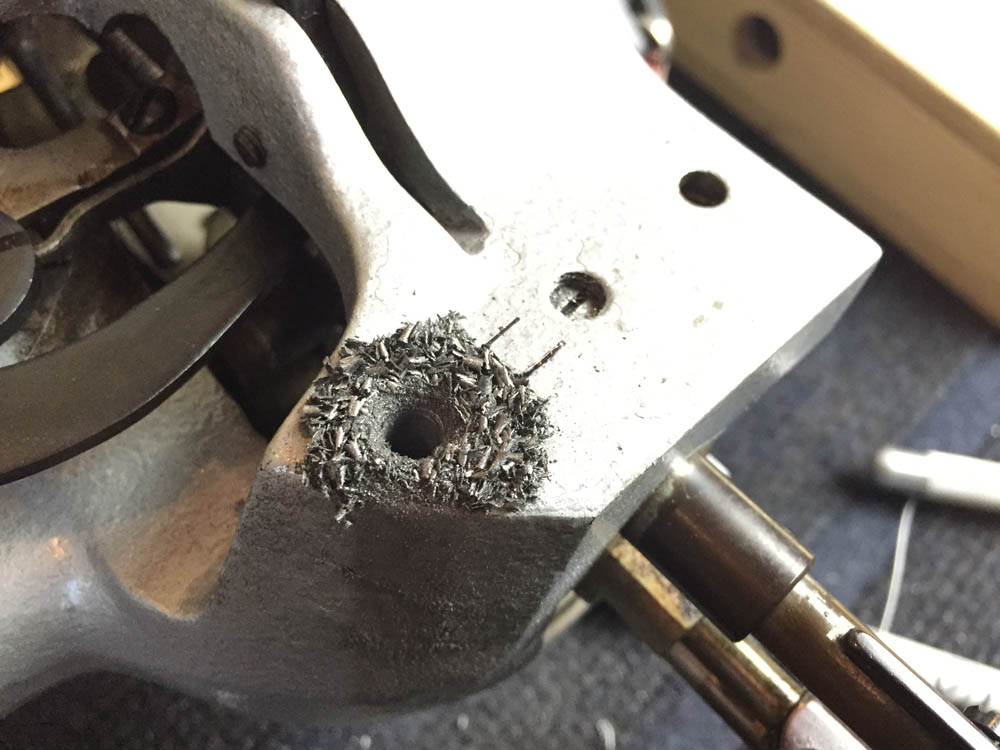
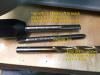
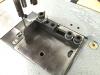
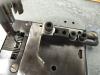
The drilling of the mounting holes was not so hard, actually, just a little nerve wracking because it was the first time I drilled into a machine. I triple checked the locations and depth to make sure I'm not drilling into anything I shouldn't. The cast iron on my machine was surprisingly soft in terms of drilling. Use a vacuum to suck up the metal shavings - you don't want to get those into the gears and bearings. Placing a magnet right next to the drill area might work, too. I had placed the machine on its front on a work surface and used shims to level the area to be drilled. Then I used a hand drill with a bubble level on the back so I can drill as vertical and straight as possible. For tapping I used two identical tap bits, but on one I had the tip purposely broken off. This allows you to get the threads as deep as possible into the holes after starting the threads with the normal bit. There are special blind pocket tap bits available, but they're expensive and a broken-off bit worked just fine for me. The picture shows the tap bit modification. (The picture is from a stripped-thread fix on my Adler 67 - your drill and tap size for swing guide installation may be different.) Get your swing guide and bracket before you start drilling. The KB-09 extension bracket uses a smaller screw size than the swing guide itself. Make sure you drill and tap for the exact screws you will use. For sourcing the swing guide, they're available from various vendors online, usually with a "fits most machines" type statement. Very few vendors carry the adapter brackets to actually make the guides fit a particular machine. I always get a few extras when I order stuff from Kwok Hing for my machines. I put the extras in my Ebay store to help finance my sewing machine habit. I have guides and brackets.
-
After fretting that no owner manual exists online for the old Pfaff 335 I realized that there wasn't one available online for my own Durkopp Adler 205-370, either. So I scanned in my printed Durkopp Adler 204/205-370 Owner Manual and uploaded it here: http://docs.uwe.net/Durkopp Adler Owner Manual 204-370 205-370.pdf I had also found a Durkopp Adler 205-370 Service Manual in PDF format some time ago. I uploaded it here: http://docs.uwe.net/Durkopp Adler Service Manual 204-370 205-370.pdf Both manuals have five language sections: German, English, Spanish , French, Italian There are reference photos are at the end of each manual. I also uploaded both PDFs to http://www.ManualsLib.com, so they may appear there too.
-
Pfaff 335 Manual For Older Version Needed
Uwe replied to CaroCaro's topic in Leather Sewing Machines
You may be out of luck finding a manual for the old Pfaff 335 online other than some subclass parts lists. Your best bet may be to start with a manual for the Pfaff 145 (or the Pfaff 145 Parts Manual). The 145 was essentially the flatbed versions of the old 335. Everything above the bed should be the same, including threading diagram, stitch length regulator, needle system info, etc. For what's going on inside the cylinder arm, look at the manuals for the new Pfaff 335 version (see manual links at bottom of the linked page) and hope that very little has changed in the cylinder arm area. As for dating a Pfaff machine, I came across this attached chart some time ago: Figuring out how to post a picture in this forum may be harder than getting your Pfaff 335 to work properly.
-
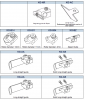
To answer your question about whether swing down guides are more versatile, the short answer is yes. Bed mounted guides are often one-trick ponies - they're mostly one-size roller guides or straight edge guides. Rarely can you easily switch between the two modes. Bed mounted guides are useless when you need to follow an edge of a small top piece in the middle of a larger bottom panel (like attaching a smaller pocket in the middle of a larger bag front or back panel.) The bottom panel will simply cover the bed area and you can't use a guide from below. A guide that descends from above can deal with that scenario quite easily. The swing down guides are more of a system with many attachments available for straight edge, various roller sizes, zipper guides, center seam guides, etc. I'm attaching a screenshot of a guide page at Kwok Hing that illustrates the various attachments available for the swing-down guides. So if it is versatility you need the swing down guides may well be worth the investment.
-
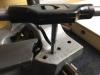
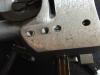
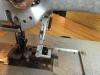
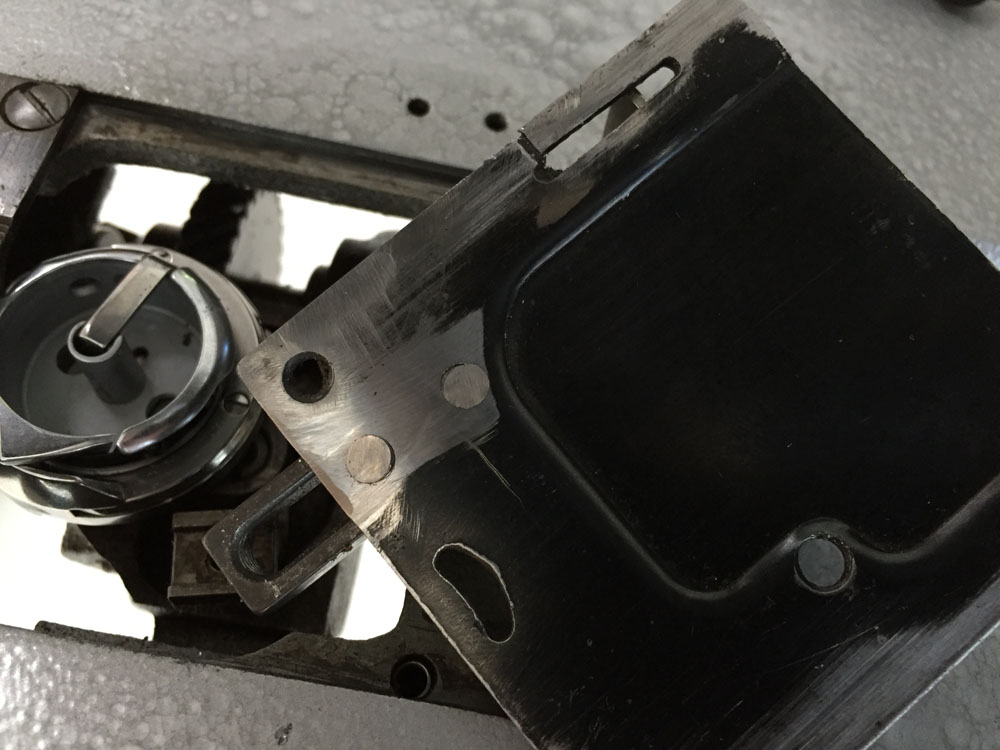
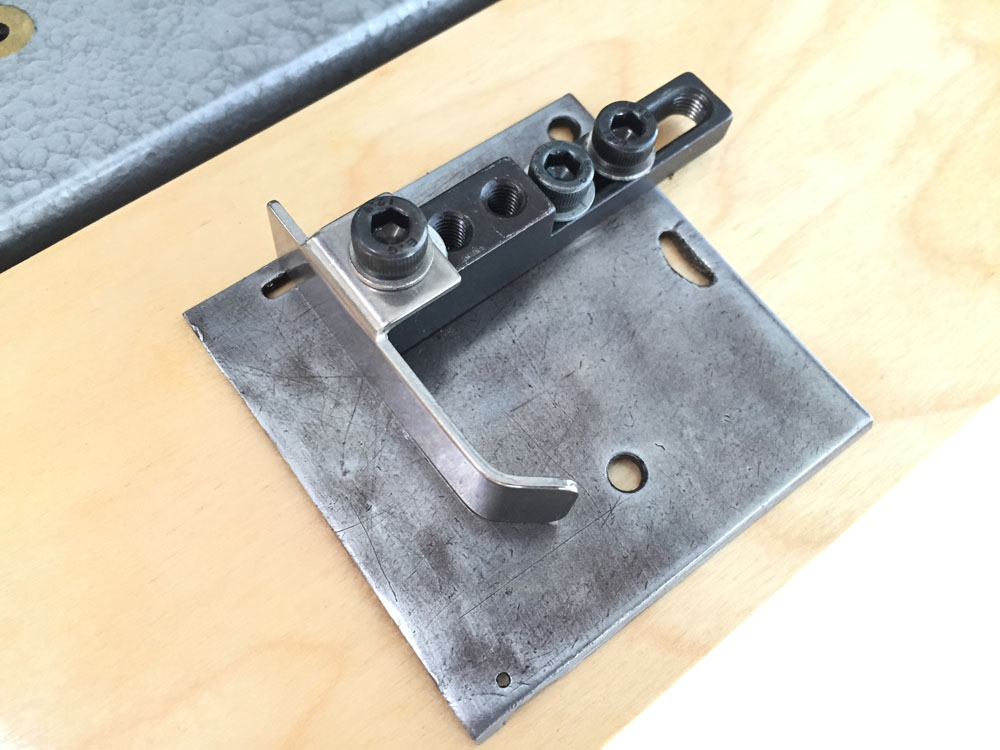
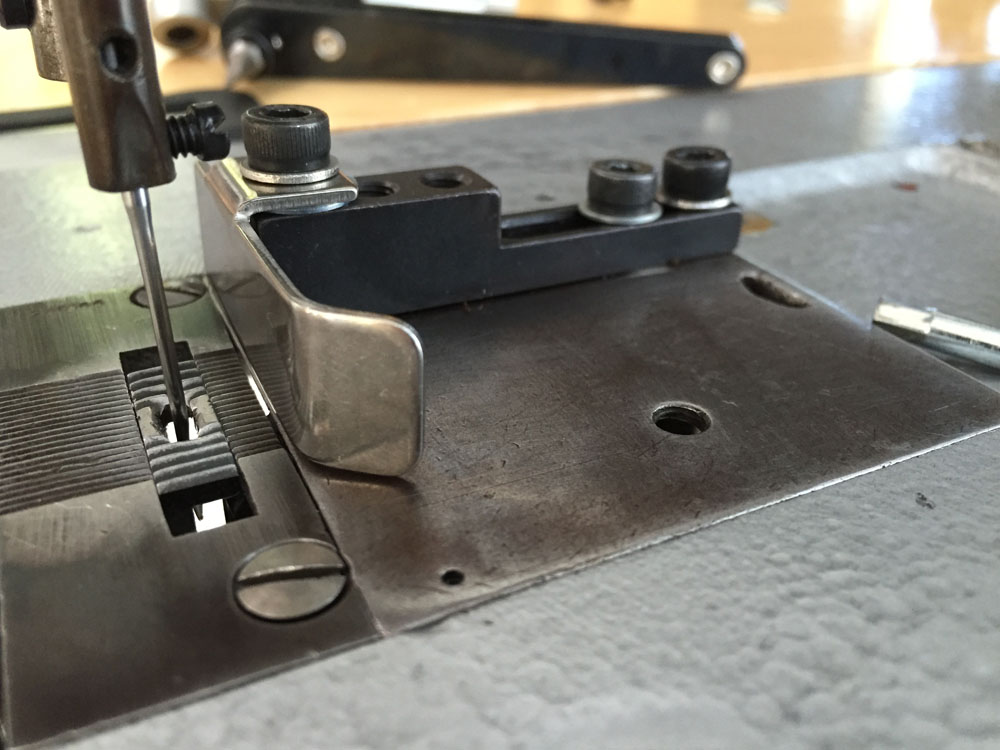
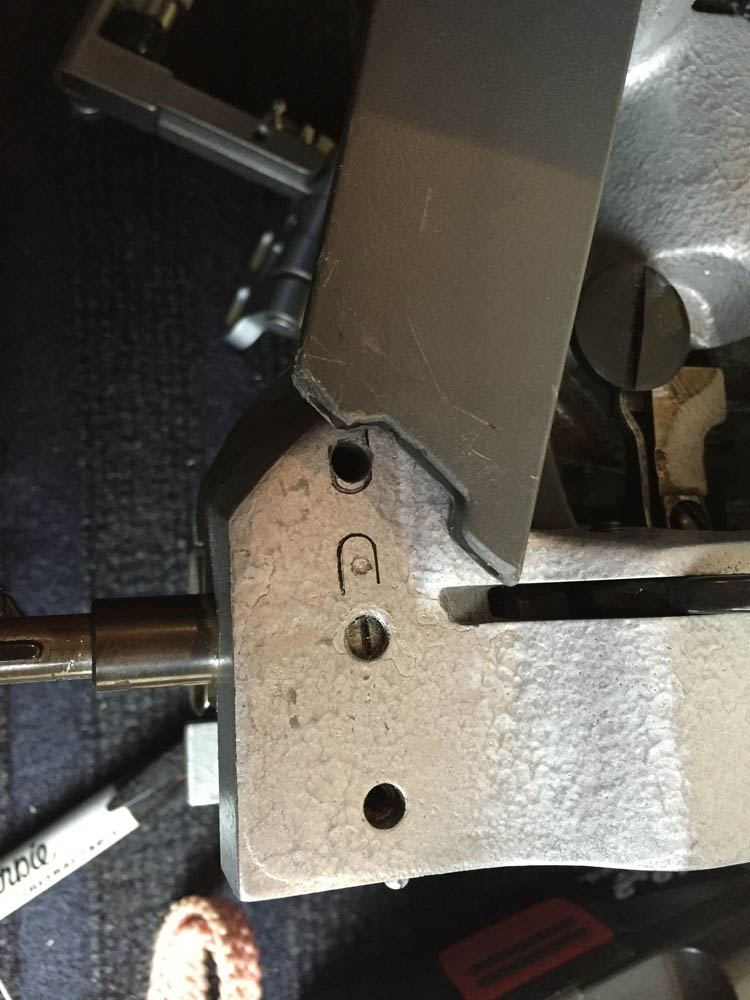
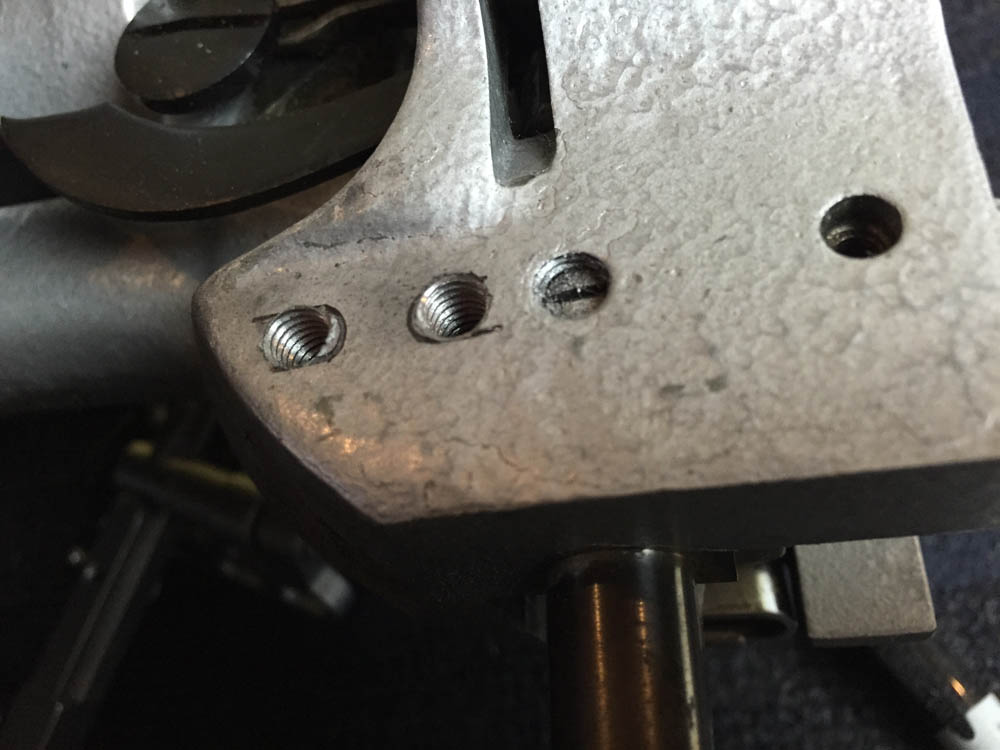
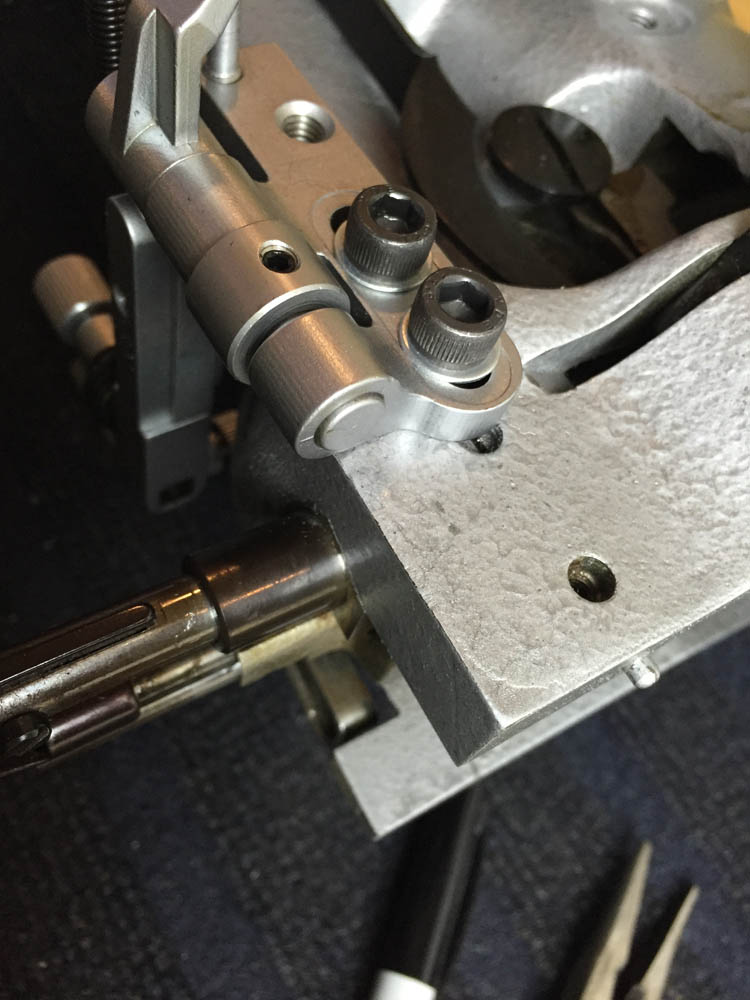
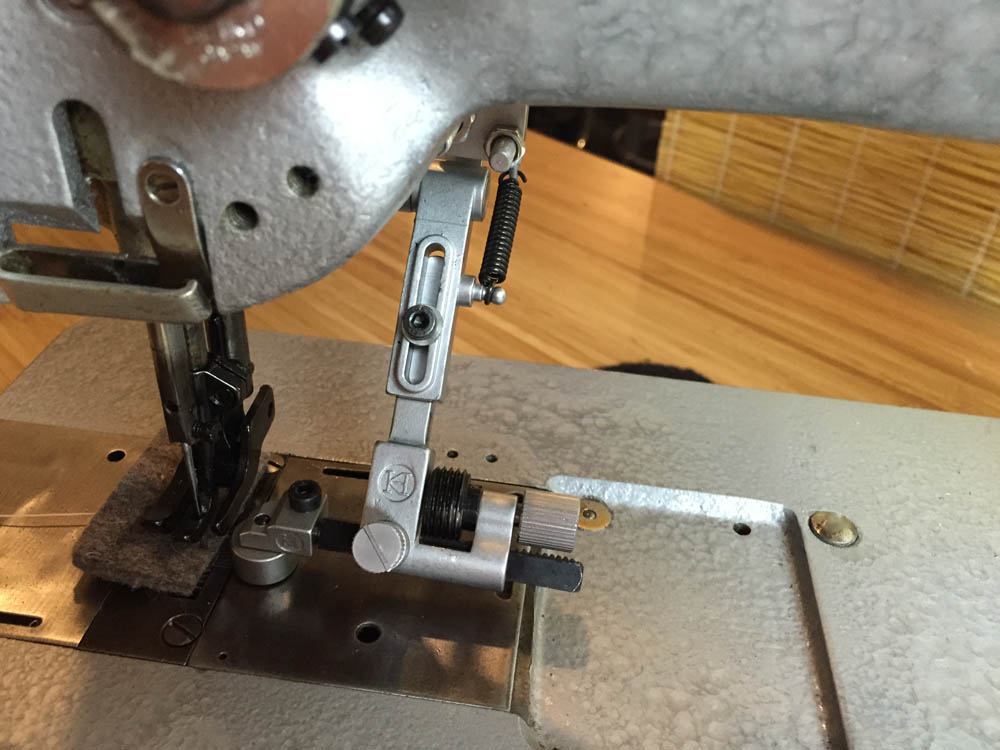
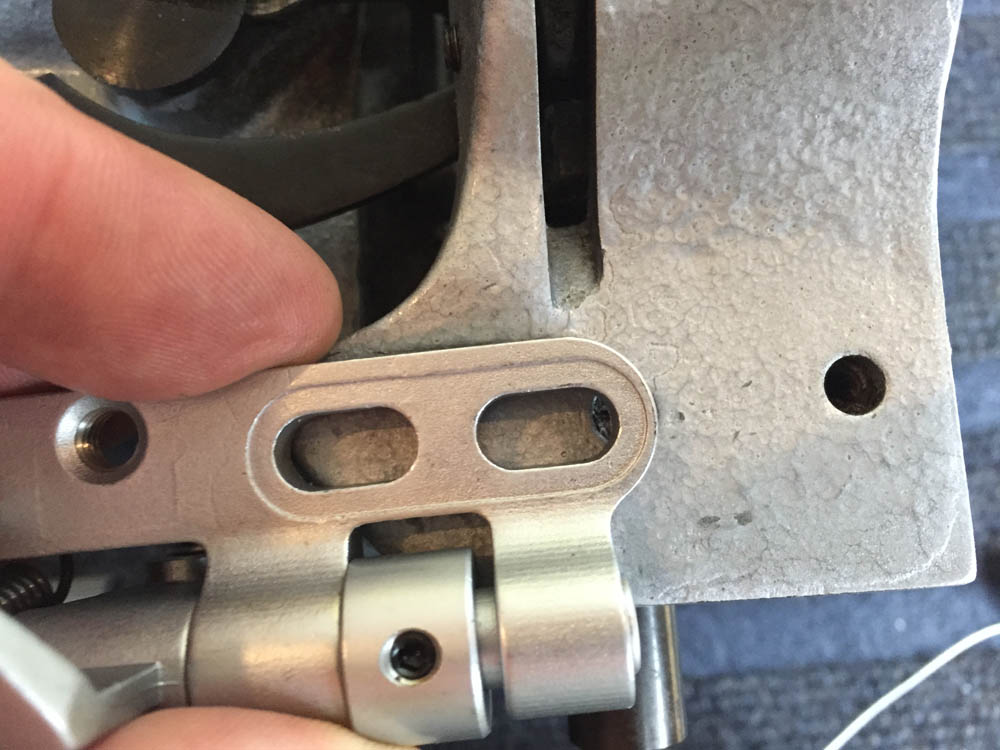
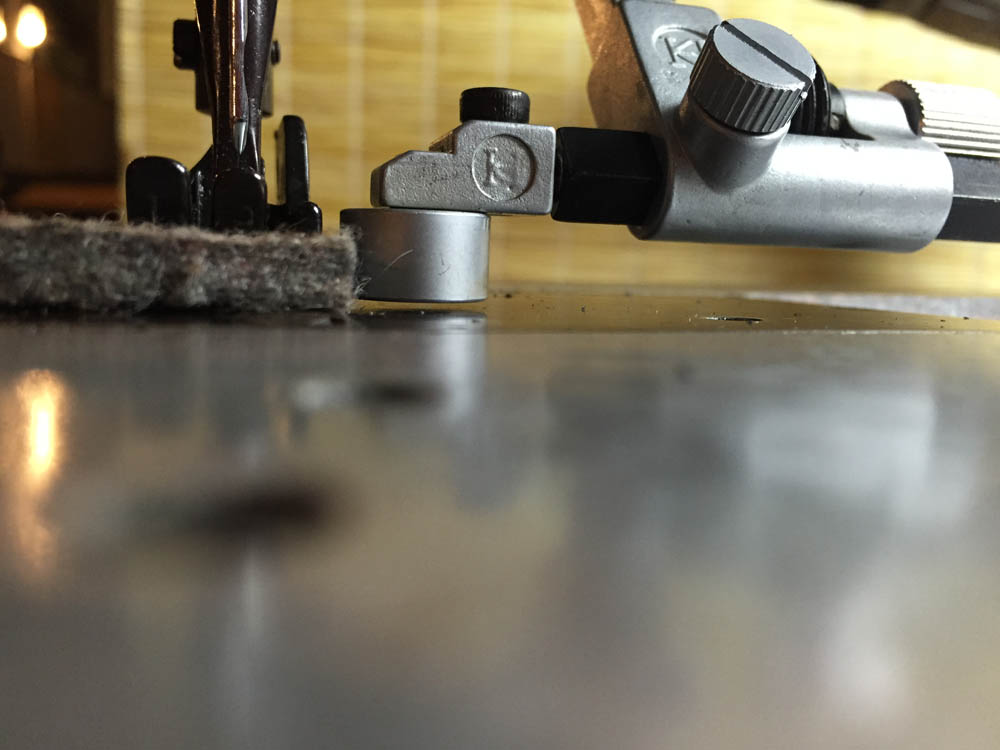
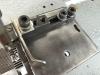
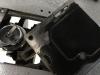
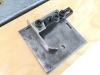
I caught the tinkering bug yet again and made a cover plate mounted edge guide from parts I have sitting around from my various Kwok Hing swing-down edge guides. The KG-AA straight edge guide and the KB-09 bracket lend themselves quite nicely to making a custom edge guide. Cover plates are available on Ebay for about $9 (and I'm sure our resident vendors stock them as well), and the two guide parts run about $25 by themselves (I have some of these). So for about $35 in materials and twenty minutes of work, you have something in the middle between the cheap, cool magnet guides and the elaborate, more expensive swing down guides. Drilling and tapping holes into a cheap and easy-to-replace cover plate is considerably less stressful than drilling into your precious machine. I drilled two holes into the thick part of the cover plate and tapped 10-32 threads. The screws are ground off level with the bottom of the plate, so the whole affair slides in and out of place as usual, making for an easy five second swap between regular cover plate and a cover plate with mounted edge guide. Hopefully the pictures help tell the story.
-
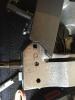
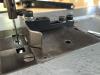
The bed mounted guides will be cheaper, partly because they're fairly simple designs and easy to make. The swing down guides are more complex to make and cost more but they're also more versatile. It's matter of personal preference often. Swing-down guides will require drilling and tapping holes on a 111W155 class machine - not something everybody is comfortable with. I had installed a swing-down guide on my Consew 225, which is nearly identical to a 111W155. I did not use an extension bracket like Constabulary. My guide sits closer to the presser feet, but the extension bracket (KB09) could be easily added for increased adjustment range. I had posted some installation pics in another thread before, but here they are again: