-
Posts
2,221 -
Joined
-
Last visited
Content Type
Profiles
Forums
Events
Blogs
Gallery
Store
Everything posted by Uwe
-

Adler 267 - Engine Question And Vs Fomax Ws 1335
Uwe replied to 276ccm's topic in Leather Sewing Machines
That is one beautiful looking machine - congratulation on finding such a pristine example! Nice setup with the new servo motor! -
If the leather is thin/soft enough and the workpiece suitably big, a post bed two-needle walking foot machine might do a nice job for a lap seam on a bag. Apparently not many leather workers use post bed machines due to needle and thread size limitations. If you have $3,400 to spare, there's a nice Pfaff 1296 post bed machine for sale on my local craigslist. The french seam approach shown in the video does not really solve the problem of how to sew a three-dimensional piece on a machine. Flat pieces like the ones shown in the video above are comparatively easy to do in both lap and french seams. French seam on a bag seems impossible unless you can turn the bag inside-out, which is not an option for stiff bridle leather.
-
A shoe patcher style cylinder arm machine (e.g. Adler 30-70 or Singer 29-4, etc.) will happily sew in any direction using a 360 degree swivel head without having to turn the workpiece. It's an option but it'll be tricky to do a double line of stitches perfectly aligned. If the leather is soft enough and the bag big enough, like in your photo, you can just fold/squeeze/wrestle the piece through a normal walking-foot twin needle flatbed machine, I suppose. Glueing the lap seam before sewing may be less aggravating but more time consuming. I was admiring a Brooks Soho bag at a store recently. This bag has multiple lap seams and uses VERY stiff bridle leather. It's probably sewn by hand but I'm not certain. I am fairly certain that Brooks does NOT wrestle these pieces through a regular sewing machine, the leather is absolutely pristine on the finished bag. I'm not aware of a practical way to sew a lap seam on a stiff, cylindrical piece lengthwise unless you have a special machine that can sew in the direction of the cylinder arm, or by hand, as ENC mentioned before.
-
Yep, I added the little spring to push up the lever when not in use, otherwise gravity makes it ride along with the moving presser foot and the whole linkage mechanism bounces as you sew. Post some before and after pictures when you're done with your conversion!
-
Ah, the foot foot lift, not the knee foot lift, lol! So you're talking about the configuration on page 11 of the illustrated parts manual. Is that what your machine has or do you want to convert your machine from knee to a foot operated foot lift? It seems like it would be fairly easy to convert a knee lever setup by attaching a pedal via rod/chain/cable to the end of the long pull-down lever. I just finished prototyping a conversion of my Consew 225 to a foot pedal operated foot lift (fully functional but not pretty yet) It's conceptually the same arrangement as your 1245, except your knee lever is already a pull-down mechanism, making a conversion even easier.
-
Sewingonline.co.uk sells a service manual that may be the right vintage, but it's hard to tell for sure http://sewingonline.co.uk/library/pfaff-service-245-to-1246.html I'm guessing you already have the user manual: http://www.bedienungsanleitu.ng/pfaff/1245/anleitung (it does have some pictures of the back of the machine) The illustrated parts list shows the presser foot lift parts on page 38: http://hensewfiles.com/PDFs/Pfaff%201245%20old%20casting.pdf Two detailed pics of the back that show the foot lift levers:
-
Henry Ford once said: "If you need a machine and don’t buy it, then you will ultimately find that you have paid for it and don’t have it." It sounds like you already made up your mind as to what machine you will buy. It may not be the machine you need in our collective opinion, but it's all part of the learning process.
-
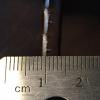
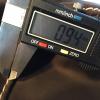
I decided to actually measure a stitchline I made with size 415 bonded polyester on my Adler 205. In real life, the 415 thread is indeed very close to 1mm in thickness. If it's the visual you're going for, the size 415 might be all you need. The 441 and Adler 205 specs are similar, so a 441 might be able to handle 415 thread well enough if you sew slowly.
-
The Consew CP 206R isn't a true triple/compound (top+bottom+needle) feed machine either, just a top+bottom feed. The needle does not help move the material. A sewing demo video of the Consew CP 206r is not confidence inducing in my mind. In contrast, the confusingly similar named Consew 206RB (slightly strange sewing demo video) looks similar at a superficial glance, but it's a totally different design, a factory strength machine with a proper compound feed. An ugly but functional used Consew 206RB is much more desirable for leather work than a shiny new Consew CP 206r, in my opinion. I started my sewing adventure with a Consew 225. It was not pretty when I picked it up at the local thrift shop, but it worked and was a great machine to learn with and work on (early video I made with it). After getting the mechanics to work smoothly, I eventually gave it a cosmetic overhaul as well. I posted it in the for sale section here after I got my hands on a nice Adler 67. Make sure you read the fine print of the machines design specs and closely inspect video footage (if available) of the machines you're considering.
-
Having a machine shipped from America seems like a waste of shipping money. You have nearly a dozen countries within daytrip distance from where you live, with a good supply of name brands like Adler, Pfaff, etc. There must be a few machines coming up for sale every so often with a major fashion center like Milan nearby. Avoid shipping if you can - it's a risk with these machines and many get damaged during shipping because many private sellers don't know how to package them properly. It may take a little time to get the perfect (or even a good-enough) machine. Start with one that just works and is cheap, then upgrade when you've earned enough money with it and you know what you really want in a machine. Make sure you can get a service manual for your machine before you buy it - it's very important when it comes to fixing things yourself. No matter what machine you start with, you'll want to upgrade eventually. Sewing machines can be addictive and you learn a lot once you start using them. Old is good when it comes to leather sewing machines. If you read the posts on this forum you'll soon see a pattern of just a dozen or so machines that have been around forever, copied many times, and have a good supply of parts and accessories. Look for an old Adler 67/167/267, Consew 225/226, Singer 111, or something along those lines. If the machine works and you take care of it and don't abuse it, it will last you forever. Check ebay and also the local/regional online for-sale sites where people sell things that are too heavy to ship (washing machines, etc.) That's were many people sell sewing machines. We have Craigslist.com here in north America - there must be something similar in Europe. Register on the site, develop some good search terms and subscribe to searches in order to get notified via email when a suitable machine comes up for sale. You'll be one step ahead of the casual shopper who only checks every couple of days. The good machines at bargain prices often sell within a matter of hours, not days. Good luck with your search, let us know what you end up getting.
-
If you're looking for a modern, state of the art machine that does what you're asking with a little more versatility than a sole stitcher, consider the Durkopp Adler 969 H-Type cylinder bed or the Durkopp Adler 967 H-Type flatbed. The 969's material handling specs are wicked with a price tag to match.
-
There's an english service manual for the Adler 267 twin needle model with needle bar instructions starting on page 20. The disassembly procedure has much in common with the Adler 67 procedure, including three tiny spring loaded balls that pop out at some point of disassembly (and surely will fly across the room into some crevice never to be seen again unless you know what to expect.)
-
How good is your German? The Adler 67 Service Manual describes how to remove the needle bar on page 40/41, albeit in German. It's a bit of a puzzle with three tiny metal balls that have to be aligned with a slot and such - I've had too much wine to give it a go. I've seen an english version of the Adler 67 Service Manual at the sewusa.com website, but they want money. I do wish people would stop charging for things that should be free, especially if they don't own the copyright in the first place. A fellow leatherworker may have the english version already and may be inclined to share it here for general edification.
-
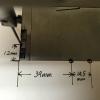
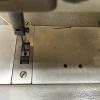
My Adler 67 has the standard mounting holes for attachments. Sailrite makes a nice binder attachment that uses these standard mounting holes and it may work on your 227R as well. The curvature of the top plate on the Consew 227 may still be an issue, as it will slightly tilt any attachment due to the offset of the mounting holes towards the front. I measured the mounting hole locations on my Adler 67 and took two pictures to illustrate their locations and distances from the centered needle position (stitch length set to "0"):
-
Somebody came up with an interesting way to attach a binder to his Consew 227R, as posted here: http://gearmaker.org/index.php?topic=347.0 I have a feeling this guy considered drilling holes directly into the top plate, but must have had reasons to go another route. The curved top plate may not lend itself to mounting a binder directly to it, perhaps due to tight space and moving parts directly underneath (having a screw extend below the top plate may interfere with moving parts). The parts list for the Consew 227 series has 38 parts listed on page 17 that are special to the synchronized binder version of this machine (227RFS). Here's a picture of the custom binder setup and the owner's description:
-
Can you post a picture of your machine head and perhaps the binder you plan to use?
-
Without seeing pictures of your 105-27 I have to guess its similar to the 105-27 that Nick-o-sew was selling on eBay some time ago. Their machine looked just like a 105-25 but had a little flatbed attachment and an elaborate bobbin winder contraption that ran off the hand wheel. It was not unusual for a time for a high-volume-buyer to request a custom version of a machine to suit their specific manufacturing needs. Help solve the mystery by looking at the Adler brochure of the regular 105 machines and subclasses ( http://www.duerkopp-adler.com/commons/download/download-text-attachments/Vintage_Leaflets_Adler/Leaflets_Adler_class_105.pdf ) and then take a few photos of yours that highlight what's different with your machine. If you post the pictures here we'll have a record of it for future inquiring minds and the ever hungry search engines. The only real 105-27 documentation reference I came across is a 2-page parts list sold by Proleptic for $2 (http://proleptic.net/shop/adler/adler-105-27/). Here's a picture of the machine Nick-o-sew was selling:
-
It is still available. I'm in Europe right now, returning to Detroit on August 22.
-
Another resource for older Pfaff manuals, including 138, 145, etc. is here: http://dixiesewingmachine.tzo.com/PFAFF%20SERVICE%20BOOK.htm
-
Pfaff makes manuals for some of its machines available here: https://www.pfaff-industrial.de/en/support/downloads/technical?set_language=en The manuals cover mostly newer models, so yours may not be in the list.
-
Your reverse lever may not be "centered" properly. With stitch length set to max and needle at bottom dead center, the top and bottom feed dogs and should NOT move when moving the reverse lever up and down. If the feed dogs move, your forward and backward feed dog movements will not be equal. On page 11 of the 335 service manual ( https://www.pfaff-industrial.de/db-downloads/technicaldoc/justieranleitungen/300/ja_335_01-14_en/@@download/file/JA_335_01-14_EN.pdf) they talk about how to "center" the reverse lever. The manual is for the newer model, but often these mechanical adjustments are the same over several generations of the machine.
-

Adler 267 - Engine Question And Vs Fomax Ws 1335
Uwe replied to 276ccm's topic in Leather Sewing Machines
The needle positioning systems on these cheap servo motors mostly work by installing the sensor on the hand wheel ( easy or hard, depending on your machine). The sensor has a switch that activates when the hand wheel is in a certain position. During setup you turn the hand wheel in the desired position (usually needle down), then turn the sensor until the switch activates and the little light comes on, then tighten the set screw. The programming unit now knows which position is the down position and will stop in that position when you let go of the pedal. The programming unit usually allows you to switch between stopping in either needle up or down position with a few button presses. However, it does NOT stop wherever you start. Some systems also have the "heel" feature which gives you an additional half turn when you tilt the pedal backwards with your heel, making both up and down needle positions easily accessible. It's not so easy to turn the needle positioning OFF on the systems I have tried. I wish they had a simple three-way switch like my old Viking has (up/off/down), but unfortunately they generally use button presses to navigate a cryptic, crude menu with no OFF option. On my motors I had to unplug the sensor to turn needle positioning off. Much of the above probably does not apply to fancy setups like Efka systems etc.


