Uwe
-
Posts
2,221 -
Joined
-
Last visited
Content Type
Profiles
Forums
Events
Blogs
Gallery
Store
Everything posted by Uwe
-
Yes it will slow things down. It's all about the ratios of the pulleys. If you replace the 3" pulley on the motor with one that is about 2", your machine will run at 2/3 of the original speed. This is basic high school geometry stuff. Remember Pi (3.141....)? At 3" diameter pulley will have a circumference of Pi*3"=9.5" so each revolution will move the belt by 9.5 ". A 2" diameter pulley has a circumference of Pi*2"=6.2" so each revolution of that pulley will move the belt 6.3".
-
Sold.
-
Sieck in Germany also has a nice selection of cylinder arm leather machines that would suit your needs within your price range. Almost any of their cylinder arm machines on their "Sattler Nähmaschinen" page would work for you. In any case, that page is good reference for suitable machines and rough pricing available in Europe. Personally I think the Sieck 369-373 ( a copy of the Durkopp Adler 269 line) would make a great machine for the type of work you're describing. Get a servo motor with speed reducer to make your learning curve easier to manage. If you're brand new to the scene, stay away from oddball old machine with limited parts availability and iffy documentation. Get your machine from a dealer you can get service from in terms of repair, adjustments, parts, etc. Where exactly you are in Europe makes difference for service and shipping.
-

Question On Shuttles, Adler 205 Vs 441 Clones
Uwe replied to oldtimer's topic in Leather Sewing Machines
I got confused, too, earlier this morning. In Adler 205 speak, the "spacers" are the little black parts that set the needle guard distance to match the needle size. Your learning curve is steep because you're taking things apart that I haven't even touched yet in the year that I've owned my 205. I'm just not sure how the ring-like shims would affect the success or failure of an aftermarket shuttle other than allowing the fine tuning of hook-to-needle distance. If the shuttle is within specs of the original it should work. If the aftermarket shuttle it's out of spec or just plain wrong, I doubt changing the shims will fix the problem. -
Question On Shuttles, Adler 205 Vs 441 Clones
Uwe replied to oldtimer's topic in Leather Sewing Machines
I thought the shims are used to fine-tune proper hook-to-needle distance. Once it's set is should never change, really (unless you take things apart). -
The outer foot needs the inner foot to press against the material in order to lift up. If the step down is too high, the inner foot may not press against the bottom and prevent the outer foot from lifting up. This would cause them to appear to stop walking. There is an adjustment on the back of the machine that allows you to change how high the feet lift up as they walk. Set that to the highest lift it allows and see if it helps. The actuator needs to be at the top of the slot for maximum foot lift as they walk. Many folks people have this at the top and never change it. Inner and outer feet should also lift the same amount as they walk. Check the service manual if that's not the case.

-
It may have to do with the shape of your presser feet or how high your presser feet lift while they walk. I can't really tell much from the tiny photo you posted. Consider using a presser foot like the KP-267Q by Kwok Hing if you have big steps in material height to climb over: If adjusting your upper thread tension does not allow you to get the bobbin thread pulled down then you may have to increase your bobbin thread tension. There's a Service manual for the Durkopp Adler 67 series, but it's in German (you can always copy and paste sections into Google translate and hope for the best). The only real difference between the 67 and the 167 series is the larger hook/bobbin size in the 167, as far as I know. If you get a more detailed manual from the owner than the Durkopp Adler 167 User Manual with 12 pages in 5 languages, please help us get it posted online. I'll be happy to scan it for you.

-
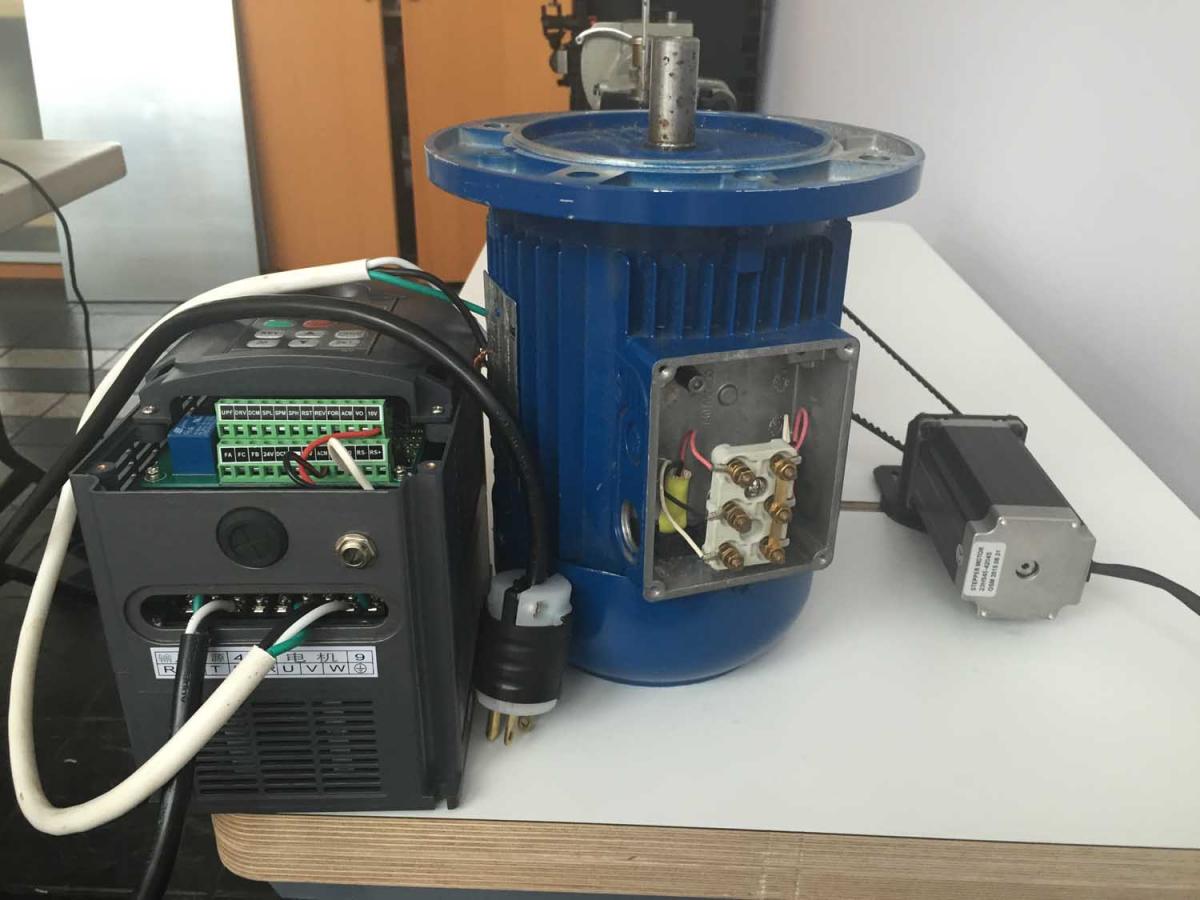
Looking pretty good right there. How about some pictures of your motor and speed reducer installation? I have no idea what model of servo motor, pulley or speed reducer you have. Don't make us guess or pull every single detail out of you.
-
Question On Shuttles, Adler 205 Vs 441 Clones
Uwe replied to oldtimer's topic in Leather Sewing Machines
That's kind of a diplomatic answer they gave you. Did they say if THEIR clone version of the 441 shuttle will work in an Adler 205? -
I doubt it can be retrofitted to NH specs. The NH version has a different feed dog movement and 2Kg worth of parts that the NS version does not have, according to the LU-1500 Series brochure which details the differences between the machines.
-
Not a bad idea at all, in fact many folks do exactly that. I've seen user manuals also recommend using one size smaller thread in the bobbin than in the top.
-
I stumbled across this video today and thought it might be of interest to folks, since the topic of where certain Durkopp Adler machines are manufactured these days comes up every so often.
-
Show & Tell: Thumb Controller For Needle Positioning
Uwe replied to Uwe's topic in Leather Sewing Machines
I've not seen a single sewing servo motor actually state the torque it produces, just marketing terms like "more torque" and "high torque". The stepper motor manufacturers always state the precise torque their motors can produce for both turning and holding still, because it's a key metric for their applications in CNC machines. I ordered the 3Nm motor just based on a guess and because it was affordable (the 13Nm motor runs $140) . The 3Nm turned out to be plenty, actually, especially with the 2:1 pulley ratio, which provides 6Nm or torque at the main shaft. 6Nm is about 4.5 ft lbs of torque. Imagine installing one foot long lever handle on the handwheel and hanging a 4.4 lbs weight on the end. That's pretty good twisting power. One of my next little science projects will be measuring actual torque the different motor types apply at the main shaft at slow speeds, where we leather workers need it the most. Most CNC class stepper motors make 200 steps per revolution. They take each tiny step at full speed and max torque and then hold on to that new position with equally strong force until you tell it to make another step. The overall speed is determined by how rapidly you tell the motor to take the next tiny step. If you tell the motor 200 times per second to take a step it will make one full revolution per second, or spin at 60 RPM (a slight generalization because the motor control box subdivides those steps) When my stepper motor stops after letting go of the pedal, I actually cannot turn the wheel by hand because the motor holds on to that exact position with full force. I can't overcome that holding power by gripping the main shaft pulley with my hand. Which is also why I need the thumbwheel to gradually move the needle a small amount when the motor is powered is on. The thumbwheel is not really a fancy feature, but rather a required element of this setup. -
Show & Tell: Thumb Controller For Needle Positioning
Uwe replied to Uwe's topic in Leather Sewing Machines
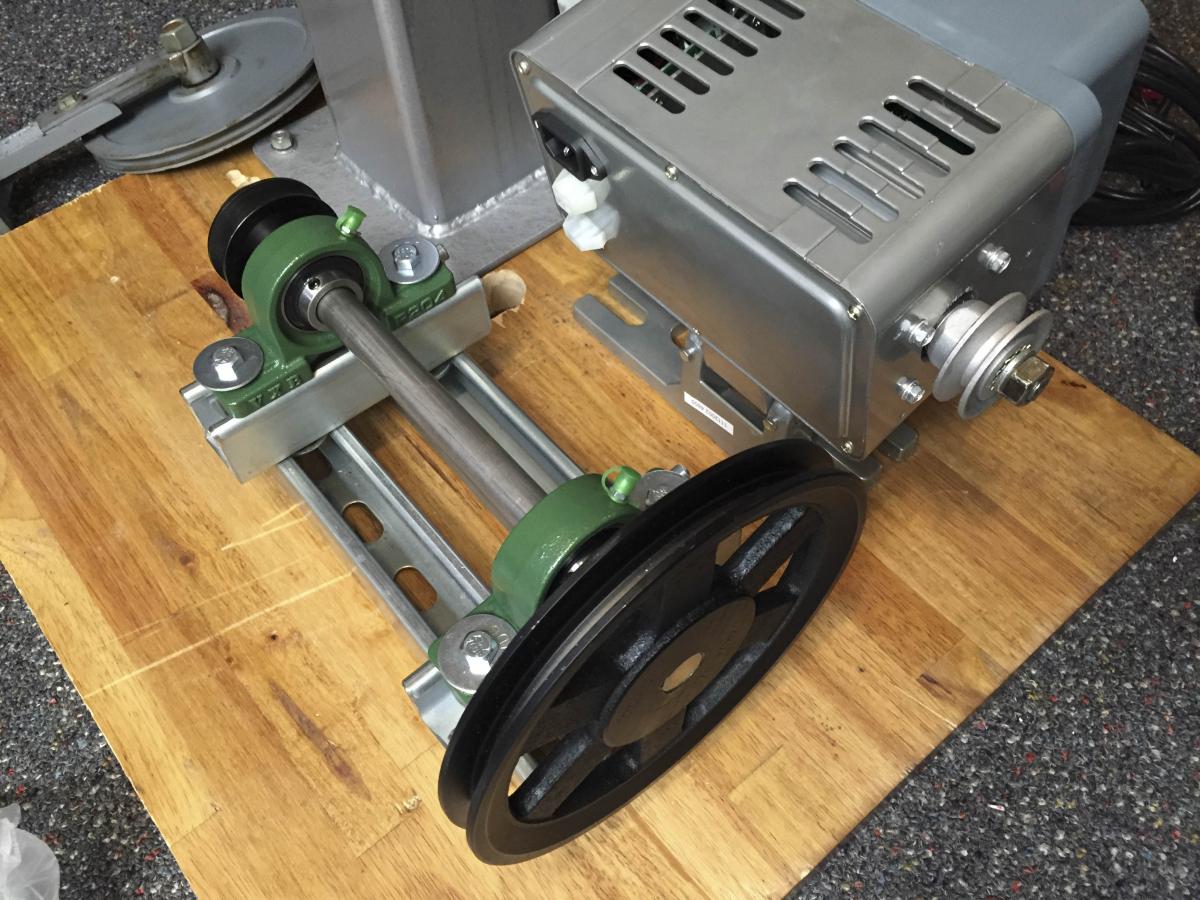
I tried the 3-Phase motor and variable frequency drive, but abandoned the idea (I used the pedal for the Arduino project). While the pedal control is super smooth, 3-phase motors of similar constant torque are huge, heavy , and expensive. And there's no easy way to do needle positioning. Here's a picture of my test gear for VFD, just for size comparison: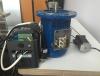
-
Question On Shuttles, Adler 205 Vs 441 Clones
Uwe replied to oldtimer's topic in Leather Sewing Machines
Call the good folks at Weaver and just ask them! The are THE experts in the country for Adler 205 machines. They will tell you if the 441 shuttle will work or not, and if not, why. Report back here what they tell you. -
Singer 111W155: Inside Presser Foot Not Inline With Needle
Uwe replied to spenzher's topic in Leather Sewing Machines
We're talking about the same thing. When you look at the needle bar from the front, the inner presser foot bar should be perfectly aligned directly behind the needle bar with no sideways offset or twist in any way. Perhaps the mounting hole drilled into the presser foot that slides onto the presser bar is not drilled perfectly straight or at an angle. That might cause the bottom of the foot to point to the right a little, which you have to correct for by rotating it to the left to make the needle holes line up. I'm curious to see more pictures that would illuminate this little mystery. -
I've no personal experience with Tippmann Boss although others have reported very good results. The guy selling the cast iron Tippmann Boss posted some stitch sample pictures that look simply amazing for machine stitches. Perhaps your machine can be adjusted to cooperate at the same level, the Tippmann Boss folks should be motivated to help you figure this out. As an alternative, consider a Pierson 6 or similar machine. That foot pedal drive is hard to beat for old-fashioned eye-candy and the machine is supposed to have impressive stitch ability and quality:
-
Singer 111W155: Inside Presser Foot Not Inline With Needle
Uwe replied to spenzher's topic in Leather Sewing Machines
The needle bar and inner presser foot bar are running inside one solid piece of metal. I don't see how they could get out of alignment other than falling off the truck. Are you saying your needle bar is not aligned front-to-back with the inner presser foot bar? Can you post pictures that show side and frontal views of the full length of the exposed needle bar area? -
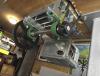
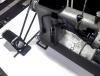
That sounds oddly familiar! My switch to a servo motor was a bit of a puzzle as well. When I got my new servo motor and tried to figure out how to mount it, the controls either faced towards the back or they faced forward and were inaccessible directly behind my stand's support column. I made my own speed reducer and a new table top, so this is the setup I ended up with : Come to think of it (and seeing the commercial speed reducer in one of the pictures), I may have ended up making my own speed reducer because I couldn't figure out an elegant way to use the commercial speed reducer that came with the machine with the new servo motor. I recommend doing an upside-down trial layout on a piece of wood or a table to figure out how things should line up. You won't be tilting the machine head back, so it doesn't really matter if the speed reducer is directly below the hand wheel or even towards the front a little. The machine is solid, bolted to the table and won't go anywhere. Pick a layout that allows you to reach the motor controls easily and adjust both belt tensions without too many headaches.


-
Show & Tell: Thumb Controller For Needle Positioning
Uwe replied to Uwe's topic in Leather Sewing Machines
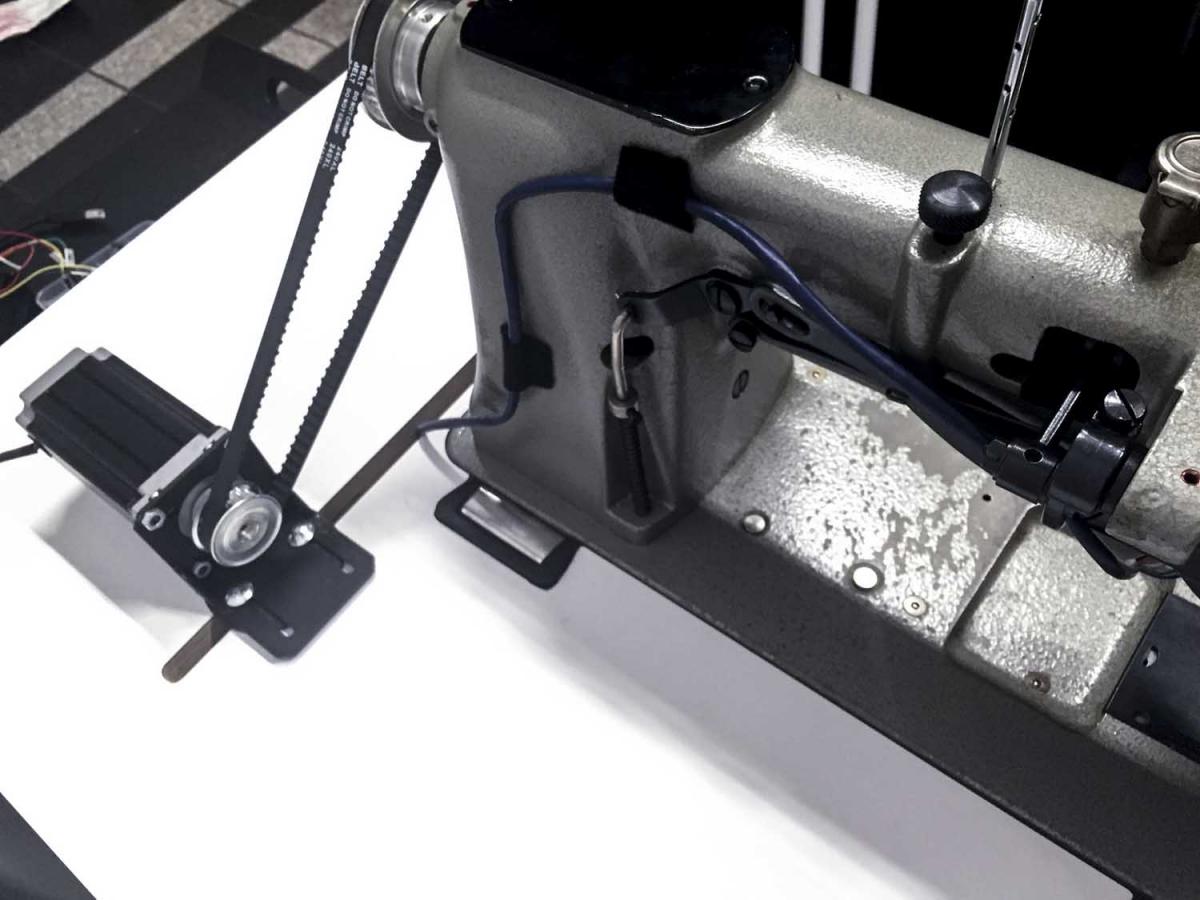
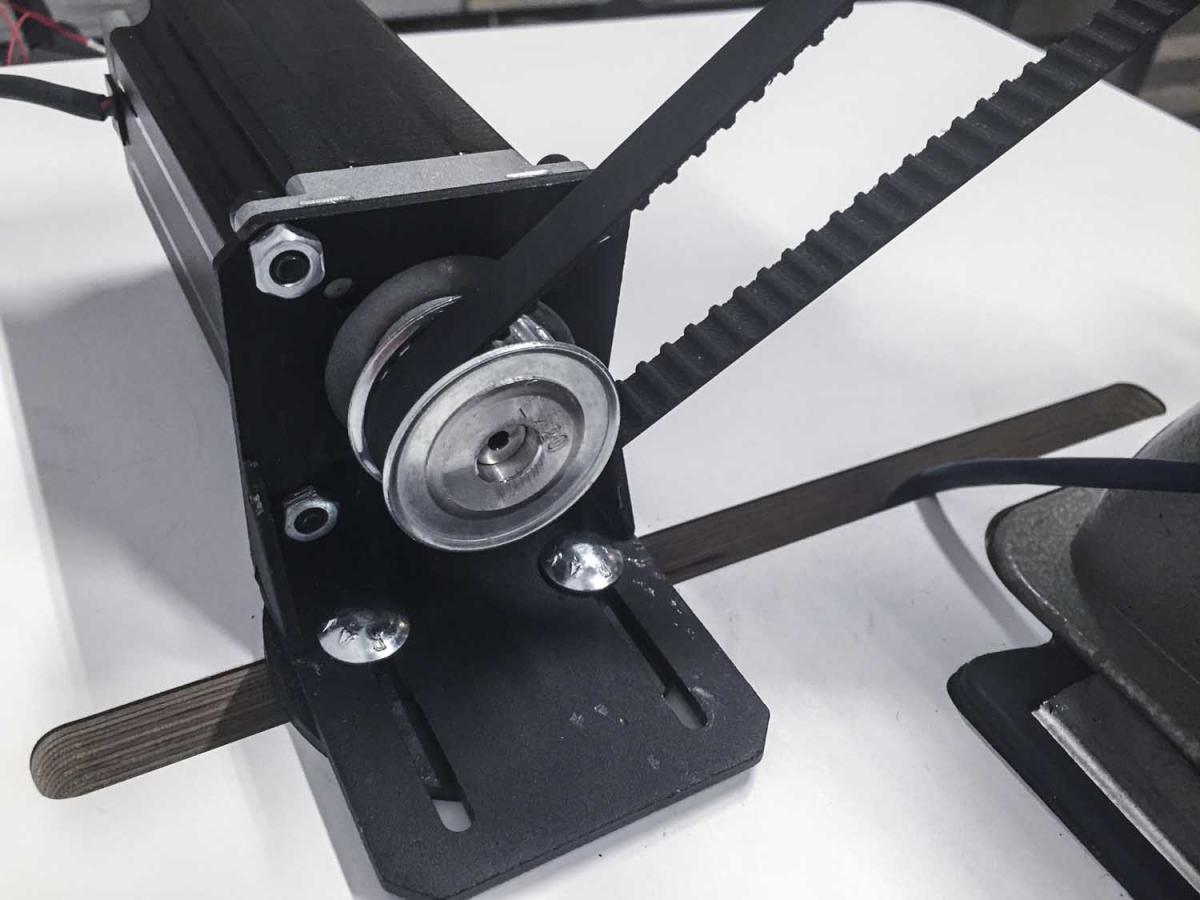
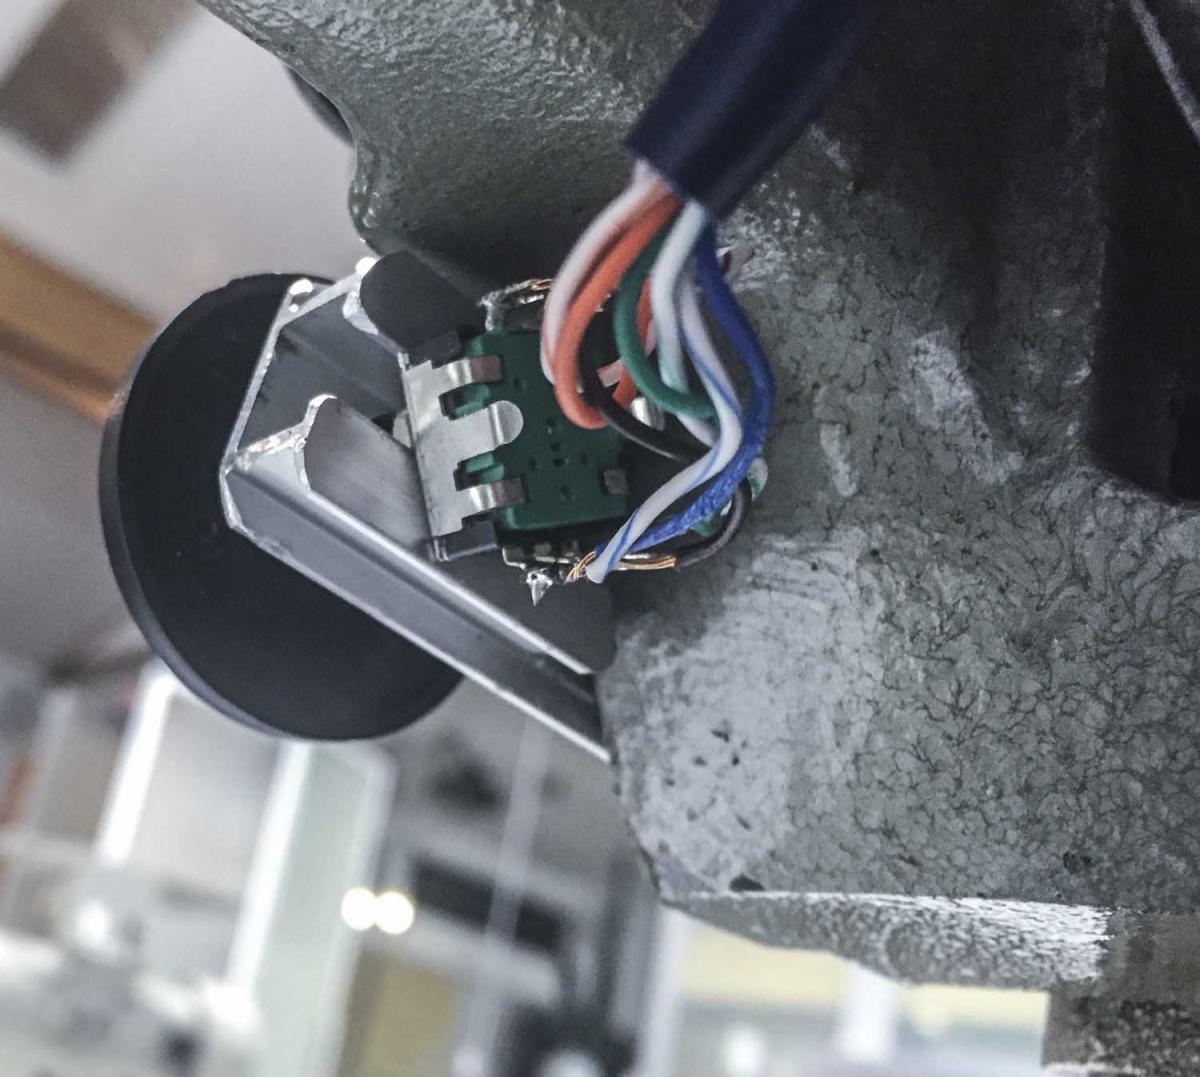
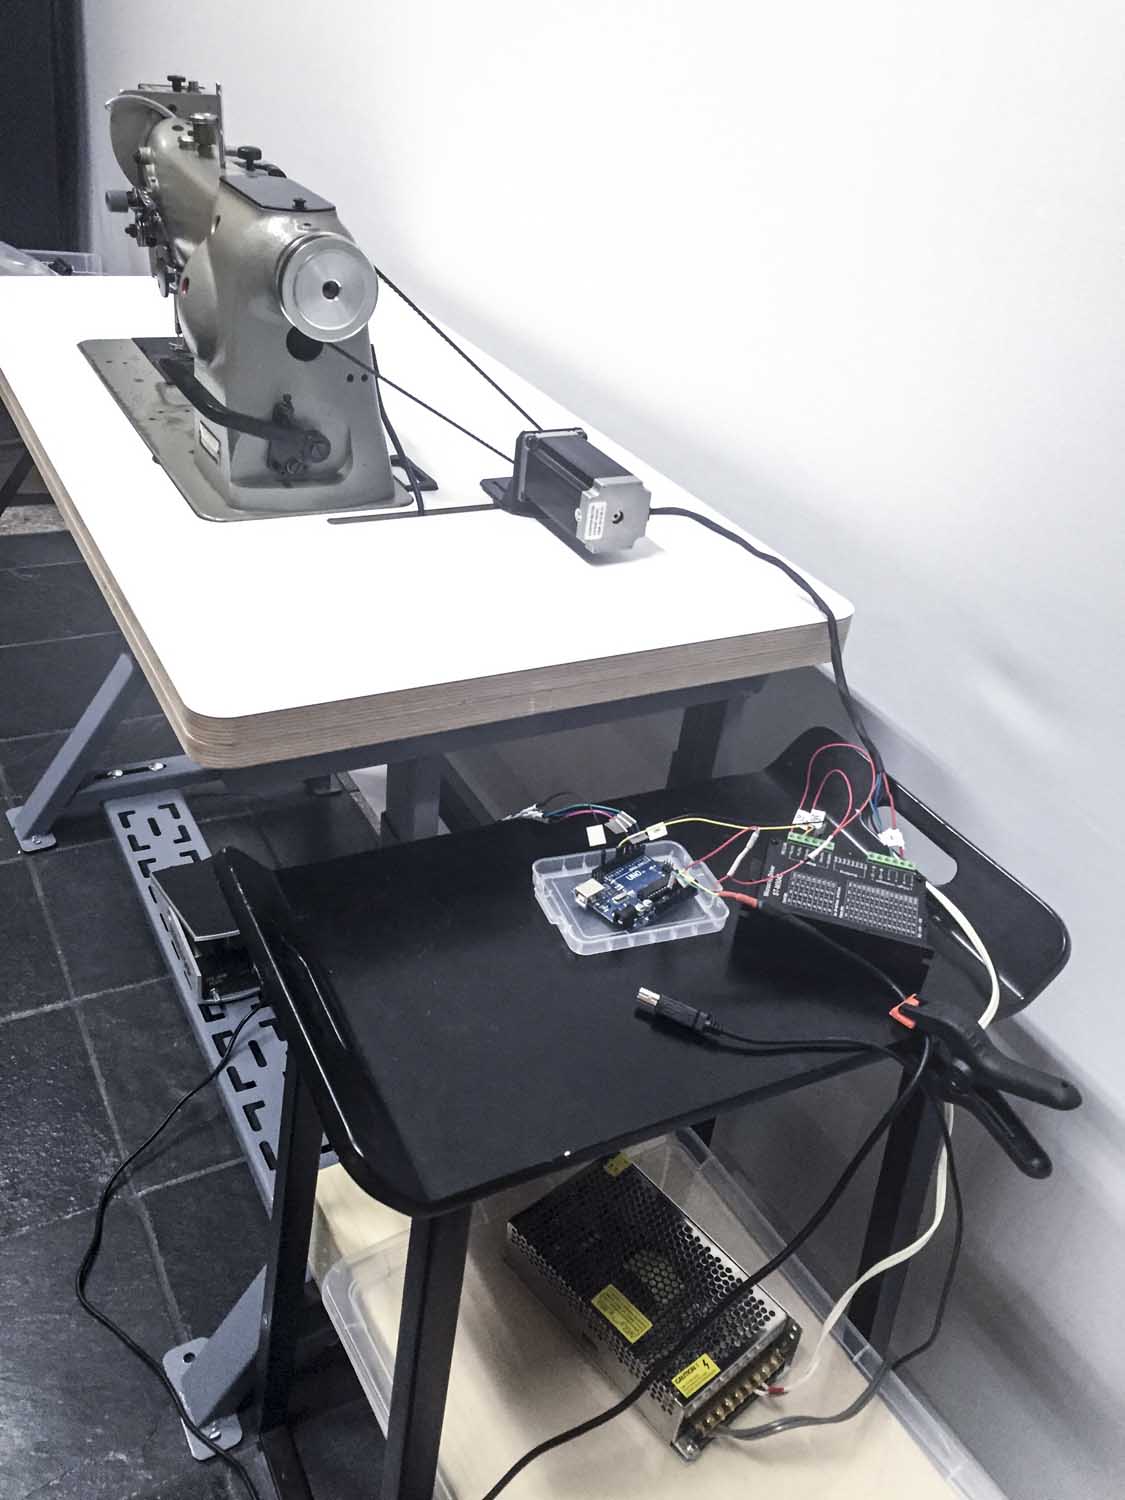
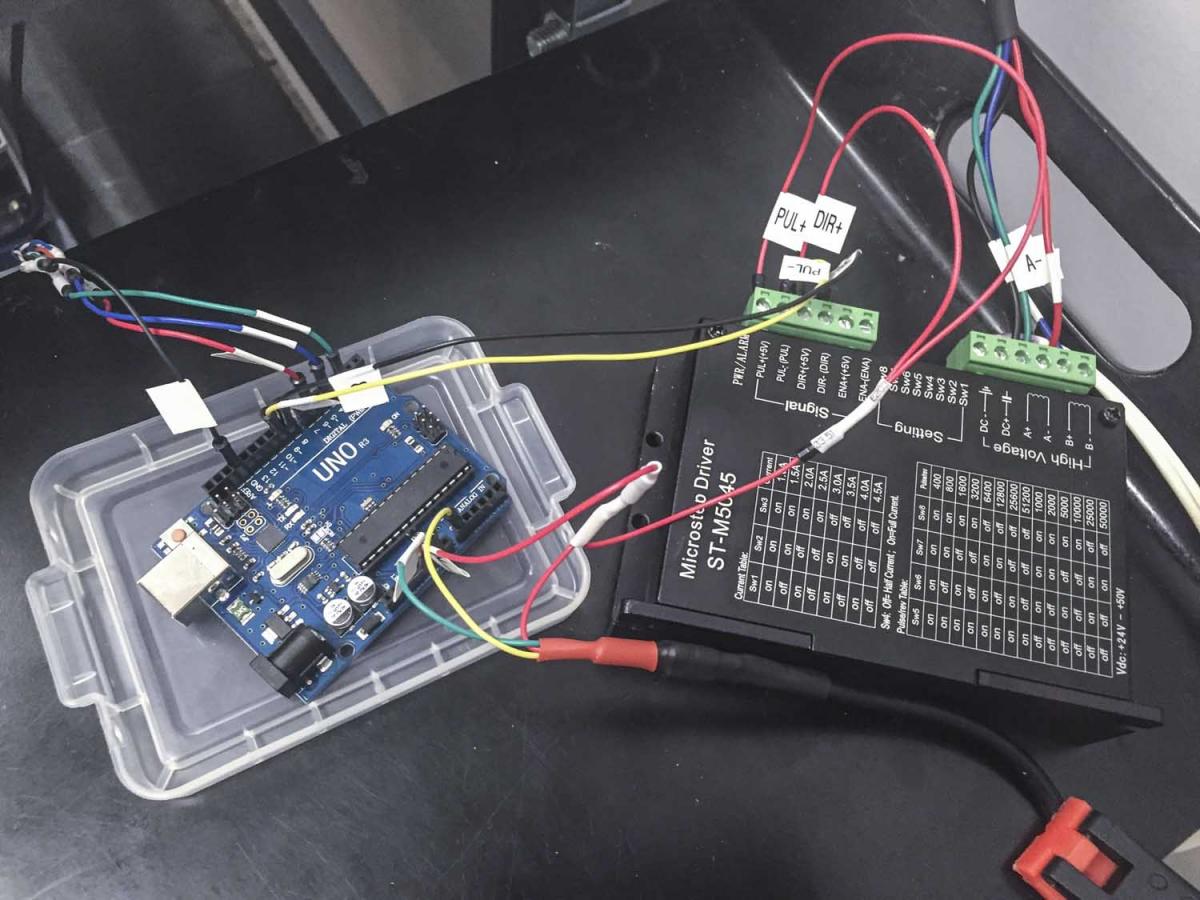
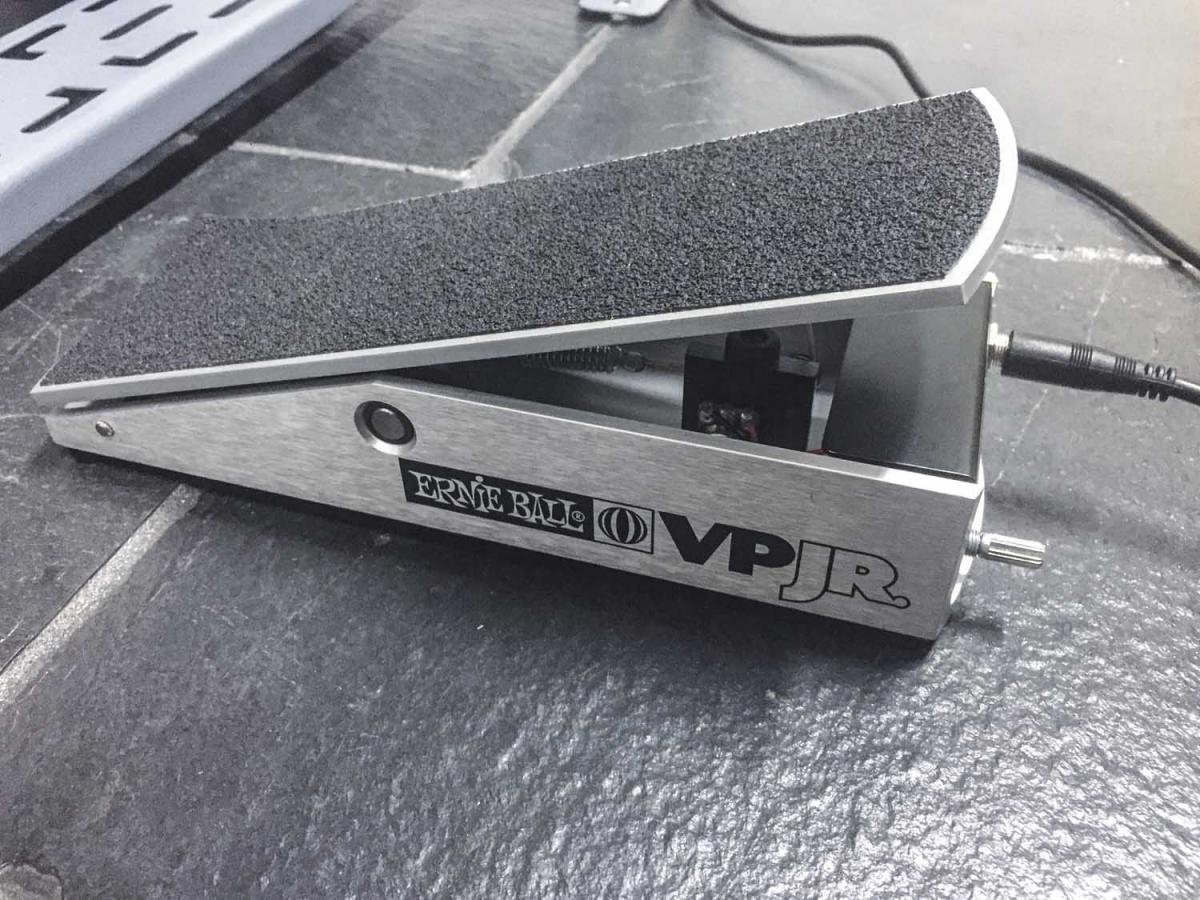
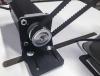
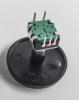
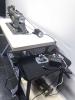
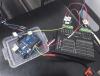
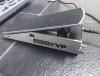
I put together some more details on the Arduino step motor drive setup for those who are interested. I know this is not everybody's cup o' tea. Feel free to ignore if it chafes you or you prefer a clutch motor or a treadle. A few pictures to show the overall setup: The stepper motor itself is quite small, actually, considering how powerful it is ( 3 Nm torque): The pulleys are XL type timing pulleys with 20 teeth (motor) and 40 teeth (machine) for a 2:1 ratio The motor is mounted using a bracket in the original belt slot. I used rubber pads to reduce vibration noise somewhat: The motor drives the machine with a 11mm wide (XL size) timing belt: The thumb dial and rotary encoder The controller bits still set up in a test configuration, not yet neatly packaged: The Pedal is actually the most expensive part at $65. It also needs a return spring. The main parts used for this project ran about $225 total: Step Motor (23HS45-4204S) $50 Motor Bracket $15 Arduino Uno R3 $10 24V 250W Power Supply $20 Step Motor Controller (ST-M5045) $35 Pulleys & Timing Belt $25 Thumb wheel & Encoder (Adafruit) $5 Pedal (Ernie Ball VP Jr. 25K Ohm) $65 I've made a shopping list on Amazon (large pulley in the list has a 10mm bore, my machine takes 12.7mm, i.e. 1/2") The prices don't quite match up because I had ordered some bits through Ebay directly from China at a lower cost. The Arduino Sketch Software Code is available as a text file to import into an Arduino Sketch window. The Code is commented to explain what's going on. The wiring diagram (also available in high res) - there went five hours of my life ...

-
Nice machine! Direct link to the ebay item: http://r.ebay.com/ZH9jeR Did you mean to say "It uses #69 Bonded thread no higher" ? Seems like the machine is designed to handle thicker thread than that.
-
Sewing machine manufacturers have delighted in messing with people's minds regarding screw thread sizes and pitches for well over a hundred years. They happily mix fractional, metric, and in-house custom sizes (random-prime/64" is popular) on the same machine and generally keep you in the dark beyond the part numbers. I've been trying for weeks to find out what size thread is on top of a 441 clone arm, but even the official U.S. importer of the machine does not know ("Whatever it is, it's the same as the Juki!"). I'm gonna call Mr. Juki himself and after he tells me I may just slap him, just because they started that particular mess. There's a fair amount of re-drilling and re-tapping going on by end-of-the-rope owners, too, so your machine may not have the same threads it left the factory with. Good luck with your search. If you find the actual thread specs, post them here to preserve the knowledge for others.
-
Part numbers are always useful when communicating with vendors: JUKI LU-SERIES HOOK PARTS.pdf The standard hook for a LU-563 is the B1830-563-0A0 The hook gib set screw is 101-12803 The tension spring set screw is 040-05140582
-
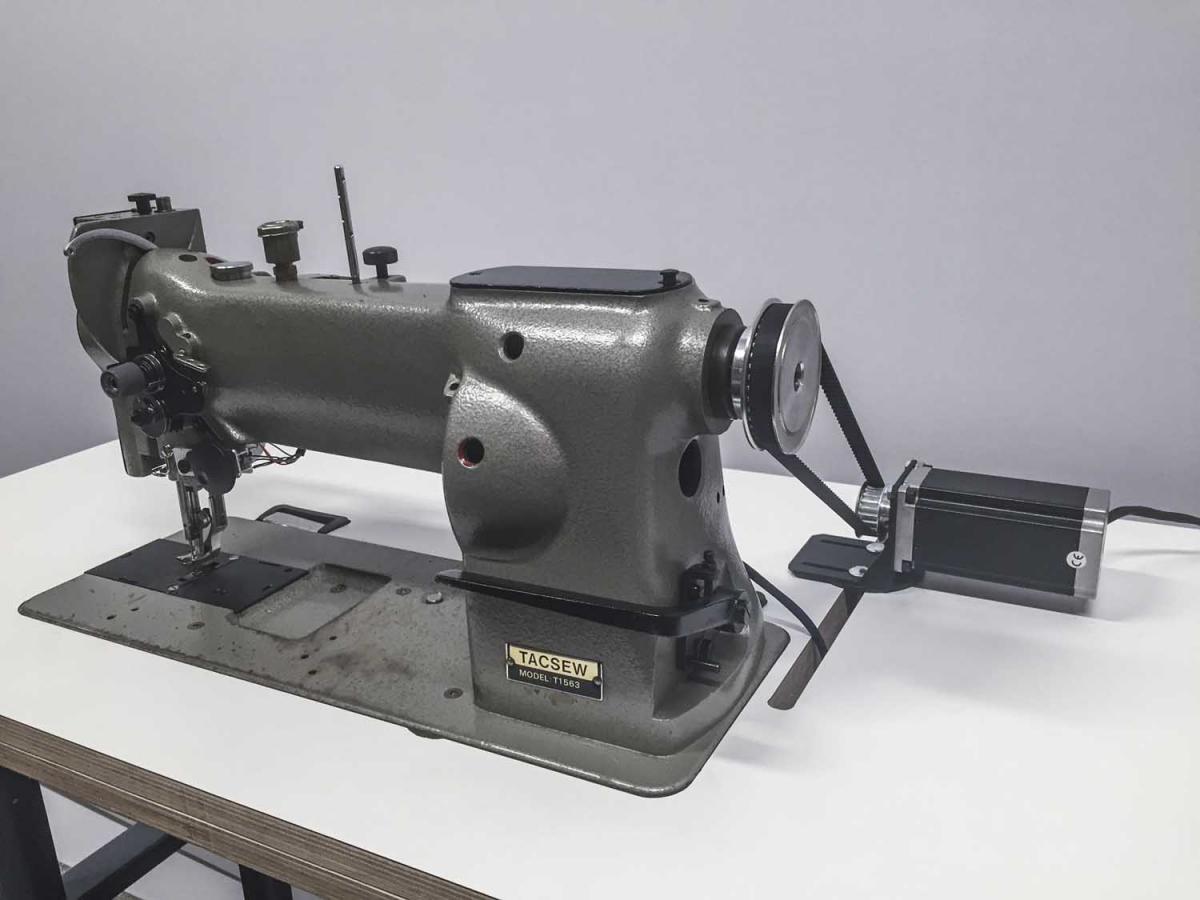
My Tacsew T1563 had a similar issue even though it is a vertical axis hook. My thread take-up lever started pulling up too soon, before the thread was wrapped around the bobbin. I had to adjust the timing belt, advancing the hook driving shaft by one notch. Some machines have markers for proper synchronization of top and bottom driving shafts. If your machine has those markers, do a visual check if the markers align at the right point in the stitch cycle. Exactly how that is checked varies between machines, check your machine's manual. In the absence of a marker or a manual, I believe the following statement about top/bottom driving shaft synchronization should be true in general: "The thread take-up lever is at the very bottom position (providing the maximum slack) when the thread wraps around the farthest point of the bobbin." In your case (horizontal axis bobbin) the take-up lever should be at the very bottom of its movement exactly when the hook pulls the thread around the very bottom (6 o'Clock position) of the bobbin.
-
I'd love to find an on-this-continent source for properly tinted hammertone spray paints. Alternatively perhaps a silver hammertone base coat and tinted clearcoat airbrushed topcoat may be a good approach. I've not seen hammertone paint you can mix yourself for airbrush use. I think I will also try one of these silicone rubber plug kits for my next sewing machine paint project to plug holes. They're made for high-temp power coating applications but they might work nicely for spray painting, too. About $0.10 a piece in bulk quantities on Amazon. They might even be reusable if you can just peel the paint off them after it dries, or perhaps just pull them out while the paint is still wet.