Uwe
-
Posts
2,221 -
Joined
-
Last visited
Content Type
Profiles
Forums
Events
Blogs
Gallery
Store
Everything posted by Uwe
-
Thanks for sharing, Joe. I'd certainly be willing to do some polishing at that price point, haha. Sometimes folks don't want to reveal wholesale pricing for items intended for resale, and sometimes it's considered rude to ask how much something cost. I just wasn't quite sure in this particular instance, that's all.
-
I don't think these work well on 441 clones. You have to drill mounting holes and the placement of the manual foot lift lever interferes with the swing-down guide.
-
And what kind of budget is required to have this machine show up at your door step in North America? Is there some kind of code that prevents us from sharing how much this machine costs?
-

cobra 4 Cobra 4: Presser Foot, Needle, and Bobbin Problems
Uwe replied to Philip Crabtree's topic in Leather Sewing Machines
The pain levels caused by a non-functioning machine your business depends on may be higher than the pain of watching some essential instructional videos that help you understand how the whole machine works. I think it's useful to use common terminology regarding needle anatomy. There's a "scarf" on a needle, but no "kerf". "You know what I mean" doesn't really work for beginners who are trying to learn. Anybody planning to rely on remote, internet-based tech support for their machine is also well advised to quickly figure out how to take sharp, well-lit photos and video snippets with their smart phone, and how to share video snippets with others on youtube, either privately or publicly. In the absence of overriding clone manufacturer instructions, the original Juki Engineer's manual for the TSC-441 class of machines is the authority on adjusting these machines. -
cobra 4 Cobra 4: Presser Foot, Needle, and Bobbin Problems
Uwe replied to Philip Crabtree's topic in Leather Sewing Machines
Make sure you use the right type of needle (794). The needle should slide easily into the needle bar before you tighten the set screw. These two videos should cover most setup and adjustment issues. Watch them in their entirety and compare your machine's settings with those shown in the videos. -
Yup, there's a scratch that makes the "II" look like "H". The Singer 111W155 is a very popular and very capable sewing machine for upholstery and leather work. A great starter machine that's well known with lots of inexpensive parts available. A well adjusted machine should sew up to 6-8mm of soft leather with size 138 thread without much trouble.
-
Three things need to be in the right spot at the same time for proper feed timing: 1. Thread take-up lever at the very top 2. Arrows on the hook drive shaft aligned 3. Feed dog all the way to the front It's possible your feed eccentric assembly (the part that changed the stitch length, "wobbles" around the drive shaft and moves the feed lever) has shifted/rotated on the hook drive shaft. It's supposed to sit in a very specific position on the hook drive shaft, usually by means of a set screw in a lengthwise slot carved into the hook drive shaft. If point 1. and 2. are in the right spot, but the feed dog is not in the front, your feed eccentric itself may be out of alignment somehow. Dial in the maximum stitch length first to make it easier to tell the position of the feed eccentric and feed dog.
-
One more little video with narration to explain what I was trying to say in the previous posts. When I purposely installed the belt with the bottom shaft a half turn out of synch (not in the video), my feed movement was reversed just like in your video, so now I'm convinced that your shafts are out of synch.
-
I'm still betting on top and bottom drive shafts being out of synch. Here's how my Consew 225 drive shafts move. The thread take-up lever tells you where the top drive shaft is in relation to the bottom drive shaft. Compare this video to yours. In case you're missing the arrow markers on the bottom hook drive shaft, you may need to use some other visual alignment method to figure out when top and bottom shafts are in synch. When you install a new belt, you need to put top and bottom drive shaft in the exact, synchronized positions before sliding the belt back on the cog wheels. I've used a hair dryer to warm up the belt, which makes it much easier to slide the belt on and off the toothed cog wheels.
-
Since you replaced the belt, the top and bottom drive shafts may be out of synch. Your machine should have two opposing arrows or some other marks on the lower shaft that need to line up when the thread take-up lever is at its highest point. My Consew 225 hook timing video shows what I'm talking about at the 2-Minute mark: Although that does not quite explain why your needle descends in the back and comes up in the front. I'll drag out my Consew 225 and have a closer look.
-
LOVE that stand!!!
-
Machines that are advertised as being "industrial strength" rarely are. The Pfaff 60 might do what you intend to use it for. But there are true industrial SInger 111 class machines available (e.g. http://detroit.craigslist.org/okl/bfs/5555446978.html) that stay below $500 even with a new table and servo motor, all within a day's drive of you.
-
Make a video of your moon-walking machine and add some Michael Jackson music to go with it. That Keystone version of the Navy manual does have the wrong spec for hook timing needle rise, by the way. The Army manual is correct.
-
The US army technical manual https://archive.org/details/TM10-3530-202-24 describes how to remove the hook on a Singer 111W155 starting on page 114. It also covers hook timing with accurate specs. Removing and reinstalling the hook for cleaning and inspection (Or installing a new $35 Hirose Hook) may be a good idea anyways. I almost always find thread fragments lodged in place you can't even see.
-
BUSMC #6HM on Ebay.com - NY era / Canada
Uwe replied to Constabulary's topic in Leather Sewing Machines
That one sold quickly. -
When I search eBay for "Juki 1541" I see original Juki heads for as little as $1250 new from Alberoni in Los Angeles, and clones by Reliable, Typical, Ludwig, and Consew, some of which actually cost more than a Juki. Shipping to New Zealand is a whole different story. I'd recommend checking with a NZ or Australian supplier for machines that have similar specs, although you're probably hard pressed to find any that are significantly cheaper than the actual Jukis. Buying local is king when is comes to heavy machinery. Check you local sources for gems like a nice looking Juki 563: http://www.trademe.co.nz/crafts/sewing/sewing-machines/auction-1067262077.htm
-
Direct contact with the Consew folks in NJ will be your best bet I n establishing official manufacturing date range and approximate manufacturing year. Just call them up. There are real people answering the phone and I got good service when I called them last year. For establishing current value, a recently completed eBay auction of a similar machine with 25 bids may do the trick: http://pages.ebay.com/link/?nav=item.view&alt=web&id=301892169599&globalID=EBAY-US The follow-up model Consew 227R-2 had brochures printed with a 2007 copyright notice ( http://www.consew.com/Files/112347/PDF/227R2.pdf) It's probably safe to assume that the 227R was no longer in production by that time, so your machine is at least nine years old.
-
Some manufacturers keep track of when a particular serial number range was manufactured (e.g. Singer). I'm not sure if Consew/Seiko did that. One option is to contact the folks at Consew (http://www.consew.com/). They might be able to give you some official info on when they made the machine (if you can get serial number off it), or at the very least tell you when they stopped producing that particular model for some "it's at least this many years old" type statement. If your customs folks insist on $2500 more to release the machine, just abandon it and write off the money you spent so far as an expensive lesson in Nicaraguan customs requirements. If Nicaragua is one of those countries where Customs can inflict an arbitrary amount of pain and suffering, you may be doomed. In general you need to at least be able to provide proof of value (receipt etc.) and be aware of tariffs for certain items before you present it to Customs. A little homework goes a long way when buying big ticket items abroad.
-
Thanks guys! Thin wool felt strips sound like great idea, that didn't even occur to me! I have some wool felt material to experiment with. I have a feeling the missing wicks got yanked out by somebody thinking they were just odd pieces of thread lodged in the hole. Some of the wicks run inside plastic tubes, and for those I think the oil lamp wick will work nicely. My main concern is to get those take-up levers lubricated properly and a rolled-up thin felt strip sounds perfect for that spot.
-
Several of the machines I've been working on recently had oil wicks missing (e.g. inside the hollow take-up lever pivot shaft). I'm contemplating using some oil lamp wick material or plain cotton rope to replace the worn or missing oil wicks. Is that okay or should I use some special sewing oil wick material instead?
-
@vonkasCould you please post a PDF version of your factory adjustment manual here so we can all learn from it? Thanks in advance.
-
How to Determine if a Thread is Bonded Nylon or Bonded Poly?
Uwe replied to Evo160K's topic in Leather Sewing Machines
I found this on another forum at ybw.com. Haven't tried it yet myself, but may be a good way to put your nose to use as a highly sensitive chemical analysis tool. "Take a few sample strands from each rope. One at a time apply a flame to a sample, for sufficient time to cause it to just burn unaided and immediately extinguish the flame by blowing or dry smothering. The fumes that emit can be useful in identifying what the plastic is.Nylon has a smell not unlike burnt hair.Polyester has an offensive acrid odour, nothing like burnt hair. Read more at http://www.ybw.com/forums/showthread.php?124455-Nylon-or-polyester-How-to-tell-the-difference&s=9c080cfdd0cd0c3f78fa965f0d72a61f#Emc4PbrLqSiCspql.99 -
That 150W161 user manual tells you a great deal about the machine, actually. Mainly it tells you (in so many words and in an Obi Wan Kenobi voice) that "this is not the machine you're looking for" if you want to sew multiple layers of leather. It was designed as a high speed machine for attaching labels on folded shirts. It has only drop feed and will most likely struggle and readily give up on sewing thick leather and moving multiple material layers in a synchronized fashion. It's also an oddball, rare machine (not in good way) that you will have a hard time finding parts and support for. You really need a proper compound feed machine, and for purses, hold out for the right cylinder arm machine.
-
Nice find! I had not seen that one before - and I've watched my share of 441 class videos on YouTube. Another new-to-me video popped up in the suggested list that covers some of the same material but also contains some important timing adjustment information that I've been looking for:
-
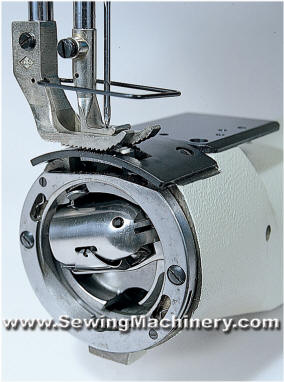
Perhaps your driver is indeed the culprit, then. The attached picture of a 441 style machine shows a driver that fills the cylinder space more and touches the shuttle in a different spot. Since your machine is apparently neither an Adler 205 nor a Juki 441 clone, you may have to track down a parts manual for your machine to figure out what part is right or wrong. Perhaps your machine was never designed to handle the larger thread sizes. Do you have spec sheet for it? Your current hook is a Hirose brand HAD-204 series hook, from the looks of it. A recent post in another thread also indicated that hooks are only interchangeable in one direction between Adler and Juki style machines ("fits" vs. " fits and actually works"). Since your machine is not firmly planted In either category, who knows what will work or not! Report back when you find out.