Uwe
-
Posts
2,221 -
Joined
-
Last visited
Content Type
Profiles
Forums
Events
Blogs
Gallery
Store
Everything posted by Uwe
-
You're on the third failed stitch in this picture. You're doomed after the first time the thread does not slip past that point. In that position the thread should be slipping though the gap at the hooks butt at the TOP of the picture. If it gets stuck here, it just pulls more thread off the spool and the take-up lever doesn't stand a chance to pull the knot tight. My little video: shows how the thread (415 in this video) should slip through the gaps if hook and driver match properly (Adler 205-370).
-
I suppose you could grind down one or both tips of the "C"-shaped shuttle driver a millimeter or two to increase clearance for the thread. The driver is generally cheaper than the shuttle hook. Both my Adler 205 and cowboy 4500 allow me to rotate the shuttle by hand so it touches either tip of the driver, leaving a gap at the other end. As I rotate the hand wheel the shuttle hook actually falls forward and backward a tiny bit in the cycle as it makes contact with both ends of the driver. I'm not aware of an adjustment that creates a gap when there is none - it's really in the dimension of the shuttle hook and the driver. The adjustments usually set the hook-to-needle distance and the amount of axial play, which should be little to none.
-

Looking At Consew P1541S-Cc What's The Difference From Juki 1541S?
Uwe replied to ocean's topic in Leather Sewing Machines
As with any original vs. copy comparison, the differences will likely range from very subtle to painted-over cracked casting (CC). -
"Stitch happens". Whatever you did when that stitch happened, don't do that. But seriously, perhaps it was some anomaly/lump in the thread that caused it to be pulled up a little as the needle ascended. Make it happen more than once on some test scrap pieces and whatch/listen for anything unusual and inspect it closely afterward. It's hard to suggest, let alone pinpoint a cause remotely from just one occurrence, when the other stitches look damn near perfect. Sew slowly enough to notice this right away and stop, to correct or figure out what was different or what went wrong.
-
Neither one of two pictures you posted show up Tor. Please try again.
-
Thanks for posting those detailed pictures! It's nice to see things up close (your white thread is caught in that lower tension spring, by the way) The "Made in the U.S.A. with pride" sticker seems a little optimistic and probably refers to just a handful of parts on that machine. Just going by the pictures, I would bet a small amount of money that these machines start life in the same factory where the Cowboy machines are made, and with a few a added custom parts and labels it becomes a Ferdco. I would be rather surprised if there were any Juki parts on that machine. If they started with a Juki, the Ferdco would cost over $6K. Now all we need is a few close-ups of that patented lower needle guide under the slotted throat plate. From the patent drawings, it very much looks like it could be made from modified standard feed dog, ground down and polished to stay below the slotted throat plate as it moves.
-
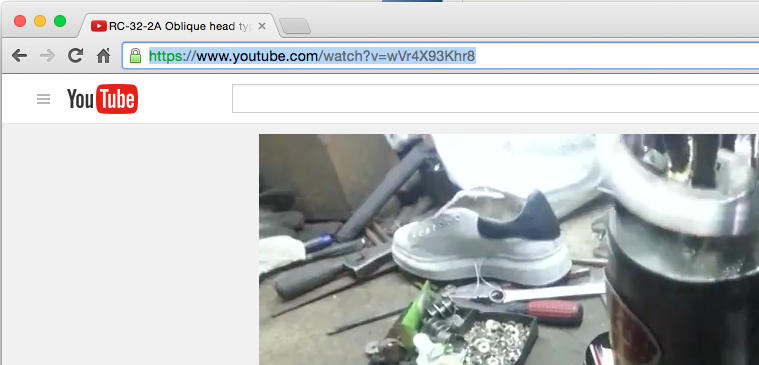
That video looks like a pretty good demo of the machine's capabilities. Might be just right for small scale shoe production. Those machines are very interesting I think - worth taking a little gamble. I'm going to try embedding the video again just by copying and pasting the YouTube URL directly from the browser's web address field (the blue highlighted part in the attached screen shot): Here we go:
-
That hook part should not be touching the needle or anything else, and the feed dog should NOT be moving up and down (unless you have a special, rare sub-class of the 335). My advice at this point would be to take it to a mechanic to be put back in working order (or take it back to the person who sold it to you). There's too many interconnected things wrong right now to trouble-shoot and talk you through fixing it remotely. It's extremely hard to learn on a machine that is way out of adjustment. You're also likely to cause even more damage as a novice to sewing machines. Once you get the machine back in good working order, have somebody show you the basics of using this machine. Take time to inspect how everything should work/feel/sound and read the user and the service manual front to back and compare the manual's diagrams and descriptions with your machine. THEN hook up the motor again.
-
In general, an original machine in good condition is worth about the same as a new chinese aftermarket copy. Five years from now that used original will STILL be worth about the same (whether a good used original is 20 or 25 years old makes no difference). The shiny new aftermarket/chinese machine will loose a third of its value the moment it arrives at your door steps. Five years from now it will be worth half, if you're lucky. You also have to be willing to pull a machine away from the wall so you can see the front, and tilt it back so you can see the underside.
-
You're gonna have to find out exactly what metal in the back the needle is hitting (or getting hit by) on the upstroke, because it definitely should not be hitting ANYTHING during the cycle. With the feet raised and the thread removed you should be able to turn the handwheel in a very smooth fashion without any binding or resistance (other than overcoming the spring pressure). There should be NO snapping/grinding/rubbing sounds, just buttery smoothness. Don't force it if you hit resistance. Jog the hand wheel back and forth gently and find out exactly where things touch that shouldn't touch. This may take a flashlight, neck craning, and strong reading glasses (in my case). Once you know what touches, then you can figure out WHY things touch and make an adjustment so they don't touch. When the feet are raised, you should be able to pull the thread through the eye of the needle with little force. I've had the upper thread accidentally wrap around a post/screw/spring or otherwise get hung up. Nothing will work right if the machine can't pull the upper thread when it needs to. It'll deflect the needle, chafe the thread, make the needle hit the feed dog or the hook, and all manner of bad things start happening, especially under motor power. When something bad happens under motor power things may slip, the safety clutch may pop, or other things may bend or otherwise go out of alignment. Quite often it's something simple like threading, seating or changing out the needle, inserting the bobbin properly, etc. If the machine in a totally screwed up state, you need to methodically go through the Pfaff 335 Service Manual and compare should-be settings with your machine's real world settings one by one, in sequence, until you find one that's not as it should be and fix it. Repeat until everything is adjusted as it should be and things move smoothly. Don't loosen screws unless you know what they're for. There's definitely a learning curve with these machines and it can be steep and frustrating. The industrial sewing machines are tough and fragile at the same time. Ultimately there's no way around learning a few basic adjustments yourself unless you want to take the machine to the mechanic at $90+/hr every time some little thing goes wrong.
-
Turn off the motor and turn the wheel by hand. Closely look and listen to what happens in the hook area. Don't turn the motor back on until you can hand-turn a dozen perfect stitches. You can do considerable damage by stepping on the gas pedal if something is not right. Make sure the thread unwinds from the spool and isn't caught somewhere.
-
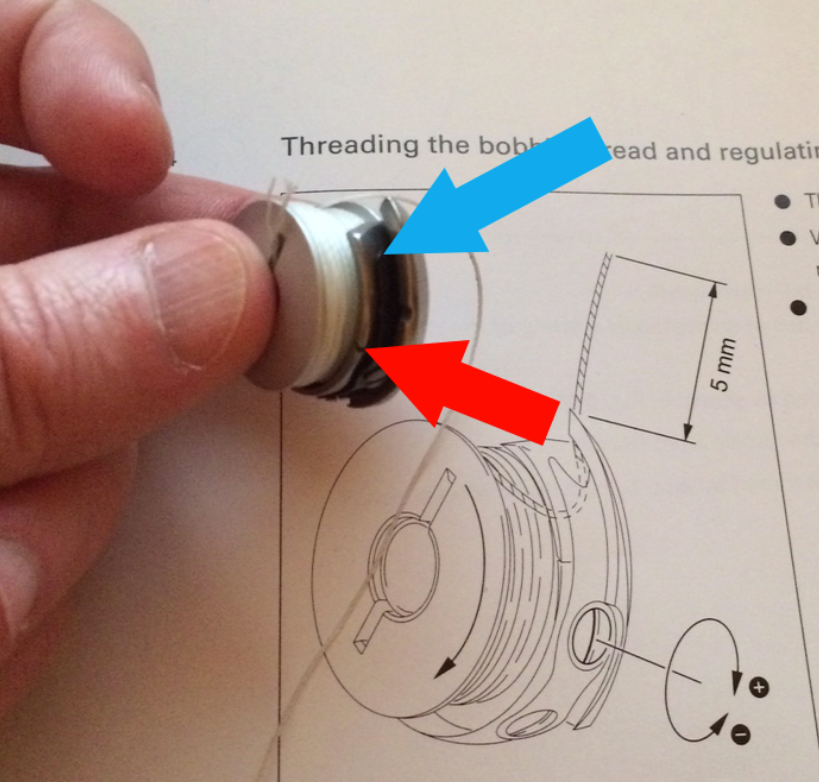
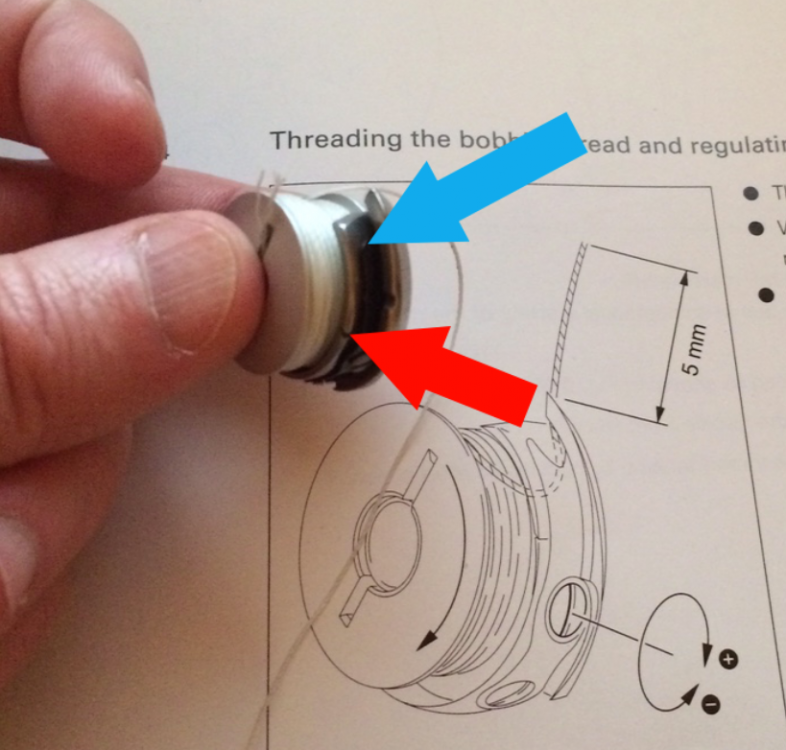
They really are the same. You need to pull the thread into the slot on the bobbin basket (red arrow) and then pull it to the top so the thread runs under and emerges at the tip of the black tension spring blade (blue arrow).
-
It's probably faster because a few hundred thousand pictures are missing from the forums.
- Show previous comments 5 more
-

Johanna has not collected "stuff" for herself. She created a site where information could be shared by all.and input given by all. I for one am very grateful for that have have learned a great deal and also met some great people in the chat room. None of that however creates a debt or a responsibility to Johanna and her team to meet the demands and expectations of anyone just because they are not happy with the site. She doesn't owe you, me or anyone anything!
Perhaps you can offer some insight and assistance to Johanna and her team on how to address the issues rather than just complain about how you cant see a picture on a free site that you have contributed nothing to (in terms of building and maintaining the site, and financially contributing) but seem to have taken advantage of (in terms of accessing and using this valuable information)
-
I am offering help by pointing out technical issues with the upgrade. I'm not judging or accusing or demanding anything. I've spent countless hours composing detailed educational posts with images, created graphics, and recorded videos for fellow members, so that the information can be shared and preserved for future use in the archives. All I'm asking is to take precautions not to loose the information we collectively have added to your archives.
The vast majority of users on the site are consumers of information. Very few are content creators. If the archive is not deemed a safe storage place, there will be less incentive to contribute.
-

I am trying to recover the missing pictures. I am sure they will be back soon. I take my responsibility very seriously, which is why I had to do the update. Thank you for your patience.
-
Thanks Bob. I sure hope they fix that upgrade issue soon to make nearly ten years worth of posts show pictures again. Back when I was doing IT work, we tested these things before we rolled them out.
-
Now I'm curious what this "famous patented lower needle guide" is that you're about to purchase for your clone! Do you have any pictures or sources for this famous device?
-
The Pfaff 335 Manual actually shows the threading and bobbin loading steps fairly well on pages 23-25.
-
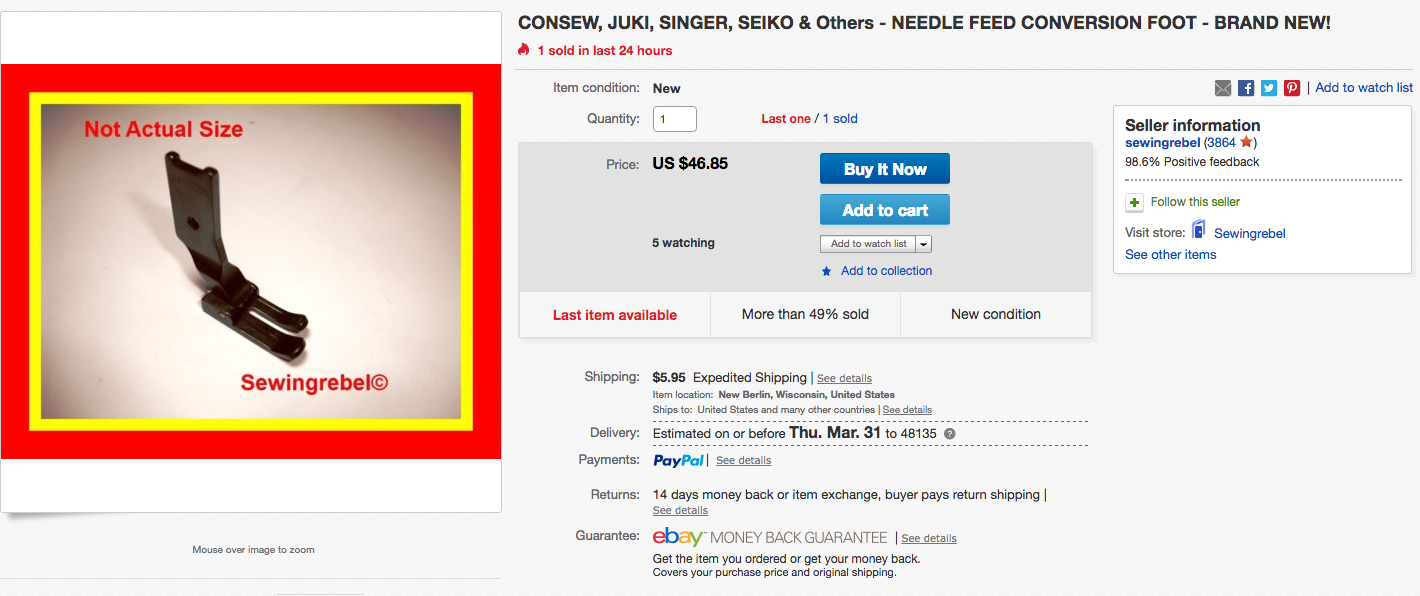
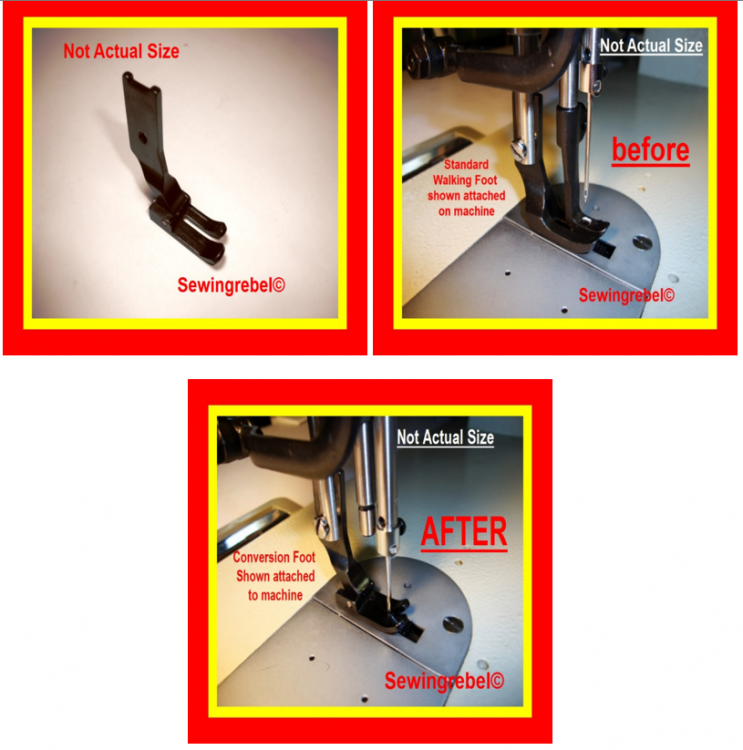
Old posts seems have lost some images after the recent upgrade, so I'm not sure if this was covered already. In any case, I came across a needle feed conversion foot on ebay today and thought I'd share it. Apologies if it's a duplicate of a previous post.

-
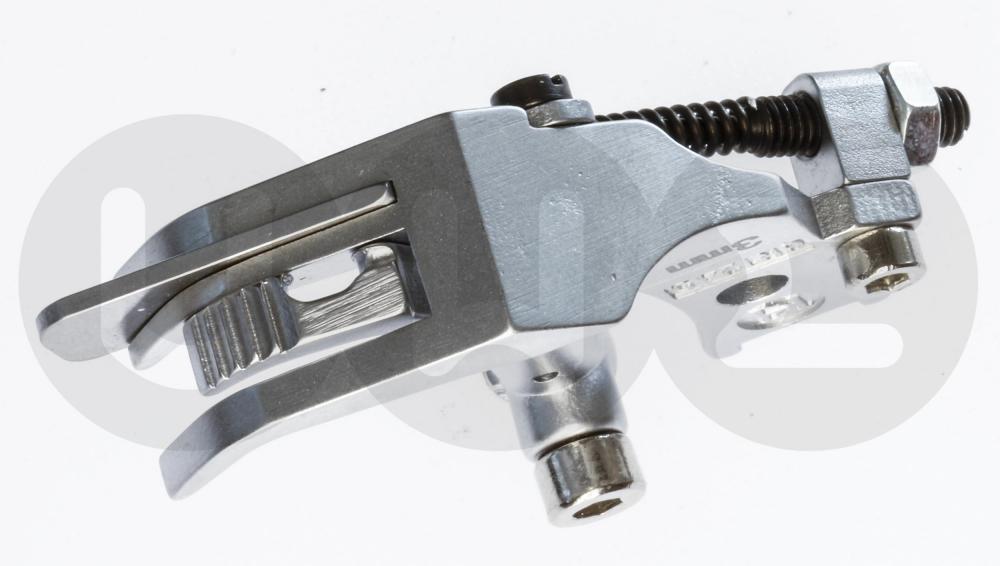
Sometimes even the "smooth" inner feet have teeth upfront where the foot curves up to help it climb up an edge or over a seam. I'm attaching a picture of one example of a Pfaff 335 edge guiding foot that has a smooth bottom, but still has teeth at the tip of the inner foot. The teeth at the upturned tip are unlikely to leave marks on a flat piece of leather. If your inner foot has teeth at the bottom, that's a different story - and a fabric foot.
-
Now I have a crook in my neck and I still haven't seen the front of the cream colored one. Both seem like very nice machines. Differences in specs between the two sub-sub-models ill be subtle I suspect (other than age - one might be a decade or two older than the other but newer isn't always better). Look up the specs for each machine online to compare their abilities. If you can't find documentation for one of them, get the other one! I have a feeling both machines are perfectly capable of performing really good work in the right hands. Having access to both machines, you can best judge relative cosmetic and mechanical condition. There's a nice little service video for the hammertone one: http://sewing-machine.xyz/how_to_put_in_time_a_pfaff_1245_706_47_sewing_machine_tutorial.php That guy does amazing upholstery work with his Pfaff machines.
-
$1500 To Spend And I Need Some Suggestions
Uwe replied to Striver's topic in Leather Sewing Machines
When buying heavy machinery, buying local has its benefits. Paying for shipping does not really add value to your machine, it just adds value to UPS and increases your risk of having a machine damaged in transit. You have the Cobra folks right outside L.A. and a few other local vendors within L.A. (Zamir, etc.) I'd spend a day visiting all of them to check out their offerings and the vibes you get from the folks. Being able to pick up a machine in person locally (and take it back in for service if need be) is a big deal and has value. Take some samples of your materials and have them demo their machine sewing it. New machines are nice if you can afford them, for sure, sometimes a good used machine will be the perfect match for your needs. -
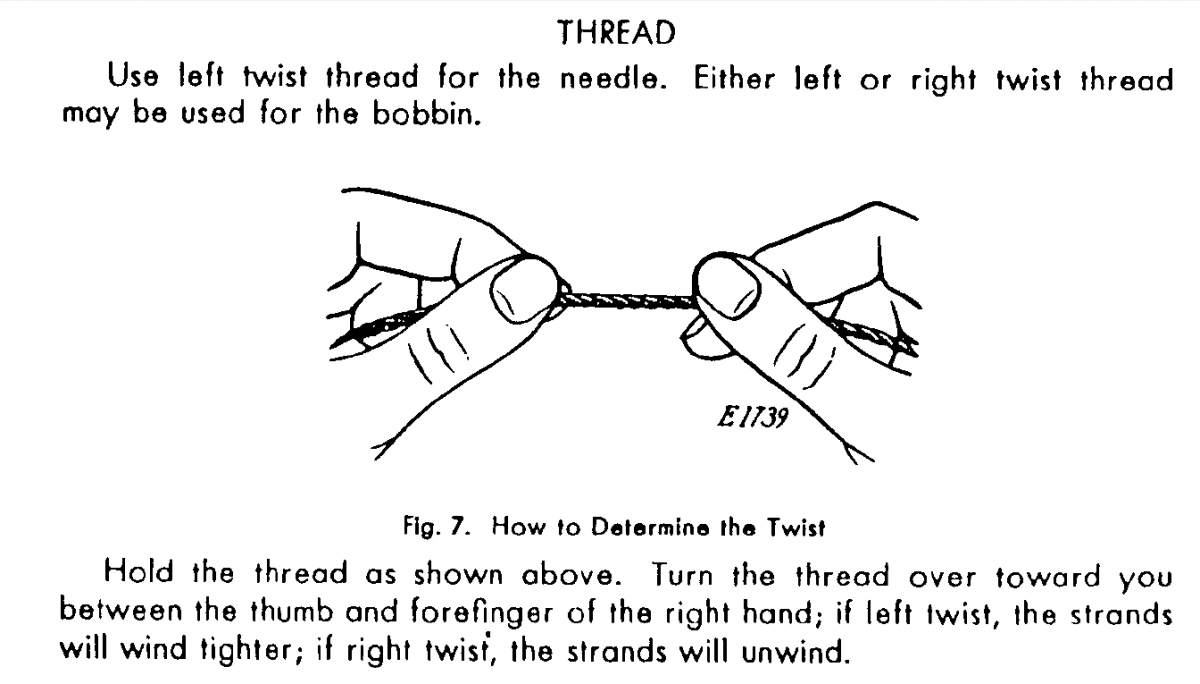
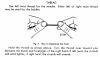
Is that thread some oddball opposite twist thread from a bargain bin? It looks a little like it's unraveling as you sew. Just about every vintage sewing manual has this diagram on how the thread should twist: Some specialty threads twist the opposite way and they often end up in bargain bins.
-
Shoemaking is bit of a specialty application and shoe manufacturing uses lots of expensive specialty machinery. Exactly how much are those cool SM-7555 machines? I've looked at them before and I'm fascinated by how they work. Not sure what your threshold for ridiculously expensive really is. The thing is, if you're going make a bunch of shoes, that kind of machine (SM-7555) is probably exactly what you need, you just need more time to accept that and save up the money for it. If you're only make a dozen shoes or so, hand stitch them and charge twice as much. Many cylinder arm machines could do the back half of the shoe, it's the front half that'll cost you an extra few grand and very few machines can do that. For potentially cheaper vintage options, look at shoe repair machines like the McKay stitchers or potentially some Puritan single needle post stitchers. Those machines are designed to sew shoes along the inside edges. The weigh a ton, almost literally, but can be bought used for a few grand. They look like a real pain to use. Needles and awls are also expensive at around $8 per needle or awl:
-
We'll need to see some more close-up pictures, especially of the underside, too. The photo does show a stitch length viewing hole that is not in the 111W116 manuals or reference photos. I believe the intention for this machine is (or at least my advice was) to get a very cheap test machine to learn and practice maintenance tasks with before he buys a precious keeper.
-
The exact model is not super important for a practice machine to tinker with and explore adjustments, etc. Many Singer 111 sub-models will share a great deal of parts. For cleaning a machine I use Marvel's Mystery Oil: It's available at most home improvement or automotive parts stores here in the U.S. It's does a nice job dissolving crud and dried oil varnish, but it's not too aggressive to accidentally take off labels and such. I use a tooth brush to get into tight spaces and then wipe things down with a soft cloth. The Marvel oil is red in color, so be a little careful with the toothbrush if you're cleaning in front of your white curtains. Once clean, I use normal sewing machine oil like "Lily White" (available online from various vendors) to lubricate things thoroughly. TriFlow also makes a very nice oil and clear grease which many local sewing supply stores carry (also available online at Amazon etc.). The little spout extension is super useful to get into tight spots for precise oiling. I later refill these bottles with Lily White and keep them with each machine: Get a few dedicated screwdrivers for working on sewing machines. Short/stubby and skinny flat screws drivers are very useful. The Craftsman finger driver bits are useful, too: Also little ratchet drivers like this (except with a flat tip): Tiny eyeglass repair screw driver kits from the drug store work great for taking those tiny screws on the hook gib off.
-
This machine has sold and is on its way to Rhode Island.