-
Posts
2,221 -
Joined
-
Last visited
Content Type
Profiles
Forums
Events
Blogs
Gallery
Store
Everything posted by Uwe
-
As for the feed dog lifting motion, I don’t think you can easily turn on or off , or adjust the feed dog lifting motion. You can adjust the feed dog height, but the amount of vertical movement of the feed dog is determined my an eccentric lifting cam that is not adjustable, to my knowledge.
-
Your machine stops in the needle-down position. It is normal for the rear foot to lift up as soon as the front foot presses against the material or feed dog. That’s just the walking foot mechanism functioning normally. There’s nothing you have to do, because there is nothing wrong, from what I can tell.
-
Feed timing issues are often caused by improper synchronization of upper and lower shafts via the timing belt. One quick visual check to do if your machine has the indicator plate with the arrow, is to bring the thread take-up lever to the very top position. In this position the two arrows on the underside should line up. It they don’t, then you’ll have to adjust the timing belt position. This video shows the basics of that adjustment on a Consew 225:
-
I still think you should try to advance hook timing. It may make a big difference. After my previous recommendation, you just said hook timing looked fine as it was. What I’m a asking you to do is to purposely advance hook timing away from that “fine” adjustment. You may just end up with a “perfect” adjustment. On occasion, the by-the-book setting is just the starting point. Then you make small adjustments until everything works smoothly - I do this quite often. Picking up the top thread loop is only one of the functions the hook timing tries to get right. There are several other functions that are also affected by hook timing. To get all of them working just right at the same time, you may have to vary slightly from the original adjustment. Don’t view the adjustments shown in the Juki engineer’s manual as absolute commandments. Your machine is a copy and it uses a different hook. Some adjustments may simply be a little different for your machine. That change-over to the 1341 configuration you’re contemplating seems like a major undertaking, one I personally would be very reluctant to sign up for. I’m not sure it will be worth the money you’ll spend to have a mechanic do all that work. It’s like accidentally buying a car with a manual transmission, then asking the dealership to install an automatic transmission. While technically possible, it’s not an economical solution. It’s generally far cheaper and better to trade the manual car for an automatic one (or learn to drive a manual.)
-
It’s not very difficult to make small hook timing adjustments. I just tried it out on my Juki LS-341. This video is NOT a full hook timing video! It’s just shows you how to quickly make very subtle adjustments to the hook timing.
-
There are several parts that need to be changed over to use the other hook. Check the parts diagram. Every part that is listed separately for the 1340 vs 1341 is involved. It’s not a simple task, more like major surgery. I’d recommend trying to make the current hook work reliably before undertaking that project. That hook by itself isn’t very useful to you.
-
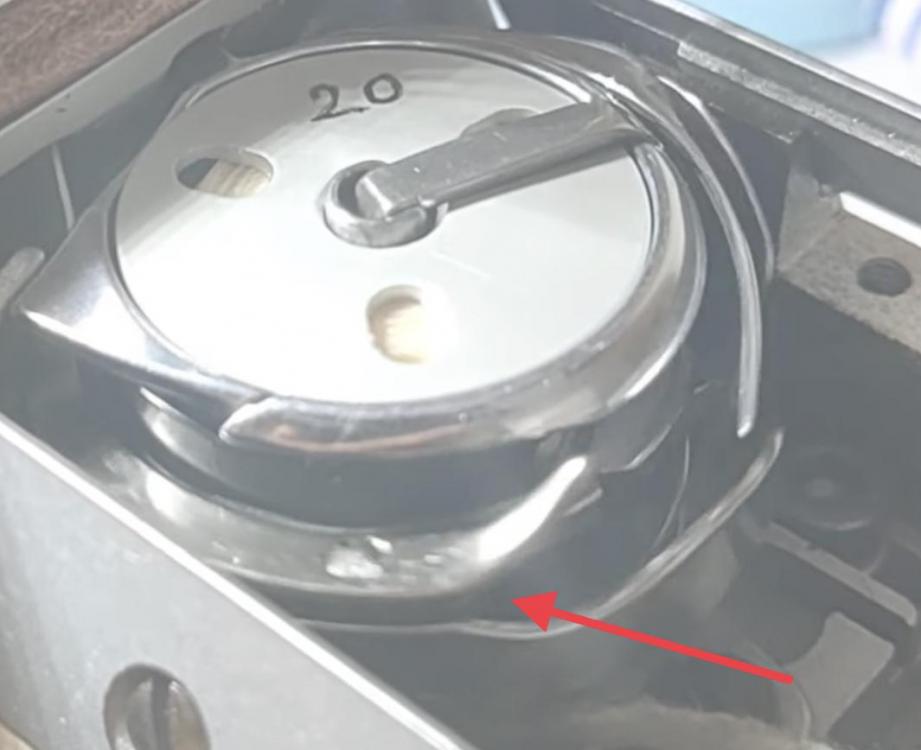
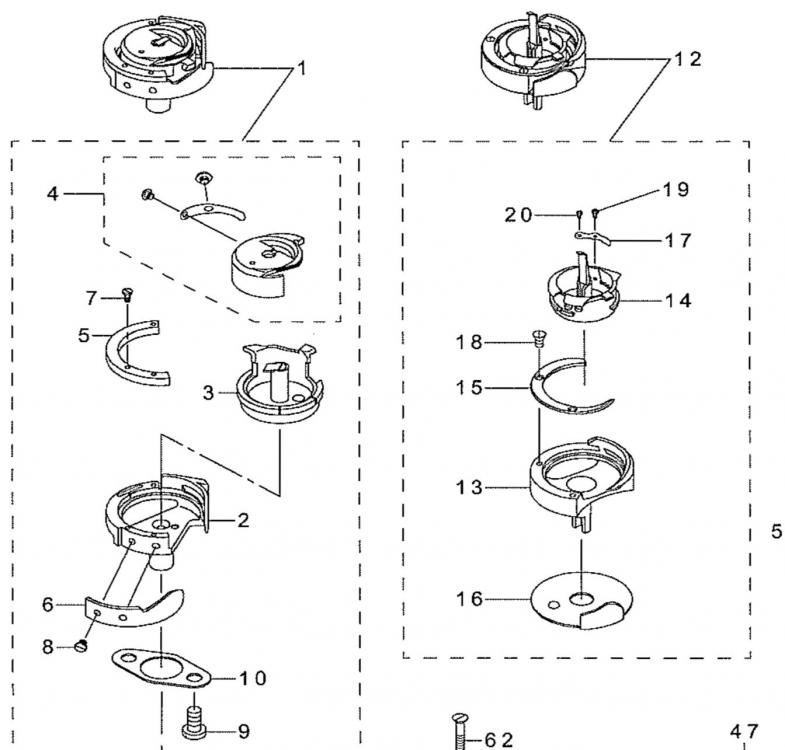
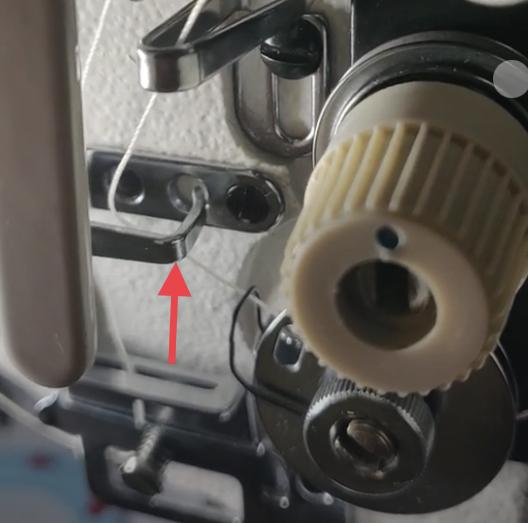
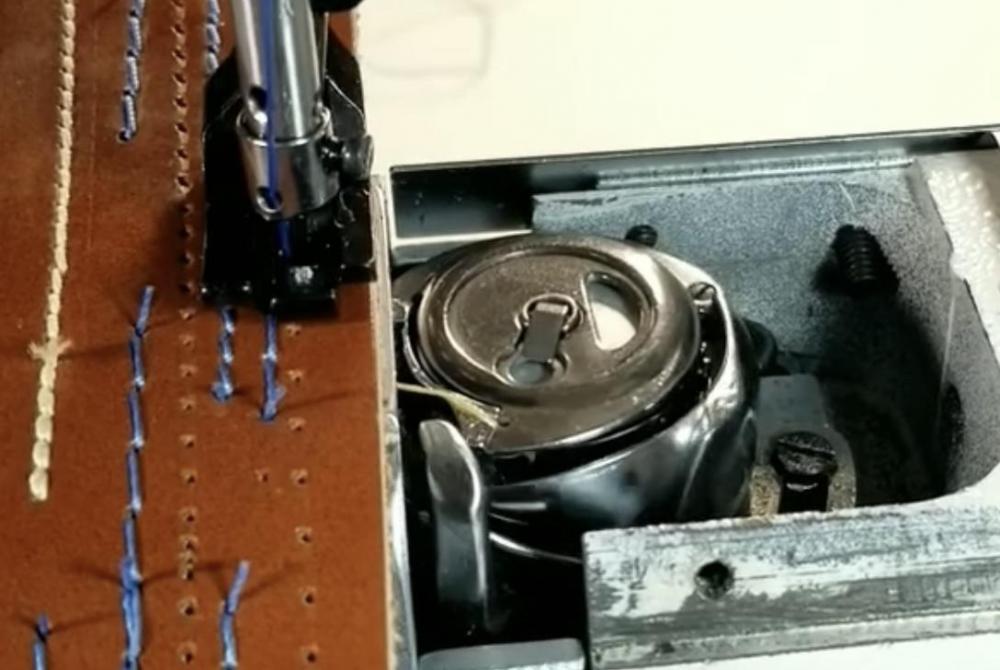
I see the thread snagging slightly as it’s trying to slip into the passageway under the throat plate, and a second time when it’s trying to cast off the hook gib. The thread take-up leaver is trying to pull up the thread, but the hook hasn’t let go if it yet. The upper shaft with connected (non-adjustable) linkage for the needle bar and take-up lever determines the timing of everything else in the machine. So, based on that video I’d say you need to do two things: 1. Advance hook timing a little bit to make it arrive at the needle sooner. This will also make the hook let go of the thread a moment sooner. Your top thread snags momentarily as it’s trying to get cast off the hook. 2. Your bobbin case opener is too late in starting pull back the bobbin case. The thread has already force-slipped into the passage when the bobbin case opener is just starting to touch the bobbin case. Ideally, by the time the thread needs to slip into the passageway under the throat plate, the bobbin should already be pulled back into the center of the cutout under the throat plate. The arrow in this still image points at your hook cast-off gib, the little finger that point up. Your thread gets stuck at the bottom of it. My stitch cycle video above does show both of those somewhat critical moments. The bobbin case opener video show the proper adjustment of that mechanism. Details matter. If the thread snags at any point during the stich cycle, more thread may get pulled from the spool and the thread take up lever has no chance of pulling the knot into the material. In your case the hook timing and bobbin opener timing is off just a little bit, which may explain why it sometimes works fine, and sometimes it doesn’t. To make it work consistently, you have to adjust the timing to be in the sweet spot, not teetering on the edge of failure. Just to illustrate the cast-off problem, this video shows the too-late-cast-off problem on one of my other machines. Advancing hook timing solved the problem in my case. By the way, according to the Juki LS-1340/1341 parts manual diagram ( LS-1340-LS-1341_P.pdf), you appear to have the hook assembly for the LS-1340 (hook assy. 12 in the diagram) , which is the smaller capacity hook for smaller thread sizes (up to size 92). The large capacity hook (hook assy. 1 in the diagram) is for thick thread (up to 138) and has a bobbin cap. Clone manufacturers often mix and match parts from different versions of the original to come up with their own clone version. This hook design difference may contribute to your troubles making size 138 thread work consistently, because it’s really beyond the spec for that hook assembly. However, with a little fine tuning, you can likely make it work.
-
Yes, it is possible that the top thread snags somewhere as it travels around the hook, that was the focus of the Kobe 1341 topic. In general, it’s almost never a good idea to “force” though a thread jam. The only sensible thing to do when the thread gets jammed is to stop the machine, open the cover and un-jam the thread gently by pulling it out with a tweezer and/or gently rocking the hook back and forth to loosen the jam. Going forward you’ll to make it VERY clear whether the knot is on the top or bottom, especially in pictures. Use two layers of leather that face the same direction so that there’s a very clear visual difference which side it top and which is bottom. Then always stitch from the top side. I think several of us got confused early on when we looked at photos of your stitches. Take another look at the stitch cycle video, and if possible, show us what that exact same sequence looks like on your machine. As for the bobbin case opener detail, here’s another video that goes over the function and adjustment (and possible bind issues) of that mechanism.
-
Tough one, it works perfectly until it doesn’t. Next move: experiment. My next suggestion would be to try a larger needle. The machine appears to pull the knot into the material just fine, until it doesn’t. (The machine does appear to struggle a little pushing the needle through the leather.) A larger hole might help makes things easier for the machine and provide more consistency. The tip of the needle also plays a role. If you’re using a fabric needle with a regular pointy tip, you may get a different results compared to a leather needle with a cutting knife-edge tip. The knife-cut hole in leather has less of a tendency to close back up again, making it easier for the knot to get pulled into the material. The knife edge makes it easier for the needle to slice through the leather, allowing you to use larger needle. Leather needles tend to make clean holes with clean edges, fabric needles sometimes tear a rough-edged hole out the back, which may resist the knot more. Some may protest that there’s some chart somewhere that says a size 140Nm/#23 needle should work fine with size 138 thread. These charts work well in some circumstances, in others they don’t. Use the chart as a starting point and then make adjustments as needed. Whatever works, works. If the needle in chart doesn’t work, change it. Leather type and thickness, machine design, moon phase and The Force may play a role as well. There’s no needle police coming after you for using a needle that’s not in the chart. Sewing is an art and science. The needle chart is part of the science, the art comes in when you ignore the chart. Of course it’s not quite that simple in real life.
-
Find a reseller for Serafil brand thread. They’re made by the Amman Group who appears to be a major manufacturer of thread and has a rather extensive color selection. Their UK offices should have info on where you buy the thread: Here in the US we have The Thread Exchange, which sells thread in LOTS of colors: https://www.thethreadexchange.com/miva/merchant.mvc?Screen=CTGY&Category_Code=nylon-thread-small-spools-size-69
-
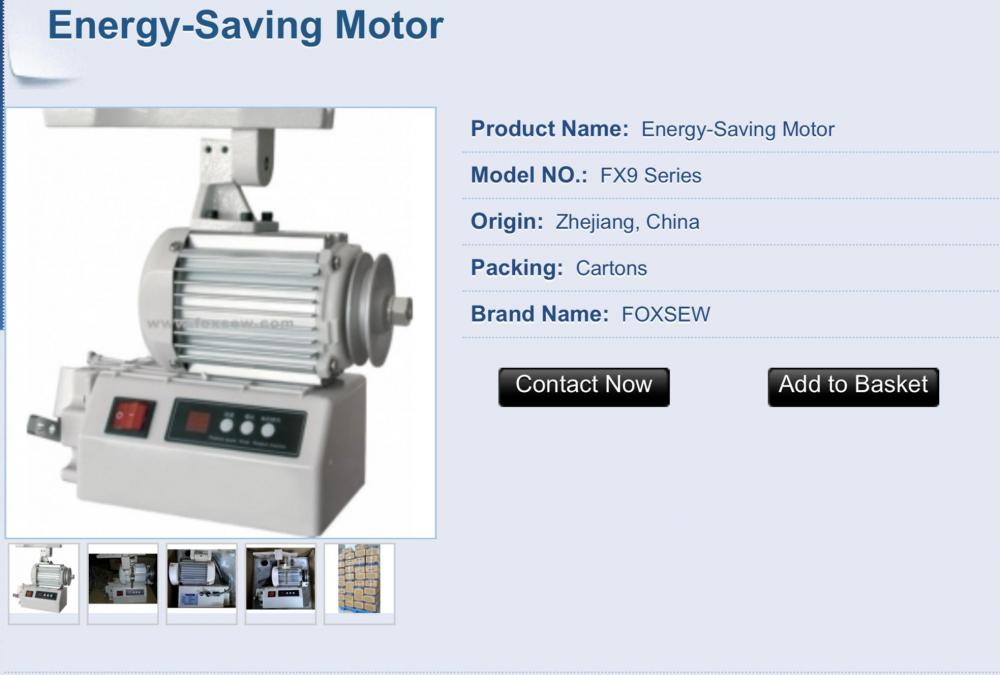
I’m guessing this is a FX9 series motor made by FoxSew: https://www.foxsew.com/sewing-machine-motors/132.html Alas, they don’t make the manual available online either. Might be worth a try to send them a message along the lines of “I have one of your very fine motors and can’t find my manual . . .”
-
The presser feet also play a role. Your left-only presser foot may not hold soft or thin leather down quite enough to make consistent stitches. If the leather pulls up as the machine tries to pull the knot into the material, then the knot will stay on the bottom. This may happen only occasionally as you encounter soft or thin spot in the leather. Leather is not as uniform in thickness and density as man-materials like vinyl. When you get a chance, perhaps show us a close-up video of your machine sewing that stich line, veeeeeery slowly. There are reasons to choose different feet for various sewing projects, to get closer to an edge, to see better, etc. The “best” feet for consistent stitches are double-toed feet that hold the leather down very close to the needle. Very thin leather of course is also among the most challenging because there just isn’t a whole lot of material for the knot to pull into. It doesn’t take much variation to have the knot become visible on top or bottom. Thick leather or material is much more forgiving in that regard. When I test sew a new material/thread/needle combo, I usually sew extremely slow while turning the tension knob to increase the top thread tension until I see the knots getting pulled to the top. Then I back off the top thread tension again until the top knot disappears into the material and that’s my tension setting for that particular combo.
-
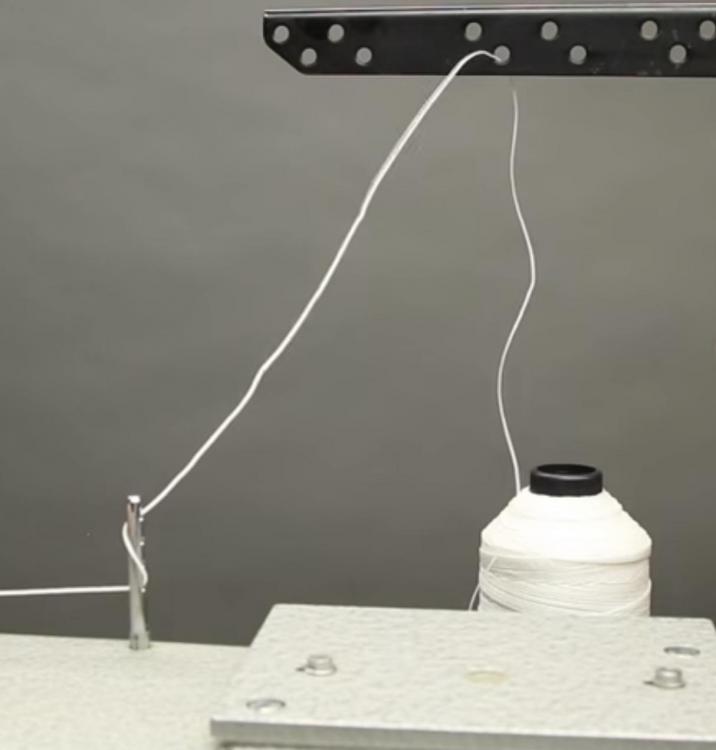
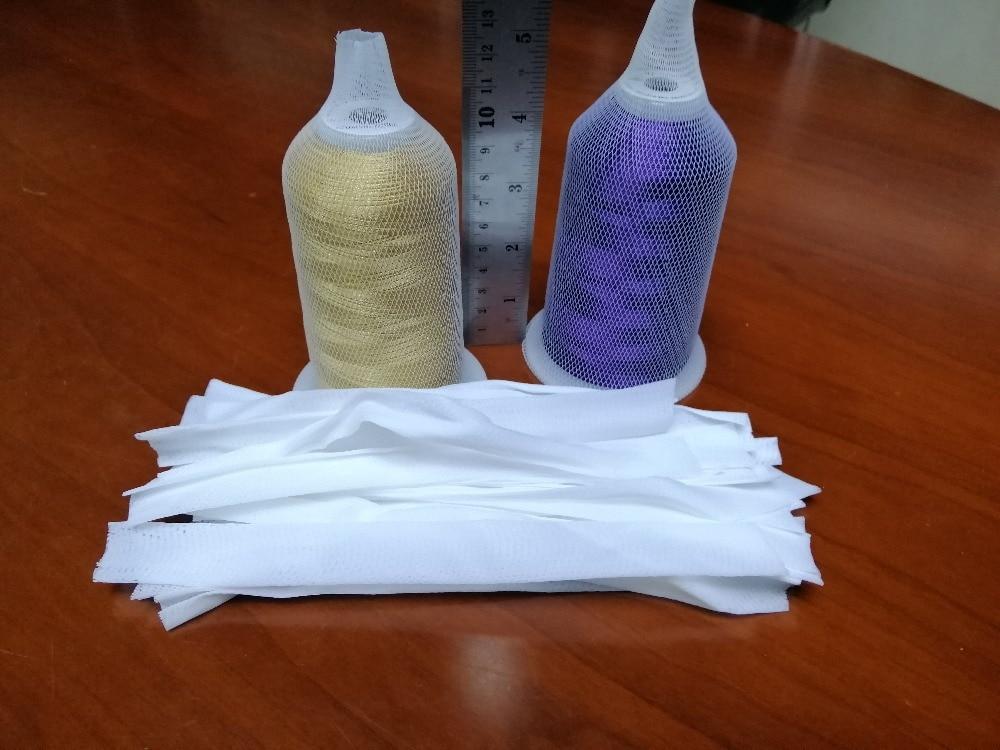
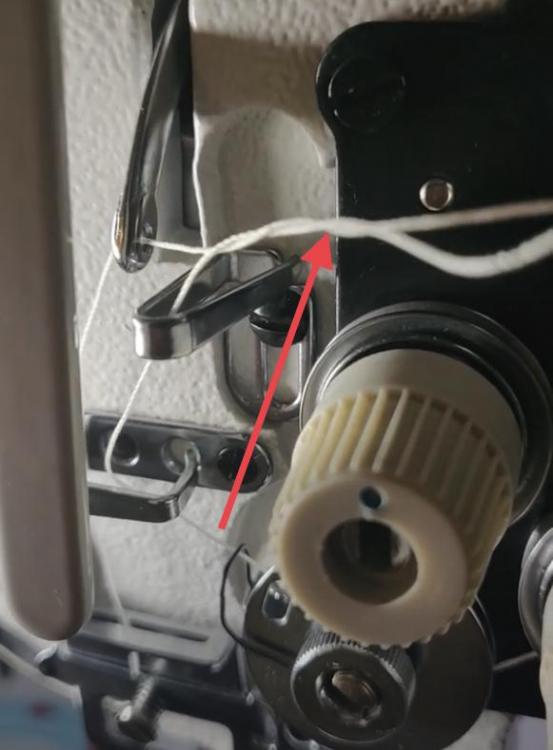
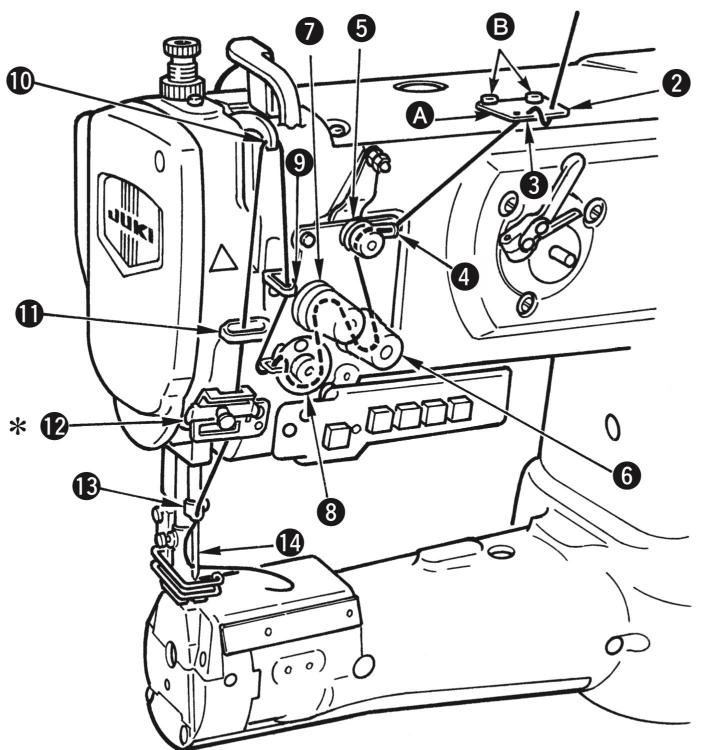
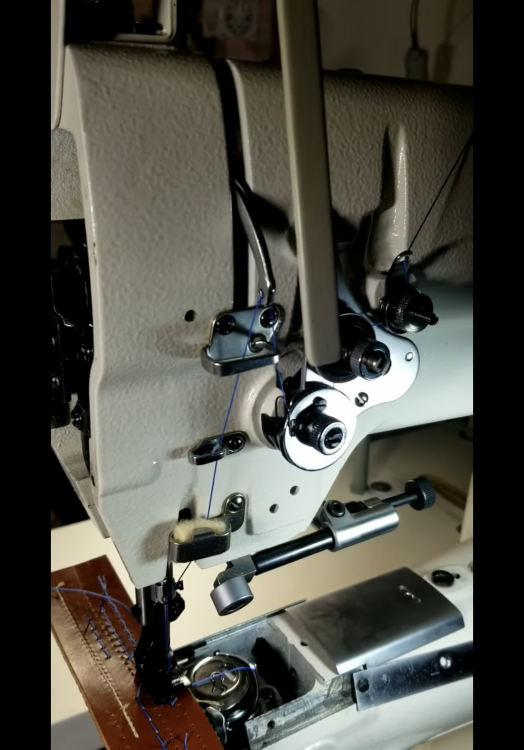
I agree with @DonInReno about the top thread possibly snagging or binding at times and causing trouble. Inspect your thread path starting at the spool and make sure it doesn’t get hung up anywhere. The normal stitches on your belt look very nice, actually, and I don’t see anything drastically wrong with your hook timing (nice video, by the way!) Sometimes the arm with thread guide holes gets pushed out of alignment with the spool, causing trouble. The thread should come off the spool straight up into a guide hole directly above the spool, like this: Certain type of threads also have a tendency to unwind by themselves and fall down off the spool, causing it to get stuck under the spool. It’s easy to miss because you’re so focused on the needle area of the machine. A thread sock can help prevent that. You can buy special thread socks like in the picture below, or just use a piece of cut-off lady’s hosiery (a super elastic thin sock/pant, also called pantyhose) : There are lots of other places where the thread might wrap itself around a post or something else, especially if the thread wants to twist and curl up around itself like your thread does in the take-up lever video: Also, according the Juki LS-1340 manual (https://www.juki.co.jp/industrial_j/download_j/manual_j/ls1340.pdf) the thread should NOT go through that guide on the way up, only on the way down:
-
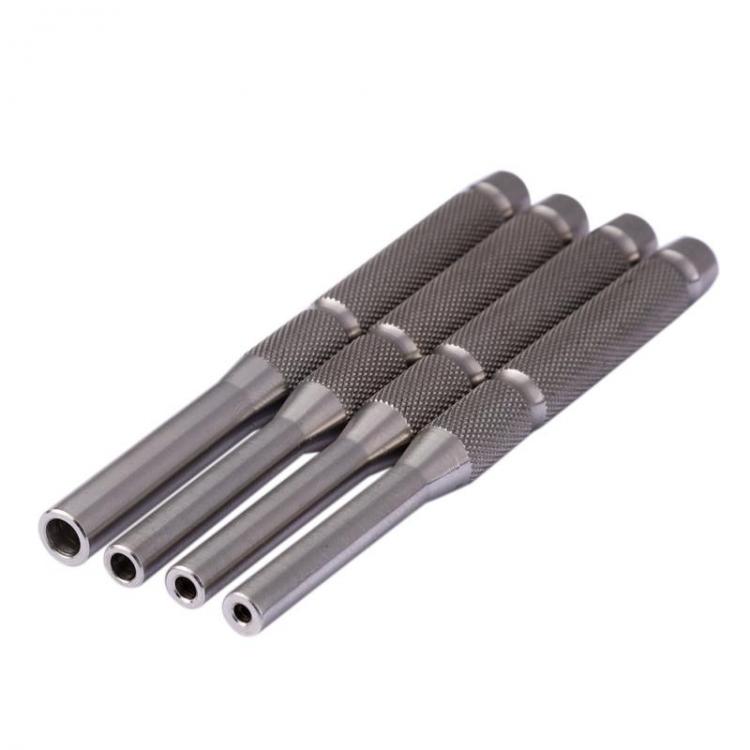
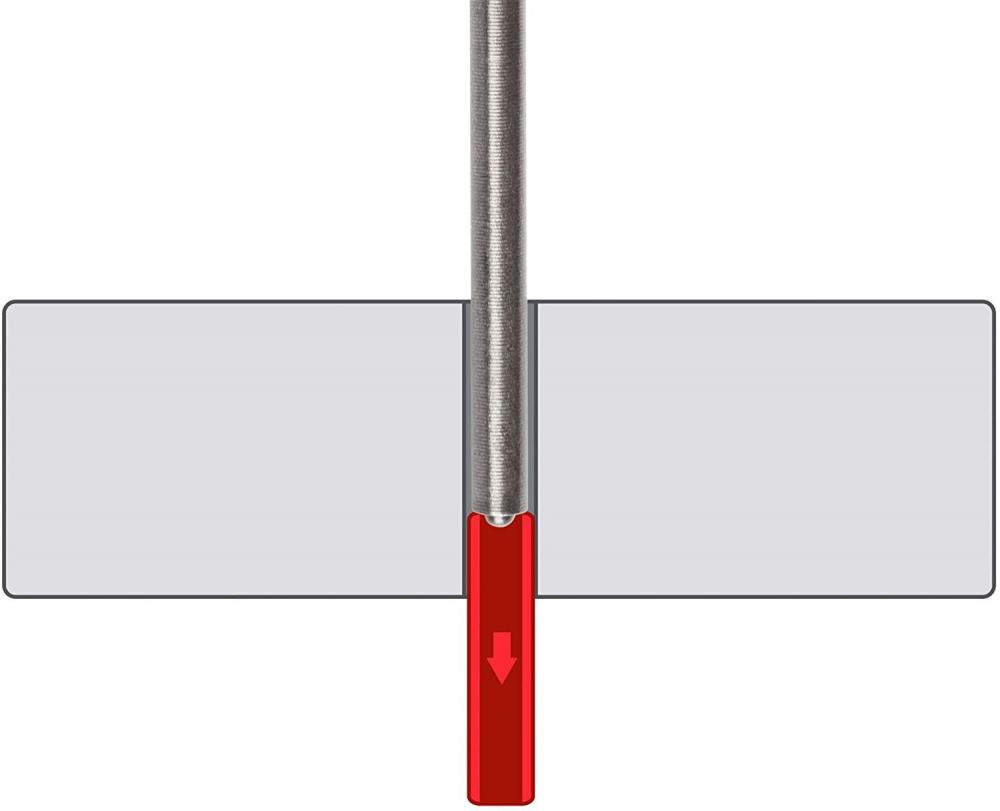
I used to have a pop-up note on that video talking about that pin. YouTube no longer displays the old pop-up notes. The note basically said that if you have the pin, skip this step - it’s not adjustable. Removing that roll pin is either easy or near impossible. If the hole is drilled all the way through you can use a suitable roll pin punch tool and hammer to tap the pin all way through and out the other side (if there’s enough room on the other side). Here’s a picture of roll pin punch tools: Here’s how they’re used: If the hole is not drilled all the way through, your only real option may be to use a drill and drill out the pin. Not sure that will really work, though. There’s a very good chance your machine was set up properly at the factory and that the pin is maintaining a good setting. There are a few other factors that might affect stitch length balance. I’d check feed lifting motion and timing before I messed with this pin. As @Pintodeluxe said, you can always use the external travel limiters for the reverse lever to dial in perfect stitch balance - for one particular stich length. All you have to do is shorten the longer direction of the two stitch directions to match the shorter one. Designing machines to have matching reverse in all stitch lengths was not really a priority for most vintage industrial machines, because they were often used at one single stich length for the entire life of the machine. If a high volume product required operations at three different stitch lengths, they would set up three machines, one for each operation. Very often the operator in a factory was not allowed to change the stitch length. A mechanic would come and change the stitch length if needed. There was more design effort put into preventing the operator from changing settings than into making it convenient for them to change settings.
-
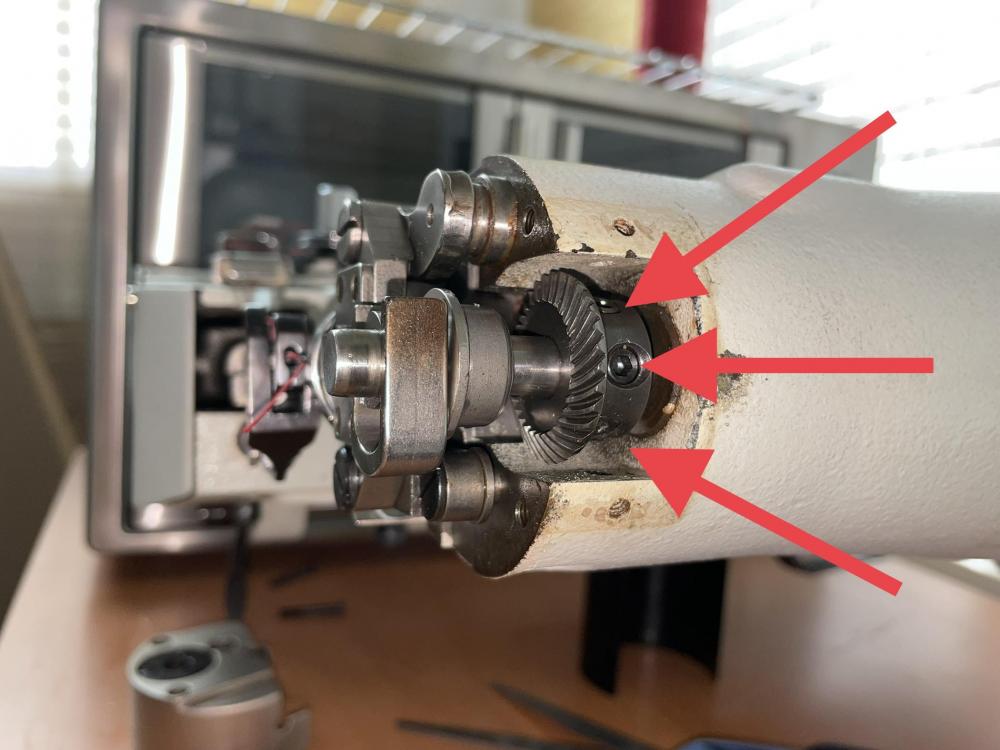
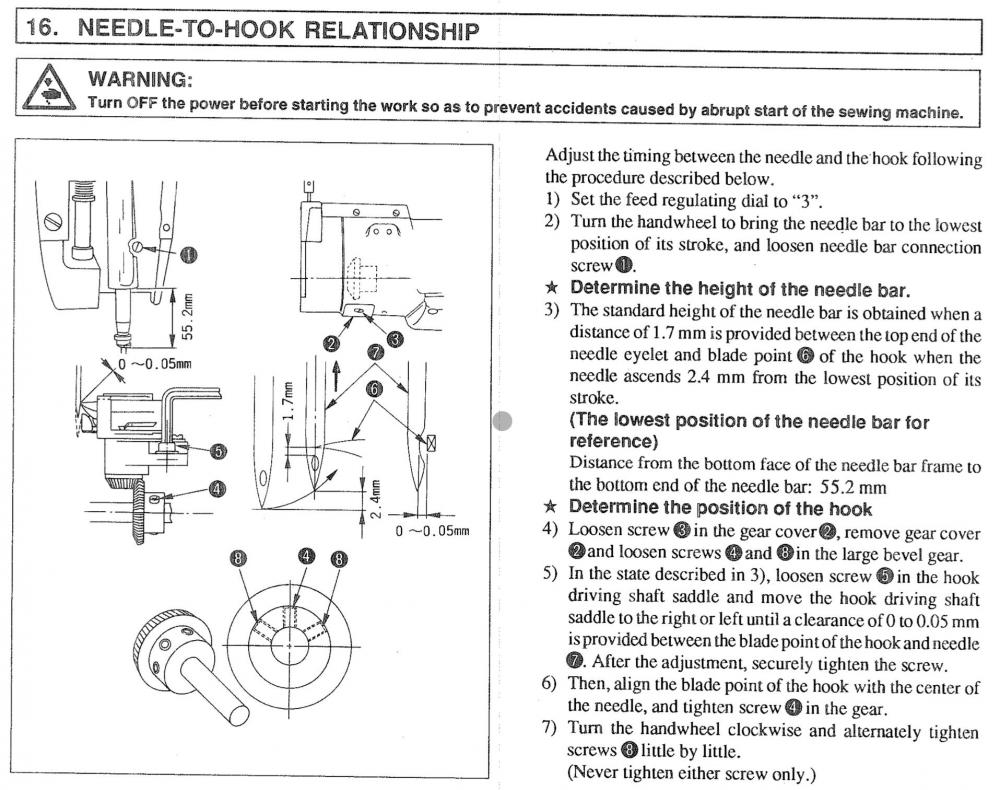
back lever.mp4.mpg (I can’t remove the accidentally embedded/deleted video above, please ignore) The Juki LS-341 manual is the main reference for adjustments. Here’s the full PDF: ls341n.pdf Here’s the relevant section: The picture below shows the three screws that hold the hook driving gear to the shaft. Follow the manual for adjustments and screw tightening sequence. Things to keep in mind: Keep the teeth of both gears engaged at all times. The gears are very likely matched pairs, meaning they are made to mesh with specific opposing teeth for optimal smoothness. Push the driving gear gently to the left to fully engage the teeth before tightening the screws again. If the teeth are not fully engaged (touching), you will have play in the driving gears, meaning you will be able to wiggle the hook back and forth. Ideally the hook should nice and snug with very little play. This hook driving gear design on the Juki LS-341is nearly the same as on the Adler 67, the only real difference being the number of clamping screws on the gear itself. The two machines are very different in many aspects, but this driving gear detail and how to adjust it is very similar. You can watch this video on hook timing for the Adler 67 to get an idea of how those gears work, starting at the 3:50 mark. Note: The Adler uses only two screws, the Juki uses three screws and a specific screw tightening sequence!
-
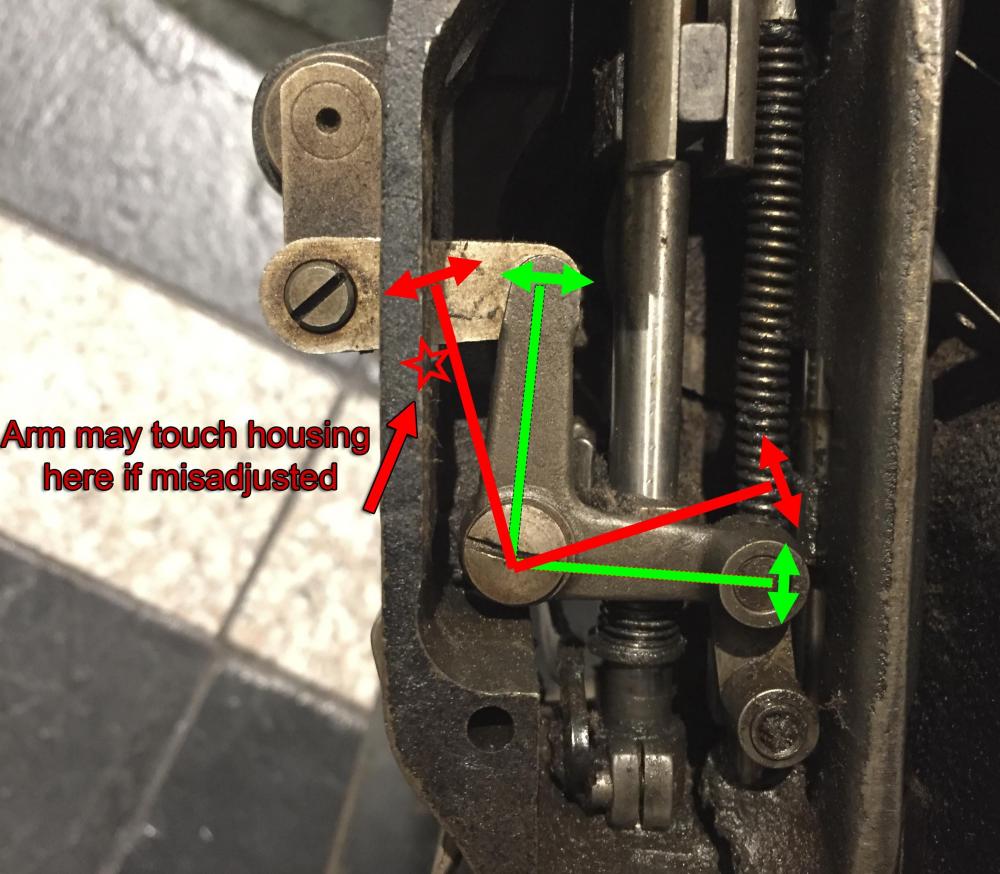
That’s a VERY nice stitch line on your samples right there! Many people would be thrilled to manage just that. There’s chance that your front presser bar is simply bent. That might be the reason it will only lift so far; it may also explain the misaligned needle hole in the front. The best way to tell if a shaft is bent is to roll it on a flat surface, but you have to remove it for that - not easy. The second best way to check for a bend is to loosen the shaft clamps, remove the foot and rotate the shaft in place inside the machine. If the bottom of the shaft wobbles as you rotate it, then it’s bent. Often when you lift the feet by pressing down on the large lifting arm in the back with your hand, you’ll feel a hard stop with a sort of “clunk” when it reaches it limit of travel. If feels like it’s binding instead of reaching a hard stop, that’s a sign of trouble. If you can make the feet get stuck in the up position that’s definitely a sign that something is not right. When the feet are lifted, only the front foot will move as you turn the hand wheel, that’s normal. The rear foot only moves if the front foot presses down against something. There’s also some wiggle room in how you can adjust the linkage that provides the walking motion to the feet. If that movement of the linkage is not centered properly, it may touch something and bind as you lift the feet. Take off the head cover and observe the linkage as you lift the feet (I press down on the long lifting arm on the back with my hand for that purpose.) The linkage inside the head will move as you lift the feet. Watch for any touch points against the casting or other parts that may limit travel when it shouldn’t. Normally, when both feet are at the throat plate level, the linkage should be roughly in the position shown by the green arrows in the picture below.
- 17 replies
-
- presser foot
- reverse
-
(and 2 more)
Tagged with:
-
Those specialty chain stitch machines are amazingly complicated designs and intimidating to service, at least to me. I tried my hand at one some years ago and gave up. If this machine doesn’t make a stitch after you thread it properly using correct thread and new needles, then you may need an actual mechanic to sit in front of it and figure it out. It’s also most definitely not a leather sewing machines, so you may not find much expertise for that specialty machine here in the leather sewing machine forum. In any case, prepare to post pictures and share YouTube videos to show what’s going on. Otherwise your odds of getting meaningful remote, crowd-sourced help are super slim. My general advice would be to remove the cutting blade(s) until you get the machine to make a reliable stitch. Nothing good can come from running a machine with misaligned cutting blades. Don’t run the machine under motors power until you have it figured out and can make nice, hand-turned stitches. Nothing good can come from running a mis-adjusted machine under motor power. For proper operation the hand wheel on this machine may turn in the opposite direction of most “normal” sewing machines. Some clutch motors have a tendency to start in the wrong direction. Show us what you have in terms of documentation. A picture of your machine’s threading diagram would be very helpful, for example. And of course, show us pictures of your actual machine, and perhaps how you have it threaded currently. Be precise in your descriptions. “having trouble threading” doesn’t tell us a whole lot. “I can’t figure out the threading diagram”, or “I can’t get the thread through the guide tube” is more meaningful. You’ll need some long tweezers to hold the thread while threading this type of machine. Doing it with your bare fingers is nearly impossible, unless your fingers are the size of long tweezers. Uploading pictures to this site is a bit of a challenge. Find a picture editing or resizing program or web service to make the pictures small enough to post here.
-
That clicking or snapping noise in reverse sounds like the thread getting hung up on the hook’s cast-off gib as the thread is being pulled up. Advancing the hook timing a little more often fixes that.
-
I think it’s better to know what’s broken than to get frustrated with a machine that’s not working properly without knowing why. Hopefully that new thread tension release slider will fit and your foot lift and clearance issues will be resolved. Perhaps this was why the machine was for sale in the first place. Kudos for getting all that disassembled, that was not a trivial task! On the plus side, it’ll give you the chance to give the disassembled parts a good cleaning and remove gunk from the works. It also is good to get to know your machine at that level and gain confidence in handling service and repair tasks yourself. Let us know if you run into trouble putting things back together. It takes some patience to line things up properly inside the tight space. It’s okay to just let it sit for a while if you get frustrated with it. Then try again. Hopefully by the time you’re done you’ll feel good about the machine working the way it’s supposed to and having done the repair yourself.
- 17 replies
-
- presser foot
- reverse
-
(and 2 more)
Tagged with:
-
I still think the issue has to do with hook timing and not needle size, although it may be a combination of factors. It looks to me like the hook arrives a little too late at the needle. This causes it to be slightly out of synch with the the take-up lever movement. The still frame below shows the moment where I think more thread gets pulled from the spool. The thread is taught everywhere and the check-spring is overpowered and maxed out. The thread take-up lever has already started going back up at this moment. At this point it does not matter what tensions setting you have dialed in, thread will get pulled from the spool no matter what. Every millimeter of extra take-up arm movement pull two millimeters of extra thread from the spool. That excess thread will later prevent the knot from getting pulled into the material. This still frame below is taken at the moment the needle is at bottom dead center. The tip of the hook appears to be near the 6:30 o’clock position. It really should be near the 7:30 o’clock position (needle is at the 9:00 o’clock position) I made a quick handheld video showing the stitch cycle on my Juki LS-341 in a slow motion hand-turned stitch. Hopefully it will allow you to compare my stitch cycle timing with your machine. My recommendation would be to advance hook timing by about “5 minutes on the clock face” and see if it helps.
-
Thanks for the pictures and videos. Posting pictures right here in the forum is the best way for easy in-topic viewing and also for archiving purposes. That Google drive link will just not work a year or two from now, and the search engines don’t index the photos unless they’re actually on a web page. It’s a bit of a pain to resize photos to upload them here, but well worth the effort in the long run. There are quite a few adjustments that are not quite right from what I can tell based on your videos: Top three issues that need to be corrected first: 1. Hook timing looks retarded, meaning the hook arrives at the needle too late. This causes the needle bar to be set lower than it should be, and it causes the thread to snap around the hook because the hook timing is not properly synchronized with the take-up lever motion. This video shows how to time the hook on this class of machine: 2. The walking motion of the feet is not timed correctly. The front/inner foot arrives at the throat plate much too late. This video shows how to adjust the walking foot timing on a Pfaff, your machine works the same way: 3. Your rear presser bar is adjusted too low. This causes your foot clearance issues. The video below shows a lengthy repair that you DON’T need to do. During the re-assembly steps it shows how to adjust the rear presser bar height starting at the 11:35 mark (use a 1/2” spacer block for your machine) You’ll need to back out the presser tension screw (shown at 1:00) and loosen that clamping screw I’m tightening in the video to be able to move the rear presser foot bar up and down. Report back after you’ve made these adjustments and we’ll address the other issues. We’’ll need to see how various parts are aligned with the needle in three key positions: 1. When the descending tip of needle is level with throat plate. 2. Needle at lowest point (bottom dead center) 3. Needle in hook timing position
- 17 replies
-
- presser foot
- reverse
-
(and 2 more)
Tagged with:
-
Please post some pictures of your machine. That model apparently went through multiple versions and castings over the years. There are surprisingly few pictures of this Seiko model available online. Suggested pictures: whole machine front and back, remove left cover plate on head and show internal bits, underside of machine with close-ups of hook gears, head near take-up lever and tension unit, close-ups of needle area, rear of machine near lift lever. Having pictures eliminates much guesswork and allows us to identify what version of the machine you actually have. Plus, we can mark up your photos with arrows as we try to explain things. A video clip uploaded to YouTube with a link to it posted here is the best way to show problems in motion. Extremely slow, hand-turned stitches tell the best stories. The feet on your machine may be cheaply produced aftermarket feet that are simply not to spec, off-center, or with a misaligned mounting hole, causing mis-alignment of needle and foot. If the needle is nicely centered in the hole of the feed dog, then the presser foot itself is a suspect. Show us how high the rear foot lifts above the throat plate when using the manual lift lever - hold a small ruler next to the foot. Show us a picture (or video clip) of the position of the tip of the hook when the needle is precisely at the lowest point. Hook timing variance may cause trouble, even if the machine manages a nice stitch. Show us a photo of the needle package you’re using.
- 17 replies
-
- presser foot
- reverse
-
(and 2 more)
Tagged with:
-

Contemplating A Puritan Stitcher: Vamping, Staying, Fairstitch ?
Uwe replied to Uwe's topic in Leather Sewing Machines
Mine is a three needle machine and I gave up on getting it going. It sits patiently in a 40’ storage container full of vintage sewing machines and parts. The key to that storage container is for sale. -
Check out the Leather Hide Store. They have lots of upholstery type leather: https://www.leatherhidestore.com/leather-for-upholstery I’ve ordered from Maverick Leather before. They often have interesting leather in their clearance section, in case you’re just looking for one-off projects. https://maverickleathercompany.com But this leather supply discussion really belongs in a different forum.
-
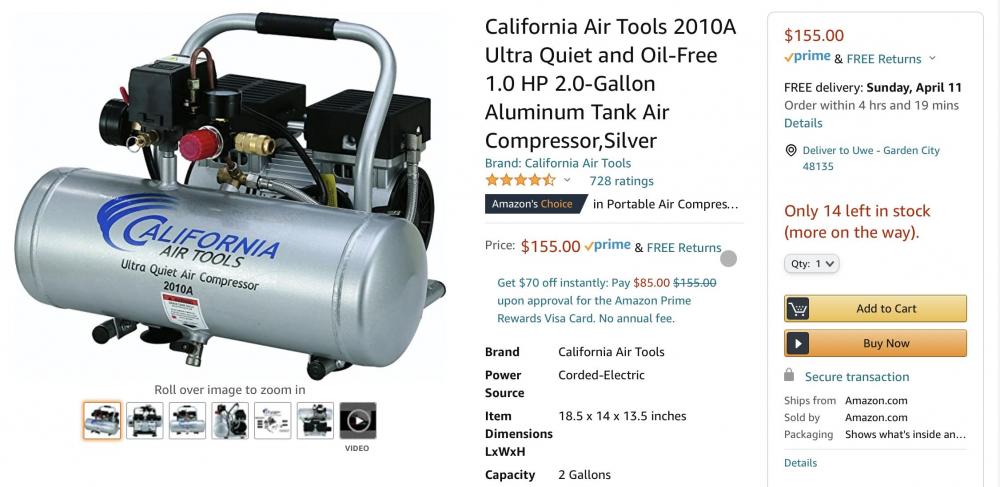
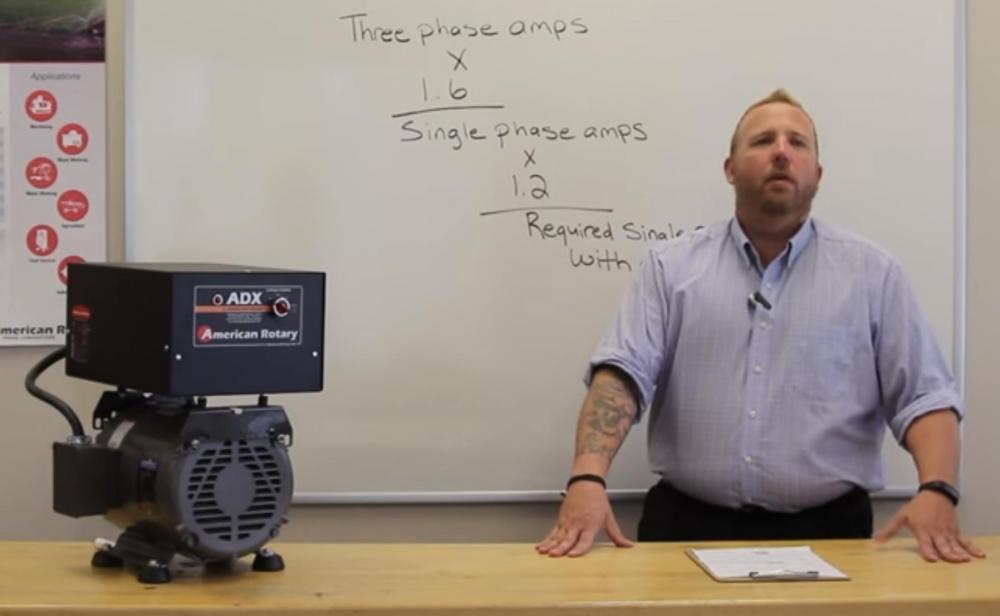
The rotary converter is just a separate device that plugs into your 220V outlet (like an electric clothes dryer or range type outlet - every house in the U.S. has 220V available in the circuit breaker box.) You may need an electrician to install a 220V outlet in your work area. Plug the phase converter into that 220V outlet and then you just plug your sewing machine into the outlet on the rotary converter. You may have to change the plug on the sewing machine power cord to match the one on the rotary converter, which is fairly simple to do. This screen shot from a video gives you an idea of how big the rotary phase converter is in the portable configuration. It’s essential an electric motor/generator and a box with electronics. Other configurations have the motor sit on the ground and the box with the electronics mounted on the wall. Same function, just a different configuration. I have mine mounted on a small moving dolly so that I can wheel it around and use it in different rooms. They are quite heavy. Aside from the rotary phase converter, you’ll also need a compressed air source for the pneumatic system. I use a small, relatively quiet air compressor and it works just fine. Some cheap compressors are very loud when they’re running. I recommend one that similar to this California Air compressor pictured below. Similar models are available at hardware stores like Home Depot or Lowe’s.


