Uwe
-
Posts
2,221 -
Joined
-
Last visited
Content Type
Profiles
Forums
Events
Blogs
Gallery
Store
Everything posted by Uwe
-
I think this is the video @TomE mentioned. I made this video over four years ago and forgot that I had it in my hidden archive on YouTube. The Cobra 4 shuttle hook assembly should be identical to this Cowboy 4500. This topic really belongs in the Leather Sewing Machine Forum. Perhaps @Northmount or one of the other admins can move it there.
-
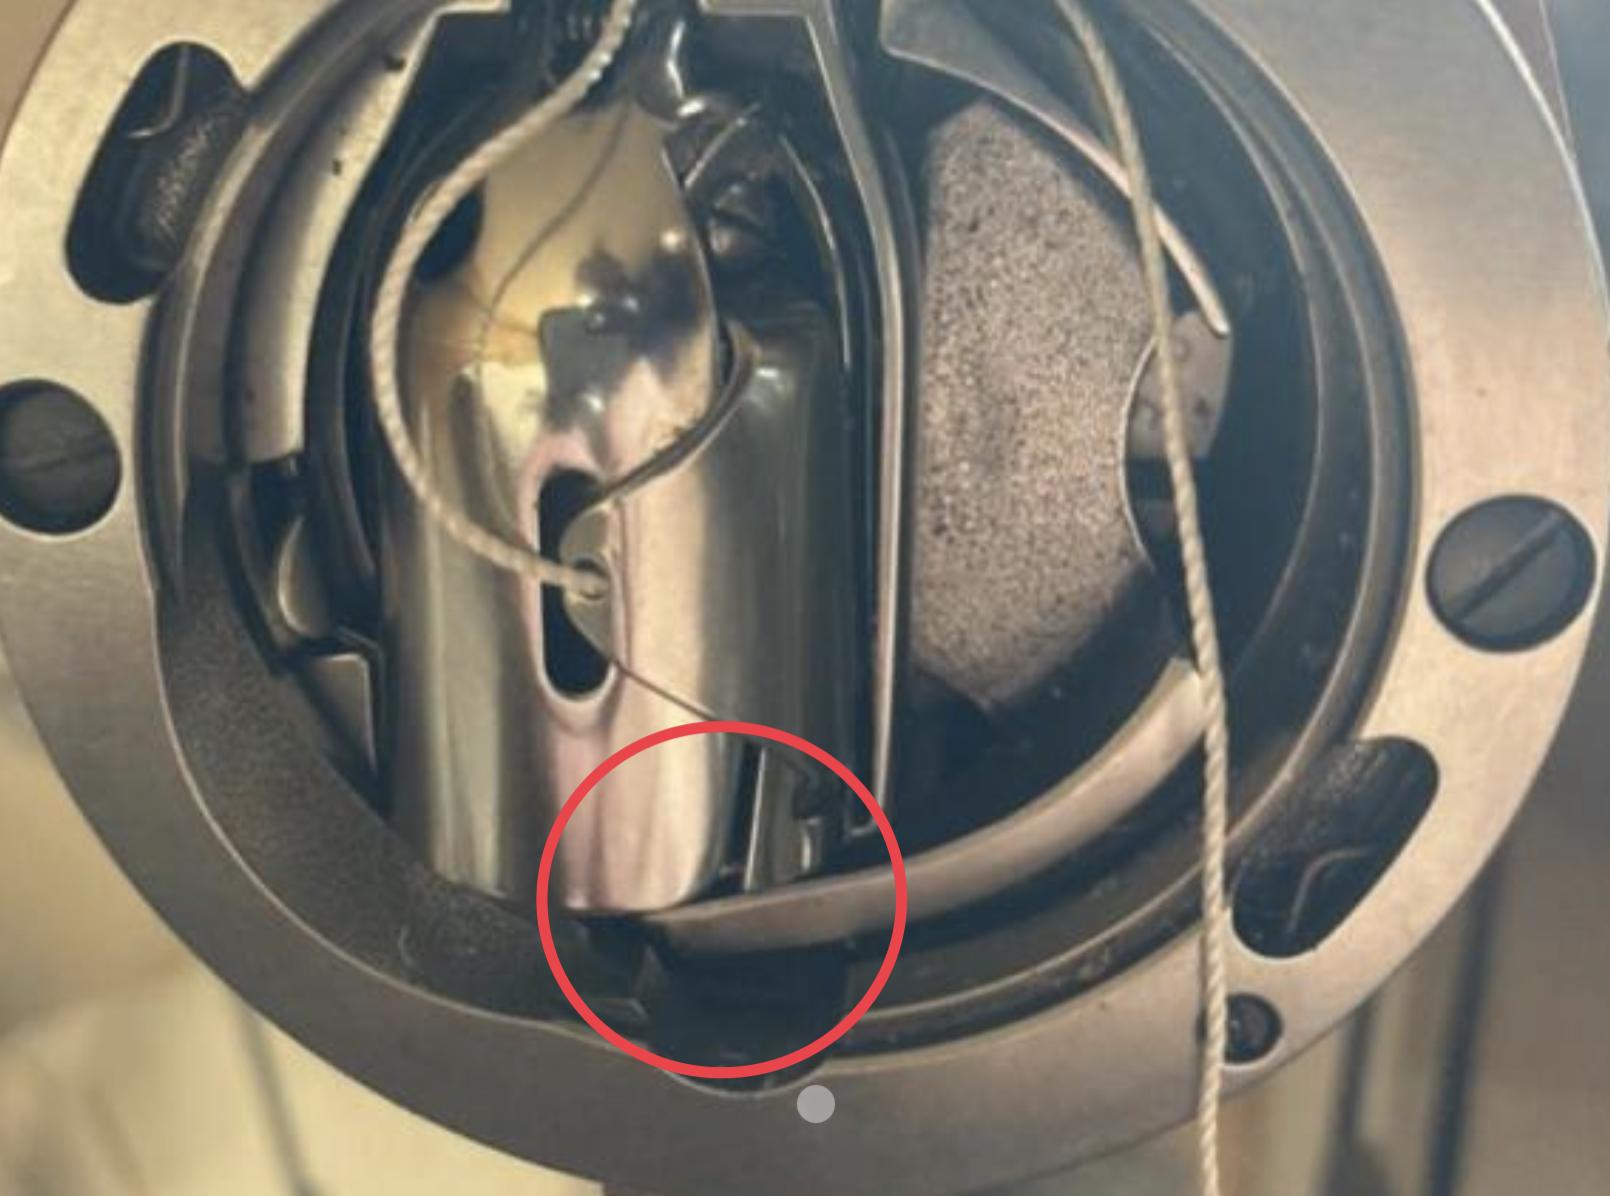
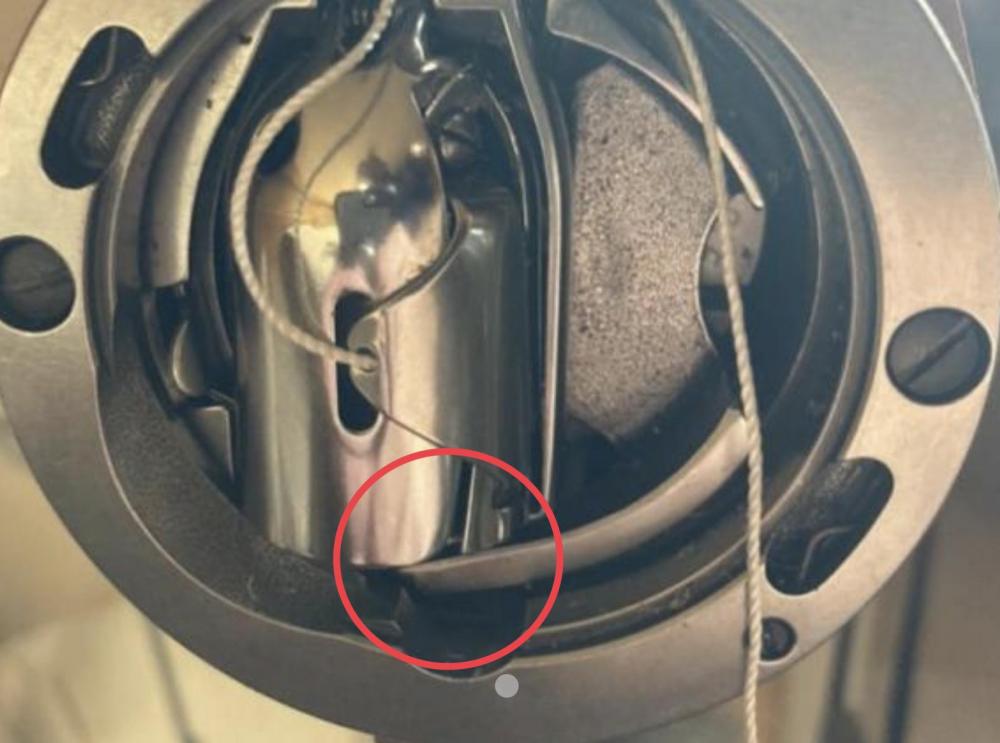
The photo does look like the shuttle driver is pressing against the bobbin instead of the shuttle hook frame. The whole assembly looks a bit off-center and out of alignment for some reason. You may have an intermittent bind due to parts in the shuttle area that are too loose or out of alignment. Something may have come loose in the shuttle area. Also make sure the shuttle race is properly oiled. As @Hags suggested, taking the shuttle hook out for a proper cleaning and inspection is probably good idea.
-
Option1: Just try it out: Sew 1 foot long stitch lines on a scrap piece of same thickness and count how many runs back and forth you get. If you get more than twenty runs, then you’re good. Option 2: ballpark it: take a fully wound bobbin, unwind it and measure how long the bobbin thread is. If it’s more than twice your stitch line length (40 feet in your example), then you should be good when sewing at 5spi. Option 3: Math Every stitch uses up one material thickness worth of bobbin thread (it turns around in the middle for the knot). So at 5spi you add five times the material thickness to your thread usage for every inch sewn. At 10 spi, you add ten times the material thickness per inch sewn, etc. Without getting into too much detail about unit conversion and terms cancelling out, here’s an example: If you’re sewing something that’s 20 feet long and 1/5 inch thick, then you’ll need roughly: 1’ for lead/tail, plus 20’ straight line, plus 20’*5spi*0.2”material=20’, which all adds up to about 41 feet of bobbin thread
-
I don't think the bottom tension is the culprit, the bottom thread is clearly loose in the picture I suspect the problem has to do with a snag of the top thread as it's wrapped around the hook. The bobbin case opener, the opener finger, and the cast-off gib on the hook, are all candidates for top thread snagging opportunities. If the top thread snags at any point during the stitch cycle, more top thread may be pulled from the spool through the top tension unit, which make it impossible for the take-up lever to pull the knot tight, regardless of tension settings. No matter of tension adjustments will fix that kind of snag. The ONLY time top thread is allowed to be pulled through the tension unit is when the take-up lever is at the very top of its movement. A few slow, hand-turned stitches while closely observing how the thread wraps around the hook is usually key to debugging this type of problem. The purpose of that pin is to keep the tension disks from spinning, which would cause the thread to slip out from between the tension disks.
-

singer 45k clearence between 98607 and needle
Uwe replied to Deeio's topic in Leather Sewing Machines
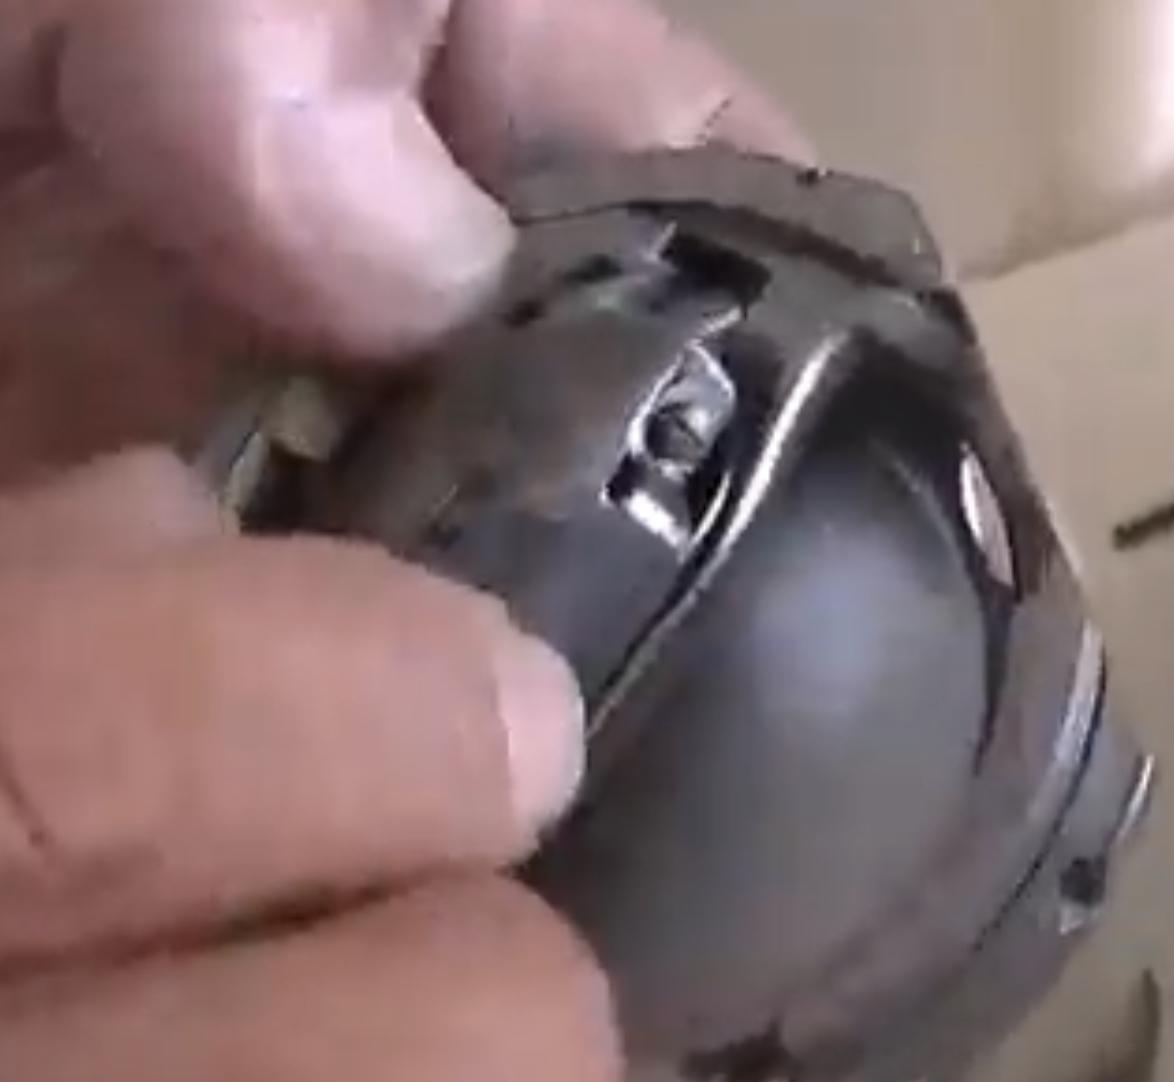
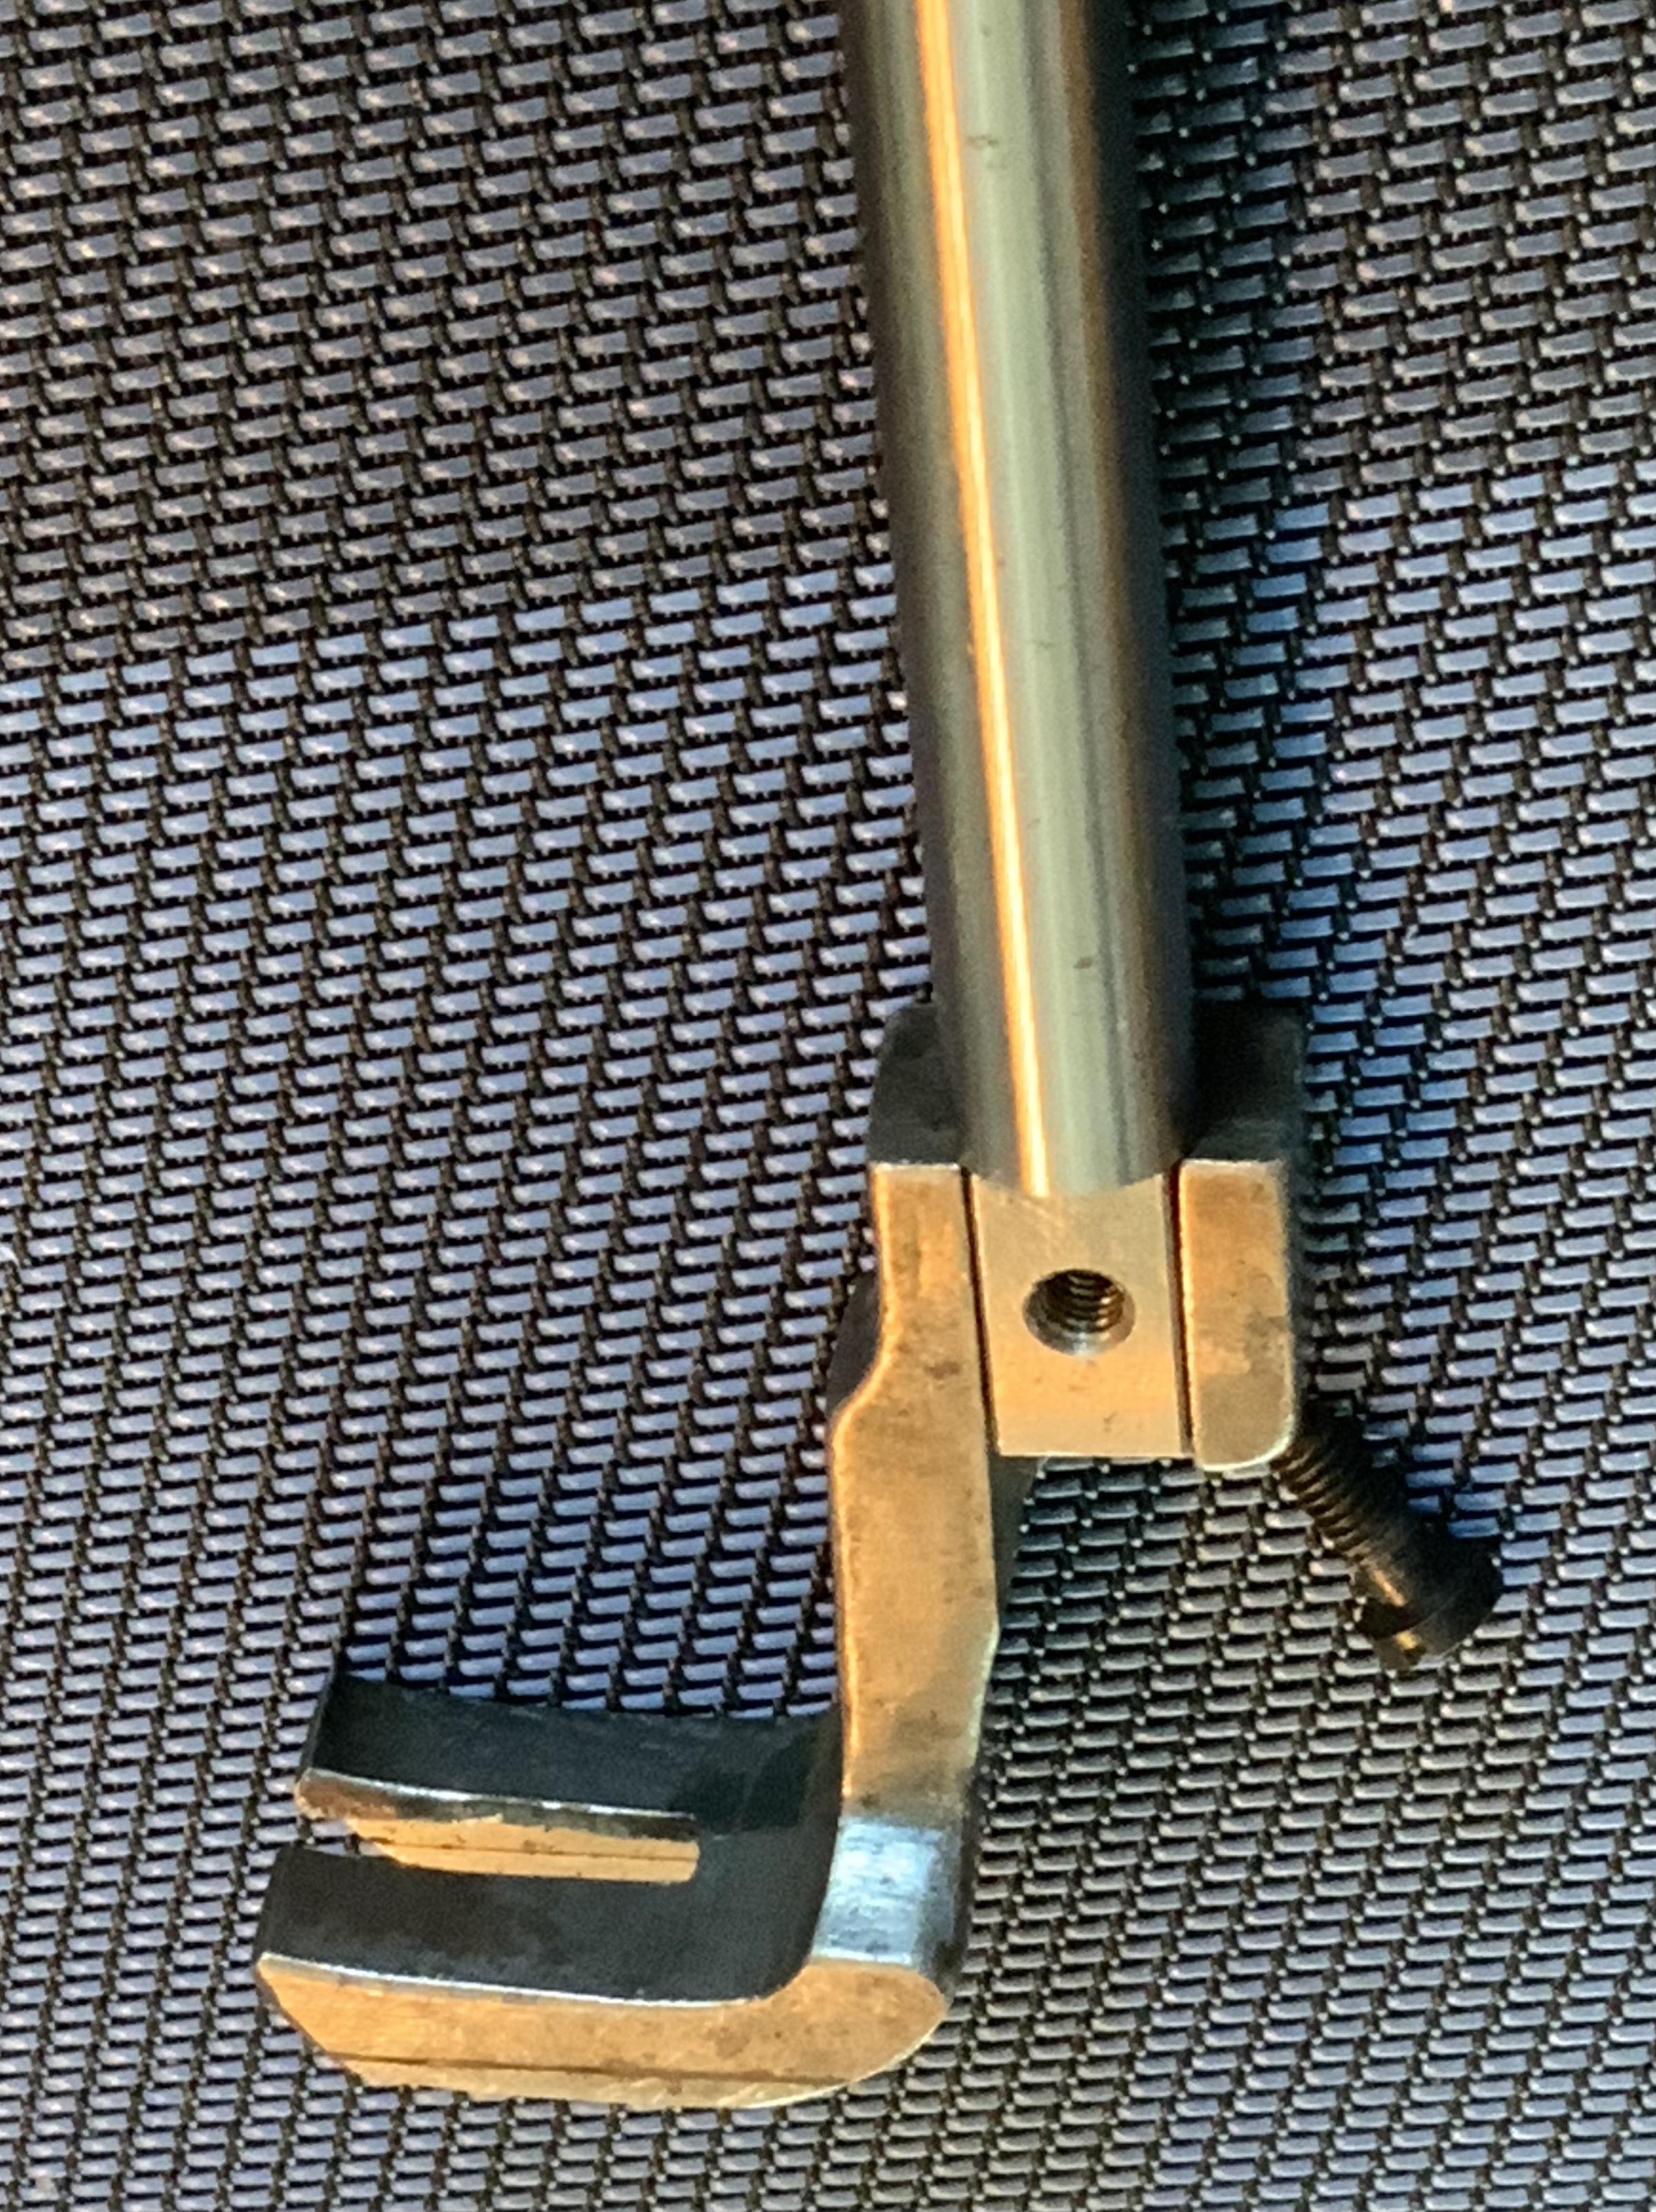
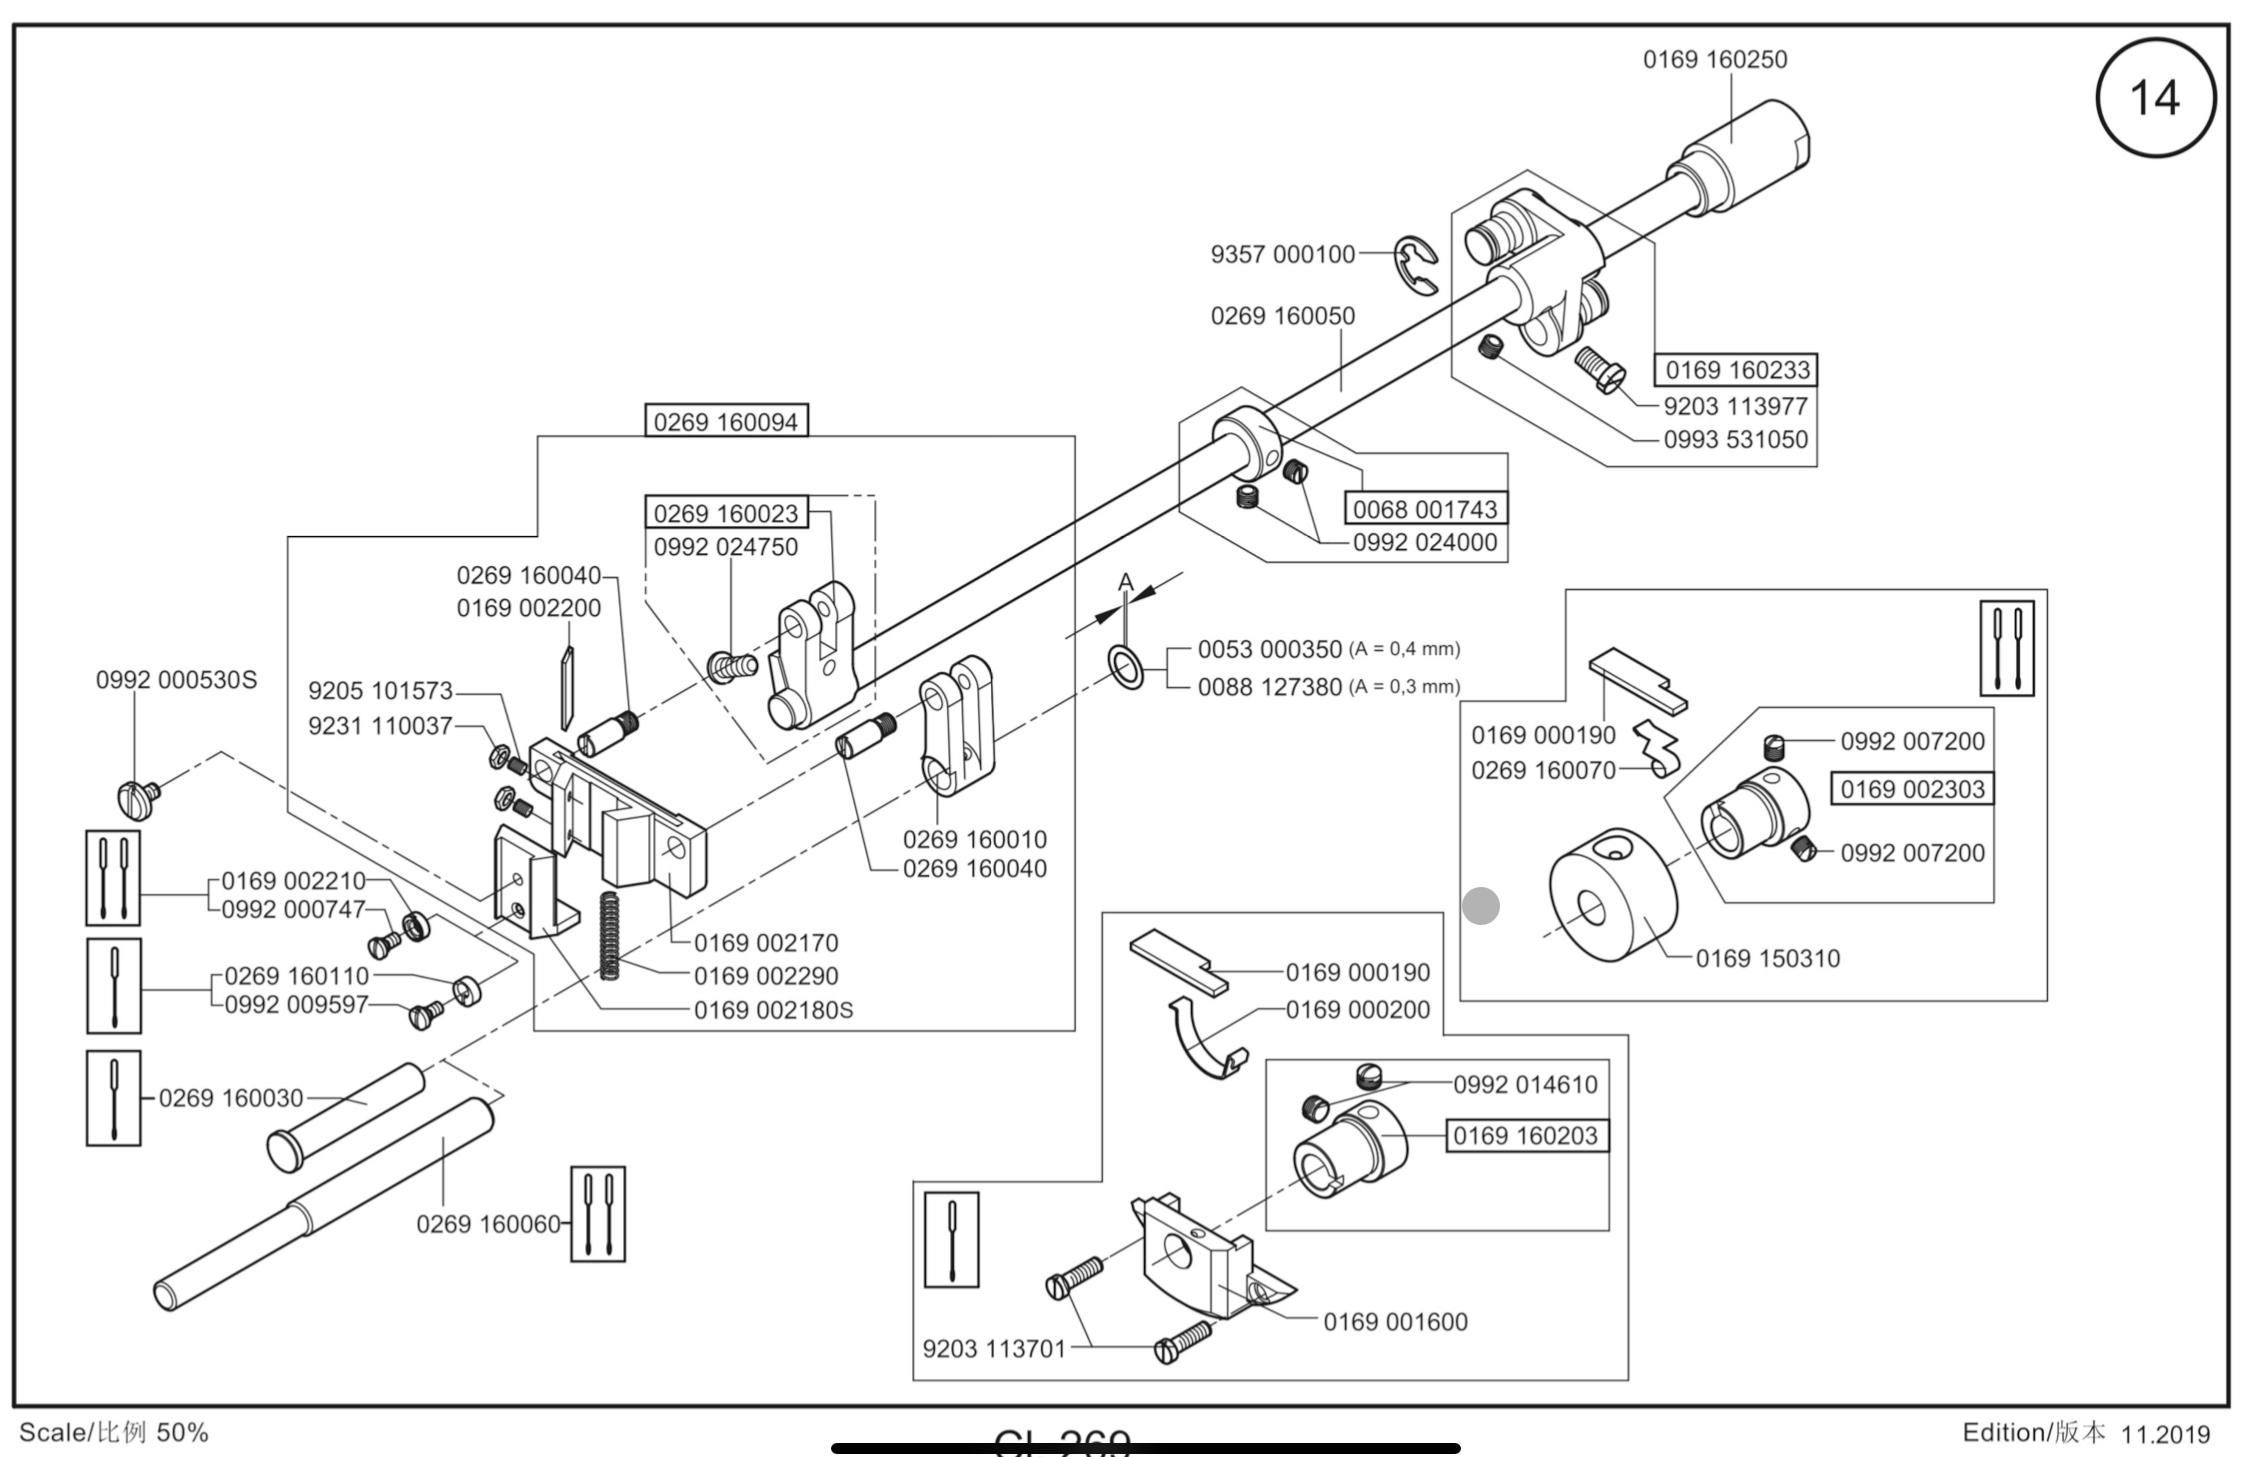
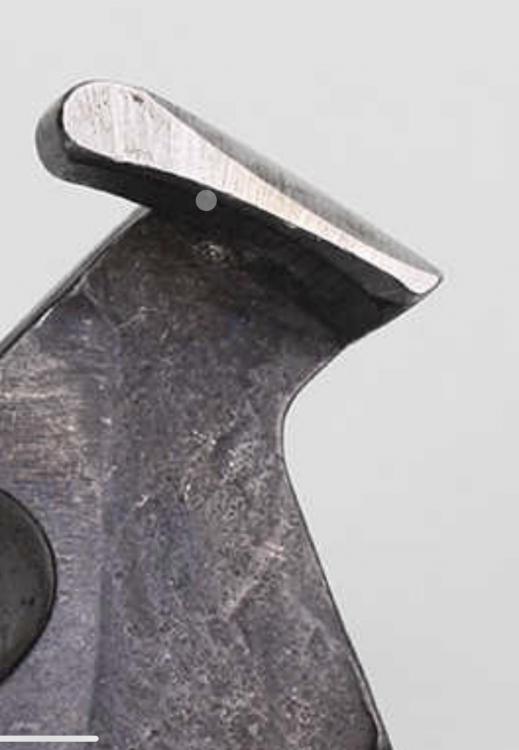
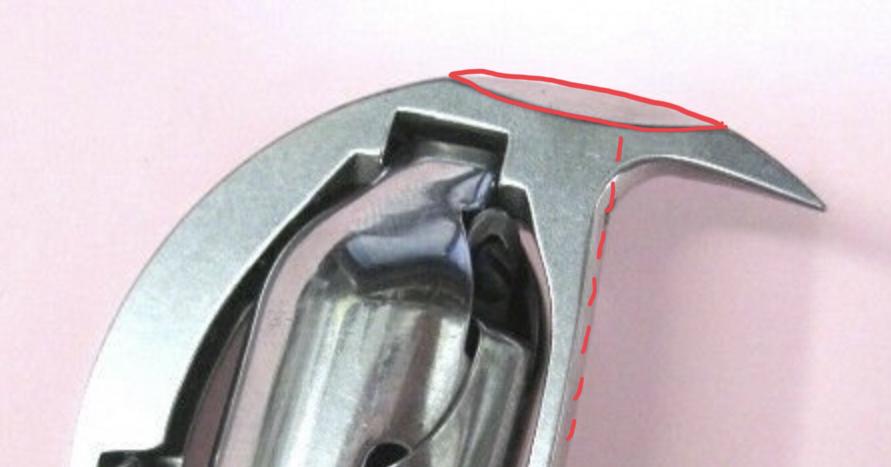
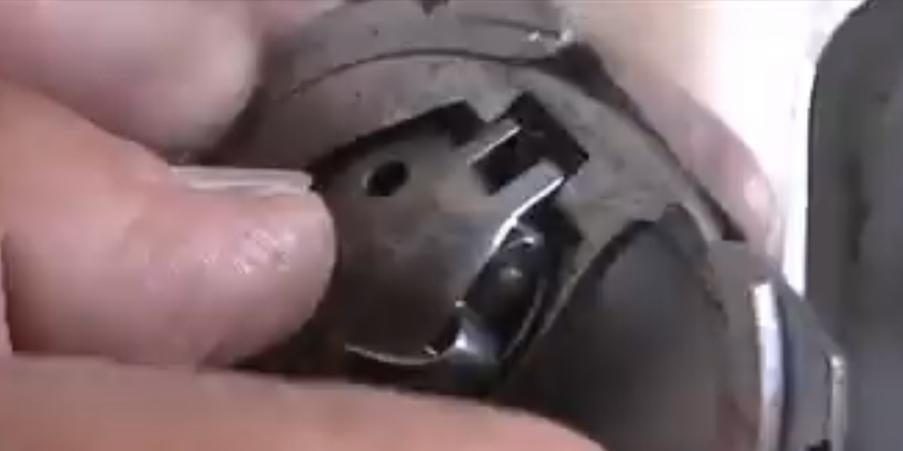
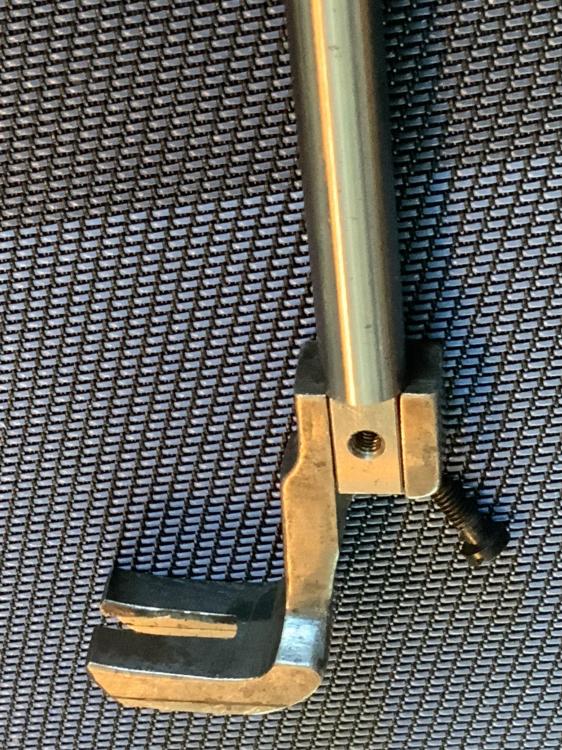
@Deeio I suspect that shuttle hook is an aftermarket part, not an original Singer. There a many aftermarket shuttle hooks that will “fit” inside the race, but not all will work equally well. You may need to get a new hook that is closer to the original Singer design. The seemingly too-tight lower thread tension is very likely caused by the upper thread snagging on the shuttle barrel. In your picture it’s the top thread that snags on the barrel as it gets pulled around the shuttle hook. The snag will pull more upper thread from the spool and then the thread take-up lever has no chance of pulling the knot tight. Again, a better shuttle hook with different barrel geometry solve this problem. Or moving the shuttle hook away from the needle may also work. The needle guard surface of the shuttle driver also looks quite worn. The needle is supposed to gently touch the needle guard surface as it goes down. This will prevent the needle from coming too close to the hook. On your shuttle driver, that needle guard surface looks like it has been ground down by many needle that got deflected way too much. I marked the area in blue. You can see gouge marks as if they were made with a file. This what that needle guard surface on the shuttle driver is supposed to look like. The bright surface is the needle guard surface that the needle is supposed to lightly brush up against. You’ll need to either move the shuttle driver away from the needle (the shuttle driver position IS adjustable) I have a feeling that the needle bar position is not adjustable - your needle bar may simply be bent for some reason and may need to be replaced. Your shuttle hook also has a slightly different geometry in the notch that is ground in the top behind the tip of the hook. On your hook this angled ground surface appears to start farther behind the tip of the hook than the original 45K hook. Here’s an photo with that cutout marked in red. The dashed line is just for reference. The hook in this picture has a cutout that starts well before the dashed line. On your hook the cutout appears to start right at the dotted line. I think the purpose of the cutout is provide clearance for the needle as it moves up and the thicker part below the scarf of the needle moves past the hook. I’m far away from my machines, so I have to rely on images sourced online.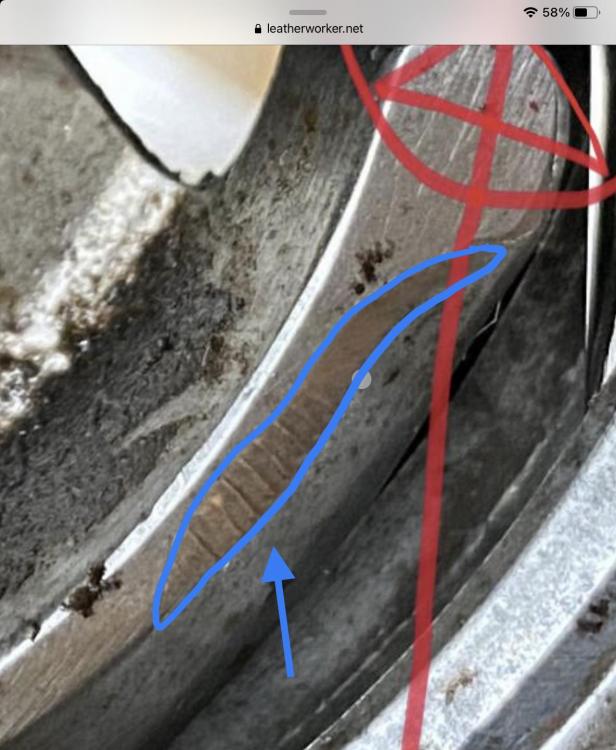
-
Consew 226R1 going opposite directions of controls
Uwe replied to marscstars's topic in Leather Sewing Machines
The issue may also have to do with synchronization of the bottom hook driving shaft. If the safety clutch is not cooperating, it may have slipped and rotated the bottom shaft out of place. You really should get the safety clutch working again. Otherwise the bottom shaft may rotate out of position randomly as you sew and create all manner of trouble. The safety clutch not only prevents damage when it disengages, but it also locks in the proper hook and feed timing when it’s engaged. If the bottom shaft is rotated out of position by 180 degrees, then the feed motion will be exactly opposite of what it should be. A quick visual check to confirm proper feed synchronisation to is rotate the hand wheel to bring the thread take-up lever to the very top position. In this position the feed dog should be at the very front of its motion. If it’s not, then the bottom shaft is not properly synchronized. This video shows how you can pop and reset the safety clutch in case the reset button is not working: This video goes over the safety clutch mechanism in some detail, in case you need to service it: Lastly, a video that shows how to synchronize the drive belt and bottom shaft (this video only make sense if the safety clutch is already in the correct, engaged position.) -
You don’t really have to remove the race/shuttle in order to remove or replace the feed dog. This video shows how to remove/replace the feed dog starting at the 1:25 mark (ignore the remainder of the video, it was a private demo video for a potential customer). It’s not really that hard to do. With a little practice it should take less than five minutes to swap out feed dog and throat plate,.
-
Are Zig-Zag machines exceptionally hard to find?
Uwe replied to williaty's topic in Leather Sewing Machines
Yes, they are exceptionally hard to find, especially used. Compound feed plus zig-zag is also exceptionally tricky from an engineering standpoint. Most zig-zag machines are bottom-only feed mechanisms, very few have bottom + top feed. If you want bottom+top+needle feed plus zig zag, then I’m not even sure such a machine exists. -
That’s an interesting stitching tool. Their website states about process for attaching the sole: “This process is done manually with a basic home-made sole stitching lever designed by a shoemaker in Spain for this purpose” ”basic home-made” may be a bit of a stretch. The stitching lever is really quite ingenious and you need a well equipped metal shop to make it. Using a “stitching lever” instead of a “sewing machine” allows them to claim that the shoes are stitched by hand. Which is true, since the tool doesn’t make the stitch for you. I had to play the video in slow motion a few times to see what’s going on. The stitching lever tool appears to form a normal lock-stitch. After the top lever action lowers the hook needle to pierce the material, he lowers the foot to hold the material in place. Then he twists a knob at the bottom which must somehow rotate some internal mechanism that lays the bottom thread into the needle’s hook. He then pulls the needle with bottom thread up and uses his fingers to unhook the loop from the needle and thread the top thread though that loop. Then a bottom lever action pulls the bottom thread down again to lock the knot into the material. I have a feeling the people in the video have little interest in sharing how they came by that tool, since it’s it’s one of the elements that makes their products unique. Perhaps somebody can track down the “shoemaker in Spain” who invented this machine.
-
You didn’t say if you took just the head in or the whole table setup with motor. Are you sure your motor (and the machine) is turning in correct direction when you try to sew at home? If the machine is spinning backwards then the feed will be reversed and it certainly won’t make a stitch.
-
The hook assemblies on the 67 and 69 are two totally different designs, a vertical axis design on the 67 vs. a horizontal axis design on the 69. The two hook designs have very little in common I would not expect the bobbins to be identical.
-
The part number on the blue box in the video actually does match the parts drawing, yay! And the shuttle does look like it fits nicely inside the race in the video. Having a clear, steady moment of that view would have been useful. Since the parts appears to be correct, then it comes down to the installation procedure, which my video linked above hopefully shows in enough detail.


-
The part numbers on your actual parts don’t agree with the part numbers shown in the parts manual linked above, so you may not have the correct parts. This video below shows how to remove and re-install the shuttle hook (not really necessary in order to remove the feed dog!) You will have to insert the shuttle into the outer race before inserting the race+shuttle assembly back into the machine. The part numbers on the shuttle hook in the video start with 204……
-
The feet and throat plate are not the same. The main advantage of the 969 may be that you can actually buy a new one today. The 205-370 has been out of production for over a decade. I attended a service training class on the 969 at the DA factory in Germany a few years ago. Personally, I’m in awe over the design and engineering that went into the 969. I’m not aware of a current production cylinder arm machine that has more impressive specs.
-
Singer 45k presser feet fit Juki TSC 441 series?
Uwe replied to Cumberland Highpower's topic in Leather Sewing Machines
Adler 105 feet also fit the OEM Juki TSC-441 presser bar. But the thread on the Juki presser foot screw binds before actually holding the foot tight. You’d have to use a different presser foot screw that’s threaded all the way to the head of the screw.
-
Singer 45k presser feet fit Juki TSC 441 series?
Uwe replied to Cumberland Highpower's topic in Leather Sewing Machines
Are you saying that the Juki TSC-441 is a re-branded Nakajima design? Do you have any sources for this claim? -
When I adjust machines I make sure the check spring engages a little to put some tension on the top thread when it’s about to get pulled through the gap between the bobbin case tab and the throat plate cutout. This will look a like secondary little jump of the check spring as it goes through the stitch cycle. This kind of contradicts the statement @Dave4 made in the original post at the top of this topic that stated: “If my observations are correct, the check spring should not enter the game again until after the hook has carried the captured upper thread more than half way across the bobbin face on its journey to becoming a lockstitch.” If the thread is too slack at the moment it gets pulled around the far side of the bobbin case, then it may not slip though the gap before it closes up again. This could cause a potential snag and loops. I don’t have a separate video about it but I sorta-kinda mention it in the Juki LS-341 stitch cycle video at the 1:30 mark
-
There’s nothing to synchronize on this machine when you replace the belt on a Pfaff 1245. You’ll just have to adjust hook timing after replacing the belt. This machine design has feed motion driven via cams located on the main (top) shaft. Replacing the belt does not change feed timing, it will only change hook timing. If you remove the belt, then needle and feed motion are unchanged, just the hook no longer rotates. The Pfaff 1245 manual provides details on various adjustments, including hook timing.
-
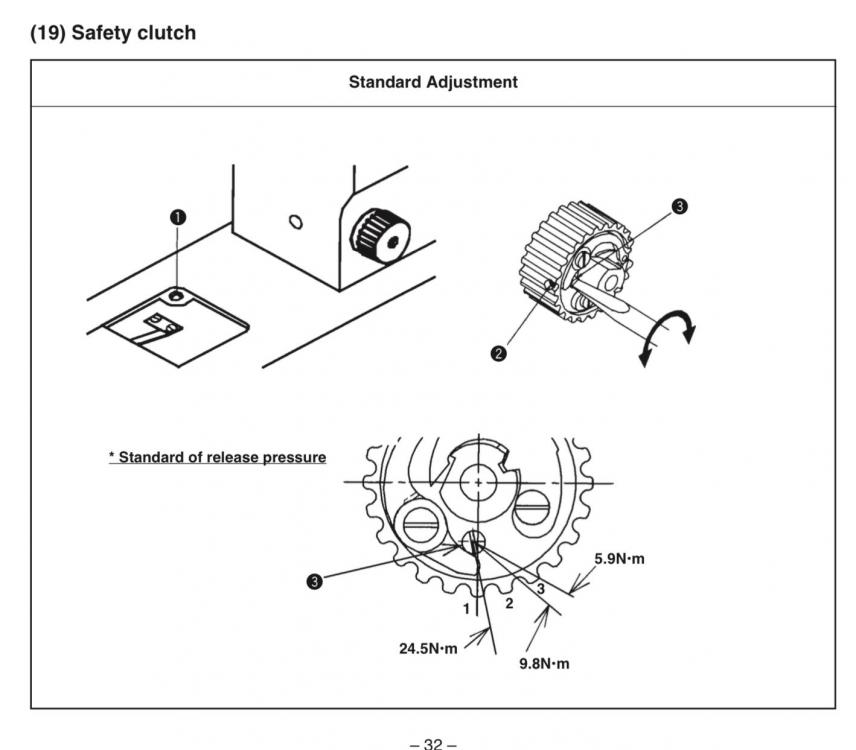
The Juki 1508 Engineer’s Manual (lu1510n.pdf ) describes how the adjustment of the safety clutch torque works, on page 32/33. Here’s a screen shot of the relevant section:
-
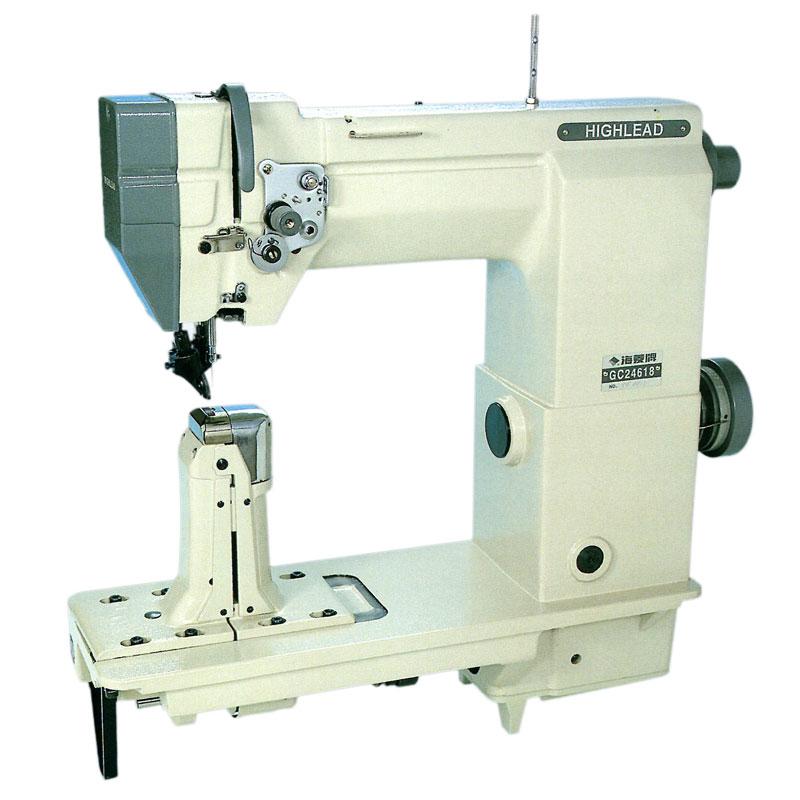
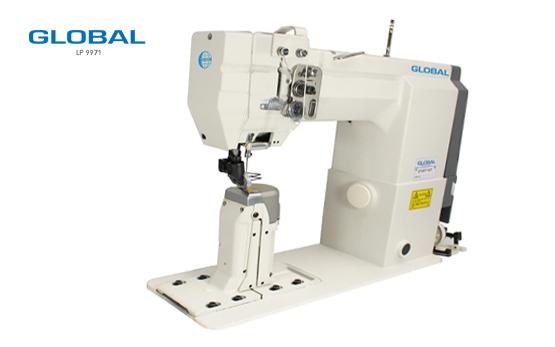
The Global 9971 appears to be yet another a copy/clone of a popular design dual driven-wheel post bed design. I don’t know what original design these machines are based on, but there’s a lot of them. The Global 9971 is essentially the house brand version sold by Global, a big sewing machine company based in the Netherlands. If you’re within day-trip driving distance to Global then you should strongly consider visiting them. I’ve not personally used this machine, but I spoke with a Global representative at a sewing machine trade show a few years back. Global seems to have their act together from what I can tell. Other clone brands sell very similar machines, often with a 9910 or 24618 in the model name. Example: Highlead 9910/24618 The relative quality of generic clone machines often depends on the company importing them and setting them up. This is why being able to visit the vendor in person for a demo and/or purchase and for service is important. In Europe, some of the big brands for generic clone machines are Global, HighLead, HighTex (Cowboy), Typical, Sieck, among others. Take some of your materials and finished products to get meaningful advice on which machine is best suited. The dual driven-wheel post bed machines are generally popular with people who make shoes. They’re very good at sewing tight curves and following intricate designs very close to the edge. Long straight stitch lines can be challenging because the material pivots so easily around the needle. The YouTube videos showing theses types of machines in action often feature very skilled sewists who make it look easy. You can also sew belts, bags and similar projects with a machine like this. If you’re expecting the machine-sewn seams to look like your hand-sewn saddle stitch seams, would will very likely be disappointed.

-
Singer 111w155 feed lift eccentric - balance wheel?'s
Uwe replied to Wyowally's topic in Leather Sewing Machines
Which parts book is that page taken from? Do you have a link to the whole parts book? I don’t remember ever seeing that mechanism on a Singer 111W155. I’ve seen it on other machines. The position of the slider on that eccentric determines the eccentric offset - the distance between the center of the driving shaft and the center of the collar bushing. That offset determines the amplitude of the eccentric motion, meaning how much or how little the connecting rod moves (wobbles) as the mechanism spins. The worm gear is used to change the position of the slider. As with most worm gear designs, the purpose usually is that the worm gear can move the slider, but the slider cannot move the worm gear. Rotating the worm gear moves the slider, but pushing on the slider does not rotate the worm gear. This prevents the slider position from changing on its own as you sew. There’s probably a locking screw that fixes the slider in position and takes slack out of the mechanism to minimize noise. I’m curious to know if your Singer 111W155 is a special version of some sort to employ this eccentric mechanism for walking foot lift. The standard 111W155 foot lift eccentric has a fixed-offset eccentric and the motion amplitude is then changed by changing the position of the connecting rod on the “banana slot” in the driving lever. I’m looking forward to seeing some photos of your machine and that eccentric detail. -
Singer 111w155 feed lift eccentric - balance wheel?'s
Uwe replied to Wyowally's topic in Leather Sewing Machines
You’ll have to show us some pictures of the parts you’re talking about. Your words don’t really match what I’m picturing in my head. -
For turning corners, I recommend stopping the machine with the needle in the material, ideally right after the needle enters the material and well before it reaches the very bottom of its movement. There’s some bad advice floating around on this subject. Also, lift the feet just enough to pivot the material, but not so high that the thread tension release activates.
-
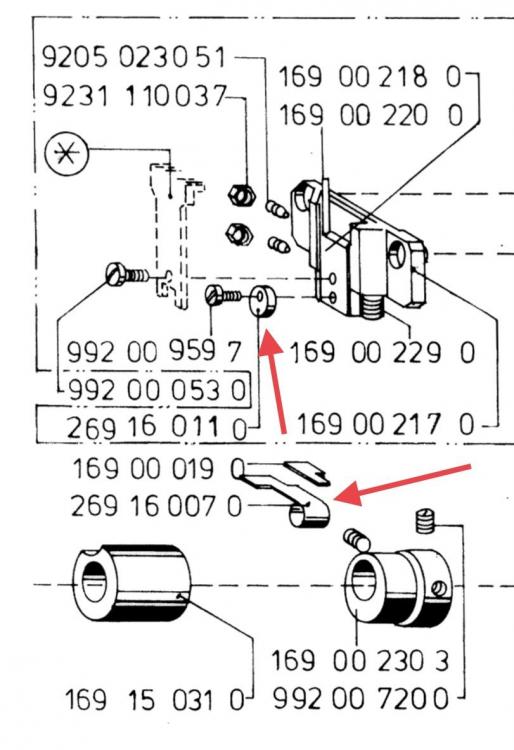
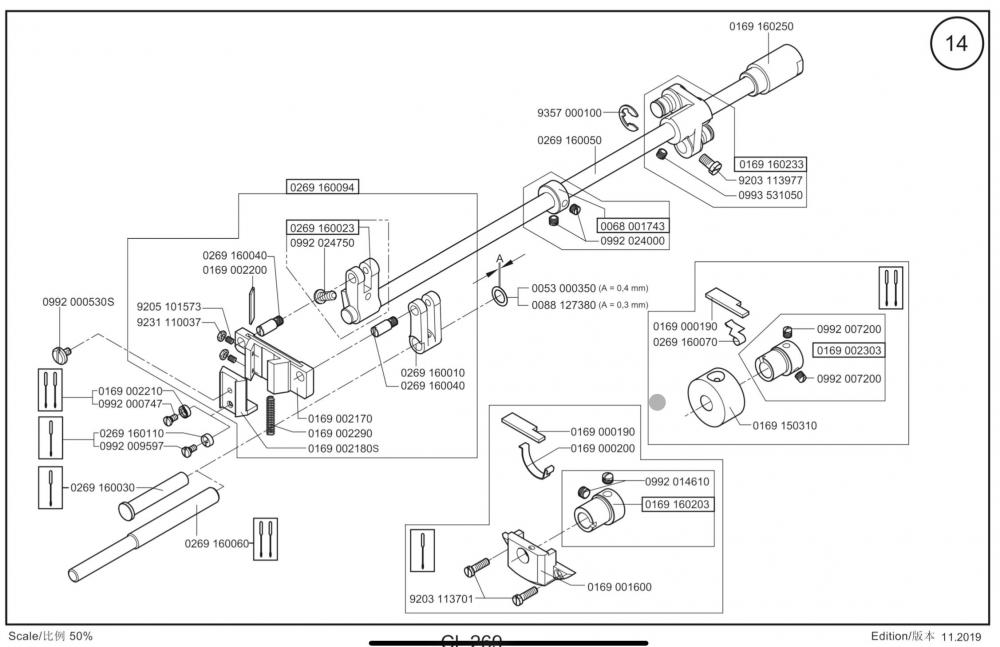
I think you may be missing a part or two in that mechanism. One is a small eccentric disc (269 16 011 0) that I think allows you to change the height of the feed dog when vertical feed motion is enabled. I’m not sure what the function of the flat part (269 16 007 0) is. Do you know when your machine was built? Durkopp Adler also made some updates to the 269 design in 2017. Manuals published by Durkopp Adler for 269 machines built through May 2017: https://www.duerkopp-adler.com/en/main/Support/downloads/index.html?action=search&prop0=%2Fcommons%2Fdownload%2Fpublic%2F269_valid_till_May_2017%2F&prop1= Here are the manuals for the newer versions of the DA269: https://www.duerkopp-adler.com/en/main/Support/downloads/index.html?action=search&prop0=%2Fcommons%2Fdownload%2Fpublic%2F269%2F&prop1= Perhaps somebody else ( @DonInReno ?) can take picture of that area on their DA269 machine to compare? Feed dog lifting parts through 2017: The newer DA 269 parts manual has a slightly different layout and shows slightly different parts for the feed dog lifting mechanism, including double-needle versions.
-
That’s very interesting. I wasn’t aware that the machine has a built it mechanism to disable vertical feed dog movement. I was trying to find some reference to this adjustment in the manuals, but didn’t see anything. I’ll have to check again. It’s possible that your machine has never been used with the vertical feed dog movement enabled.The lifting parts may not be as smooth against each other as they normally are with lots of use, or there may be some dirt or grit making a noise. A good cleaning and oiling of that mechanism might help.