rickybobby
-
Posts
722 -
Joined
-
Last visited
Content Type
Profiles
Forums
Events
Blogs
Gallery
Store
Everything posted by rickybobby
-
Press - Shop, Clicker
rickybobby replied to Red Cent's topic in Gun Holsters, Rifle Slings and Knife Sheathes
Be aware that the pressing pressure and process of the clicker is uniform over the whole surface. With the shop press you will get uneven pressure/distance pushing downward. The results are, your die will get buried into the cutting board on one side and on the other side it will not have gone through the leather yet. Results will be an uneven cut and the need to pry your die out of the cutting board. It will probably be fine for small items like rosettes, key fobs, items under less than 4 square inches but for holster dies you may run into troubles. JMHO, I have used both, but at this time I only own a press (used to mold holsters, no cutting). -
Hi, I have 2 Brand New Rings Dummy Guns for Sale Both have never been used #1 Glock 19 9mm #2 Springfield Xd-9 9mm Would Like to sell together $80.00 inc.s shipping in U.S. lower 48 Separate $45.00ea inc.s shipping " " " " Paypal Only.... rick_jorgenson (at) yahoo.com Thanks, Rick

-
How To Turn A Corner With A Rolled Edge?
rickybobby replied to bryanleenheer's topic in How Do I Do That?
As Ferg states, watch the edge thickness so your stitches hold. Good luck and post photos! Would love to see what you are doing!! -
I thin the first coat Tan Kote with water about 50% and use scrap shearling from lining saddles. I wet the shearling with water and wring it out first. I just wipe it on in even coats and let it dry for 10 or 15 minutes. I Pour it inside holsters to cover the inside and just wipe it out. After that, I have a 2nd bottle of Tan Kote straight (not thinned) using the same damp shearling it put a second even coat on and let it dry. I have not needed to use the full strength Tan Kote on the inside of holsters, The diluted one seems to do the job and that helps the whole piece dry faster. Always looks even, only clean up is a 9 x 9 cake pan and the shearling to rinse out for next time. Rick
-
Lots Of Questions About Tooling/forming Leather
rickybobby replied to niteshiftfromkc's topic in How Do I Do That?
Niteshift, Dwight is right on this one, You can usually have one or the other but not both. With that said, here is a tip that "works only as good as it will work" and sometimes it is better than others.... Wet form your leather to the item, lets just say it is for a "Leatherman Multi Tool" I do the whole wet forming process leaving the "plug" or item in the wet leather, nailed/tacked to a board until it is completely dry. Lightly re wet the surface and flatten the piece so it can be marked and tooled. Gently take the leather after tooling and push it back over the plug/item it was wet formed on and tack it back down (not as tight as the first time) this is just so it will keep the basic shape. When dry, contact cement the formed/tooled piece to the back and start stitching. Insert plug to make sure stitches are not to tight so item will come out. You will not get as good of tooling/burnishing so you may consider using highlighter or antique finish on the tooling Hope this helps, Rick -
How To Turn A Corner With A Rolled Edge?
rickybobby replied to bryanleenheer's topic in How Do I Do That?
Maybe a little more info or photos could help us get you an answer. This is a pretty vague description to try help with. Weight of leather? Is it the lining you are rolling? Is it a skived edge rolled and stitched? Rick -
Questions Posed On Another Forum
rickybobby replied to Red Cent's topic in Gun Holsters, Rifle Slings and Knife Sheathes
I use a press to get the holster imprint and then "chase" a couple of the major lines of the pistol. I smooth around the stitch lines next to the gun and press the ejector post to "show it off" and that is about it. I have seen leather that has been detailed to the gun, all ridges, grooves, almost the texture. I admire their work/time involved but it is not for me. -
Hi, Obviously you want to be able to do the best job on your projects. Think of it this way, "Would you use a 5 lb. hammer to do jewelry work?" or "a jeweler's hammer to build a bridge?" I agree with Andrew on this one, You may need multiple sewing machines as you grow your skills and interests. Like Andrew, I have several machines because the items I make require it. I sew some bags on my Flatbed Cowboy machine, All wallets are sewn on that machine too, as well as chaps. It was the first machine I bought because it was the one I would use the most for the majority of the work I was doing (Chaps, Wallets, ect.). As my business increased to saddle making and repair I bought a used Artisan 3000 from Steve at Cobra. I acquired a "patcher" Singer 29-4, used it for a while then no longer needed it so I sold it. The thing about sewing machines is that you have something of value that can get the majority of the money back you put out if you no longer need it. If I were you, look to buy the machine for what you will be making the most for a while.
-
I pull straps through saddle soap on both smooth and rough sides then pull the straps through my hand while wrapping the latigo with canvas. It seems the saddle soap lubes the fibers on the sides while the pressure of squeezing the canvas burnishes. It also leaves the straps with a nice feel to them when finished.
-
I would think 1mm is not a huge difference to be concerned with. The leather will differ in size while working with it in regards to moisture content, tooling, pulling, stretching while assembling a project, ect. Think about it this way... 1 mm difference from one side to the other is only 1/2mm off on each side. Don't be to hung up on small things, you may begin to dislike the craft searching for perfection. Make your item to the best of your ability and see what others enjoy.
-
Brass Knuckle Holster
rickybobby replied to glockanator's topic in Gun Holsters, Rifle Slings and Knife Sheathes
Nice job on that, I like the detail work on it. And, it is a first for me, I have never seen a Brass Knuckle Holster!! -
Give it a try! The more I use it, the more I like it! Bob, I am pretty sure it can hold some other beverage as well! Maybe something to warm "yer self" on a winter ride! Thank you Wishful!
-
Hi Ron, I started using the dye infused neatsfoot oil after reading about it somewhere, I just don't remember where. When used by itself it leaves a neat finish, it is a little darker in the tooling marks and where it penetrates the edges it darkens the edge and some of the darkness blends inwards (almost like airbrushing the edge darker). The Tan Kote was used for a final finish (the lacquer was a resist, after the oil but before the antique paste). I have found that just using the antique paste without a lacquer resist just gives no depth to the tooling (to dark over everything) so the Tan Kote helps protect the antique finish and gives a mellow glow. You could use the lacquer again but it finishes to shiny for my taste. I highly recommend trying the oil dye infused neatsfoot oil. I use it a lot just by itself, I get the color I want and after letting it sit for a day I just use the Tan Kote and its ready for the new owner! There is no formula that I have followed to the mixture so I am guessing that it is 80% NFO and 20% Fiebings oil dye. I just add oil and pour in some dark brown oil dye until it looks right. I used to little dye at first so I bumped it up and have never measured since! Doh!!! It does kind of look like tranny fluid, if that helps! lol!! I keep it is a plastic coffee ground container with a snap lid and use a piece of shearling wool to apply it. I hope that helps and thanks for looking!
-
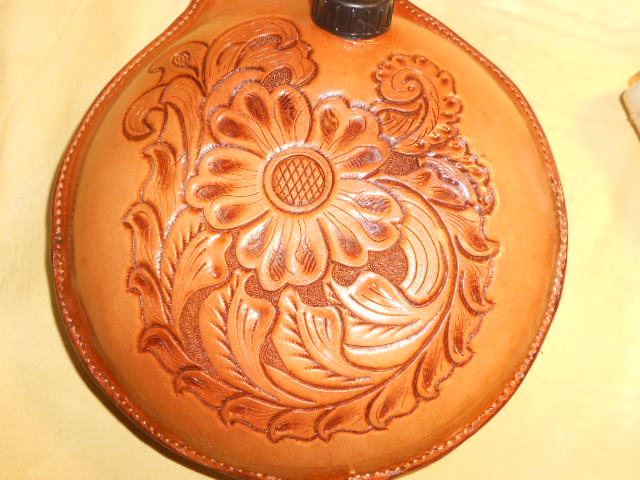
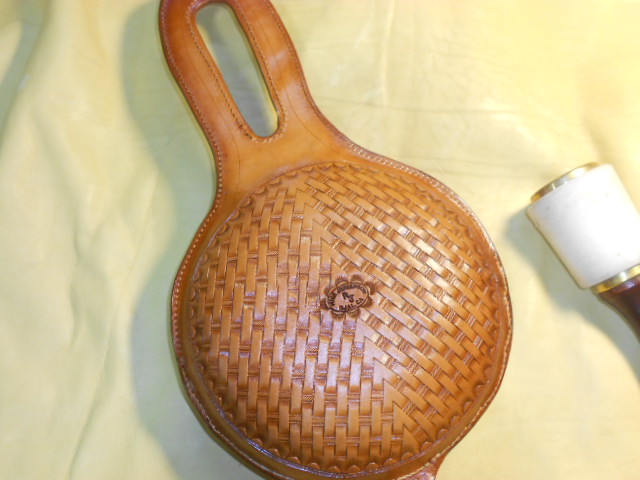
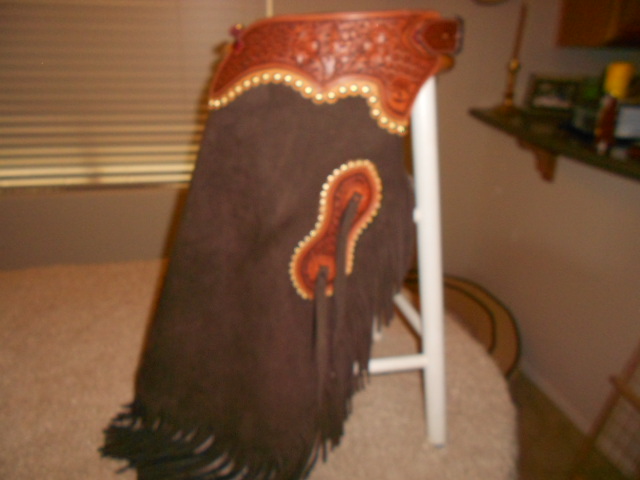
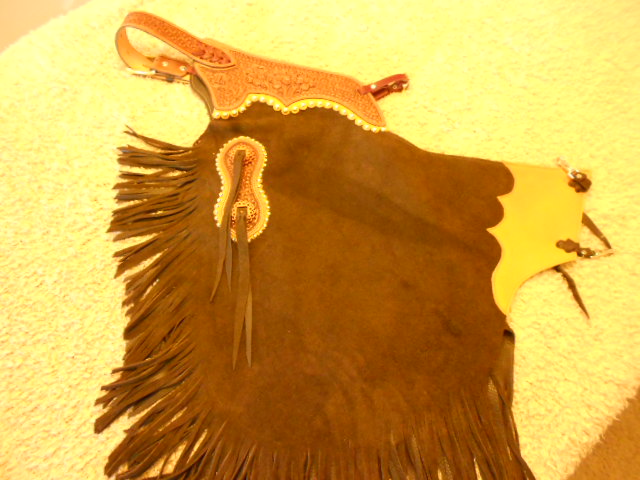
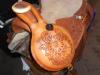
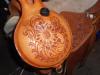
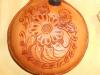
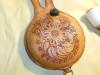
Saddle Canteen I finished this after starting it several months ago. I cut the leather a little short so I had a difficult time with the edges (lesson learned!) I will leave a larger boarder and trim afterwards. I tooled it while laying flat, let it completely dry then re wet it to form around the canteen. I did not loose much tooling depth at all. It is 5/6oz grade 3 leather from Tandy. I use it for a first time project just to work the bugs out before using a better quality leather. I oiled it first with neatsfoot oil infused with fiebings oil dye (dk.brown). It sat for a day then I sealed it with clear lacquer resist from Sheridan Leather. After that dried I used fiebings antique lightly, and final sealed with Tan Kote.

-
Where To Buy Leather
rickybobby replied to Red Cent's topic in Gun Holsters, Rifle Slings and Knife Sheathes
Charl, Shipping for 4 7/8oz. dbl shoulders (42 to 48 sq. ft.) runs $38.00 on average (that is my usual order) Roger does not sell Herman Oak. I buy his #1 7/8oz double shoulders. I use it for holsters, gun belts (dbl layer). I find the leather to be better than any Herman Oak I have ever seen and/or used. The backsides are smooth from being split (and are beautiful). I find the cost for my materials down to the square inch of usable material. Rogers hides are 95% usable as opposed to competitors poor hide density, poor backsides = about 60% useable leather (for top notch items). Tell Roger what you are using the leather for and he will pick the best for your needs. It is not that there are not flaws, there can be a "butcher cut" or a hole in the hide, I do mostly holsters and tack for horses so I can work around them. But I also request at least one for strap goods and belts so he picks at least one for the best yield for that use. I have used his #3 hides for blanket trophy corners and other tooled/antiqued items and they were still better then Tandy leather! -
Very nice job on those! On your Rifle Scabbard, After stitching together, trim excess off with a super sharp knife, then sand the 2 pieces (or 3 if you have a welt) with a sanding block. Start with 80 grit, then 150, finish with 320. Round the edge. Use a damp sponge to wet only the leather edge, rub some saddle soap on the edge. Use a piece of old blue jean material or canvas to slick the edge. Only re wet edge enough to see the burnishing action take place (turns slick and brown) if thats not happening it is to wet or not wet enough!
-
If I modify a pattern (custom order/hard to fit person) I always lay them out in a cheap fabric and try them on the customer. (Just do one leg unless you feel you need to do both). Get a few yards of scrap from a fabric shop (sale bin, close outs) for a $5.00 or $10.00 investment you can save yourself a lot of headaches. Make all adjustments on the material and see how it fits up. Have the customer pull their leg up in to riding position so you can judge the amount of "pucker" that may need to be taken out in the jockey area. While the customer is there use scissors, cut what you need out and use masking tape to hold it together, when you are done you have your custom pattern for that person. (And it may fit others). Mark it and keep it. Try to get a fabric that is not to light and of course not to heavy. It needs to have a little body but be flexible. It still may not lay like your leather but it will give you the best start to the fit you need.
-
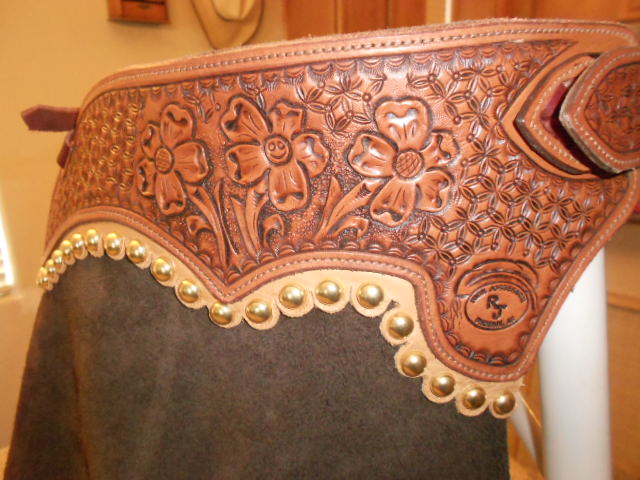
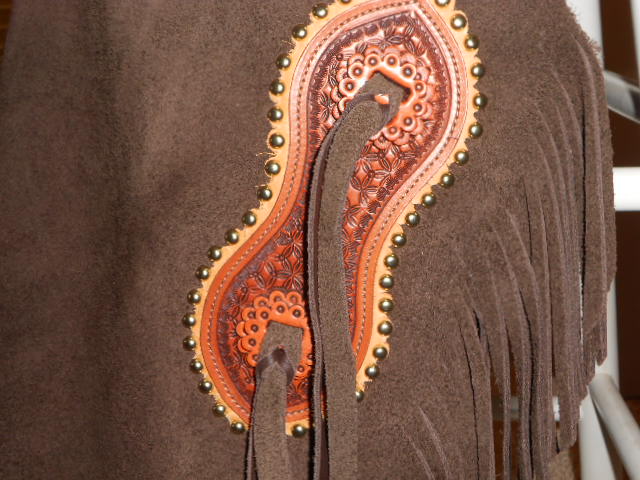
Finished A Pair Of Chinks
rickybobby replied to rickybobby's topic in Clothing, Jackets, Vests and Chaps
Thanks for the kind words Bob. I have seen your work and I am a fan!! -
I did these for a friends wife. She loves them (thank goodness!) He didn't ask her about color, tooling, or anything he just ordered them. 7/8 oz. tooling leather 4/5 oz Chap Hide from Hide House Sewn on my Cowboy Compound Feed GC628 with 138 thread I oiled the veg tan after tooling and let it sit for a day then sealed with Clear Lac Then I used Fiebings Antique "British Tan" after that dried I sealed with Tan Kote Sorry about photo quality. I'm still trying to master that!


-
Good looking chaps!!
-
Holster For Charter Arms Undercover
rickybobby replied to Rohn's topic in Gun Holsters, Rifle Slings and Knife Sheathes
It's all been said!! Thumbs up on this one!! I like the wrap around strap that holds the belt loop piece! -
Sewing A One Piece Mag Pouch
rickybobby replied to Modad2010's topic in Gun Holsters, Rifle Slings and Knife Sheathes
Hi, Make your sewn edge larger, (longer, wider) more width, just saying it different ways to help you understand. Add about 1/2 inch to both sides of your pattern. After sewing your belt loop (or attaching your clip) put contact cement on the edge to be sewn (while the leather is dry). Next, dampen your leather, use a sponge or dip it for about 2 seconds (the contact cement is waterproof). The contact cement should be pretty dry by now, use paper towel to make sure no water is beading up on contact cement (don't push to hard). Put your mag in and align the glued edges and start pinching them together. Get some slick jawed pliers (grind off the ribs and sand smooth) (line with 2 oz leather). Use them to pinch your stitch line together. You can let it dry at this point before sewing ( I use a hair dryer then sew it up) Mark your stitch line and sew it up. The extra with give your sewing foot some room to run a smooth stitch line. Afterwards, trim off excess, about 1/8 inch away from stitch line, round edge and burnish. -
I quit trying to please people read (busting my butt to try and make them happy) against what you know is best. Are you going to buy a "special" hide for this person. How much are you willing to spend $$ to try and make her happy? I send these people down the road (i'm not rude to them) I just tell them someone else is better at ________ then I am and give a huge price and they go to the "expert" that may or may not do it. Send them away, if they don't like what you make, they won't like what they make for them.
-
Oiling A Saddle
rickybobby replied to CuttingHorse's topic in Saddle Identification, Restoration & Repair
Yes, you can remove those nails and replace them after you are finished. It will not loosen the fit. Use an oil can with a long spout to reach up under stirrup leathers and between skirts/jockeys (rear housing). -
Oiling A Saddle
rickybobby replied to CuttingHorse's topic in Saddle Identification, Restoration & Repair