Dwight
-
Posts
5,265 -
Joined
-
Last visited
Content Type
Profiles
Forums
Events
Blogs
Gallery
Store
Everything posted by Dwight
-

How Do I Terminate A Start And End Stitch .... Tippmann Boss
Dwight replied to RoosterShooter's topic in Sewing Leather
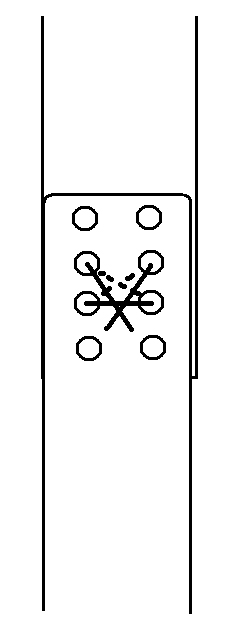
What I usually do, . . . use my 6 stitches per inch wheel, . . . lay out about 6 stitches at one end of the line. Make 4 or 5 of those stitches. Your direction will be away from the center of that line. Turn the leather around, . . . and re-stitch those you just did, . . . going in the opposite direction. When you get to the end, . . . simply back stitch the same number of stitches you did to start. NOTE: after you do the first 4 or 5, . . . cut off the ends of the thread where you started. If that extra length "gets involved" with your new stitches, . . . OHHHHH, is it ugly and hard to manage. May God bless, Dwight -
Shoulder Holster Advice
Dwight replied to Steve75's topic in Gun Holsters, Rifle Slings and Knife Sheathes
Steve, . . . being this is the first one, . . . consider it a training exercise: instead of cutting a whole new piece, . . . simply lengthen it. If I lengthen a strap for some reason, . . . this is the usual method I use, . . . lacing it together. You can also later adjust the length if necessary. May God bless, Dwight
-
Best Way To Attach Iwb Straps
Dwight replied to glockanator's topic in Gun Holsters, Rifle Slings and Knife Sheathes
Chiefjason, . . . I too have some pull the dot snaps, . . . I think I got them from Sail Rite, . . . but I only ordered the inner male and female parts. I use the Tandy posts. I just checked and they measure right at .334 to .337 in length. Two pieces of 9 oz leather is only .281, . . . so there should be plenty of length there. I have "cheated" a time or two on the male post if it seems to be close: I go to the back side and lightly skive off a few thousandths, . . . sometimes makes all the difference in the world. May God bless, Dwight -
Best Way To Attach Iwb Straps
Dwight replied to glockanator's topic in Gun Holsters, Rifle Slings and Knife Sheathes
7 oz, . . . through the front plate of the holster and through the IWB strap, . . . put em on with a $10 rivet tool I bought at Walmart. I don't have anything against using t nuts other than I just simply chose not to use them. My reasoning is simple, . . . I lose things. If there is a nut or a bolt anywhere on my *********** that can come off and get lost, . . . it will. If you drive by a yard, . . . see the lawn mower sitting idle, . . . and the old grey haired guy walking around the yard like he is looking for something, . . . that may be me, . . . looking for parts off my mower, . . . it just happens When I put a snap on my IWB strap, . . . it isn't coming off until someone takes a pair of side cutters and cuts it off. That was the business model I chose back in '04 or so, . . . and it has been working for me ever since. May God bless, Dwight -
Best Way To Attach Iwb Straps
Dwight replied to glockanator's topic in Gun Holsters, Rifle Slings and Knife Sheathes
Uhhh, . . . no, . . . now that you ask. This is my stock and trade holster, . . . that's how I do it. May God bless, Dwight
-
Best Way To Attach Iwb Straps
Dwight replied to glockanator's topic in Gun Holsters, Rifle Slings and Knife Sheathes
I use snaps, . . . sandwiched, . . . as said before, . . . if you do it right the first time and use quality products, . . . your trouble should be minimum. I only use t nuts when putting furniture together. Leather gets snaps and rivets. May God bless, Dwight -
Good news, Jake, . . . if you can't clean it off, . . . it will be very unlikely to transfer. Why worry about it? As a last resort, . . . can you turn the bag inside out? May God bless, Dwight
-
Finish For Rough Out Holster
Dwight replied to supercub's topic in Gun Holsters, Rifle Slings and Knife Sheathes
I occasionally make roughout holsters, . . . and I just give them a coat of Resolene just like the regular ones. They are a bit abrasive at first, . . . but they are also protected, . . . which is more important to me for my customer and his long term relationship with the product I produced. May God bless, Dwight -
Making a gunbelt to carry a full size 1911, . . . Colt or Smith .357 or some similar firearm, . . . will only be successful if it is at least 12 to 14 oz thick. Making a 7 oz with a 3 oz liner will most likely result in an unhappy customer in about 4 months when the belt starts rolling over at the top and developing a curl in the back that would make Robin Hood's bow envious. The best ones I have found come out right at .210 or shortly thereabouts thick. The outside piece is cut roughly 10 inches longer than the liner, . . . folded over to accept the buckle, . . . and chicago screwed into position. Both layers are contact cemented together, . . . edges sanded, . . . beveled, . . . stitch gouged on both sides, . . . and stitched the full length and around the end of the tongue. I do not skive anything as I try my best to use two pieces of leather from the same hide, . . . side by side if it can be worked out. When you dye the belt, . . . bend the buckle end over while it is still wet, . . . and form that end. Also while it is still wet, . . . do a rough "bending" of the belt to begin to develop the curve it will need to go around it's owner. I do it all with a dip dye process and latex gloves. Trim the outside piece to perfectly match the glued together inside piece location. I actually use a home made punch on both pieces, . . . which forces them to match. Stitch, dye, and finish, . . . you'll have a belt you or your customer will be proud to wear and use for years to come. May God bless, Dwight
-
You might want to re-think your post, Glendon, . . . I've seen a lot of big cows, . . . but never one that a 10 foot long side could come from. May God bless, Dwight
-
Dip Dying With Fiebings
Dwight replied to medsar's topic in Dyes, Antiques, Stains, Glues, Waxes, Finishes and Conditioners.
I use the dip dye process for my holsters, knife sheaths, belts, mag carriers, phone holders, billfolds, etc. I use 2 each, 9 inch by 14 inch by 2 inch deep, . . . cake pans. One is for browns, . . . the other is for black. I pour basically a quart of dye into the pan, . . . and roll it all around down in the pan until I know it has all been covered. Probably no part of the item stays in the pan for more than 5 or 6 seconds. Belt are the easiest, . . . I just start the buckle end through and snake it along in the pan until it is all dyed. One caution, . . . if you are doing big pieces, . . . don't hang them right away. I did a batch of belts a couple of years ago, . . . not thinking, I just pulled them out of the dye, . . . up on the hangers. WRONG !!!!! The blacks and dark browns weren't that much affected, . . . but there were 2 or 3 shades of difference in color in the lighter browns. The dye gravitated to the "down" end, . . . making that end much darker than the other end. I was able to salvage them, . . . but now I just lay them on edge for the first hour of drying time. May God bless, Dwight -
What Do I Use To Glue Leather, Stitch Leather Belts
Dwight replied to darrellmead's topic in How Do I Do That?
Actually, . . . Elmers white glue will do what you want. Or, Weldwood yellow wood glue, . . . put it on the leather with a small paint brush, . . . put the belt down on the canvas, . . . you should be good to go. I would find a piece of stiff foam rubber if I could, . . . and lay it over the glued belts, . . . leave it for 10 to 14 hours, . . . remove it and the belts & canvas should be one piece. Depending on the thickness of the belts, . . . you will about 80% chance, . . . be out of luck on the sewing machine, . . . unless you want to spend some serious money. One think you can try, . . . if you have a large JoAnn's store near by, . . . the big ones have people demo'ing the machines. You might take a sample in there, . . . tell them what you need. I actually have an old singer, . . . and I use carpet thread in it, . . . I can sew most garment leather with it, . . . May God bless, Dwight -
You heard right, . . . belly leather is good for buying, . . . practicing, . . . and pitching, . . . and not much else (IMHO). Back and side leather is good for belts, purses, bags, etc, . . . just remember that the closer you get to the belly, . . . the less quality it is. Rump and shoulder leather make good belts, holsters, etc . . . . stuff that needs to be formed, and keep it's shape. I pretty much use only double shoulders in my holster / sheath / belt work. May God bless, Dwight
-
Double Mag Pouch Kicking My Tail.
Dwight replied to Dfarm's topic in Gun Holsters, Rifle Slings and Knife Sheathes
If you first make a wooden mold, . . . you can literally press out the fronts in 5/6 leather, . . . let them fully dry, . . . trim them so you have enough to sew them, . . . contact cement them to the back, . . . and VOILA, . . . you have it. I did not "give up" on making a mold that does two of them out of one piece of leather, . . . but after enough of the failures, . . . I said to heck with it, . . . now I just make the singles, . . . and if anyone wants 2 or 3 or whatever, . . . I can just gang them up on the back piece, side by side. Mine are done quick and dirty, . . . sew center seam, . . . bottom seam, . . . left & right edges, . . . soak, . . . hammer the wooden fake mags into the wet leather, . . . let dry, . . . remove the wooden fake mags, . . . stain and finish. They are not as pretty as the molded ones, . . . but they work well, . . . and so far, only one customer had a problem, . . . we tried snapping the back on, . . . it kept catching on things and unsnapping, . . . not good. May God bless, Dwight -
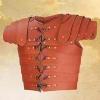
If you are referring to this particular armor, . . . archer's would have to leave off the shoulder pieces, . . . or at least cut them down some. Looking at your deadline, . . . if it were me, . . . I'd make a front piece, . . . back piece, . . . and the belt to hold it all together. If you did it out of 10 oz leather (my suggestion) you could pretty much tool all the designs in rather than making the separate pieces. A little antiquing, . . . creative dye work, . . . it should look good. Make it out of veg tan leather, . . . make a "dummy" out of old shirts, . . . boards, . . . what have you to resemble your bodily makeup and shape, . . . soak it wet, . . . mold it to shape with your hands, . . . be sure to "flare" out all openings so it doesn't chafe and eat you up. Once it is shaped pretty good and dried, . . . lightlydampen the top layer of the leather, . . . and you can tool in the details. Looks like a fun project, . . . I'd offer to come help if you'ld pay my way to the Gold Coast, . . . we could sit on the beach and tool leather Here in the states, . . . you are probably looking at 120 dollars worth of leather, . . . +/-, . . . a good razor knife, . . . swivel knife, . . . mallet, . . . a rough backgrounder, . . . a couple of bevelers, . . . and two or three full days of work adding the designs to the front plate. I'd attach a robe to cover the back, . . . you could then leave it plain. The belt, buckle, everything can be made of leather, . . . proper dying and/or painting and it will pass inspection for what you are doing. May God bless, Dwight May God bless, Dwight
-
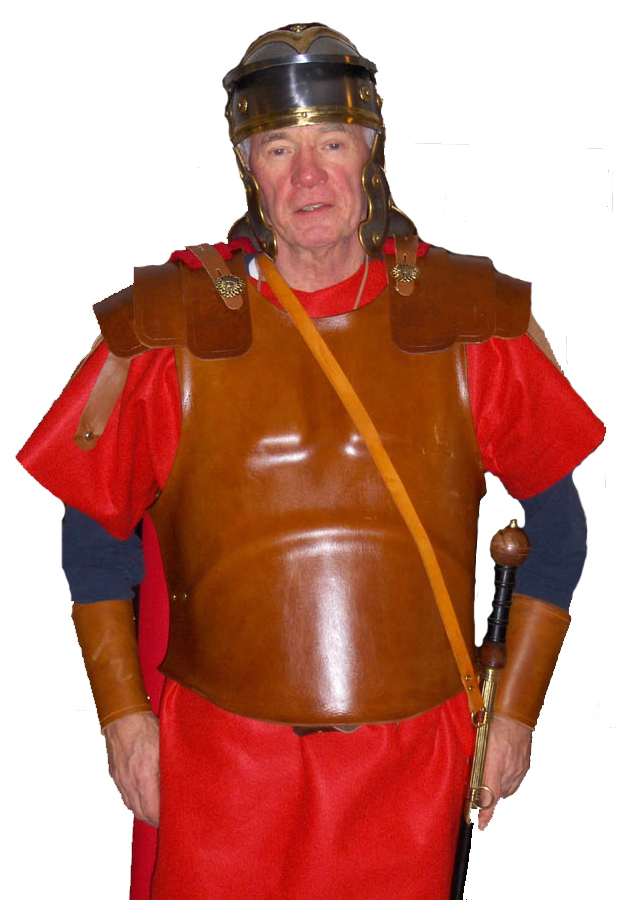
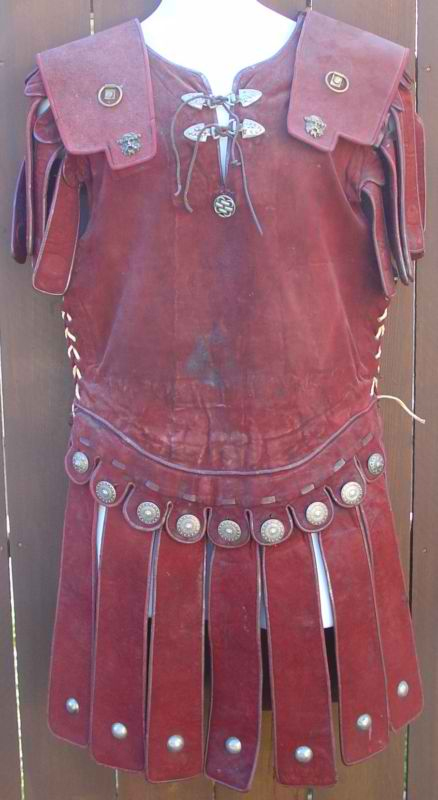
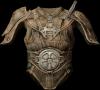
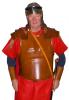
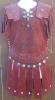
It depends on the armor you want to make. Reply with the time frame, . . . description, . . . type, . . . etc you want. St8line showed one type of Roman armor, . . . My armor for my alter ego: Centurion Salvatorus Antonio, of the 6th Legion, Centurion of Capernaum, was far easier than the other two examples. The orange picture is the really tough one to do, . . . the pinkish looking one is mostly sewing, and is done with thicker garment leather, . . . mine is really thick and somewhat heavy, . . . but was the easiest of all to do in my opinion. May God bless, Dwight
-
The first indicator I look at is the back side, . . . if there is a lot of strings and stringy stuff hanging off the hide, . . . forget it. What you want is a smooth, flat, clean back side that almost feels like very, very fine sandpaper. You don't want the one that feels like a piece of felt or worse yet, thick flannel. Final test for me is then the front side, . . . scars, fence marks, brands, cutouts, gouges, etc. A premium hide will have little of this, . . . the more it is blemished, the less valuable hide you have. If you have a Tandy store nearby, . . . go look at a cheap 7 oz side, . . . compare them to a "European tooling bend" piece. You'll see the difference. May God bless, Dwight
-
The cliff note version: 1 oz of leather thickness = 1/64th of an inch. IOW, . . . 8 oz = 1/8th of an inch,.........16 oz = 1/4 inch,........... Most leather is sold as a "range" of thicknesses. If you bought a piece of 7/8 oz leather, . . . it would range from 7 oz to 8 oz across the piece. May God bless, Dwight
-
THANK YOU, jlaudio, . . . I've got a couple of little cowgirl customers, . . . they will LOVE that little pink trick. I have used oxblood, mostly use it with black to make a black cherry that can really turn out beautiful. May God bless, Dwight
-
A couple of things you can try, . . . because I don't know your definition of "light". One simple and quick pass with a brush of neatsfoot oil darkens it somewhat. The same goes for one coat of Resolene, though the Resolene is only about half the oil. You can also lay it out in the bright sunlight, . . . that will darken it some. Personally, . . . I don't like doing browns, . . . it is really hard to match 1 for 1 unless the pieces all came from the same hide, . . . dyed the same day, . . . out of the same bucket, . . . etc. May God bless, Dwight
-
It's too bad you live clear over on the left coast, . . . we could start a class of 2 I've researched it back and forth, . . . looked at different models, makers, etc. and have determined one thing for sure, . . . there is no such thing as a "standard" chap, . . . although they all look somewhat alike. So far, I've made only one pair, . . . have orders for 3 more (but they're patient folks and don't demand much). I used the 13 year old sister's chaps as a pattern for the 11 year old, . . . and if all my customers become as happy as that 11 year old cowgirl, . . . I'll be OK. There are a couple of cd/dvd offers here on this site, just use the search function. There are also patterns available. This is the one pair I did. May God bless, Dwight
-
Matt said, "Don't be afraid to ask questions, make mistakes or accept constructive criticism. Above all have fun." The last 4 words are the most important of all. An inexpensive but yet very rewarding way you can build your confidence and skill is to take on a small project such as making little leather snap bracelets for a Sunday School class, . . . for some old folks in a local nursing home, . . . for the kids in your child's class. You will learn to cut, stamp, burnish, trim, how to add snaps correctly. Most important of all, . . . you will be able to see your progress from #1 to #20 if you do them one at a time. Finish them in different ways using coffee, tea, shoe polish, etc for stain, . . . sharpies to do background, . . . be creative. May God bless, Dwight
-
Flat Backs Vs Molded Backs On Holsters
Dwight replied to mnelson8758's topic in Gun Holsters, Rifle Slings and Knife Sheathes
Just remember, . . . opinions are like dirty socks, . . . everyone has a couple and the all stink at one time or another. But since you asked, . . . I prefer flat, . . . more comfortable, . . . harder to make, . . . and does not have the retention of the molded back. May God bless, Dwight -
A hole saw and a drill press is THE ticket to this problem. First cut a hole in a piece of 1 x 6 long enough to clamp on to the table of the press, . . . sandwich the leather between the top board with the hole, . . . and another board below, . . . remove the center drill bit from the hole saw, . . . cut to your hearts content. May God bless, Dwight
-
I started with a tool I was familiar with, . . . the old Stanley carpenter's razor knife. I have a circular knife that I seldom use, . . . as well as other tools, . . . razor knife works the best for me. May God bless, Dwight