CitizenKate
-
Posts
2,672 -
Joined
-
Last visited
Content Type
Profiles
Forums
Events
Blogs
Gallery
Store
Everything posted by CitizenKate
-
You're off to a great start, katkon. The strap is cut nice and straight with clean edges. I gather you invested in a strap cutter... One thing you may want to consider to give the collar a little more of a finished appearance, is to dye and slick the edges. There are many posts here with details on how to do that, especially an excellent tutorial by hidepounder who makes the most wonderful slicked edges you ever saw. If you need help finding them, just holler and we'll be glad to help. Welcome to Leatherworker! Kate
-
The tan also looks pretty close to me. Kate
-
Hot Off The Bench Chinks!
CitizenKate replied to jbird's topic in Clothing, Jackets, Vests and Chaps
Nice depth on the tooling, and I also like the colors. That little bit of airbrushed color around the edges of the tooled portion is always a nice touch. Kate -
Holly, I think this one is my favorite of all the ones you've made that I've seen. May I ask how you created that bead around the inside of the inlay? Kate
-
How Do I Not Do This!? My Boner Don't Work!
CitizenKate replied to ShortBBL's topic in How Do I Do That?
PM Johanna to request access. Kate -
How Do I Not Do This!? My Boner Don't Work!
CitizenKate replied to ShortBBL's topic in How Do I Do That?
Wickett & Craig also makes veg tan tooling leather that has excellent wet molding properties. There are several places you can get Hermann Oak - I think Springfield leather will let you buy a cut off a side if you don't want to buy an entire side. RJF Leather Co. carries Thoroughbred leather in a natural veg-tan that also has good molding properties. Kate -
How Do I Not Do This!? My Boner Don't Work!
CitizenKate replied to ShortBBL's topic in How Do I Do That?
Fortunately, I came to the correct conclusion that you were actually referring to your bone folder tool, and not your... never mind. I agree with Jeff, I think the grain of the leather you're using may not be the most suitable for wet molding. Kate -
How Do I Not Do This!? My Boner Don't Work!
CitizenKate replied to ShortBBL's topic in How Do I Do That?
What kind of leather is that? Kate -
Nice! Kate
-
I've used the denatured alcohol, and it works perfectly well... no undesirable side-effects. Kate
-
regretsy is hilarious! Kate
-
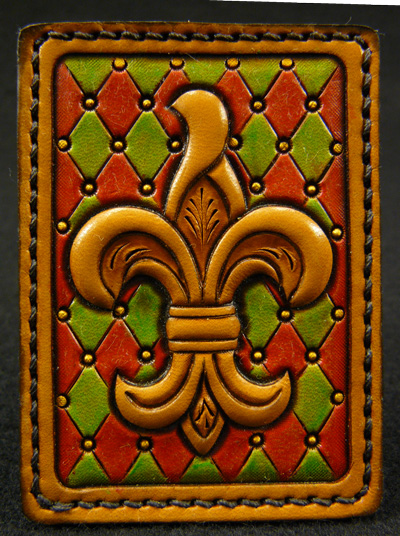
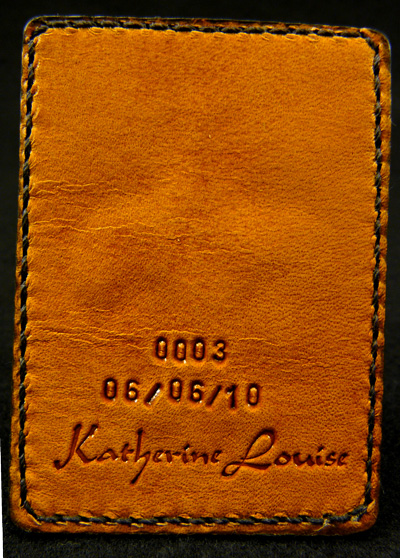
Just finished a couple of art trading cards to trade with some that Leerwerker offered for trade a while back. I'll probably be doing more in the near future, if anyone's interested in trading. The figure in #0002 is Susan Boyle. #0003 is a plug-embossed fleur de lis. The pattern for that comes from one of the old Al Stohlmann Doodle Pages he did on plug embossing. Had a bit of a problem with the edges on this one and slightly mis-cut the top edge, and my stitching is a bit rusty. Guess I need to get back to doing more of it again, or maybe someone will send me a sewing machine. The third photo shows the treatment of the back-side. Kate


-
Pinapple Knot, type 1, 16 part x 16 bright, 2-pass
Images added to a gallery album owned by CitizenKate in Our Leatherwork Galleries
An illustrated tutorial for a 16 part x 16 bright 2 pass, Type 1 Pineapple Knot. This one is from a base 9px8b Turks Head with a 7px8b Turk's Head interweave, which gives 3 zigzags in the finished knot. It is tied in rope but would work with leather easily, too. Thanks to skyout for giving us permission to post this. -
-
Pineapple Knot tutorial in PDF format
CitizenKate posted a gallery image in Our Leatherwork Galleries
From the album: Pinapple Knot, type 1, 16 part x 16 bright, 2-pass
Tutorial to make a 16 part x 16 bright 2 pass, Type 1 Pineapple Knot. This one is from a base 9px8b Turks Head with a 7px8b Turk's Head interweave, which gives 3 zigzags in the finished knot. It is tied in rope but would work with leather easily, too.© © leatherworker.net
-
Greetings From The 19Th Century
CitizenKate replied to 19th century bootmaker's topic in Member Gallery
Well, I'm used to seeing greetings from all over the world, but I think this is the first one I've seen from another century! We're very glad to have you join us, JesseLee. That is very interesting and cool how you became a boot maker. We look forward to your participation on our forum. Kate -
Oops! Thanks for the good eye, Clair. I'll have it fixed in the morning. Kate
-
Hi pinkchaps, There are quite a few existing topics that I think will answer most of your questions. Feel free to post a response to this thread if you still have questions after reading these: http://leatherworker.net/forum/index.php?showtopic=17726 http://leatherworker.net/forum/index.php?showtopic=20495 http://leatherworker.net/forum/index.php?showtopic=17528 http://leatherworker.net/forum/index.php?showtopic=15511 Kate
-
In My Studio Seminars
CitizenKate replied to CitizenKate's topic in Special Events, Contests and Classes
Just making sure everyone has a chance to see this information - a great opportunity to learn from a master artist. Kate -
The volume of traffic alone may not tell the whole story. Etsy targets a more specific market than Ebay, those seeking handmade work and are willing to pay for it, which we as leatherworkers are uniquely qualified to cater to. Kate
-
Velcro, that's a thought... as long as it makes a snug enough fit to stay put while the instrument is in use. Kate
-
Wichita State University, and later Kansas State University. Kate
-
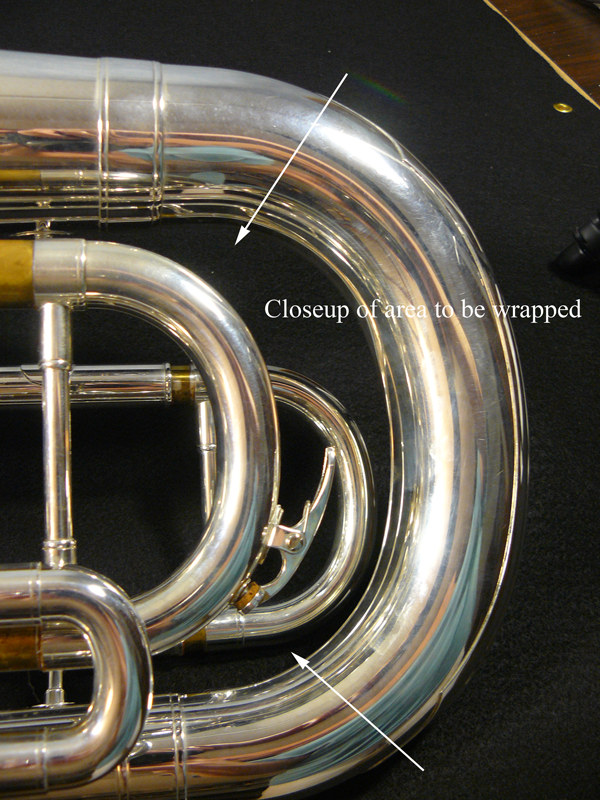
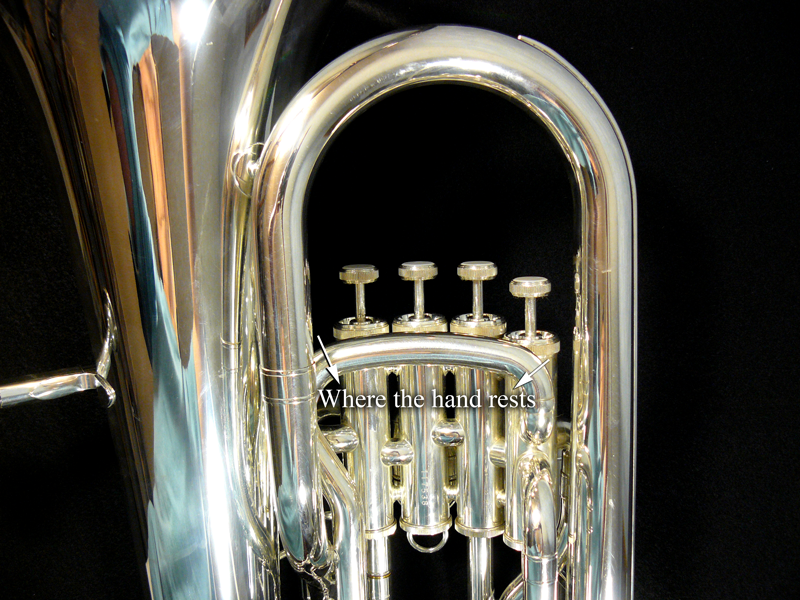
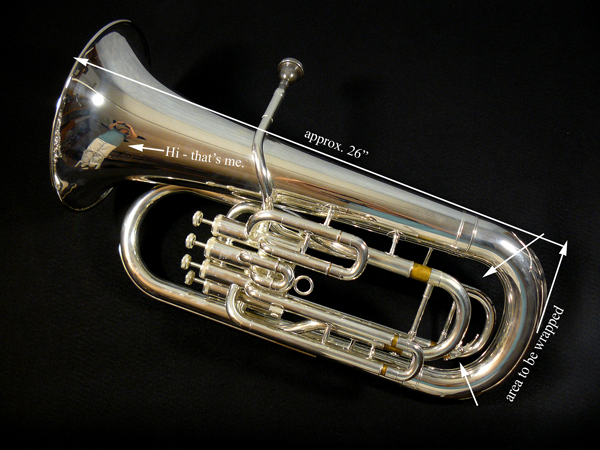
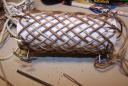
Good point, Charlie... we need some illustration. In all its undressed glory. <grin> Here are some annotated photos I just slapped together on the spur of the moment. This should give everyone an idea what we're talking about. Dimensions vary with the brand of instrument, but this should give you a general idea. Kate
-
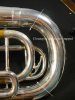
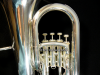
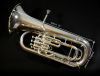
Oh yes. Low brass is my old stomping ground (former euphoniumist in two university symphony bands, among numerous other groups). I've seen accessories for euphoniums and tubas like this, but I've always kept a deerskin chamois handy when I'm handling my instrument, and just laid it across my lap when I play it. That also helps keep the valve oil and condensation off my clothing. But what the "corset" is, is just a simple soft leather wrap that goes around a single segment of tubing at the bottom of the instrument that is about 8-10" in length and ranges about 1.75-2.0" in diameter (it gradually changes in diameter). That is the one spot on a euphonium or tuba (other than the bell) that usually takes the most abuse. It needs to be made of very soft leather, and it needs to be easy to remove and replace, so the instrument can be bathed without getting the leather wet. My first idea for attaching it would be to use a soft lace with un-riveted holes. I would not want any hardware touching the finish at all. The lace could not be pulled too tightly, or the holes would tear, but to help reinforce the holes, you could double the leather over where the holes go. Veg tan may be okay on a lacquer-finished brass instrument, but I don't recommend it on a silver finish - it's pretty delicate. A nice quality (i.e., soft and supple) piece of upholstery leather, or some heavy deerskin is what I would lean towards. You may also consider a similar wrap for the narrower and shorter segment of tubing that your hand rests on, as a very acidic perspiration from the hand can wear out the finish over time. Hope this gives you some ideas... Kate
-
Welcome to Leatherworker.net, goot! Every good project starts with a bit of daydreaming, so it sounds like you have mastered the first step. Probably any information that's available here on the subject of wet molding leather will give you some general methods for creating your project. Aside from that, we have some people here who make armor and leather corsets, who may have already shared some very specific information about making molded leather garments. So if you haven't already, I would suggest searching our vast collection of existing posts and see what's there already. You are welcome to post any questions you may have in an appropriate category; we have lots of people here willing to share what they know and answer your questions. Glad you've joined us, and we look forward to seeing what you come up with. Kate
-
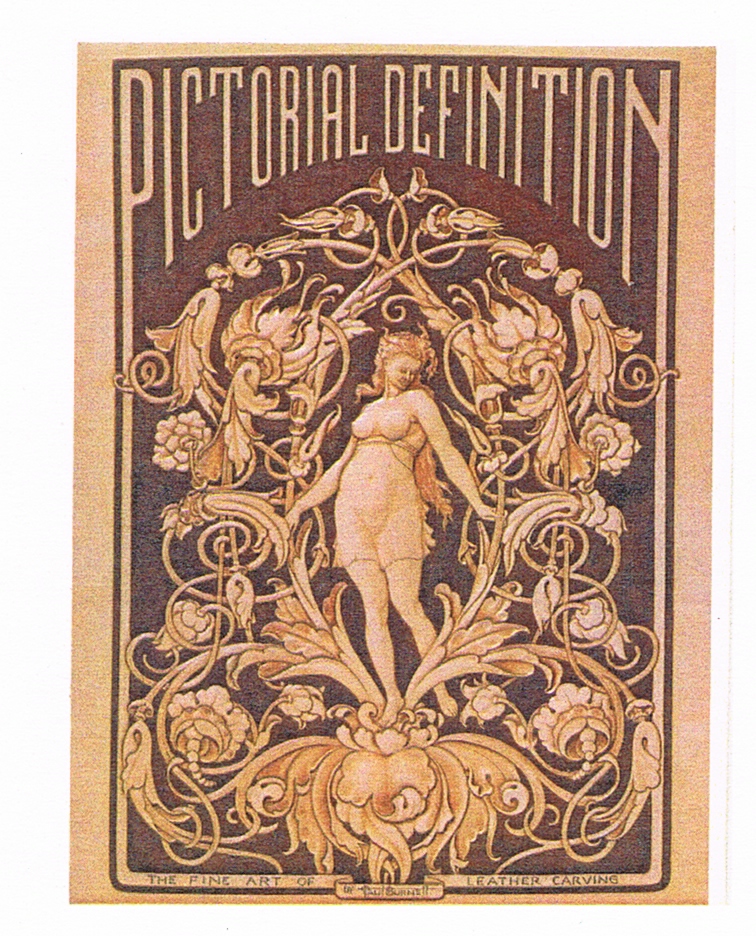
From Paul Burnett: "I have decided that I will try to devote at least one week a month to teaching. Each month’s seminar will last 5 days, Monday through Friday, 9am until 6pm, at my studio in Mount Jackson, Virginia. I will also have a few informal after-hours sessions during that week for problem solving and additional help. I have tentatively scheduled the first seminar for June 14 through 18, 2010. For my first seminar I chose the Victorian carving that was featured on my very first book, Pictorial Definition, of course without the title, etc. The finished size will be 11” x 14”. In order to do this I must have a minimum of 3 students for each seminar. The cost of each seminar will be $300 for each student. There are plenty of local motels with in 15 minutes of my studio, Mount Jackson or Woodstock, VA. Rates may vary, but they are somewhat modest rates of $55 to $75 a night. The quality is average or above. A list will be including in the registration package along with what you will need to bring etc. All the details haven’t been worked out as yet as I don’t know if there are any out there that are interested in such an offering. So if you are interested please email me at pburnett@shentel.net or call me at 540-477-2065. I realize this might look like a “scary” piece for someone just beginning leather carving, but I can promise you that, even for the very beginner, I can work you through it and teach you more about leather carving than you every imagined. There will be one requirement for those that are new to leather carving, that is: You will need to purchase the download of Lesson One of my Realistic Leather Carving course and do the practice exercises as much as you can before the seminar starts. This lesson has practice exercises that will help you to prepare for the seminar as well as give you an understanding of the swivel knife and the cutting phase of leather carving. It wouldn’t be a bad idea for those of you who are more experienced in carving, but not totally confident in you swivel knife skills, to study this lesson too. Perhaps you even own it. If so, you should review it."