CitizenKate
-
Posts
2,672 -
Joined
-
Last visited
Content Type
Profiles
Forums
Events
Blogs
Gallery
Store
Everything posted by CitizenKate
-
Hi Larry, Perhaps something from Chaylor-Fenneli will fill the bill... I believe Springfield Leather has recently become the only USA distributor for their nice line of wallet insides. I suggest sending a PM to Kevin Hopkins (or maybe he'll pipe up here). Kate
-
Now, that's pretty clever! Like a home-made felt-tipped pen. Kate
-
Beautiful, Andy. Hope we don't have to wait that long for the next one. I especially like to see nice deep impressions on the basket weave stamping. Kate
-
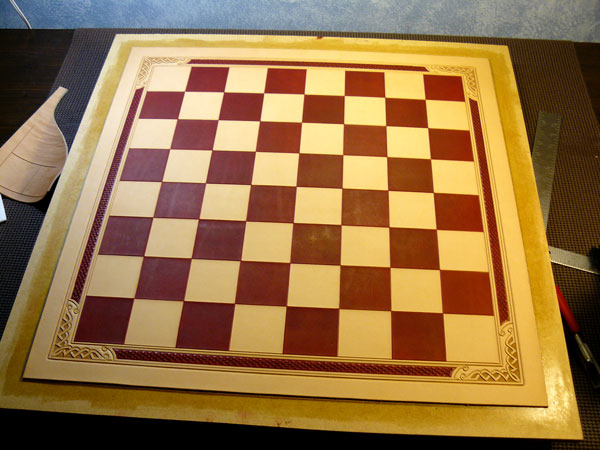
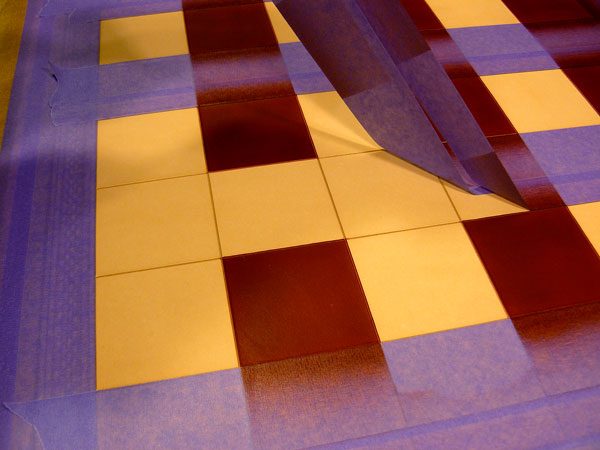
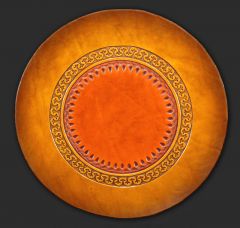
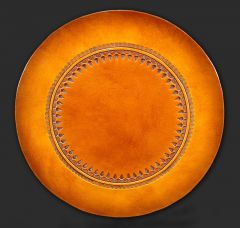
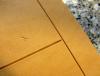
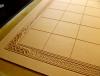
Thanks for all the nice comments! Here's the latest progress on this board... I will need to finish the dye work, as well as the antique and finish by tomorrow if I want to ship this thing by the end of the week. The person who ordered it is taking it to give to a friend in Australia. I checked into what it would take to just ship it there, and now I know why I've never gotten an order from Australia!!! I would cost about as much to buy it a seat on a passenger jet. I could ship it to Japan for less than half the cost. Anyway, all the airbrushed dye work is done now. Since there have been questions about the masking, I included a shot that shows a little of how that works, and how nicely it keeps the dye right where I want it, and how nicely it comes up afterwards. Kate

-
I don't know for sure if that's the reason I don't get water spots when I re-wet a specific area of the leather. Another possibility might be that, since the entire piece is wet at the start, there might be enough moisture in the surrounding area to prevent clear water lines from forming. That's an interesting idea. Hope you post the results! Kate
-
Denatured alcohol is the perfect thinner for spirit dyes. Kate
-
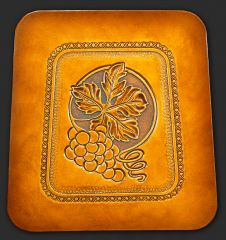
From the album: Katherine Louise Leather Designs
© © leatherworker.net
-
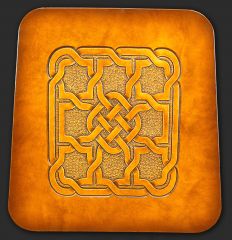
From the album: Katherine Louise Leather Designs
© © leatherworker.net
-
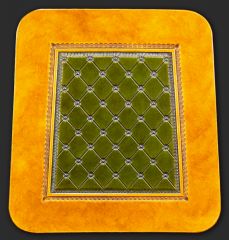
From the album: Katherine Louise Leather Designs
© © leatherworker.net
-
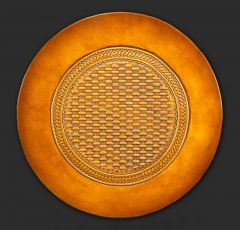
From the album: Katherine Louise Leather Designs
© © leatherworker.net
-
From the album: Katherine Louise Leather Designs
© © leatherworker.net
-
From the album: Katherine Louise Leather Designs
© © leatherworker.net
-
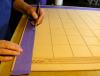
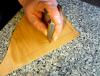
To show a little of my process for some of the dye work, all the "maskable" areas of my game boards get the colors airbrushed on, so the first step is masking off the areas I don't want the dye to go. I use a modeling tool to tuck the edges of the tape into the lines to help keep the dye from getting under the edges of the tape. Tomorrow I'll take it down to my garage and spray the dye on. It's very cold down there right now, and it's supposed to get warm tomorrow, so I decided to wait until then to do that part. It's easier to make photos than explain it. As you observed, the intersections of perpendicular lines tend to come up a little short of a perfect intersection because the end of the cut tapers off. I just take the swivel knife from the other direction and draw it from the intersecting line to the end of the other. I think there is a "rule" somewhere that says you shouldn't do this, probably because it's easy to make the end of the cut look very choppy, but with some practice you can make it perfect. As for making the depth of the cuts consistent, that is just something I learned from practice. Having the leather at a consistent moisture level helps, as does having a well-conditioned blade that you aren't struggling with. For cutting the layout lines, I use a half-inch straight hollow-ground blade. I like for those lines to be fairly strong. Kate

-
For straight edges, there are a number of low/adhesive or medium/low-adhesive painter's tape products available that are designed for use with delicate surfaces (and leather certainly qualifies), or also described as "60 day clean release". Scotch Blue 2080 is one example. Painter's Mate Green also works well on leather. These tapes are somewhat absorbent, so the dye doesn't tend to bleed under the edges, although if you spray the dye on too heavily, it can still happen. It's sticky enough to stay put while you're working, but then it comes off without tearing the leather grain. The latex product I use for masking is not a liquid, but more of a heavy paste, which is designed for making casting molds. I use it for masking really complex shapes, but as you noted (as well as others who have PM'd me about their experiences with using a latex mask - some positive, and some not-so-positive), it does have some considerations. The product I use has not caused any discoloration on the leather, but it does change how the leather takes dye, so I have limited my use of it just to areas I don't plan to apply dye to. Another approach I use for masking complex shapes, that is a great alternative to the latex, is to cut the shape I want to mask from a full-page sized self-adhesive label. I keep my art on my computer (mostly illustrator drawings), so I can just print the shape on the sheet, then cut it out with a hobby knife. These sheets are a little tackier than I like but so far, I haven't had any problem with them hurting the leather. Next time I have a project that involves this, I'll post a demo. Kate
-
Are you maintaining an inventory? Kate
-
Kate
-
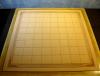
Got all the tooling done, finally... Tomorrow I start dye work. Kate
-
Yeah, I do remember that. Okay, I'll take you up on it... looks like it would be fun! Kate
-
This looks awesome, so far, Clay! Your wildlife carvings are always so life-like, and this one is no different, even without any coloring. Can't wait to see how it turns out! Kate
-
I try to avoid re-wetting as much as possible, because I have noticed that re-wetting does seem to "soften" existing tooling impressions. But on a piece this size, there is no way you can do the whole thing with a single wetting. I've tried using plastic to keep the unworked portions of the leather from drying out, and that works okay, but on a piece this size, it's sometimes a bit of a hassle to keep the plastic in place while I'm working. So what I do now is re-wet, but only at certain points. The entire piece is prepared prior to cutting the lines. I do all the cutting for the entire board at once. Then, for all the stamp work, I go back and re-wet just the area I'm working in only once, and do all the stamp work for that area. Swivel knife cuts get re-wetted, but no stamping work gets re-wetted. And I keep the whole thing under plastic between work sessions, until the whole thing is done. I know some of you might be concerned about water lines forming from re-wetting just parts of the leather. Maybe that's a problem in places where the water is hard, but I haven't had any problems with it. Kate
-
Well said, Mr. Redding. Kate
-
Yes, I did notice we hadn't seen you around for some time. I'm very sorry to hear of your loss, Tashabear, but we are glad to see you back again. I know I cannot truly understand what it is to experience something like this... we can only try to be good company and send all the kind thoughts your way that we can muster. The tat is very touching and nicely done. Welcome back. Kate
-
They both turned out nice, Grumpy! Look forward to seeing more... Kate
-
1911 holster
CitizenKate replied to Cowboy316's topic in Gun Holsters, Rifle Slings and Knife Sheathes
That is a beautiful holster, Tim. The carving is very nice. I think the question Josh brought up about the trigger showing is a question of relative safety vs. quick-drawing. Some holsters are designed to expose the trigger for very quick drawing (such as the "Tom Threepersons" holster design), but the majority of pistol holsters are designed to protect the trigger from coming into contact with fingers until well after the weapon is drawn. Kate -
Red and black shoulder bag
CitizenKate replied to leatheroo's topic in Purses, Wallets, Belts and Miscellaneous Pocket Items
Nice, Caroline. Very simple, yet also very attractive. Nice bit of design work, there, and thanks for posting it! Kate