


Rustwa
-
Posts
20 -
Joined
-
Last visited
Recent Profile Visitors
1,710 profile views


Rustwa's Achievements
Member (2/4)
-
Wow! This site always comes through. Thanks for the replies. I'm glad to hear that I'm not alone in finding archival patterns from the period easily accessible on the internet. I plan on doing some museum hunting this winter for this topic and some other cowboy era stuff. Dwight, those are good looking chaps. Ild be a fool not to take you up on that offer but it's tough to get away right now with overtime at work and near 300 acres unplanted with all the rain we've had. My leather hobby gets about 15 minutes a night and to answer your question I don't own a machine but my hand stitching quality is decent allbeit slow. When winter rolls around I'll have more time to venture out. I'm trying to get a pair of chinks made up to finish my costume for classic cowboy for the state shoot in July. I ordered some chap suede today and I'll have to work out how I'm going to fasten the back belt to the yokes and whether or not to use a buckle in the back. My intuition tells me to go without a buckle because I already have a pistol belt and then the shotgun belt above that. Ill keep posting what I come up with.
-
I am looking to make a set of chinks for cowboy action shooting and could use an education. I only play a cowboy on the weekends and even then it's mostly robbing trains and shooting up saloons. I have zero experience with chaps or chinks that a cowhand would wear. I have looked at the Tandy pattern pack and it's probably good enough for what I need but I'm not thrilled with how they attach the back strap between the yokes and the side panel detail is a bit different than some of the images I see online. I could go on and on with questions but I'll start with just one. 1.) Is there a good book on chaps, chinks, history, styles, regional variation, construction, ect.? Or any other must have resource (other than an actual pair of chaps/chinks) that I should be digesting? I see the pinned thread in this section about a video on chinks and the other pattern is klenda I see used with frequent success. My issue really isn't the pattern although that will be an issue but more so how the chinks fasten around the leg and waist. I see many different techniques and so I figure there must be some reason. I'm not a stickler for historic accuracy in my costume but do make some effort to be within the realm of possibility for what might have been seen in the 1890s although that's not a deal breaker.
-
I wish we had a like button, although I was hoping for some advice on antiquing. I get that what works for some doesn't work for everyone and why it doesn't work for me must be the intellectual portion cause it sure ain't for the lack of throwing money at it. There are some great people on here furthering the craft. You can click on the user and see a body of their work and decide for yourself if theirs is the path for you. Like you could click my name and run away. Lol
-
I agree with that method of determining height. At my dayjob we have height adjustable tables with hydraulic jacks doing the work of adjusting. They are built like tanks with a meter by meter sized table weighing 1/3 of a ton. They are still not as sturdy as a fixed table weighing half that. I hope you do find a simple, easy, and effective way to make your table height adjustable and still be sturdy. A quick study of your layout leads me to think you won't be hindered by different heights in your workbenches. My old shop was laid out similar. I kept the tall bench clean and piled junk on the short one.
-
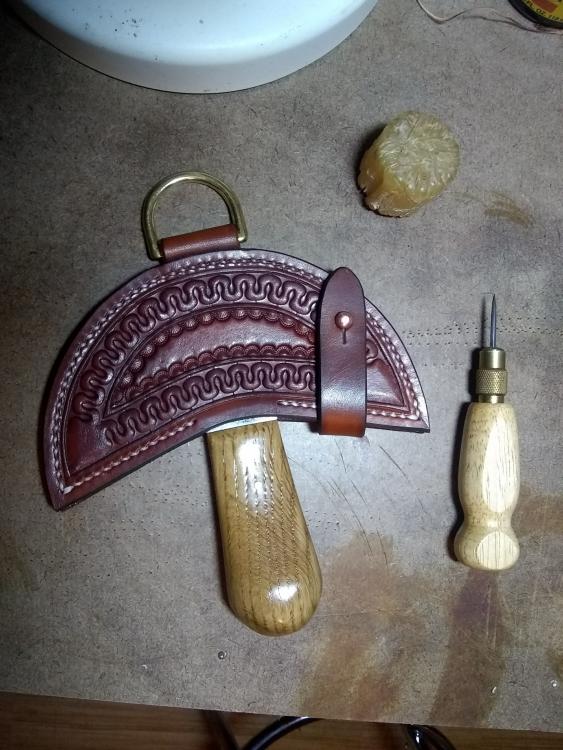
Sheath for head knife
Rustwa replied to Rustwa's topic in Gun Holsters, Rifle Slings and Knife Sheathes
That is my main regret. At the very least I should have taken the opportunity to practice more with the beader blade. The stitching there is through a "retaining welt”? not sure what to call it. It is an extension of the welt around the radius but only attached to the front panel. The knife slides in past it and is then captured by it as the retaining strap holds the front and back panels closed. I too look forward to making cases for many more of my tools as I reorganize my workbench. Here's hoping for a long winter. -
I'm just over 6' and my work bench height is determined by the distance from the ground to the bottom of my elbow minus a couple inches. That worked out to 40" for me. That puts my carving work where I need it when standing or sitting on a bar stool without hunching over. My workbench is probably a bit high for most but it saves my back not having to bend over. The top measures 5'x3' and I wish it were bigger. I have a 4'x4' piece of HDPE that I lay on the kitchen table to cut out my hides. That works for most things as long as I have the table cleared when the wife walks in. One thing that I think is crucial is that my feet be able to fit under the work surface. A friend of mine has cabinets that run flush with the edge of the countertop to the floor and it is painful to work that way.
-
This is a sheath I made for a new Weaver head knife I recently bought. It is made to hang on a peg from the d-ring. There are a few first for me on this project. 1. I have never used this serpentine stamp. I think it came out well enough, but I might dull off the border corners so that it's easier to blend one stamp to the next. 2. This is a new to me border stamp for the inner crescent. I hate it. It was hard to line up and it just doesn't have good definition. Live and learn. 3. This is the first beaded border that I've cut with my BK beader blade. I'll get better with it and it was a ton easier than cutting 2 parallel shapes. 4. And finally. The first pattern I've ever cut out with a head knife! This is just an in house utilitarian piece so it was a good opportunity to try some new things with little risk. The stitching got away from me in a few places but that's due to an inconsistent angle of the awl around the curve. There are things I would have done differently but it was a fun little project.
-
Cowboy Action rigs SASS
Rustwa replied to HBAR's topic in Gun Holsters, Rifle Slings and Knife Sheathes
I like the belt slide for the shotgun shells. I'm in the process of making one myself and I prefer the shells on a separate slide as it gets the shells a little further off the body for an easier grab. Your work looks great and yeah I struggle with finish myself. Like mentioned before I try to do batch lots and just accept the variance. On design if a shooter is doing a weak hand transfer then access to the front of the trigger guard is my preferred method. The holster needs to support the gun by the cylinder frame. The mernickle and doc noper rigs have their own way of doing that. Everybody has a different draw and so the need for so many holsters. Your design looks good with a mix of classic lines and modern shooting technique. If I were to change one thing I would allow a little more access to the front of the trigger guard. Keep up the good work and I hope to see you on the range someday. -
Some wallets
Rustwa replied to Heavyp's topic in Purses, Wallets, Belts and Miscellaneous Pocket Items
I think the colors really make them pop. I'ld love to see how you do that. The stamp in the corner looks great and I assume that's where the snap is. -
Biker wallet
Rustwa replied to Peter Darby's topic in Purses, Wallets, Belts and Miscellaneous Pocket Items
Looks excellent. I like the details on the closure strap. -
That is craftsmanship!
-
Looks like an appropriate collar for a dog name Rukus. What weight leather did you use?
-
Poppin' out some holsters
Rustwa replied to Tinbender's topic in Gun Holsters, Rifle Slings and Knife Sheathes
Do you have any tricks you can share for keeping the definition in your basket weave pattern when you form the holster? Yours look great. Mine tend to lose definition when I make the fold. Do you wet form after stamping at all?
