Stetson912
-
Posts
1,433 -
Joined
-
Last visited
Content Type
Profiles
Forums
Events
Blogs
Gallery
Store
Everything posted by Stetson912
-

iPhone 5 wallet case.
Stetson912 replied to Stetson912's topic in Purses, Wallets, Belts and Miscellaneous Pocket Items
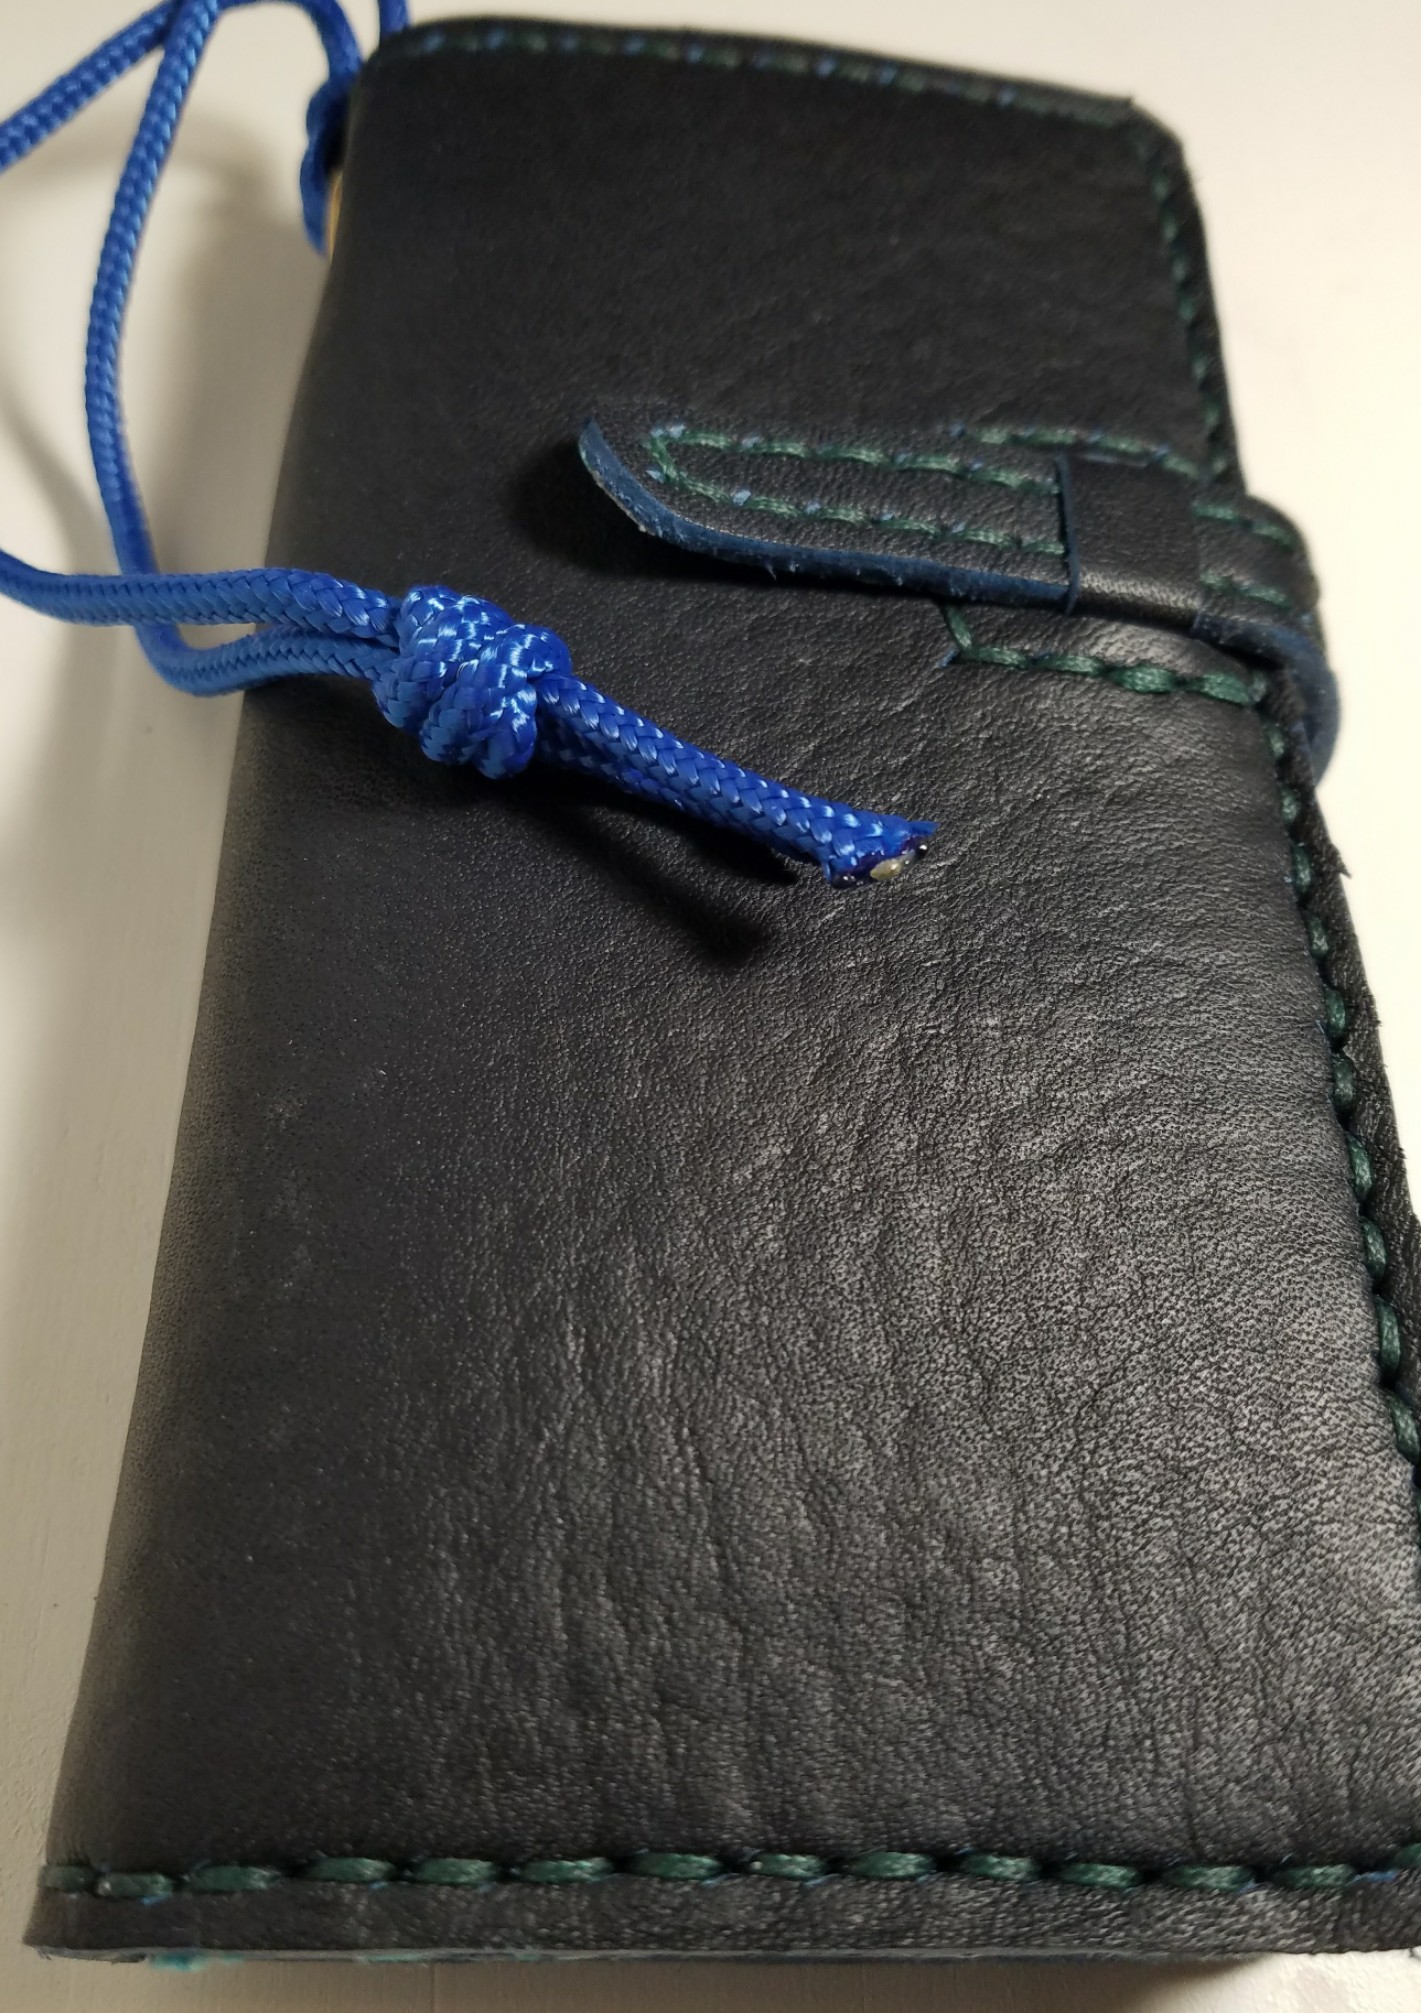
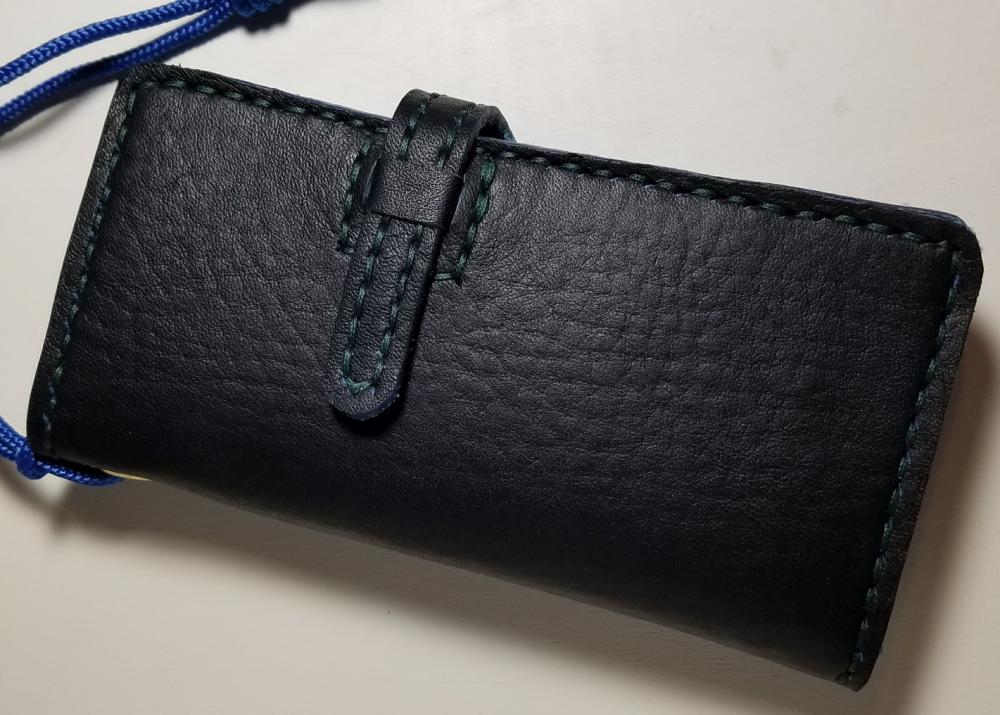
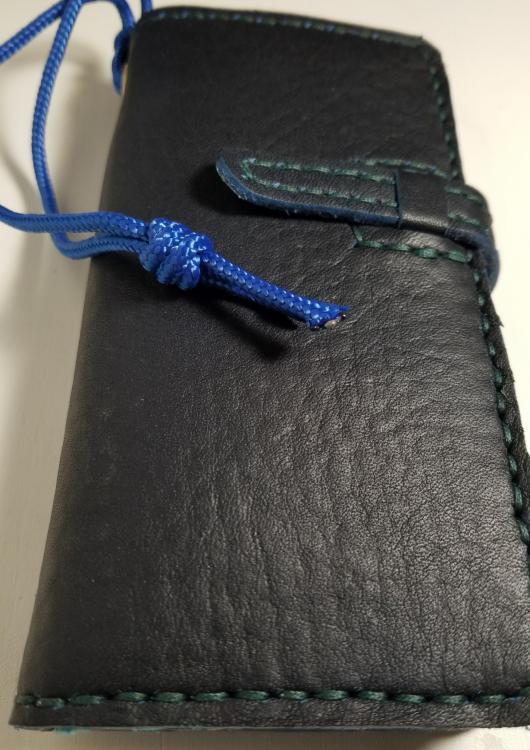
Oh yeah I shoulda said it is. It's a body glove? Just a generic case. It's flexible too tho. I believe it said it's a "gel" case. But even at that it's rigid enough. I did see somewhere where someone wet moulded a case the phone snapped into. That would be too difficult for me but would be super awesome too haha. Also the wrist loop is just a piece of 325 paracord with a Matthew walker knot on the end of it. Her favorite colors are green and blue. I found this out after I started. Just so happened I was already going with green and blue haha. Lucked out. -
First ever bag!
Stetson912 replied to motocouture's topic in Purses, Wallets, Belts and Miscellaneous Pocket Items
It's amazing your stitching stayed straight with the scotch... Unless you're like me and see a little crooked any way, scotch would even it out hehe -
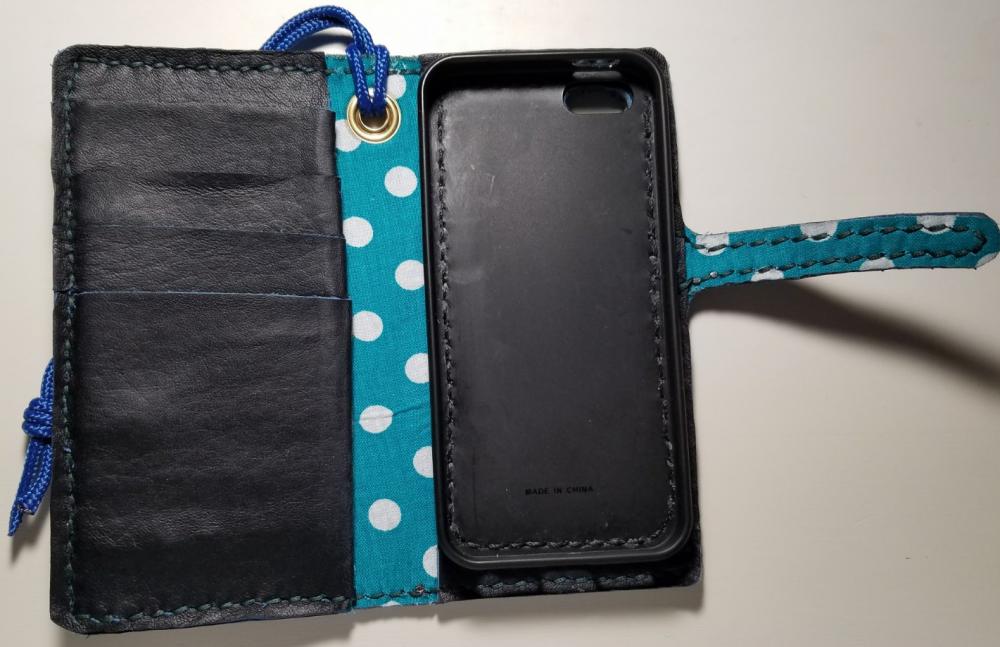
Howdy all, been a while for me but I made this thing! My step moms birthday is coming up and she's mentioned she wanted a phone wallet. So I made one. I used 4)5 oz horween tumbled Essex in parisian blue and .8 green tiger thread. The card slots we're split down to 1 mm and it's lined with cotton fabric. I didn't do much with the edges because of the fabric. Next time I'll trim it short so I can do the edges better. Otherwise I'm pretty happy with it. Thanks for looking. All comments and critiques welcomed. Cheers!
-
First ever bag!
Stetson912 replied to motocouture's topic in Purses, Wallets, Belts and Miscellaneous Pocket Items
Well butter my butt and call me a biscuit! Looks great. I have no clue how to do zipper so, one up on me haha. -
Cobra Holster
Stetson912 replied to bobwarlick's topic in Gun Holsters, Rifle Slings and Knife Sheathes
Nice. I wonder about scales falling g off tho. Is that an issue? -
Cobra Holster
Stetson912 replied to bobwarlick's topic in Gun Holsters, Rifle Slings and Knife Sheathes
Looks nice. I like how u used the cobra head with that snake skin. Good idea. I've never used snake. Is it hard to work? -
Latest long wallet
Stetson912 replied to Sanch's topic in Purses, Wallets, Belts and Miscellaneous Pocket Items
Another home run. Sexy wallet. -
1911 Pancake Holster
Stetson912 replied to TrentonP's topic in Gun Holsters, Rifle Slings and Knife Sheathes
Looks good! I like your name ( it's mine too haha) not many Trenton out there. Keep it up -
Long Wallet
Stetson912 replied to kncorey's topic in Purses, Wallets, Belts and Miscellaneous Pocket Items
Looks good! I think a 9spi would look real nice. But that's a lot of stitching haha. -
Holsters i just finished up
Stetson912 replied to Sblades76's topic in Gun Holsters, Rifle Slings and Knife Sheathes
Way cool. -
My First Journal
Stetson912 replied to Rolandranch's topic in Purses, Wallets, Belts and Miscellaneous Pocket Items
I like it -
Sheath for Dagger
Stetson912 replied to garypl's topic in Gun Holsters, Rifle Slings and Knife Sheathes
Yeah, garypl said he kept it flat so it wouldn't damage or dig into itself. I also may help keep the handle from stabbing the wearer in the back so to say.hehe. I will say you won't be able to hurt that sheath haha. How do you burnish that thick edge? -
Sheath for Dagger
Stetson912 replied to garypl's topic in Gun Holsters, Rifle Slings and Knife Sheathes
That's a chunky sheath. But it'll wear nicely. Looks good to me, and I'm not familiar with machine stitching. What spi did you use? -
Are Prongs Different Sizes Seiwa Stitching Chisel?
Stetson912 replied to Docott's topic in Leatherwork Conversation
Seiwa chisels are a good beginning chisel set. I'm eying the crimson hides stitching chisels. They are very nice but you pay for it too. Go to Armitageleather.com and check out the review pages, or he has videos on seiwas as well. I thought he said the size of the prongs changed for the spacing but I can't remember -
Simple riveted handbag
Stetson912 replied to Wedgetail's topic in Purses, Wallets, Belts and Miscellaneous Pocket Items
Good to hear. -
Simple riveted handbag
Stetson912 replied to Wedgetail's topic in Purses, Wallets, Belts and Miscellaneous Pocket Items
@Wedgetail I'm a dad too, so them jokes come naturally hehe. Sorry to hear your wife is sick. That's no fun, makes things more challenging too. -
Simple riveted handbag
Stetson912 replied to Wedgetail's topic in Purses, Wallets, Belts and Miscellaneous Pocket Items
Some might say it's "riveting" -
Hmm that's a good question. I don't have an answer per say. I would think it depends on the shape and design aspects of the bag. Like for the gussets you have to take into consideration the thickness of the gusset leather for the inside dimension of the compartment. Same with liners and foam padding. That will build up thickness making the inner dimensions smaller than desired. Also, thicker leather doesn't fold or bend as easily so if you have anything like that (again the gussets maybe?) That needs to bend you'll have to add extra length unless you are going to v gouge it or something. I think you'll have to play with it and little bit. Maybe use some cardboard and duct tape to make a mock up for your pattern.a piece of corrugated cardboard is close to the right size of 8 oz leather I believe
-
I know both the laptop and PS4 are somewhat large. Getting both in one case would be challenging. The case will be very large but you could probably still make it small enough to be a good mobile game center. Sounds like a cool idea. A lot of stitching though haha.
-
Cartridge holder
Stetson912 replied to Sofaspud's topic in Gun Holsters, Rifle Slings and Knife Sheathes
Yeah. It looks very similar to his that's why I thought that. He has a free pattern on his site and the video shows how to do it up. I'm sure you could adapt the loops to fit whatever you like. -
Cartridge holder
Stetson912 replied to Sofaspud's topic in Gun Holsters, Rifle Slings and Knife Sheathes
Nice. It reminds me of Nigel Armitage's shotgun slider. Did you use that for inspiration? -
I agree with grumpy. Craft foam should be fine. You can find it fairly thin I believe 2 mm. Also there are rolls of sponge neoprene you can buy. But I'm not familiar with that product as much.
-
Social poo 'n' stuff
Stetson912 replied to JLSleather's topic in Gun Holsters, Rifle Slings and Knife Sheathes
More of an educated trial and error technique haha. I was just curious. I'm sure if I sat down with a pencil n paper I could figure something out along those lines. I make my own patterns too when I do a holster. I just haven't made many so I'm still learning. Thanks for the insight! -
Social poo 'n' stuff
Stetson912 replied to JLSleather's topic in Gun Holsters, Rifle Slings and Knife Sheathes
Ahhh, thanks for that. I didn't think of binding. That's just a little bit important I would think haha. So how do you enlarge the front panel? And how do you know it's enough? I suppose you could trace half the back panel and shift it over a certain distance to trace the other half then just connect the two parts? -
Social poo 'n' stuff
Stetson912 replied to JLSleather's topic in Gun Holsters, Rifle Slings and Knife Sheathes
Color me daft but what is the difference between the curved pancake and a regular pancake? How is the curve accounted for in the pattern/design? I see the backside is curved to fit round the hip a bit better but doesn't a regular pancake do the same? Just wondering is all. I have limited experience haha.