


hidepounder
-
Posts
1,808 -
Joined
-
Last visited
Content Type
Profiles
Forums
Events
Blogs
Gallery
Store
Everything posted by hidepounder
-
Tim, The mix is something like 1 oz Oxalic crystals to 1 pint of water. You can also use lemion juice...it works pretty well...but I like oxalic acid better. Is the project already tooled or is it going to be tooled? Also is it just dirt on the leather? I'm asking because the oxalic acid makes the leather more difficult to cut with your swivel knife. I apply it with a piece of trimmed woolskin which allows me to do some very light scrubbing. You'll want to cover the whole piece tp prevent any color changes. Hope this helps.... Bobby
-
Now this is some awesome leather work
hidepounder replied to BradB's topic in Motorcycles and Biker Gear
This is the first time I've seen his work and I'm really impressed with how clean everything is and the fine detail is very well done! The stitching was perfect also. He is definitely a hand! Bobby -
Dixie, A rubbing is the way I would do it. Bobby
-
I'm on IE8 also and everything is really slow here too. When I click "View New Content" it makes me sign in again so that's a pretty minor glitch. Coming along great! I like the bolder colors with the beige background...spices everything up!
-
Thanks Kate.....I enjoyed that! Bobby
-
Getting the spacing and alignment right with letter stamps
hidepounder replied to UKRay's topic in How Do I Do That?
Hi Ray, Almost everything I make has lettering on it and I have figured out an easy way to deal with "kerning" (learned a new word today!). The very first thing I did once I learned this new technique was to box up all my letter stamps and put them away....FOREVER! Occassionally I will get the box out when I need something heavy to use as a weight...that is the best use I have ever found for letter stamps! I think the letter stamps always looks amatuerish. It is so easy to open a word processor and type in the lettering and apply a font that looks right, enlarge to the size needed and print it out. Hand cut letters just look a lot nicer and a lot more custom. If you apply a piece of packing tape on the backside of your printout you can trace the lettering directly to your leather. I usually trace them onto a piece of tracing film and then trace them on....I get a little clearer impression when I transfer that way. A trick I've learned is that the "blockier" the font, the harder it is to carve. Softer more freehand style letters are easier to do and it's harder to see that they are not cut perfectly. I realize of course that hand cut letters take a lot more time and that definitely affects price, however I am absolutely convinced that the end result is so much nicer that I cannot justify using stamps. I know you all have heard me rant about this before, but I just couldn't resist putting my two cents worth in again. Give the lettering stamps away to the grandkids to play with on scraps! Free advice is usually worth what it costs..... Bobby -
You're definitely making progress fast though...quotes are highlighted today and some other things are working.... Glad I saved my personal notes though.....I'd have to shoot myself if I lost those. I'm not sure "New Content" is sorting correctly....maybe it's my settings....I'll check that out. Also, someone will have to teach me how to read the new "date" system...I only understand dd/mm/yy. I can't figure out what the "status" deal is. My profile page kept telling me I hadn't set my status! What is that....our condition...like happy, sad, hung over? I guess I'm "Verticle".......beats the alternative! Lookin' good Gals!!!!!!! Bobby

-
Marlon, Beautiful work! I didn't know you did figure carving! Good job. Bobby
-
Mike, I use Leather New (by Farnum) on my saddles, but for splits I've been using Horsemans One Step. It is a a white cream with the consistancy of mayonnaise. It will darken the leather however. I recently found an old bottle of Tanners Saddle and Harness Dressing tucked away in the tack room and I used it on my reins this last time and I am crazy about it! I don't even know where it came from or if it is still available, but I like it! It also darkens the leather, though. Bobby
-
WOW Johanna!!!! Caught me completely by surprise!!!! WOW, I've gotta go prowl around!!!!!!
-
best product for cleaning tack?
hidepounder replied to wildrose's topic in General Saddlery Discussion
Holly, We clean with soap and water and then apply Leather New liberally. It is a glycerine saddle soap sold by Farnam and is available from any tack & feed store. It's been around for at least 40 years that I know of. I like the spray bottles and I use a trimmed piece of woolskin to rub it in with and then a soft clean cloth to polish with. It does a nice job. There are a lot of other good products out there and I have used several of them and liked them, but it seems I keep coming back to the Leather New for some reason. Hope this helps.... Bobby -
neat-lac
hidepounder replied to dustin29's topic in Dyes, Antiques, Stains, Glues, Waxes, Finishes and Conditioners.
Dustin, Apply your NeatLac with a piece of trimmed woolskin. Multiple light coats are preferrable. Your first coat should be applied lightly and carefully to avoid picking up the antique. The antique should be dry, well polished and there should be no residue left. After you have one coat on, the leather is sealed and the next coats are much easier to apply. If you don't want a high sheen....rub it in a little as it dies. I spoke directly with LSI, the company that makes ClearLac and verified that ClearLac is NeatLac. They even have left over NeatLac labels sitting there at the plant. Hope this helps..... Bobby -
Frank, Here are a couple of threads on this subject that I think you will find informative: Thread #1, Thread #2 If you still have questions, please ask. Hope this helps.... Bobby
-
I agree....the tape residue or the glue residue will dictate that you apply a lining. But to me, that only makes it a better. Adding a nice finished lining is just a more professional way to complete your project. Bobby
-
I, like Randy, use 1/8" and 1/4" thick acrylic. Leather like 7/8 oz will cause 1/8" acrylic to warp when you are tooling and that is frustrating. You will find yourself chasing it around your bench while tooling on it. The only reason I use the 1/8" for light leather is because I have it left over. I have since began using the 1/4" and it is much better........so I guess what I'm saying is that you are better off to just start out with 1/4". I call acrylic and plexiglass the same thing, although I am not certain that is true. I bought a 1/2 sheet and took it home and cut it into shapes that were convenient for me to use. Hope this helps.... Bobby
-
I see nothing wrong with leaving the backing on and using it as a stiffener when the option exists. It would depend of course on what the backing is and how well it would function as a stiffener. I use a backing on almost all leather thicknesses. My leather thickness is determined by two thiings.....function and tooling pattern size. For a small refined tooling pattern I need to use a thinner leather to make the pattern look it's best. If function reqiures a heavier piece of leather, I increase the thickness of the lining.....but either way I use a backing when tooling. As far thickening the leather to avoid stretch goes, a large pattern tooled on skirting leather can still stretch, so I'm not on board with that. Again, the type of pattern being tooled and the depth of the tooling make a big difference in the amount of stretch you can expect. In my case where I am using acrylic as a backing, removing the backing from the leather really isn't an option. However it makes sense to me to remove the backing from the leather when the backing material allows you to do that. Hope this helps... Bobby
-
Steve, I use rubber cement. You can use Barge if you glue to the acrylic only and apply the leather before the glue is set, however, you get a messy build up on the acrylic that has to be removed. Bobby
-
Dixie, I agree with Bruce and Jon, and as a tooler I am particularly interested in the tooling pattern I see on the seat. It is very unusual to see a pattern that was done like that one, on a saddle of that era. It demonstrates a lot of the design attributes not found until the 1950's and 1960's. The tooler was way ahead of his time on this one! Bobby
-
Meg, This is a copy of a recent post I made in answer to the same question: Casing is a very important step in preparing you leather to be tooled. Years ago, saddle shops would have a "Casing box" which was usually a wooden box lined with galvinized steel sheets to prevent moisture from escaping the box. Needless to say these boxes were anything BUT airtight and you could put a pretty wet piece of leather into the box and remove it next day and it would be ready to tool. Today, people use plastic trash bags, zip loc bags and ice chests, all which prevent ANY moisture from escaping....especially the plastic trash bags and zip loc bags. When you put your overly soaked leather in that sealed bag it did what it was meant to do....it preserved it....moisture and all! Your leather was not cased...it was just soaked! When I wet my leather, I pull it through a pan of water. I want to see bubbles coming out as it passes through the water.....but waiting until all the bubbles are gone is way too long. Once you start casing you will learn how much is enough. The same holds with learning what the leather should look like when properly cased. Almost it's natural color.....a cool feel to it when touched to your cheek....you will get the hang of it quickly once you get started. If you are going to utilize plastic bags to case your leather, you need to allow much of the moisture to evaporate BEFORE you put it in a bag. I let my leather begin to turn back to it's natural color before bagging it. I want it a little wetter going into the bag than what I want to begin tooling. The idea is for the moisture to be evenly distributed through the leather. Not wetter on the top than on the bottom. Properly casing your leather will result in cleaner, crisper and better colored tooling. In addition, properly casing the leather will allow you to tool a little longer than than just wetting it with a sponge and starting to tool. Wetting the leather with a sponge IS NOT casing! Additionally, the more you have to re-wet the leather, the more definition you lose in your tooling! The colors fade, beveling begins to raise and the piece doesn't look nice and crisp because it isn't any longer. If you can wet your leather once and get the whole thing tooled then that is fine. It will look nice. But you won't get the nice burnish produced when beveling and shading that properly casing your leather will give you. Nor will it cut as nicely! When I am tooling a piece that I know I can't finish without re-wetting several times, I break the tooling down to sections and keep everything I'm not tooling covered with plastic wrap until I am ready to move on to the next section. I am not saying you can't add moisture as you go...it's just that the more you do it, the more you will lose. I do not know one single professional tooler who does not case his leather. Give it an honest try...once you get the hang of it I think you will be sold. I hope this helps.... Bobby
-
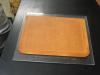
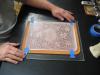
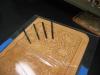
Hi Meg, I glue everything I tool to a piece of acrylic. I do this after I have cased the leather at least over night. I slick my leather just before I put it up to case and again just before I mount it to the acrylic. I don't cut the leather to it's final size until I have slicked it the second time. Taping with packing tape works well but I prefer gluing to the acrylic because there is less chance of the the leather separating from the acrylic if I have to add moisture. Additionally, the acrylic is just so stable that I prefer tooling on it rather than allowing the leather to flex with the tape. It's just a personal preference thing for me. I am not concerned about any residual glue on the back because I line everything I tool. I feel it produces a much more profesional job. Here is a photo of a piece I have glued down: Gluing to acrylic gives me some other options as well. It gives me something to tape my pattern to so that it doesn't move while I am tracing: When I cannot complete a piece in one sitting, I cover part of the leather with plastic wrap until I have finished the first tooling session and am ready to begin with the next section. Again, the acrylic provides something for me to seal the plastic wrap to, preserving the cased condition of the leather. This photo shows where I am working on one section of the project while the other half is being preserved under the plastic wrap: There are a lot of methods which can be utilized to help prevent stretching....slicking and mounting to acrylic are just the ones I use. Hope this helps.... Bobby
-
Anything missing or broken? Do you know who made it? Bob
-
I had an occassion today to speak to Todd who purchased the steel stamp division from Tim Harper. Todd has been there making stamps for a long very long time. I was unaware that the company had sold and that Todd, not being a Harper, changed the name to Steel Stamps Inc. Now that I know what transpired in the sale of the company and who has purchased it, I am once again confident that they are producing the same great stamps they have become well known for and I will continue to recommend them to anyone who desires a quality steel makers stamp. Personally I prefer a more aggressive knurl on a tool handle as it enables me to maintain a firmer grip. I really like the look of the spiral pattern and was unaware that it has been available for some time. I happened to have a conversation with another maker who requested the spiral knurling on his last two stamps and absolutely loves them. I recognize that on occassion mistakes are made or there are commincation breakdowns that can leave a customer dissatisfied. It happens in every business and it is always unfortunate. Hopefully Steel Stamps Inc. and Ken will be able to work together to resolve the issues Ken has with the knurling on his new stamp. It sounds like an issue of personal preference rather than the quality of the stamp. Bob
-
gun belt sizing
hidepounder replied to Windom Leather's topic in Gun Holsters, Rifle Slings and Knife Sheathes
The very best method I've found for measuring belts is to make a "measuring belt". It is nothing more than a piece of leather (plain belt) with snaps for a buckle and a series of numbered holes starting at around twenty inches and ending at around fifty or sixty inches with an additional seven or eight inches of tail. The holes should be punched at 3/4" on center because that is the standard spacing for holes on belts. The numbering system should not represent a size in inches...it is just a reference point. The customer will put his buckle on the belt and put it on as he would a normal belt and pull it to where it is comfortable. Make note of the hole number. Now you can use the measuring belt to exactly duplicate the customers size. It is handy to make note of where the customer would like the tip to end by indicating a hole number there also. This method will work for measuring for a gun belt also. One thing to watch out for. It is not a good idea to use a one inch wide measuring belt when measuring for a gun belt. You would want to use a much wider belt so that it will more closely simulate the way a gun belt will fit. Remember to put on the measuring belt exactly like you would wear the gun belt. I keep two measuring belts around. One is 1" wide, the other is 1-1/2" wide. I use the one which most closely matches the width of the belt my customer wants. Hope this helps.... Bobby -
Hi Crissy, The first question I would ask is what color dye are you using and where on the leather are you using it? Is it just a highlight or are you dyeing the entire piece? I use the alcohol dyes rather than the oil dyes, mostly because that was what I learned on and am most comfortable with. Also, 90% of my dyeing is in the background of my tooling and I use very dark colors. I haven't found a need to do anything to the leather to accomodate this type of dye. When I am ready to dye my backgrounds I clean the surface of the leather with oxalic acid. This removes any soiling picked up off the bench as well as oils from my hands that are left on the leather. I feel strongly that the this cleaning makes a difference when I begin applying my finishes such as antiques. So it holds for me that it will be beneficial when dyeing the leather with medium or light colored dyes as well. By cleaning the leather you are removing anything which may inhibit the penetration of the dye or affect the color. For the dark colors, I doubt you would notice any difference whether you are using oil dyes (which aren't really oil at all) or alcohol dyes. Using oxalic acid is just a good habit to get into to help keep everything as clean as possible. I can see where applying a coat of thinner may help increase the penetration of the oil dye. I have just never seen the point in using it on what I do because the alcohol dyes work so well. The alcohol dyes dry much faster than the oil dyes do, which I think is a positive side benefit. I hope this answers you questions... Bobby Hi Mholzer, For me the answer to your question is yes, that's the best sequence. There are, however, times when I will edge and dye before I apply any antiques only becasue the sequence of assembly requires it. I was taught to edge and dye right after tooling, but I like to get some of the finishes out of the way first. It helps me create neat straight lines when dyeing the edges and also helps in keeping everything clean along the way. It's not critical, it just works a little to my advantage to do it this way. Hope this helps.... Bobby
-
That's a beautiful press Ray! I've never seen one like that....


