


Kustomizer
-
Posts
230 -
Joined
-
Last visited
Content Type
Profiles
Forums
Events
Blogs
Gallery
Everything posted by Kustomizer
-
Thanks for the info, I will defiantly wear a respirator.
-
Thanks gentlemen!
-
I'm getting ready to do my first seat and was wondering what adhesive you guys use to glue the seat padding to the pan?
-
Yeah, his posts on the Jockey Journal are what inspired me to get into this, Xian does some fantastic stuff.
-
Thanks TwinOaks!
-
Commissioned Wallet
Kustomizer replied to Spider's topic in Purses, Wallets, Belts and Miscellaneous Pocket Items
Cool wallet, I like the nurse kitty also! -
Demon Heart
Kustomizer replied to Kevin King's topic in Purses, Wallets, Belts and Miscellaneous Pocket Items
I really like your work, I love the way you layer and the different types of leather you use to get some fantastic results! -
Thanks and I guess I'll just need to give it a shot and see what happens, thanks for the input. I'll have to think a bit about what needs to be cut and what doesn't.
-
So Busted, it looks like the lines in the face should be just cut in and no tooling, right? Right now when I cut with the swivel knife I have a tendency to cut kind of deep, and looking at some work it looks as though I have to learn to cut at different levels for different parts of a piece and have the tooling not so deep, does this sound right? Nice work by the way, I remember seeing that on the Jockey Journal or HAMB I believe.
-
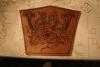
OK, I'd like to tool the upper half of this Rat Fink into a pattern, but was wondering how best to do it. There are a lot of small, close details on this pic, like the teeth and the hairs on the edge of the ears and face lines, etc. that I think might be hard for a newbie like myself and was wondering what advice you all might have if I was to try and tackle this. What I'm thinking about doing is a motorcycle seat and I want to replace the "Sportster '74" with the top half of Rat Fink, this was a practice piece I did to see if I could tool the main pattern, now if I can tackle the Rat Fink part I might use this as my first motorcycle seat pattern, here's my practice piece: Let me know what you think, any advice would be greatly appreciated, thanks!
-
What weight leather for a motorcycle seat
Kustomizer replied to Kustomizer's topic in Motorcycles and Biker Gear
David, Busted, Murse, thanks for your input!!! -
What weight leather for a motorcycle seat
Kustomizer replied to Kustomizer's topic in Motorcycles and Biker Gear
Thanks all for the input. Busted, do you do that over padding? -
Johan, I have a long, long way to go, but your classes, help and advice have helped me a ton!!! Plus, thanks for telling me about this site, tons of great craftsmen here! Thanks!
-
OK, here are the 3rd and 4th pieces I've done. Getting closer to trying my hand at my motorcycle seat. Man, I really like this leather tooling! Let me know what you think, good or bad. This is my 3rd attempt. This is my 4th attempt and my first try at two color antique. Any feedback would be greatly appreciated.
-
Just wondering what weight leather everyone uses for a leather solo seat? When I was at Tandy last week I was looking at the 4-5 oz. leather, but I think I've seen where people have used as heavy as 7-8 oz. Let me know what you guys think works the best for a tooled motorcycle seat.
-
Thanks David for the reply. Makes sense to finish it after it's assembled. I have tons to learn and it helps so much to hear how people who have been doing it for awhile have done it, thanks!
-
Beautiful work David as always. One question about the seat building process, is it normal practice to put the finish on after the seat is assembled?
-
Sorry to bring up an old post, but I was about to post this very topic and would love to see the process on making a motorcycle seat, especially from the point of how much bigger should the leather be to lace and how do you meet the bottom piece of leather and top piece? Do you butt them up or overlap them? Do you attach the bottom piece of leather to the seat pan before you start lacing (which I think you do). And did I understand correctly that you use 3-4 oz. leather for a seat? And if there was anyway to bring up the "Jesus seat from start to finish" that would be fantastic, or if anyone has a good link (besides the Paul Cox link which I've seen) that shows the process from start to finish that would be great also.
-
Your work is very inspirational, you are a craftsman! Another great job. I really like the pin-up stuff and it looks great on your seat!
-
Hi all! I've been cruising the site for a few weeks now and am totally blown away by all of the talent here. I took a tooling class a few weeks ago at the local Tandy Leather store here in Bloomington, mn and Johan, who taught the class told me about this site (thanks Johan). I have done two practice pieces that I posted a few days ago for feedback in the Show-off section. My plans are to first practice until I get comfortable enough to tool a seat for my motorcycle and then if it turns out I'd like to get good enough to do some work for others. I've got tons to learn and I'll probably post some dumb questions, but I guess that's the only way to learn.
-
What happened to the pics? I'd love to see your seats.
-
Thanks everyone for the feedback! I really like doing this and hope to get good enough to someday sell a few things. Bustedlifter, here is a pic of my bike.
-
Thanks for the kind words and input, it helps a ton. Yeah, I had a real hard time figuring out what to do with the skull, which is probably why it is that way. The two areas I struggled with most are the eyes and the border around the outside of the skull. Any suggestions? Or what areas do you think I could change to improve it?
-
The Tandy Leather store in Bloomington, MN Thanks and the skull is supposed to have a cartoonish look to it. I know that people that do skulls want them to look more evil, but I wanted to do something that had more of a 2 dimensional look so it would be a bit easier to practice on.
-
Well, I took a tooling class at Tandy Leather two weeks ago and these are my first two attempts. Please let me know what you think.
