Alaisiagae
-
Posts
136 -
Joined
-
Last visited
Content Type
Profiles
Forums
Events
Blogs
Gallery
Store
Everything posted by Alaisiagae
-

Spurs straps for the wife
Alaisiagae replied to tennesseebulldawg's topic in Saddle & Tack Maker Gallery
Love the red stitching, it really pops and shows how neat and tight it is. I am envious of your skill at doing that geometric pattern, well done! On the bottom photo, is that a channel/grove down the center of the strap with the holes? How did you make that, and what is its purpose (I am very inexperienced with buckled goods!)? -
I suspect even Resolene would work as a good resist, though I've only worked with its cousin, Super Shene. One would have to do head-to-head testing to see which product (Resolene vs. Pro-Resist) performs better. Battlemunky, you may want to apply and wipe off the paste even faster - if you have some scrap leather, you can set up some experiments: different numbers of coats of Pro-Resist, and different sit-times for the paste. If you decide to do that, I'd be interested to hear about your findings! I've had bad luck with Fiebing's Antique pastes personally, I've got Tan and Mahogany. When I use them, it's a 50-50 chance that some or all will turn a waxy pale color within a few days or months. The guys at the Tandy store couldn't figure out the cause.
-
Couple of today's projects
Alaisiagae replied to DustinSmith's topic in Gun Holsters, Rifle Slings and Knife Sheathes
Wow, you did great on the texture for that arrowhead! For the strap, do you tool and then punch the holes, or do you punch the holes and then tool around them? -
You'd need to dye after waterforming it, of course. What kind of issues have you had with the Eco-Flo? I use Eco-Flo, so maybe I've run into the same thing and have a solution you can try. You may find the tooling (depending on what it is and where it is on the piece) may distort if, for example, it is on a bend or crease.
-
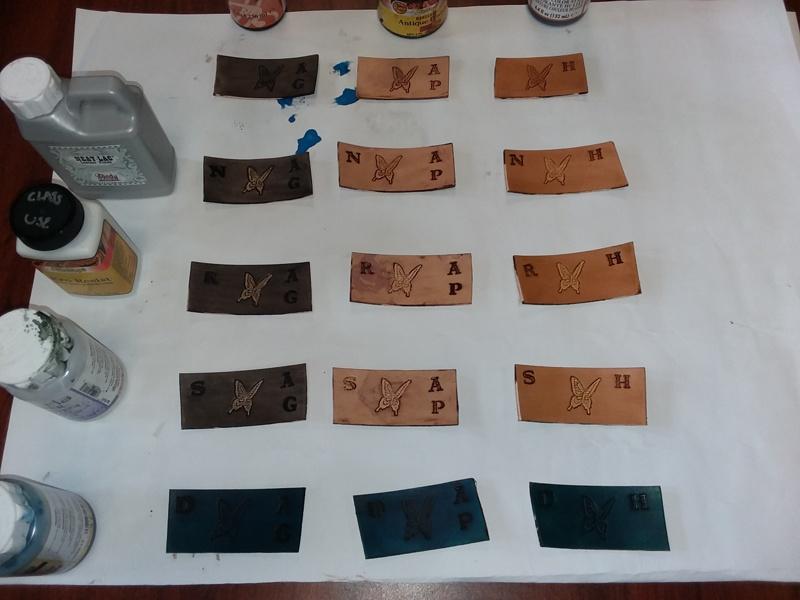
How long did the paste sit on the leather before you wiped the excess off? The longer it sits, it will typically penetrate the resist more. I took a Tandy class where the staff member showed the effect of different resists with different products. Columns: Antique Gel, Antique Paste Hi-Lite. Rows: Untreated, Neat-Lac, Fiebing's Pro-Resist, Satin Shene (it might have been Super Shene), and just dye (blue). As you can see, Pro-Resist and the Shene did better than Neatlac to resist the paste (the resists were applied to the butterfly).
-
Leather Phone Holster
Alaisiagae replied to Leather20's topic in Purses, Wallets, Belts and Miscellaneous Pocket Items
It looks pretty good, and I like the basketweaving! I noticed your veining on the scroll stems looks a little odd to me, have you watched this video? It has some nice tips for angling the tool, see at time 7:04. -
stupid question about using diamond chisels
Alaisiagae replied to Alaisiagae's topic in How Do I Do That?
Okay, so I did all the recommended changes, and here's the back side of the piece. I see that when the chisel punches through, it's pushing the leather outward into a little dome around each hole. Is this normal, or does the tool just suck? I recall having this same wrinkling/bowed out problem when I used a leather drive punch (round) on the flesh side; the grain side look really crappy. EDIT: same thing happens with my thonging chisels, they're brand new.
-
Hello Mich! I am new to these forums, too - but I am also new to leatherworking, and it is clear that you are an expert! I look forward to learning from your posts (your English is very good) and seeing your latest creations!
-
Those look fantastic and so professional! I like how you outlined the red letters in white so that the red stands out from the background better. The firefighter logo (a stamp?) is a nice touch. Your stitching looks superb. Are those copper/brass rivets I see on some of the pieces? I hear those are some of the sturdiest connections you can make, so I'm sure your pieces will stand up to any rigors they're put through. Did you carve the awareness ribbon, or was it a stamp?
-
There are indeed leather dyes and leather paints. Dyes come in a few styles, the most common 2 are water-based and alcohol (spirits)-based; there are also oil dyes. After you dye, you need to lock in the dye (to prevent it from rubbing off) with a sealer/finish, such as Fiebing's Resolene (there are many different types of finishes, so that is like a topic in and of itself!). Your jacket will have a finish on it, and a finish will inhibit/prevent further dyeing of the product. Therefore, to prepare the area you want to dye, you may need something like Fiebing's Deglazer to remove that finish. This step might not be needed - you describe that the leather has worn quite a bit in a few areas, and it is possible the finish has worn off, too. If you could provide a photo of your jacket (both wornout and non-wornout places), that might help the people on this forum to recommend you product(s) or steps you'll need to take to restore it. Leather paints come in some variety, but the most commonly known brand, Angelus, is acrylic-based. I thiink you want a dye for your jacket, so that the color penetrates and is flexible. Leather paints are flexible to a degree, but they mostly sit on the surface of the leather and might rub or flake off with lots of flexing and wear. A dye will penetrate the leather layers more deeply. (At least, this is my limited knowledge of paints and dyes.) My concern is that the color of a re-dyed area may be much more vibrant than the non-rubbed off portions of your jacket - i.e., those parts of the jacket might have faded a little over time. Additionally, it is possible that the new dye might not 100% match the original dye (you know how some blacks just don't match? Like on clothes, you can tell when two blacks, say a blazer and trousers, were made by different companies). Where do you live? This would help the people on the forums to recommend you products and vendors available in your country.
-
stupid question about using diamond chisels
Alaisiagae replied to Alaisiagae's topic in How Do I Do That?
Thanks, @johnv474, @Frodo, @zuludog, @battlemunky. @fredk This actually is electroplated rather than chemical blackening. I used one of the interchangeable chisel heads in my arbor press, the ram has a hiole and set screw, and I tighted the set screw. The pressure caused the set screw to squish the threading on the interchangeable chisel head and the black coating flaked off in some areas. I do have chemically blackened tools, and these are indeed different. I will use the techniques you all have described, and punch some holes today to see if that solves the wrinkly-back-hole problem. My poly board is thick (about 1/2 inch) and I've driven my chisels and hole punches into it before - it's not like a thin cutting mat. Nonetheless, I'll use a thick piece of leather (I've got some scap belly I practiced stamping on) under my project piece, and coat the chisel prongs in beeswax more frequently. I'll also follow johnv's excellent tutorial for how to hold my chisel and mallet - I am definitely guilty of striking at a slight angle (my poor mallet head). I glued (Fiebing's leather glue/cement) the two pieces together last night, which raises a question: do you make your chisel holes before or after dyeing? If I use a strong permanent glue, I can't separate the two pieces to dye them (specifically, if I want to dye the flesh sides). -
stupid question about using diamond chisels
Alaisiagae replied to Alaisiagae's topic in How Do I Do That?
Yes, that's the back piece. It's medium strength tape, it can be removed and isn't a permanent or super strong bond. Yes, I had some trouble negotiating the curves... it's easy when it's a straight line! I did put one of the prongs in the previous hole, but as you can see I erred when turning the corner and flipped the chisel so the slant changed. I tried to pull out straight up-and-down, but it's possible I yanked at an angle. I poked the chisel in beeswax to help ease pulling the chisel out. The teeth are electro plated, so to sharpen them I'd end up scraping that off... I'm a little reluctant to do that. -
stupid question about using diamond chisels
Alaisiagae replied to Alaisiagae's topic in How Do I Do That?
I used double sided tape ("Tanner's Bond") along the edges to secure the two pieces. I punched on top of a poly cutting board. My chisels are these ones (diamond hole chisel set) from Tandy. I dyed after punching, not before.
-
So, I tried using my diamond chisels on some thin (2-3oz) veg tan. I am making a pouch with 2 pieces, so I lined up the front and back piece, rough side touching rouch side (grain/grain facing out) and used the chisel to punch through both from the grain side of one piece through and out the back of the grain side of the other piece. Aside from make a total disaster out of it (diamonds are angled all wrong, my bad), the holes out the back piece look bad: the leather on the grain side got distorted and wrinkled around the holes. What am I doing incorrectly? I feel like I keep making rookie mistakes, is there a big list of "never do the following things"?
-
Moccasins made of vegetable-tanned leather
Alaisiagae replied to ScottEnglish's topic in Shoes, Boots, Sandals and Moccassins
Veg tan is much more rigid than something like deerskin, which is very flexible and soft. Milled veg tan might work, it's fairly flexible. -
By "seal" do you mean a finish that locks in the dye? It locks in the dye to prevent it rubbing off and also resists/prevents further application of dye. There are many different ypes of finishes (I have personally used Resolene, Super Shene, and Neat-Lac). I don't think those would prevent the application of conditioner, though perhaps heavy coats of laquer or acrylic (such as a wood finish) might (I am not sure of this, I don't have experience with it). Leather conditioners include oils with or without a mixture of waxes (such as beeswax). Oils (such as Neatsfoot oil) will absorb into leather that has been finished. I think the oils will also penetrate through waxes, though I don't personally have experience with that. I mean, first thing that comes to my mind are my leather dress shoes - they are finished leather that readily drink up conditioners. I don't have any experience with saddles, but I am nearly certain that they are indeed finished leather - either straight from the tannery (think chrome-tan leather) or by the craftsman/woman. Depending on the type of finish (e.g acrylic-based or not), you can further add a paint on top - paints generally don't absorb into leather like dyes. If you have an acrylic-based finish (such as Fiebing's Resolene or Super Shene) you can add on top of that some acrylic-based paints (such as Angelus or Cova-Colors). You'd probably then want to add a finish on top of the paints for a little extra protection. You can also thin paints, such as Cova-Colors, with water to create a stain with which you can apply to the whole leather, as you would a dye. You can apply paints directly on to unfinished leather, you don't need to finish the leather before adding paints. Here is a process I have used: add the paints -> add a finish to the painted area -> dye the rest of the leather (the finish will help resist dye getting on the paint - and so will a quick wipe with a paper towel if I accidentally get dye on the painted area) -> apply a finish to everything. I use paintbrushes to apply paint. I use wool daubers to apply dye (the dye likes to wick up into the ferrule of paint brushes and, for my flat brushes, is impossible to get out; I have better success with my round brushes). You can use a similar process with dyes: dye one area -> apply a finish to that area -> dye the other area -> apply a finish to that area. Applying the finish to the first area will reduce/minimize any accidental color spread when dyeing and finishing the other area. Some finishes work as better "resists" than other finishes, depending on the type of dye you use. I find that a few coats of Neat-Lac make for an excellent resist. Please note that my experience is limited to water-based dyes such as Tandy's Eco-Flo line of dyes. Alcohol-based dyes will behave a bit differently (more dye penetration of the leather, faster drying time). I'd recommend searching/browsing thesse forums for past threads that deal with the products (dyes, paints, finishes) that you use. If you have some scrap leather, you can also set up some experiments. I've done this with my scrap leather to test the effect of dye penetration on different finishes. In general, more coats of finish = more resistant to further dyeing. Do note that multiple coats will also typically increase the glossiness of the finish.
-
Those look great! I like your take on the traditional floral carving style.
-
This Art Form Is Going Straight To Hell
Alaisiagae replied to Reegesc's topic in Leatherwork Conversation
I'm not sure why they discontinued the Craftool Pro stamps. I think they wanted $20 each orginally (at my store, they've been marked down to $3 a piece). Maybe at the time they did not make a strong enough case that the Pro tools were better quality than the regular $6 stamps? It seems they are keeping the Pro line of other tools, (edgers, chisels) or maybe I'm mistaken. Do you mean the boxed kits, or the small ones that come in plastic baggies? I haven't seen too much of a decrease in the baggy kits, though it would be nice if they brought back some of the older discontinued kits (but that's just me). Baggy kits can be tooled as much (or as little) as one desires. I think the acrylic template kits they sell now are overpriced for a piece of blue plastic (but I don't know much about how much it actually costs to produce something like that). @fredk I agree that there needs to be a new, modern take on tooling other than Celtic knots and Sheridan floral, niether of which really tickle my fancy. Personally, I am not even sure where to start with tooling. Yes, I could find an image or pattern from a book or the internet that I like, but I don't know which stamps I'd need to achieve it (e.g., maybe Art Deco or Art Nouveau). I guess there's the old "trial-and-error" method... -
It could be the tekonole (tokonole?), isn't that a waxy kind of substance? It would definitely affect dye penetration. If I may ask, why do you clean the leather with diluted lemon juice? If you have more of that leather that has not been lemon-juiced or had any products applied to it, you might test out a piece and dye it, to see if those spots appear. If they do not appear, then perhaps either the tokonole or lemon-juice is the culprit. You could experiment, by purposefully putting tokonole on the grain and then dye it to see what happens. Good luck!
-
This Art Form Is Going Straight To Hell
Alaisiagae replied to Reegesc's topic in Leatherwork Conversation
I didn't know that, Johanna, thank you for sharing. :-) Oleskiver, technically most of the tools are made in Taiwan, and any Taiwanese will tell you they are NOT China (despite China's claims). I agree that the tool quality is not super duper fantastic, but it's affordable enough for a beginner like me, and having a physical store I can walk into, ask questions, see and touch the tools, try them out - that's an experience I really enjoy. I do agree that it is frustrating when a craftaid or pattern calls for a tool/product that is no longer offered. I wish there was a way to just interchange the heads of the stamps on a single handle. -
This Art Form Is Going Straight To Hell
Alaisiagae replied to Reegesc's topic in Leatherwork Conversation
I'm glad Tandy offers beginner classes, but you're right, some more advanced classes would be nice. My local store primarily offered beginner classes and not as diverse a range of classes as some of the other stores (back when they posted the class schedules on the Tandy website for each store). Now with the pandemic, there are no classes anymore. My local store is also pretty small, so there could only be 4 or 5 (at most) people signed up for a class. I feel that the staff at my local Tandy store could use some sales lessons. I was in the store finishing up a class project when a guy walks in and is interested in leather and asks where to begin. One of the staff says that depends on what you want to go into, like armor, holsters and sheathes, or fashion bags. Me, I would have directed the fellow to an easy kit or asked him to sign up for a beginner class to dip his toes into leatherwork without having to commit to a butt-load of tools and supplies right off the bat. How could someone possibly know exactly what they want to specialize in when they have zero experience? In the end, the fellow walked out of the store without buying anything. That was a missed sales opportunity right there. -
Custom Laptop Bag
Alaisiagae replied to AndyL1's topic in Purses, Wallets, Belts and Miscellaneous Pocket Items
Stunning and gorgeous! Love the crest, and the bag is so neat and clean, too. You are very talented and skilled. -
Thank you all for the kind words, I'm definitely my own worst critic.
-
I bought a safety lighter to burn the ends of my waxed nylon/polyester threads (waxed braided nylon cord, primarily), and it's been working pretty well, despite the flame being a little unnerving. But sometimes I need to get into a tight corner and there's a risk the flame will singe the leather. I was browsing Amazon and spotted this on the related products page for a Thread Zapper, it's an electric arc lighter. Has anyone ever used one of these to burn their thread? Does it work as well as the old lighter method?
-
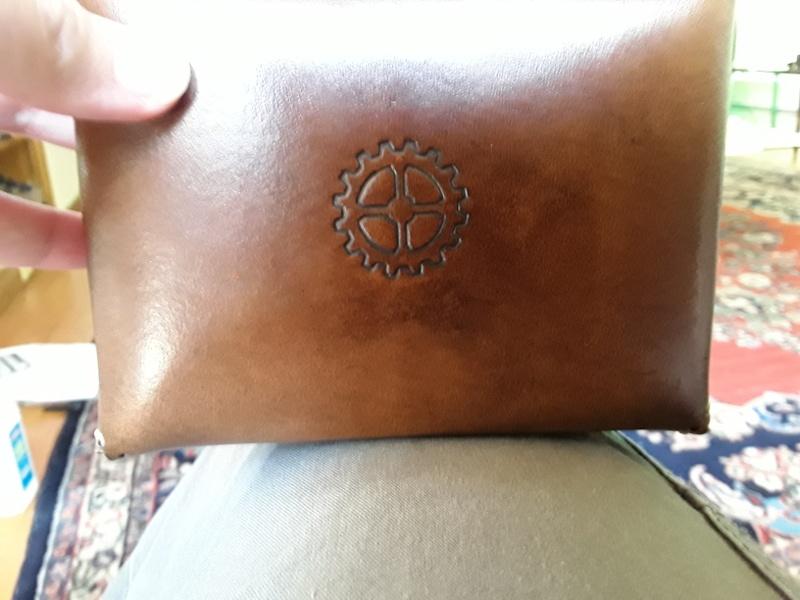
I had some scrap 6/7oz from a larger project and decided to make a small valet tray from it for my dad. I tried making some gouges on the inside so it'd fold up nicer, but that didn't work (maybe the gouge lines were too high). I also only used Tandy's Gel Antqiue (medium brown), with Neat-Lac as a finish. This was my first time using the gel on a project, and, wow, that stuff sure is messy - but I love how it highlights the tooling. There are other flaws with the piece - I don't think I cut the notches from the corners exactly equal (despite my best efforts), and, the letters are a bit crooked and the spacing not perfect, and that gear on the bottom isn't perfectly centered. My dad is an electrical engineer and likes trains.