PhilDimashq
-
Posts
24 -
Joined
-
Last visited
Recent Profile Visitors


PhilDimashq's Achievements
Member (2/4)
-
 Very nice. I made one myself recently
 -
Newbie query on lining billfold and making ID pocket
PhilDimashq replied to PhilDimashq's topic in How Do I Do That?
@Danne Hi Danne, I've seen some of your work on here and love your attention to detail, really outstanding. I recently found a tutorial of yours where you showed how you skive pockets and I've just started trying to use that method. In particular, I really like how you skive the bottom of the "arms" of the T.. when I saw that I immediately had a lightbulb moment.. think it's the solution for something that's been bugging me. Last project I finally clicked that the arms of my T should be measured for the SPI I'm using in order to line the irons up all the way. Big improvement but I could still see the T in the finished item i.e. the bottom of the arms was a visible line between each pocket. I'm doing a vertical card wallet this weekend and this time I've made the "arms" about 2 mm longer than I want. Then I've skived that 2 mm on the bottom of the T arms, and I'm overlapping each pocket by 2mm. It's glueing at the moment but looking promising and I've no visible gaps. Also this time have added about 2mm all round to my pattern and colour coded it - saw you doing this and really liked the idea. This should give me a decent trim allowance which had been something I was failing to do. In terms of my current project, I think the consensus is that the materials I have are too thick, but now I've a bit of leather to play with I'll make a prototype anyway. At the very least, it'll be some much needed sewing practise and will allow me to test the pattern and then make adjustments. I'll do some test pieces with the lining but I'd say gluing while curved will work, thanks for the tip. Given the issue with thickness, I'll burnish one side (great tip, thanks also) and line the visible side. It probably will be a phone book when finished so the next project could be making bigger pockets for my brother's jeans In terms of chevre, I've visited the alran website and there's a wide range available (oxford, caprino, chevranil etc.) I've no idea what I'm looking for so any advice on this would be great. Thanks once again for taking the time to comment and share your knowledge, All the best, Phil -
Newbie query on lining billfold and making ID pocket
PhilDimashq replied to PhilDimashq's topic in How Do I Do That?
@Hardrada Hi and thanks again. You're not hijacking the thread - far from it. I really appreciate you taking the time to share. I think my brother's wallet is pretty similar - they also "cheated" using fabric inside the card pockets etc. (he's not getting that zipper pocket by the way - that's just going too far !) Your photos with the vernier calipers really makes it clear how everything quickly adds up.. our wallets do end up turning into a hamburger (or a brick) pretty quickly !! I never thought of actually building a test wallet, which is a brilliant bit of advice. As I'm pretty new to this, I was approaching each project with the view that I should be producing a finished item. Then I'd adjust my patterns based on the result (the Mark I as I call them) so the next one would be an improvement. I had been buying smallish pieces and so was a bit "precious" about wasting leather. However, I bought what I think was a reasonably priced side a couple of weeks ago - €90 for 22 sqr feet. Now I've plenty to play with so I'll follow your example and make a prototype just to see what's what. I'll use the approach you recommended for the ID pocket too. Whatever way it turns out, it'll be valuable practice and a learning experience, In the long run, when I feel I'm getting reasonably good, I would love to try chevre and the nicer leathers such as those from baladassi. But for the moment, I need to keep building up my skills before I can inflict myself on the high end materials !!! I'm still waiting on the acetate for the pocket (aliexpress - could be a long wait) but when I have the wallet done I'll post it on the forum. Thanks once again, really appreciate the help and advice, all the best, Phil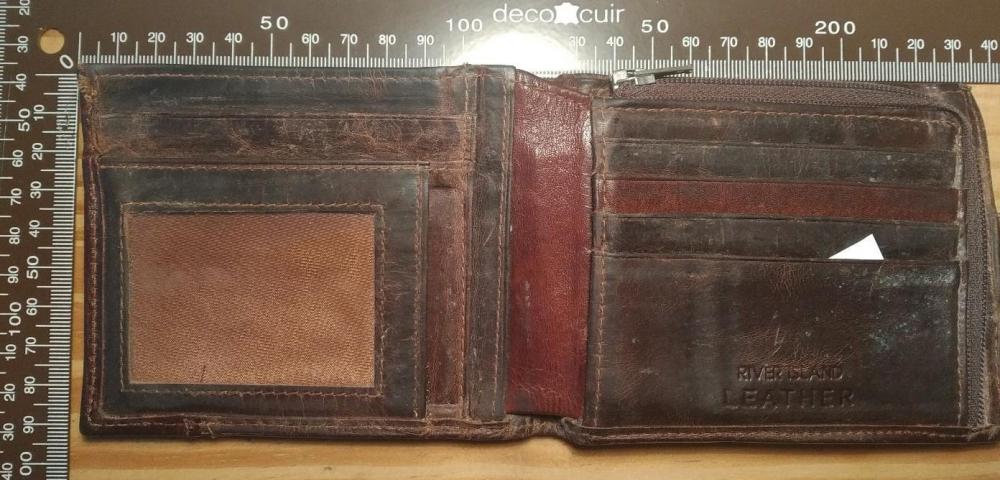
-
Newbie query on lining billfold and making ID pocket
PhilDimashq replied to PhilDimashq's topic in How Do I Do That?
@chrisash thanks -
Newbie query on lining billfold and making ID pocket
PhilDimashq replied to PhilDimashq's topic in How Do I Do That?
@Rahere thanks for the tip, I just hopped over to have a look Not much info on the site so I dropped them an email to see what they have, costs and so on. Thanks again, Phil -
@newshoes Hi there. I'm also a beginner (started in May) and the advice already given here is great. I found Valerie MIchael's book to be a good general introduction with information on a wide range of topics. She starts with the leather itself - types tanning, the names of cuts of leather, leather weights and what they're best for. etc etc. Then she goes onto the tools, other materials, hardware etc before getting into various techniques for leather work. There's also a few projects included for different levels of ability with patterns/instructions etc. A very good introduction. Al Stohlman's book on hand stitching is invaluable. Once I got my copy it changed how I sew, helped me notice and start to fix my mistakes. It's great for tips on what to do in situations that are tricky for beginners: things like running out of thread during a line of stitching or piercing your thread. As a beginner, I have found both the videos by Nigel Armitage and Ian Aktinson to be a huge help. They are superb at their craft and really good at explaining things. Both have very good videos on stitching which would be a good place to start. Other youtube sources that I have found really useful are Terrick from Chartermade, Yun from Leathertoolz and Chuck from Weaverleather. There are many, many more, but each of these has been (and continues to be) a particular help to me. A tip on youtube which I didn't know when I started leathercrafting. You can create your own personal playlists and then save videos that you like into them. So now I have different playlists set up for videos on different topics such as stitching, tools, tutorials, techniques and so on. Very handy, like having your own video library. Best of luck, Phil
-
Newbie query on lining billfold and making ID pocket
PhilDimashq replied to PhilDimashq's topic in How Do I Do That?
@fredk @Scoutmom103 thanks Fred and Scoutmom. I really appreciate your comments I was very discouraged when I came here just looking for advice and instead had someone attack the project I am trying to plan. Not what I expected, especially on my first post here. So thank you very much, I really appreciate your comments, it's restored a bit of my faith in humanity and this forum All the best @Hardrada Thanks for your reply. I would love a thinner leather but I'm in Ireland and the costs on ordering from RM are prohibitive. What I have now is the the thinnest leather that I've been able to source. However, that is 3 oz/1.2 mm, and if I was to make the ID pocket the way I think they're made, this would be three thicknesses of leather and as you say, impractical. But as I've never tried this before, I'm not sure if my assumptions on how to construct the pocket are correct. Maybe it is done with only two layers? Assuming you had the right materials, how would you make the ID pocket alone? Would it be three layers of leather? If yes, then I'll have to abandon that idea or the wallet will end up being like an old Yellow Pages phonebook !!! Also, any advice on my question re the lining would be much appreciated. Thanks again, Phil -
Latest card holder
PhilDimashq replied to Danne's topic in Purses, Wallets, Belts and Miscellaneous Pocket Items
That is super smart. I really like how the edge creases meet perfectly at right angles in the corners. And of course your edge painting - what can I say only exquisite -
Nice dye job.. did you do this by hand or with an airbrush ?
-
Newbie query on lining billfold and making ID pocket
PhilDimashq replied to PhilDimashq's topic in How Do I Do That?
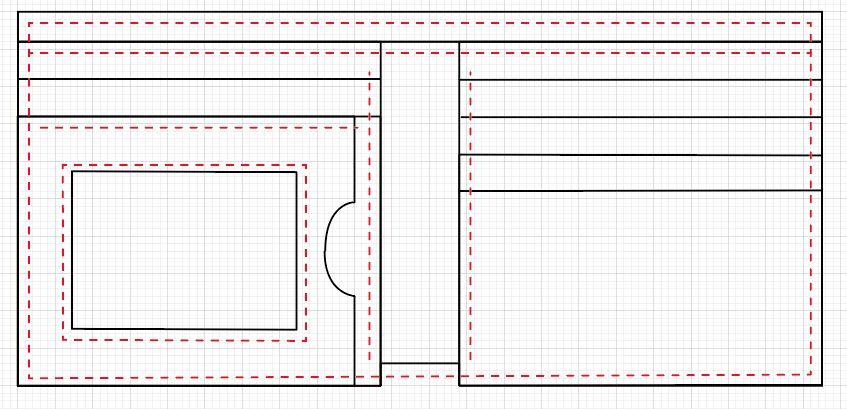
@Rahere thank you very much for your constructive comment. I've read great things about roo hide, but can't get any where I am at a reasonable price. There's going to be an ID pocket located as per my drawing because that's what my brother has asked me for. It would be so much easier to leave it out but I'm going to try my best to do what he wants. If anything, it will be another learning experience as every project is. I've just got veg tan, and it's about 1.2mm thick. If I had lighter leather, I'd take two pieces and cut out a window in each, then sandwich the plastic in between, sew around the window and that would become the front of the pocket. This would be sewn onto a back piece, making the pocket. However, when assembled like this the pocket alone will then be 3 layers and approx 3.6 mm which will be very thick. I don't think this will work and this is why I was asking for advice on the ID pocket. Still very new to this, and the wallet shown in my post is only my eight project and first attempt at a billfold. I have done my research, looked at lots of videos and spent hours looking at other people's work but sometimes you just don't find the answers. So I dropped my question in here hoping for some guidance. I'm also unsure whether to line both sides of the cash/bills pocket and the techniques for doing so. I've seen loads of examples of finished pieces but not much "how to" so any guidance on the pros/cons of doing this and/or techniques would be greatly appreciated. All the best and thanks once again, Phil -
New Wallet
PhilDimashq replied to CastleLeatherWorks's topic in Purses, Wallets, Belts and Miscellaneous Pocket Items
That is beautiful, loving those colours and the edges are just wow -
Belt bag and other bags
PhilDimashq replied to AbleToDream's topic in Purses, Wallets, Belts and Miscellaneous Pocket Items
I'm a newbie as well and I wish I could make something as accomplished as your work. Very impressive -
That is an outstanding piece of work.
-
Newbie query on lining billfold and making ID pocket
PhilDimashq replied to PhilDimashq's topic in How Do I Do That?
Understood. -
Newbie query on lining billfold and making ID pocket
PhilDimashq replied to PhilDimashq's topic in How Do I Do That?
Thanks again Mike.. that one looks so much better with the pockets spaced properly. I've drawn out my basic pattern now on the computer and the spacing looks fine. Just need to figure out how to do the lining and the ID pocket and I'll be good to go.