-
Posts
776 -
Joined
-
Last visited
Content Type
Profiles
Forums
Events
Blogs
Gallery
Store
Everything posted by Mulesaw
-
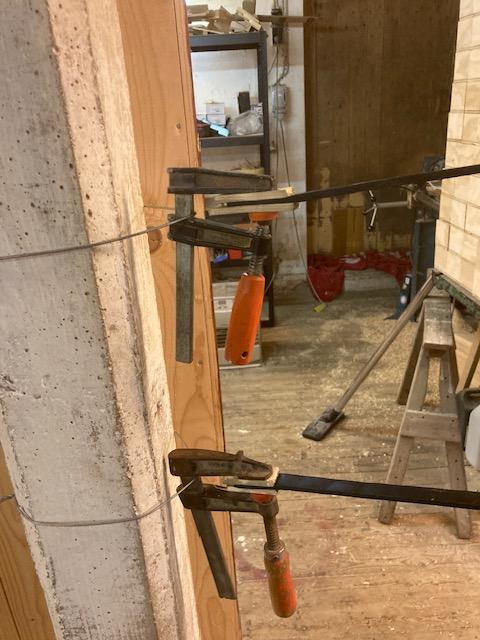
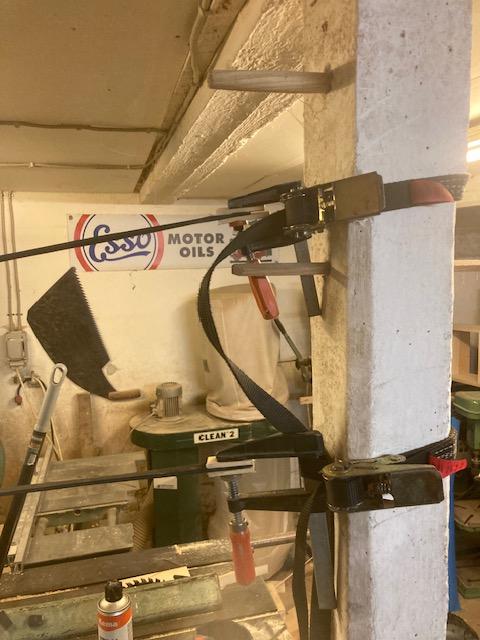
I had repaired a set of sliding reins for the stables where Gustav works, and I got inspired to make a set of sliding reins myself. The reins measured 2.5 m each (about 8' 4"), and they are basically just a strap of 5/16" leather with a carabin hook in one end and a buckle in the other end. So a very doable project. The hechte that I had was only 7' 4" long, so I needed to stretch it a bit to be able to get the desired length including bends around the carabin hook and the buckle. I soaked the straps in water for about an hour or so and left them in a plastic bag for casing during the rest of the day. In the evening I made a setup that allowed me to stretch the strapos uniformly. I clamped a small G clamp (woodworking clamp) on each end of the strap. I put small pieces of wood between the jaws to protect the leather a bit. The clamps on one end were tied to a post in the workshop, and the clamp on the other end was attached to a truck type lashing strap which was connected to another post. This gave me the opportunity to stretch the straps by slowly tightening the lashing straps. I alternated between the two straps, and occasionally I would release and reposition the lashing strap. Once I had reached the correct length, I stopped and let it sit over night. The next morning the leather had stretched and dried, so I could make the sliding reins (I forgot to take pictures of those)
-
The burr is supposed to be a tight fit over the shank. The tapered part is just to ease the mounting on the burr, so you get it through the hole before needing to "hammer" it in place. If you don't have a rivet setter, you can make one form an old piece of pipe (a small pipe), or you can drill a hole in the end of a lag bolt or something similar. The hole just needs to be a little bit bigger in diameter than the shank of the rivet. Brgds Jonas
-
@mbnaegle Here's a link to a free pdf on this site about building English saddles. The first link it dead, but the 2nd last comment from a moderator has a working link. It is completely different from western saddles, but reading a bit about different types can't hurt 🙂 I think it is universal - that it is only when we no longer have a parent, that we think about all the things that we would have liked to ask them about. But being able to touch and use some of the tools that our parents have left us gives a nice feeling (at least for me). Actually using some of my dads everyday tools is when I think about him the most. I guess there is such a strong connection/feeling through tools because it is one of the things that we see our fathers use when we are kids, and we watch him magically transform materials into something unique and beautiful, and somehow that feeling stays with us. Brgds Jonas
-
@mbnaegle the Stohlman encyclopedia of saddle making is a book that covers all. I have it and it is a great book for inspiration and reading etc. I haven't used it to build a saddle with yet since there are mostly European saddles in my area. I also like an old German book, but it is hard to read unless you are used to German and Gothic letters. (It is a reprint from around 1900). (Das Sattler, Riemer und täschnerhandwerk" There are other books that are advocated as good as well. If you search on this forum for books on saddle making, something will turn up. The Stohlman book will get you through the process every step of the way. Some of his methods have been mentioned in here to be different from what some use today, but I guess it is only natural that a craft like saddle making slowly evolves too. On another note: The tree for the Percheron looks amazing, I would hang that on the wall as well if itr was me 🙂 Brgds Jonas
-
@mbnaegle I can easily understand the lure of doing a project like this, but given that western saddles require a lot of leather and a lot of work, it might be better to purchase a worn saddle or a new tree that will actually fit a horse that either you have or someone else does. Making a "learning saddle" is a great idea, but making learning saddle that will be used is even better. If the purpose is to give you some experience to work on those heirloom saddles, then it would be great to know that the solutions you want to use actually work. And you can't really tell that if the saddle you are training on is just "going to look pretty" The price of the leather is going to be the same more or less, and also the work involved. But once the saddle is completed, it should fit a horse or a pony. It is quite possible that your small saddle will, but I would check with some local horse owners (if you don't have horses yourself), that the tree fits a horse that is regularly ridden. If it doesn't fit anything - then I would probably try to get a hold of another tree. I am not trying to discourage you in any way, (I have the same plan with some old English pony jumping saddles), but spending a lot of time and never being able to see the saddle being used would just be devastating in my opinion. Brgds Jonas
-
I'll second @Tigweldor, using a compressor has the risk of blowing sand/dust into places where it shouldn't go. A small brush used together with a vacuum cleaner would be my preferred method. Brgds Jonas
-
New pair of chaps with little flowers carved
Mulesaw replied to FrenchMich's topic in Clothing, Jackets, Vests and Chaps
Impressive as always! The yoke design is stunning, just like the carving. Such dramatic curves. Ands the rough side out just gives an excellent contrast to the ornamentation. Part of me thinks they look too nice to use, and another part of me thinks they should be worn 24/7 to spread joy to whomever is wearing them and those lucky enough to get a glimpse of the workmanship. Brgds Jonas -
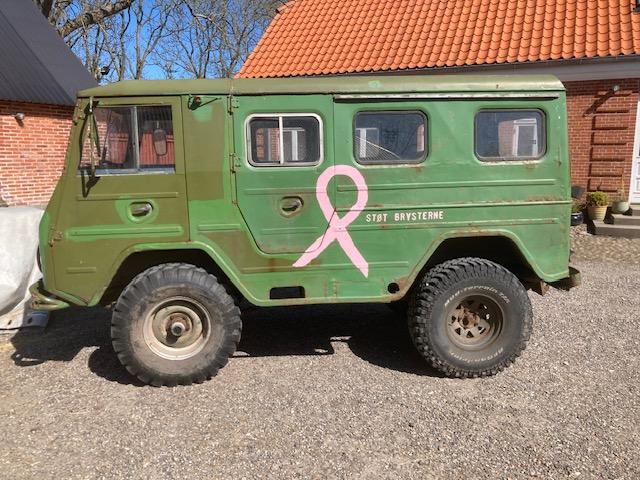
Apparently my lack of computer skills messed up the picture insert.. Here is another go: Here's my Valp, just after I painted the pink ribbon on it to support the fight against breast cancer. It is an excellent example of that the A in Volvo stands for Aerodynamics ;-) It has an exceptionally poor gas mileage, but it will go almost anywhere. At the moment it has a ruptured brake line, and I haven't found the time to fix it yet.
-
Here's my Valp, just after I painted the pink ribbon on it to support the fight against breast cancer. It is an excellent example of that the A in Volvo stands for Aerodynamics ;-) It has an exceptionally poor gas mileage, but it will go almost anywhere. At the moment it has a ruptured brake line, and I haven't found the time to fix it yet. IMG_4069.jpg 167 KB
-
fantastic looking rig! I especially like the details with the stamping on the cartridge loops. That is a nice touch.
-
Welcome, I think that a belt is a great starter project, since it is something that most people can use on an everyday basis. Brgds Jonas
-
First little project in a while
Mulesaw replied to Gezzer's topic in Gun Holsters, Rifle Slings and Knife Sheathes
My deepest condolences on your wife. The sling looks beautiful, the contrast with the light part around the letters looks really good. -
@donholloway Thanks, it is challenging to make stuff like that once in a while :-) Brgds Jonas
-
Working boots last making
Mulesaw replied to Larryvaan's topic in Shoes, Boots, Sandals and Moccassins
I think the commercial lasts (and the older ones that I have seen too) are thinned in the area to avoid the leather to become "bulky" after a little while. It the shaft sacks down it might push the leather out. But I suppose it depends on if you are using very thin leather or something with a bit of thickness in it. @Tastech most likely knows, He is a shoemaker, so I'd take his advice any day of the week :-) -
I have a 1967 Volvo L3315 Valp (meaning puppy), it is an ex Swedish military radio offroad vehicle. Sadly the Danish government is trying its best to make it difficult to drive classics or vintage cars. I also have a couple of vintage motorcycles. A 1962 Vespa GL 150 scooter, a 1973 Moto Guzzi V7 Sport and a 1978 Moto Guzzi Le Mans :-) Our youngest son has been bitten by the bug :-) and in the age of 18 forked out a wad of cash and bought himself a souped up 1962 Volvo 121 Amazon. IT still amazes me how it is possible to make such boring and bland cars today. I miss some curves on the body of vehicles. They all look very much alike those days.
-
ISO 1/2" stainless snap hook/halter snap
Mulesaw replied to TomE's topic in Hardware and Accessories
@TomE Yes it seems as though there is a bit of a rumble at the moment concerning tariffs.. I hope that you are able to get them without too much fuss. If all else fails, I'll be happy to order them and send them to you, but I guess it'll be the same result as Denmark and Czechia are both members of the EU. Another suggestion is to find a boat equipment dealer, They normally stock all kinds of things in stainless steel. It might be worth a try before unleashing the wrath of the import duty gods :-) -
ISO 1/2" stainless snap hook/halter snap
Mulesaw replied to TomE's topic in Hardware and Accessories
Pethardware in Czechia has got them. I tried to see Laederiet in Denmark, but they only got them in brass and this Zamak (zink alloy) https://www.pethardware.com/en/stainless-steel-snap-hook/stainless-steel-snap-hook-51mm-with-fixed-eye-2862/ I have ordered from them a couple of times and never had any problems. For some reason they list them according to total length, but just go for the eye width :-) They look a little bit different from the one you show, a bit more squarish in the shank, but that is the issue I can see. Brgds Jonas -
Beautiful work, looks almost too nice to use :-) I bet the customer is proud as a peacock when he/she is using them.
-
Skill Building for New Sewing Machine Owners?
Mulesaw replied to AEBL's topic in Leather Sewing Machines
I like to practice on off-cuts. They can have all sort of shapes, and putting two together and try to make a nice seam along the edge of one of the shapes is a great little exercise, and it only cost the thread. Brgds Jonas -
Really nice looking set. That knife would be a great EDC in my opinion. Hope the bidding goes high to help raise some funds.
-
If you are using the Tandy Horse tack accessory pattern pack, I just checked, and the sizes strike me as completely off. The upper part of the noseband alone for a full size horse, the pattern suggest a 24" strap. So I really don't think that you have done anything wrong at all :-) If you are making a halter for your own horse, try to take the measurements of an existing halter that has a nice fit. If it is going to be a gift for someone, go visit them in the stable and see if you can get a chance to measure the halter. Not knowing if you are a horse person, please be careful if you are going to do any measuring on the halter when it is on the horse. Some horses will happily accept that you measure a bit with a tailors measuring tape, others the exact opposite. So it is always best to measure stuff that is not directly on the horse. The patterns and instructions provided by Tom E are fantastic! I have made 4 halters using those patterns, and they fit the horses very well, and they look incredibly good. If you like the Tandy design, you could use Tom E's measurements and make a halter according to the Tandy pattern. That would get you something that will fit the horse. (Unless you are making it for a Shire / Suffolk Punch / Clydesdale). Brgds Jonas
-
Well thought out system! I was blown away by your collection of neatly organized stamps. I currently have 6 stamps, so there is still a long way to go for me :-)
-
Darn that looks good!! I feel like I cheated on my last belt using a sewing machine to make the stitching :-) Hand stitched just look better!. The copper/brass edging detail is really well thought out and executed. and the HF detail looks like it was glued on. Makins a silver soldering with nothing flowing out is not an easy task! I am going to take some of those Candian coins from the ship with me home, our own low value coins don't have any animals on them. I am looking forward to seing the finished belt. Brgds Jonas
-
They look incredible! Do you use them on belts for securing the buckle, or as ornamentation? Brgds Jonas
-
They look SO good!! What do you use for antiquing? I am getting tempted to try it out based on those beautiful conchos you just made. Brgds Jonas


