


Mulesaw
-
Posts
776 -
Joined
-
Last visited
Content Type
Profiles
Forums
Events
Blogs
Gallery
Store
Everything posted by Mulesaw
-
@Veriye I think that as long as you choose a fairly standard saddle tree, you should be able to sell the saddle afterwards. As long as it is a hobby, it is OK that it cost some money. So even if you are not able to sell the saddle when it is completed, you have learned from building it, and you have hopefully had a good time doing it. it is nice if your hobby can generate a bit oncome to covers some of the costs, but since it is "just a hobby", that shouldn't be the major concern. If you look at someone who likes to go hunting as a hobby, they have to pay for the hunting area and for a gun and some equipment. They spend countless hours and perhaps come home with a deer once in a while, so if you calculated the price of meat compared to the number of hours spent or amount of money spent on equipment - it would be really expensive meat. But the meat is just a biproduct of the hobby, and I think you should see your saddlebuild as a "biproduct of your hobby" as well. Just make sure you have a good time doing it, and enjoy every moment of the build. It doesn't matter if you spend 600 Euros on materials. If that is a project that can keep you happy and occupied for a year it is well worth it. Good luck with the saddle build. Brgds Jonas
-

What leather craft has given me in life.
Mulesaw replied to Beehive's topic in All About Us and Off Topic
I think leather crafting is a great way to leave your mark on this world! Some of the dearest things are those that have been made to us by others and gifted to us. I can't really explain the feeling of connection, but I think it is something with the fact that whoever made this or that did it with their own hands and thought of us while they were doing it. So if you make something no matter how long it takes, and give it to either a friend or a family member, those items will bring back memories whenever used. It is good to have you here. Jonas -
@Joost Many people here (myself included) are sceptical in clicking on links. So if you can take a picture or two and post, it will probably generate a response. Plus it will make sure that the thread will still be meaningful in a couple of years since links tend to go bad over time, and a picture in the post will still work :-) I haven't looked at the video/link, but if the curve is tight, it can sometimes help to make some relief cuts in the fabric of the zipper. Just cut straight in from the fabric side and leave maybe 1/4" of fabric next to the teeth of the zipper. That is how it is done on e.g. riding boots that have the zipper down the front to make it able to follow the curve of the foot. Brgds Jonas
-
@TomEThanks Tom As usual I forgot to take some pictures of the saddle before starting the repair job. But as far as I remember, the reinforcement strips were completely worn through in the middle. On some of the saddles I get to repair, only part of the stitching is damaged by abrasion, and then I just restitch that part. I haven't made tack to sell. I doubt that I would be able to. I know that I can't complete on price, and that is just such an important factor for most people over here. So repair jobs make up for the bulk of our work. I would love to be able to sell a triple stitched halter, but for the same amount of money most people will prefer to buy a brand name halter. No complaining, it is just the way it seems to be :-) I do pretty much the exact same thing with tapering over 1.5 - 2" depending on the article to be repaired. Some jobs I manage to sew on the patcher, and I can see that most tack is machine sewn originally, so I do it to speed up the process and make sure that the customers don't think the repair job is too expensive. A reoccurring repair is the buckle straps that are attached to the noseband of the bridles. It is no wonder that they fall off. Often the strap is scarfed really thin, and then it is sewn across the thinned piece. So the slightest pull it will part on the stitch line. I really like to make repair jobs on leather items, there is something very satisfying in lengthening the lifespan of a piece of tack to me. And it sure beats repairing then inner lining of a damaged winter horse blanket. :-) Brgds Jonas
-
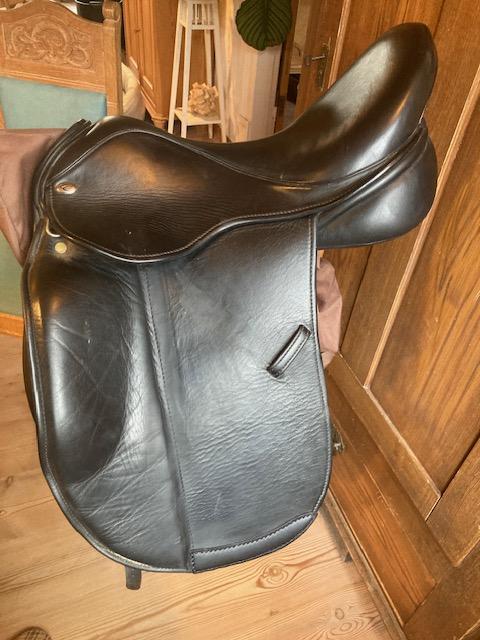
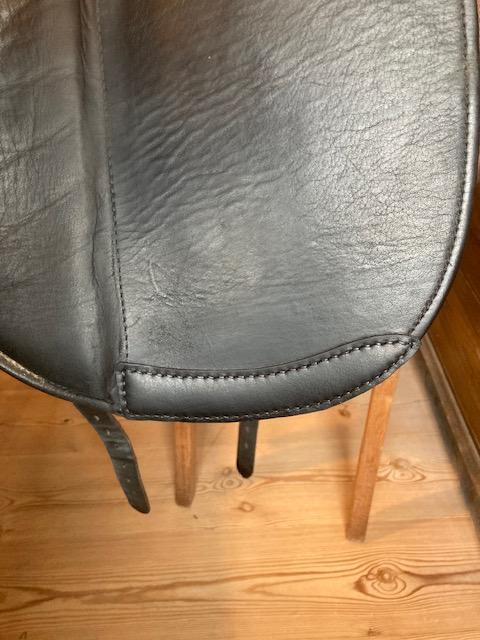
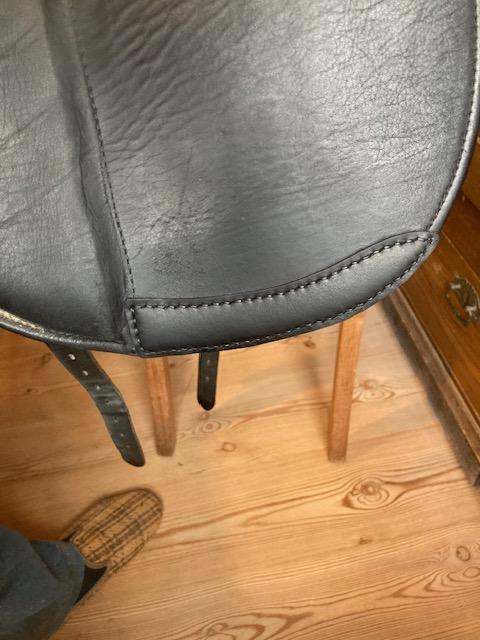
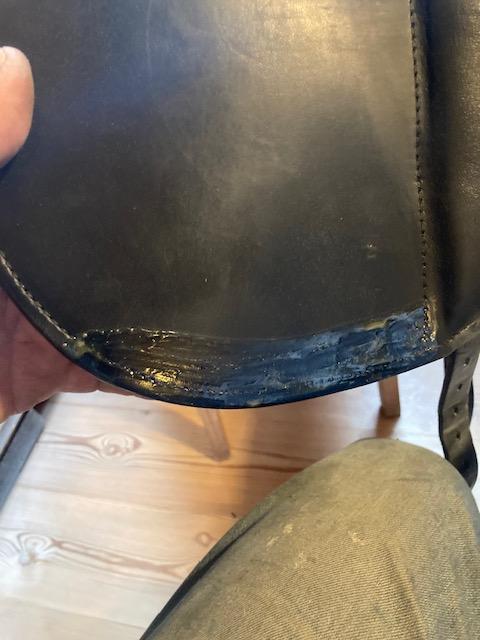
One of my clients had worn through the reinforcement on the lower part of the outer flaps on her Passier saddle. It is one of those damages that see fairly often. Mostly on dressage saddles. On this saddle I hand stitched on some reinforcements that were slightly beefier than the original very thin ones. The main cause of the wear on this saddle was inadequate cleaning. The client had oiled/greased the saddle very well, but riding in dusty conditions had caused the dust to mix into the grease that was left in the sewing and other nooks and crannies on the saddle. I tried to scrape of a bit and if I rubbed it between two nails, I could clearly feel that it was abrasive like carborundum. I started of washing the saddle really well, but technically I hadn't been asked to do that by the client, so I just did it on my own time to be nice since she is a good repetitive client. It helped some, but it could have needed an even more thorough cleaning. I was at a dilemma if I should tell her uninvited what I believed the cause was. I decided that if I was asked I would tell and show it, but otherwise I wouldn't. I would hate to sound condescending in case she did her best in cleaning already, and generally people (including myself) often get irritated if offered unsolicited advice. I really hoped that she would have asked, since I felt sorry about the fact that this damaged could have been lessened a lot with a rather simple job. @Goldshot Ron shared a great recipe for a simple cleaner: Water, ammonia, and a few drops of Ivory dish soap. I haven't tried it yet since I haven't had any saddles through my shop that required it lately, but it sounds like something that works really well, and equally important - it is a nice doable recipe without unicorn blood or ashes from volcanos as ingredients.
-
Leather lead with stallion chain
Mulesaw replied to Mulesaw's topic in Saddle and Tack Accessory Items
@Goldshot Ron Thanks Ron, I find that the problem with some of those saddle repairs is that my fingers itch to make a job, but the reality of the economics often prevents a correct proper job. I'd have do be completely sure that the customer would be OK with a hefty price, before starting on something really big. But the challenge of doing it is luring me like the song of the Sirens :-) @jcuk Thanks, this chain was the only one they had available at the local tack store. I got home from the ship on the 19th of December, so I had to make something fast for it to be ready for Christmas :-) Brgds Jonas -
Thanks, I think it'll hold up for a season or two :-)
-
Leather lead with stallion chain
Mulesaw replied to Mulesaw's topic in Saddle and Tack Accessory Items
Ouch.. No, those tears are for some weird reason not that common on the saddles that I have been tasked to repair. I would also not rely on glue to hold a patch there. And I would be afraid that If I attached a patch, it would sort of gnaw in your inner thigh, and probably cause a blister really quick, at least if the edge eventually fold over a bit. I think I might have repaired a similar tear once, but I don't think I ever took any pictures of it. It was a breaking in saddle, so it got a lot of beating, and they weren't that concerned about the looks. That one I repaired by making a baseball stitch. I didn't get any complaints about it, and it ended up looking fine. That would still be my suggestion for this saddle. It will blend in far better than a patch on the outside, especially if you find some light brown thread. Plus it is an inexpensive and fairly fast repair. You could use either curved needles or regular saddlers needles for the job, and a small awl to make the holes. Another alternative would be to cover the entire seat with a new piece. It would probably benefit from a bit of wet forming first. Next cut it out so it follows the original sewing line. This is then stitched to the stitching line. The new stitches should be stitched to the existing stitches, not through the leather (In an effort to make it as fast as possible) This would still be faster than replacing the seat, but I think it will be difficult to make it look really nice, and also getting a curved needle through every 2nd old stitch might not be a walk in the park. It is always a dilemma if the saddle can justifiably be repaired taken into account he price of a similar saddle with less wear. I picked up 2 tiny pony jumping saddles a couple of years ago with the intention of completely refurbishing them. Mostly to learn from the process such as methods and how long time this and that would take, and how difficult each operation would be. But I haven't found the time to get much further in that project. Over here, very few (if any) old English style saddles could bear a repair job that would be so costly. There are loads of old well used saddles to be had for a reasonable price. And most of the new and really expensive saddles just don't have those wear related damages. Good luck with the repair job. Brgds Jonas -
Leather lead with stallion chain
Mulesaw replied to Mulesaw's topic in Saddle and Tack Accessory Items
Hi Tom, I have repaired the lower part of the saddle flap, I think it might be the same repair job you are thinking of. (the lowest part of the saddle where the inside of the riders leg touches the saddle flap.) I'll try to see if I have some pictures of it. If I do have those picrures, I'll just make a new thread about it. Brgds Jonas -
Thanks, I used a small lunch plate as pattern, just marked around the circumference with a silver marker. I placed a square so both curves would start the same place. I had to try a few different plates first to find one that would give a nice looking curve. :-) Brgds Jonas
-
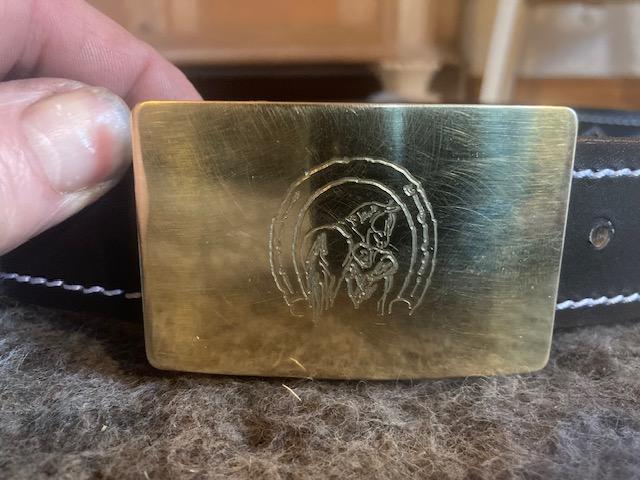
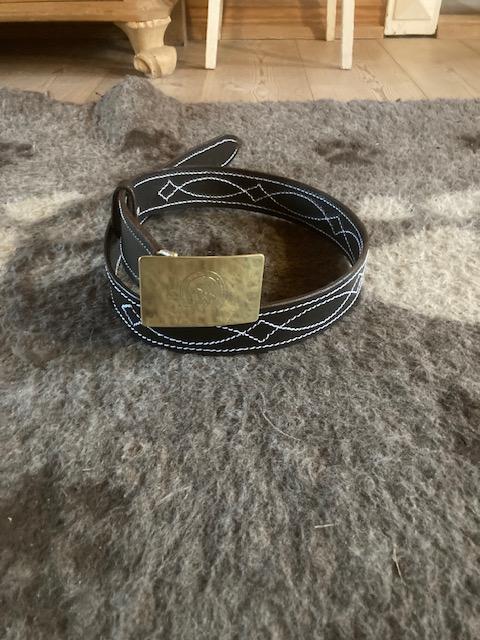
The engraving is not very deep, so I am not sure it would have stuck very well, but I see what you mean :-) I think that as soon as the buckle tarnishes a bit, it will stand out a bit more too. A very shiny surface for some reason seem to lessen the effect of the engraving (or it could just be lack of photographic skills :-) Brgds Jonas Thanks Tom Glad that I could spark a trip down memory lane. And thanks for the nice comments about the belt.
-
Leather lead with stallion chain
Mulesaw replied to Mulesaw's topic in Saddle and Tack Accessory Items
Hi Tom Patching a hole like that is something I do every once in a while. Here's my method: I take some thin leather of the correct colour - around 1 mm thick (2 oz), Make a paper pattern for the patch. The worn area tends to be kind of elliptical on the boots I have made. Trace the pattern on the boot and on the leather. Skive down the sides of your small patch over a width of 3/8" to very thin at the sides, to make a fairly seamless repair. Sand or rough inside the marking on the boot so the glue will stick. Maybe even wipe the area down with some thinner (some people drench their boots in oil). Apply contact glue to the patch and to the area on the boot. Press/hammer it in place when the glue is dry. Sew around the patch, I try to aim for 1/16" from the edge for the first round. Next make another stitching about 1/8" from your first stitch line. I just checked my phone, but for some reason I have never taken any pictures of those repair jobs. I can try to make an instruction with pictures in how I change a zipper. There are a few tricks that I have picked up along the way that have helped me. Brgds Jonas -
Repair of leather edge on Louis Vuitton bag
Mulesaw replied to Mulesaw's topic in Satchels, Luggage and Briefcases
Thanks, it is a bit daunting to repair a bag like that, but it really couldn't get any worse on the edge. So I braved myself and did it. Pig skin is really nice to work with I think. Brgds Jonas -
@Beehive I can see that those would look great on a buckle. I don't know where I'd get a doming block in Denmark.. It is strange, but some tools are just not quite as readily available over here compared to in the USA. But I guess I could turn a piece of hardwood to make the block, and then find a steel ball og something else to help me with the shaping. I just looked in my desk drawer here on the ship, and there are some Canadian coins, one with a caribou and one with a beaver. They could work I think. The Danish 50 øre (half a crown) is a copper alloy, around the size of a US nickel might work, but it is not very pretty. The Danish 1, 2 and 5 crowns look nice, they are silver coloured but the all have a hole in the middle, so I am afraid that would look strange. The 10 and 20 crowns are doubled in thickness and are brass coloured, they'd look good too if they weren't so thick. I think I see a coin doming experiment somewhere in the future :-) Brgds Jonas @jrdunn Thanks a lot :-) Brgds Jonas
-
Leather lead with stallion chain
Mulesaw replied to Mulesaw's topic in Saddle and Tack Accessory Items
@DieselTech Thanks, I don't know how he does it, but his stuff just looks SO good! -
GO AHEAD :-) I'd love to see a domed coin.
-
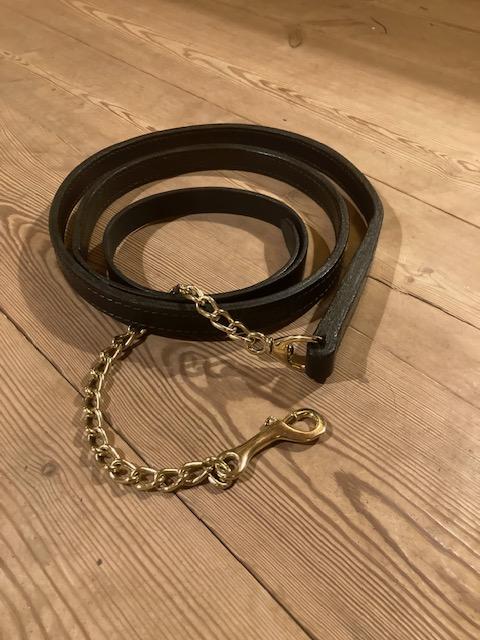
I was once again inspired by @TomE, but at the moment I can't find the post with his beautiful work. For Christmas I made a leather lead with a stallion chain connected to it for Gustavs girlfriend. She is an incredibly skilled dressage rider, and like all the dressage riders I know, she prefers her tack to be black, so that kind of dictated the colour of the lead rope :-) I have to admit that I have forgotten some of the details since it has been a couple of months since I made it. But the strap is 1" wide, I think the total length is close to 8' including the chain. The lead rope is doubled part of the way and ends up being a single layer of leather near the end.
-
@Herbie Thanks for the kind words. Brgds Jonas @DieselTech Thanks, the silver soldering could have been a bit nicer, but I doubt that anyone will ever notice unless they look at the back of the buckle :-) Brgds Jonas
-
@Beehive Thanks for the nice comment, I would like to accept the dare, but I have absolutely no idea where I'd get hold of a Mexican coin :-) I am a bit curious, do you mean like just solder it to the front of the buckle, or should it be used to connect the buckle to the belt? (I'd love it if you have a picture of something like it) Brgds Jonas @chuck123wapati Thanks Chuck, I always find it is a good indication of a decent job if I kind of want to keep it myself :-) Your friend Jonas
-
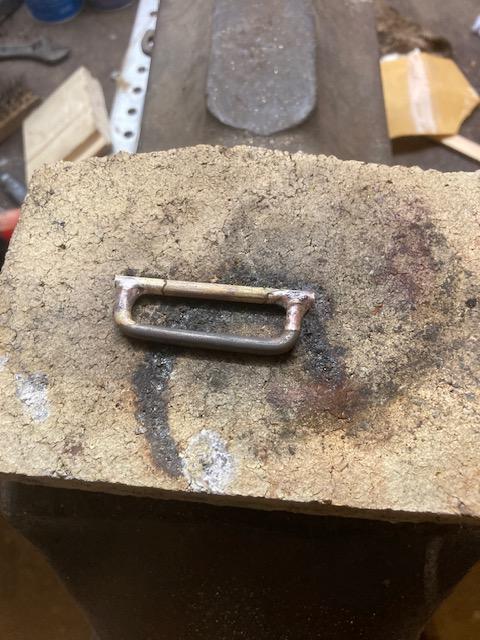
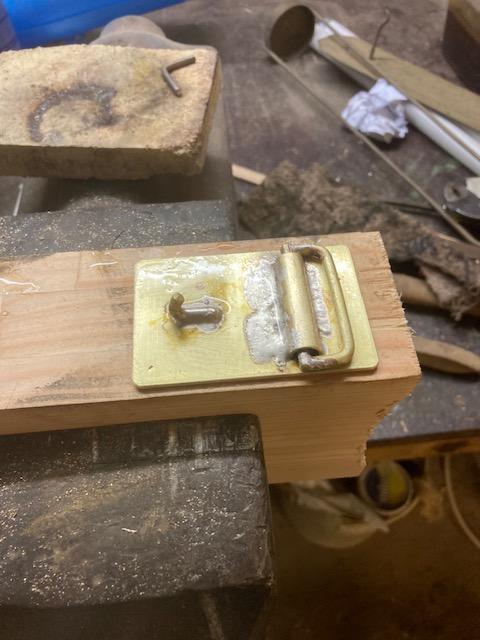
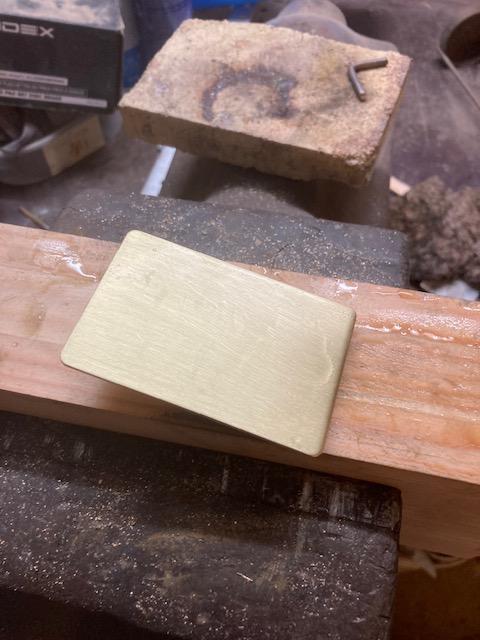
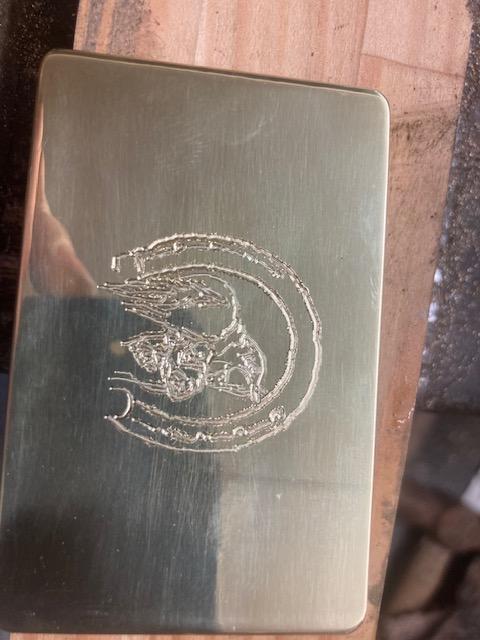
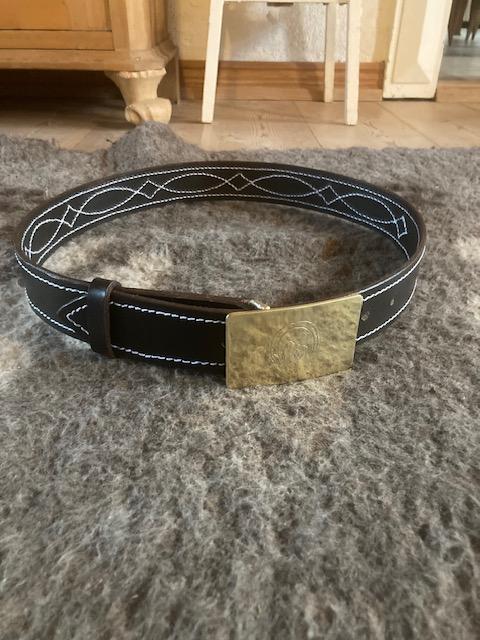
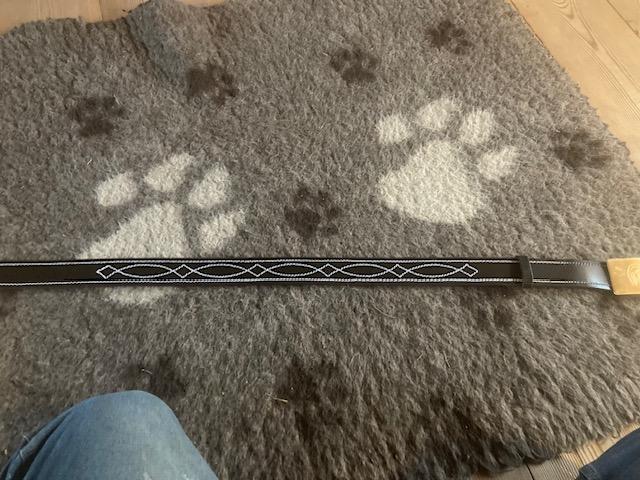
The farrier that shoes the horses in the stable where our oldest son works is into western riding. He is a really nice guy and our son asked if I could make him something for Christmas, just as an appreciation. I agreed and decided that making a western inspired belt would be a nice gift, and something that could actually use. I find that a 1.5" wide belt fits most pants such as jeans etc, so that was the size I ende up making. My idea was to buy a non decorated buckle that I could engrave with something farrier like, but since I couldn't find a buckle like that I ended up making it myself from scratch. The sewing on the belt itself was done on my old Singer class 7. The finished buckle mounted on the belt. The decoration of the belt itself. The leather isn't black, but rather a dark brown. The belt buckled up. Below are som pictures of how I made the individual pieces of the buckle. Silver soldering the part that attaches to the end of the belt. The belt attachment part and the buckle and prong now silver soldered to the buckle itself Front of the buckle with a light sanding and cleaning. Straight from the pantograph engraving machine (I used a picture as model, I can't do free hand engraving so it looks good) Buckle polished and slightly curved

-
Hi, Would you ship it to Denmark? Brgds Jonas
-
Help with fixing an old Adler 30-1
Mulesaw replied to AsItTurnsOut's topic in Leather Sewing Machines
I think the reason for the state of the long shuttle drive is that it is a homemade piece. My best guess is that someone made the rack themselves and soldered it on. The original one was probably hardened, and the homemade one wasn't hardened the same, that's why there is so much more wear on it, and also the shape of the gullets in the teeth are different from the short rack. But the good thing is that if you are a bit handy with a file, you could make a new one yourself again, just like the previous owner did. If you only use it for an hour a day, it would most likely last several years. I would use the short rack for marking the new teeth to match the correct profile. If you purchase a small propane torch for doing silver brazing, then I'd use that one to heat up the needle bar before trying to straighten the bend out again. I don't know where you found the Adler, but I just checked Kleinanzeigen.de and searched for Adler 30-1, and there's a bunch of them. Including one vendor who is selling parts. If you have a car it might be cheaper/easier to buy an extra machine to get the parts from compared to getting the parts individually. (It looks as most of the vendors won't ship the machines they are selling). Good luck with the repair. Brgds Jonas -
I got a lot of really good tips after I made my first set of chaps. If you look at this thread: There are a lot of good suggestions, from how to orient the patterns to get the least amount of wrinkles, to video suggestions etc. Have fun making them. Brgds Jonas
-
Searching for an odd machine oil. Assistance.
Mulesaw replied to HondoMan's topic in Leather Sewing Machines
The closest from the top of my head would be a hydraulic oil like Castrol AWH32 or something similar with a viscosity of 32 cSt. But I know it isn't exactly what you asked for. Another alternative is synthetic lubricant for refrigeration compressors. Hanseline produces a fine sewing machine oil, it is made in Germany, and you can get it in 0.2 or 1L bottles (I don't know how much your machine needs). I have used it for my sewing machines and been very satisfied with the performance. Nadel24.de sells it for 2.98 Euro for a bottle of 0.2 L, I normally buy a bottle or two whenever I stock up on needles for the sewing machines. Grüsse aus Dänemark Jonas -
Antler and copper rivets look SO good in my opinion, and the size and shape of the blade seems to really complement the entire knife. Well done!!