


Mulesaw
-
Posts
785 -
Joined
-
Last visited
Content Type
Profiles
Forums
Events
Blogs
Gallery
Store
Everything posted by Mulesaw
-
@TomMeyers If it works I can't see anything wrong with that. I think it will take bit of experience to make it easy and look nice, but so does most things. A saddle stitch makes sense to use where it is needed due to strength. But for purses I doubt that there will be much risk at stake should a stitch fail. So I definitely think that you should go for it. Brgds Jonas
-

Source for engraved metal hand bag label
Mulesaw replied to goober's topic in Hardware and Accessories
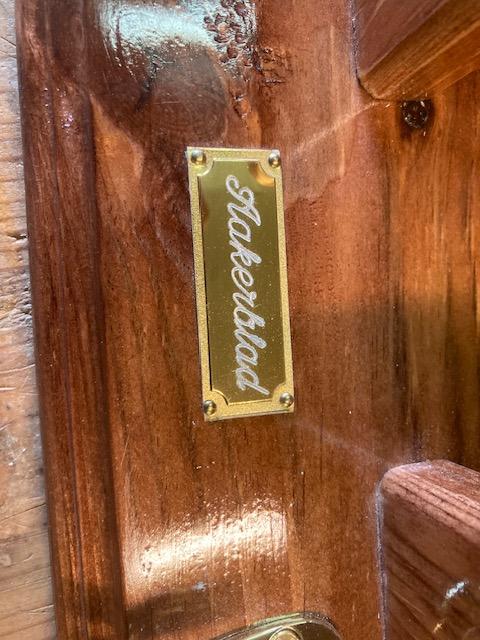
I think you just need to find someone in your area that does sport trophies. In Denmark they normally do engravings, and they would most likely have different types and shapes of small brass plates, that you could get anything engraved on. Again I don't know what the tradition is in America, but other shops that could do it would be jewelers or those shops that make dog tags and cut keys etc. If the shop has got a pantograph engraving machine, they can engrave any shape that you desire. I have got one, but it might be a bit easier to find someone local that you can talk to directly :-) The machine can reduce an image easily, so if you draw your logo say 4"x4", then the machine operator simply follows the lines and the engraving head makes an exact reduced copy of it. My machine can reduce 8 times. So if the original is very large and you need the engraving to be on a tie tack, then you could always reduce it in two steps. Here's a name plate that I engraved for a custom made headstall holder for a customer. Here's a closeup of the engraving. Brgds Jonas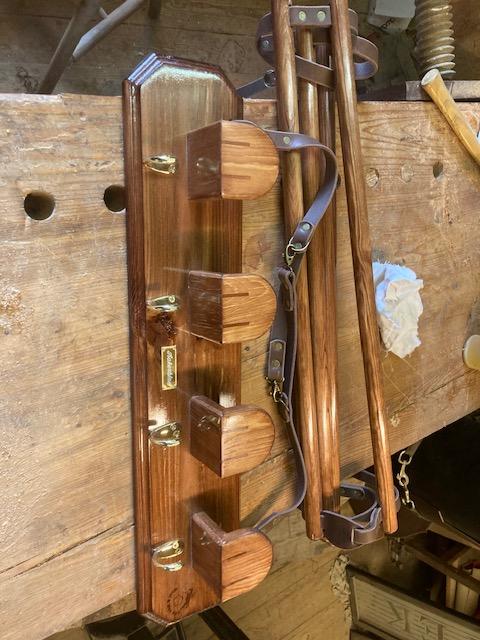
-
@TomE Hi Tom, I just got back to the ship today, and while I was at home, I looked in the old German saddler book regarding the use of pitch/tar on rivets - but I couldn't find anything mentioned about it. My best guess is still that it was done for some sort of water proofing. I have seen some old leather gear that was made using iron rivets and iron buckles etc. They often tend to get damaged when those things start to rust. So perhaps the original maker of the surcingle wanted to make sure that it didn't happen even though he/she used copper rivets. I think that if you used iron/steel rivets, coating with tar would effectively seal all the "end grain" in the holes that you punched to insert the rivet. But is is still puzzling. Brgds Jonas
-
@TomE Really nice job. There is just something about nice fluffy new fleece that looks attractive :-) I have always liked those halters that are completely covered in lambs fleece. They just looks so comfortable. Brgds Jonas
-
Morning, and welcome to the forum :-) I am pretty sure that it is described in "encyclopedia of saddle making" by Al Stohlman. I am not near my own copy at the moment, so I can't check it out for you. But as far as I remember, the saddles that makes in the encyclopedia are all made using hand stitching. Generally what I have found while repairing saddle skirts (on English type saddles), the most important thing regarding the look of the saddle is to be consistent with the tension and the position of the awl and the thread in the holes. So I would guess the same applies to a western type saddle. There is an entire sub forum assigned for saddles and tack, you could try to look there as well to see if there are some tips and tricks regarding skirts. https://leatherworker.net/forum/forum/62-saddle-construction/ Good luck. Brgds Jonas
-
Very interesting. My initial thought is that it was done to waterproof it. In the 2nd book of the "little house on the prairie" series (I think it is called farm boy in English), Almanzo's family get a visit form an itinerant shoemaker. He uses some tar to impregnate the sewing thread to waterproof it. But then again there is a difference between a rivet and a stitching. I'll try to look in the old German book when I get home, to see if there is any mentioning on pitch/tar. Brgds Jonas
-
That is really a nice looking press. I think I know how you feel with that wire coil heel attaching machine. Those old machines that are purely mechanical are small engineering marvels in their own right. And it is cams and levers that do all the job. Absolutely fascinating to watch. I am looking for a mechanical heel press, and a boot shaft enlarger (probably not the correct name), but I also try to tell myself that I should build some more knowledge about the process before building a bigger tool collection :-)
-
@rac1812 That HD machine sounds like a beast! Could you please take some pictures of it, if you decide to borrow it for the sewing? (Just out of regular old fashioned curiosity and interest in old machinery :-) Cleaning and setting up is still easier and cheaper than driving a long distance to get a new machine. Who knows, perhaps he'll even be willing to sell the machine to you? Most of those old machines can be taken apart in more manageable chunks, If the head is separated from the table, perhaps it could be possible to get it out of the basement. Provided that he is willing to part with it off course. Good luck Brgds Jonas
-
@Tastech That slide hammer looks fantastic! A couple of days ago I watched an English cobbler on Youtube who used one, though his was not nearly as good looking. I thought that I could try to make one myself some day. Do you think that any regular cobbler/shoemakers supplier have got those special nails? Brgds Jonas
-
How about some granulated cork? You could get a couple of sanding blocks at a home center and then "grind" them up. Maybe use something like a really coarse file/rasp to granulate the blocks. I don't know if you can get readily granulated cork, but it might be possible. Coarse sawdust could also be a solution, though I think that cork will result in a softer product. Sawdust/chips pack pretty hard. Mind you that I have absolutely no experience with bucking rolls, so I am just suggesting based on what I would use for something like that. Brgds Jonas
-
I wish I could (go home and fix the boot I mean), but I have a feeling that there will be a bit of an explanation to the office and the rest of the ship in case I clear off, but I'll go home on Wednesday, so I can see an end to it :-) I think I have a lasting plier at home somewhere from all my dads tools. I just have to see if I can find it. then I could really get going. Brgds Jonas
-
Darn those look nice. Tools that have been passed down from master to apprentice is just so impressive compared to the general tendency of today with things being thrown away so quickly. Thanks for sharing your knowledge with us, that is further proof of just how great a forum this is. Brgds Jonas
-
LOL Yup, we are fuzzy customers indeed :-) I don't know if the thread should go under "leather tool", or if should be put in "Shoes, sandals, boots moccassins"? technically it is a thread about the tools, but I think it would give more meaning in the foot wear sub forum. Maybe one of the moderators have an idea where to put it :-) Heck, all this footwear discussion have made me want to go home from the job straight away and fix a couple of riding boots right away
-
I think you would have to find the same type of elastic that goes into making elastic girths for horses. I purchased a roll of 40 m from a company called H. Seal Elastics in England. They were the only company that I could find that produces this type of elastic. But you don't have to invest in a complete roll. Often it is much cheaper to buy a brand new elastics girth at some outlet, and then cut it up and use it for spareparts. Once every year or so, the local riding school has a flea market, and I try to go there and buy old girths and other horse tack items, just to get the buckles and such for spare parts. That could also be a solution for you, at least that way you won't have to invest a huge amount of money on a prototype. I am not in any way familiar with tack shops in the Los Angeles area, but you could just go to a tack shop and look at the different bell boots and splint boots they have on display. That could give some inspiration. Veredus makes some very good splint boots. And I am sure that there are other good brands out there as well. It also comes down to what the rider like and what will fit the horse perfectly. A ratching buckle is an interesting idea. You might want to test the sound first, by touching the horses leg and closing the buckle. Some horses are more sensitive to new sounds as others, and if the horse's brain thinks it is a sound associated with danger, it will be a risky business to put on any equipment with that sound. It is not to discourage you, but it would be a pity to have spent a lot of time and made a set of tack that can't be mounted on the horse once it is completed. Brgds Jonas
-
@elnedro I think I might have a "pattern" for splint boots at home (I am at at ship right now for work). It is from an old German saddler book. As far as I remember, it's pretty much just a drawing, but it might give an idea of how to make it, The book is a reprint of a really old book, so the closing mechanism is simply small straps and buckles. You could put the straps or the buckles on some elastic straps, and then you'll get pretty much the same effect as with a modern velcro closure. The book is so old that the sizes might not fit a modern horse. I made a halter where I followed the suggested sizes, and it didn't fit my wife's horse at all. So my best suggestion for splinter boots would be to ask your friends if they have a set that they are going to throw out anyway, and then cut them apart and use them as patterns for a leather version. You'll probably need to add some extra space for stitching but you would still end up with something in the ball park of what will fit their horse. I found those by Googling, they feature regular straps and buckles combined with elastic straps. https://www.cactusropes.com/gear/leather-splint-boots.asp Brgds Jonas
-
@MasonLikesLeather I forgot one important tool that you also need for making a belt: A hole punch. It can either be a revolving model or one that you hit with a hammer, but you need something to make holes in the belt for the prong of the buckle. In your other post, you show some cuffs, if that is the thing you would like to make, then you can get far with leather, a hobby knife and a hole punch, plus a hammer and some rivets. My dad liked to buy old veg tan leather in thrift shops. He would buy old veg tan leather bags and cut them up and use the leather for small projects like knife sheaths etc. The leather shop that is nearest to my place sometimes have leather scraps in a bag where you pay per pound. The problem here is that you might not be able to make very big things, but for some projects that can also be ok. A sheath for a pocket knife or a favourite chef's knife is also a fine starting project. Like @SUP mentioned, you haven't told where you live. You can put that information on your profile, and that really helps people who will give advice on stuff like where to get leather or supplies or tools or classes etc. I could point you out to some great classes at Laederiet in Denmark, but if you live in Oklahoma or Alaska, that will most likely not be of a great deal of help :-) Brgds Jonas
-
Welcome to the forum. The easiest way for us to give you advice would be if you start by finding out what you would like to make :-) The tools, materials and techniques will be wildly different depending on what you would like to make. That aside, I think the best move is to make something that you can and will use yourself. A belt is in my opinion an excellent starting project. Materials needed: Leather strap Belt buckle Thread in a colour that you like. Tools needed: Leather needles (2 pcs.) Diamond shaped awl Hobby knife A block of cork that you can use as backing when making the holes. Watch a Youtube video on how to make a belt and then get to it :-) Good luck Brgds Jonas
-
@Tastech Great stuff! Could you make a new thread about it? Just so we don't completely hi-jack the opening persons resole boot thread, Also if you make a "tools for shoemaking" thread, it will be a heckuva lot easier for someone to find it in the future :-) Brgds Jonas
-
Thanks for the tip, but I'm already using a synthetic thread :-) it is Amann Serafil tkt 20, but once in a while it just seem to fray more than others. It isn't a super big deal though. It could also be my brand of velcro that has particular sharp ends, but it isn't a big enough problem that I want to a lot about it :-) Brgds Jonas Brgds Jonas
-
Replacing velcro is easily done (if you have a sewing machine). I repair a lot of horse tack, and replacing velcro is a reoccurring theme. I use a patcher sewing machine to do it, and the biggest "problem" is that once in a while the sewing thread will become frayed while sewing on the male part of the velcro, but I just restart the stitch then and that's it. Brgds Jonas
-
@elnedro This thread: @Silverd made some absolutely stunning bell boots. He very kindly sent me some pictures of the process, though I hate to admit that I have been too busy renovating an old house to get started in making them. Brgds Jonas
-
@Mocivnik Laederiet in Denmark are inside the EU, and they are really helpful. You could send them an email with the picture, then they can probably identify it for you. https://www.laederiet.dk/kundeservice/ is the customer service page. Brgds Jonas
-
Is there any sort of museum nearby who happens to have a class 7 Singer or something equivalent standing around that you could maybe be allowed to use? Or how about the local Canadian Armed Forces? It couldn't hurt to ask them, if they still have a repair shop for stuff like that, and if they do still have a heavy duty sewing machine, I couldn't see it hurting anybody that you sewed your canvas on it. It isn't like you are asking permission to gain access to the fire control center of a frigate :-) Or a local tarpulin / canvas shop might have some old heavy duty machinery standing around that they rarely use anymore. You could ask if they would be OK with you doing the sewing and paying them some sort of fee for using the machine. A third option is to ask in here in a new thread if anyone in your area has got a heavy machine that they'd let you use. I'd be happy to let you use mine, but due to the distance it won't help much. But if someone else has got something standing around it might be worth asking. Brgds Jonas
-
I'd see if I could find someone local who could do a hard soldering job. So either silver solder or bronze solder. Silver soldering can be done using a Mapp torch, and it is incredibly tough and it works on most materials. Someone installing air conditioning plants or refrigeration machinery tend to use silver soldering a lot, so if you have some local company that does that it might be worth giving them a call. Good luck with the repair job. Brgds Jonas
-
Spot on! Without intention, I can see that I am slowly getting into more and more shoe/boot repairs. I change the zippers in riding boots regularly, but people have started coming with other boots and shoes as well. I haven't tried to resole anything yet, but I hope that a bit of sound judgement and YouTube will get me a long way when that time comes. Some of the repairs are so simple that I wonder if people have lost all ability to repair even a small stitch that unravels, but I think that it might be a general false assumption that you need this or that special equipment to do even the smallest repair job. When truth be told, a needle, some thread and a pair of pliers or a thimble could get you a long way. But I can see why even the arcade cobblers will close up shop: If people can buy a new set of shoes at a price that is maybe 2x the price of getting a new heel pad glued on - well then most people will just do that. Also a lot of new shoes aren't made in a way that allow much to be repaired. At least that is a good thing about the riding boots. Many are still well made, and they are so expensive that people take care of them and are happy to pay to have them repaired.