


Mulesaw
-
Posts
785 -
Joined
-
Last visited
Content Type
Profiles
Forums
Events
Blogs
Gallery
Store
Everything posted by Mulesaw
-

Repair of Scharf freedom girth
Mulesaw replied to Mulesaw's topic in Saddle and Tack Accessory Items
Maybe some parents don't really understand that while a pony is smaller than a horse and it looks nice and behaves nicely, it is still 350 kg of muscle that can do some serious damage to youngsters and grown-ups alike. So far I have only had stable rugs that I have had to say I couldn't repair. But that was also for Katrinelund, and they are totally cool about it, I could technically repair them, but if I estimate that the work involved would exceed the value of the rug, then I just lay it aside and use the hardware as spare parts for their other rugs. Brgds Jonas -
Repair of Scharf freedom girth
Mulesaw replied to Mulesaw's topic in Saddle and Tack Accessory Items
I think you have a very valid point in the importance of checking the tack is a safety issue. The cracks in this girth elastic started in the "underside", so unless you actively bend them backwards you won't see them until one of them snaps (like this one did). So I guess that even though she maintains her tack well, I have to tell her to check it more thoroughly :-) I just talked to her on the phone and suggested that if she knew of anyone else using the same girth, that they should check it in the same places. I am not a trained saddle maker, so I haven't tried to reflock a cushion beneath the seat etc. but I have repaired stuff like broken girth strops either by sewing them on or riveting them to the tree if that was the method used originally. I especially remember one saddle from the riding school that they had someone else repair before sending it my way. The girth straps should have been fixed to the tree, and they were broken, whoever did the repair job simply stapled them to the underside of the seat where there was a bit of nylon to shape the seat. The first time you would have tightened a girth - the strops would have come off. So I think that a lot of the repair jobs I do aren't super difficult, but they still require that I have a sound judgement of what stress that particular part will receive. One of my regular customers (Katrinelund stallion station) sends a lot of stuff my way, and (though it may sound corny) I actually enjoy looking at the tack and doing the repair and checking the rest of the tack before handing it back. Especially the girths where there are 4 buckles. If one buckle is broken I change that, and then go on to check that the stitching is still OK for the remaining 3, and also the stitching where the elastic is joined to the actual girth. I know that technically I could just change the buckle and give it back and don't care if there wasn't another fault. But I just can't help it, if people have faith in that I can repair something then I'd hate it if I missed another obvious fault that would endanger those using the tack. :-) When I was a child they would occasionally show steeplechase on the TV, to this day I am still impressed with the courage displayed in standing so high up in the stirrups and hammering away on a thoroughbred, and I believe that it makes you extra attentive to the small details in your tack given that there is so much strain on the equipment in that sport. -
What am I doing wrong? Saddle Soap Making
Mulesaw replied to ToddW's topic in Leatherwork Conversation
@ToddW That's great to hear that you got it to work :-) I got to think of the other day that your initial problems could be if the soap "part" is measured after it has been grated. If a recipe says parts, I always think in volume, and there is a lot of difference between one tablespoon of grated soap vs a tablespoon of solid soap bar. Both soaps sound like they are OK and I guess most mild soap types fall into that category. If you are looking for a new type of saddle soap to make, you could try to experiment with making a pure neatsfoot based soap. My soap making book is at home, but it describes that most soaps that are made with liquid oils is going to be paste like (save for olive oil that will make a very firm soap). A quick search right now gave a saponification number for neatsfoot oil of 190-203. that should be for KOH (Kalium Hydroxide). KOH gives a soap that is more paste like compared to NaOH (Sodium hydroxide). The basic idea is that you make a lye out of either of the bases that you want to use, and the weight and volume depends on the oil/fat type you want to use. To make sure your soap leaves behind a little bit of actual neatsfoot oil, you only make the lye mix 90-95% of what it technically should be (the saponification number). That way all the lye has got some fat/oil to react to, and there will be a small surplus of oil in the soap. The fat/oil is heated to warm on the stove and the lye is slowly poured in. I mix using an old stick blender from a thrift shop. After some time (depending on what oil/fat you use and if you ad honey or beeswax or other things) the mixture will start looking like mayonnaise, and then it is ready to be poured into forms. The soap needs to continue its saponification in the forms for some time, but mind you I have only made soap that will become hard, so I don't know how long time you would have to let it sit for a paste soap. But this time is to enable the lye to do its stuff to the oil/fat to convert it to soap. Lye is highly caustic and will cause chemical burns to skin and tissue. It will cause blindness if you get it into your eyes, so you need to wear proper protection equipment. The same goes for the basic chemicals to make the lye, Sodium hydroxide and Kalium hydroxide. So be careful. These are the basic steps, but soap making is really fun, and doesn't require a lot of gear to get started in. I'd recommend you to get some sort of basic soap making book, as there are a lot of tips and instructions that could prove valuable. Good luck and be careful with the chemicals. Brgds Jonas -
Repair of Scharf freedom girth
Mulesaw replied to Mulesaw's topic in Saddle and Tack Accessory Items
@jcuk Thanks for the kind words :-) It is the first time I have seen one of those too, but they claim that it is working well. I am not much of a dressage rider myself, so I am not quite sure. But I know that some horses have "girth cramp", and for those horses it might help since it only presses certain places? I haven't really thought about that over tensioning thing, but it makes a lot of sense. And like you say they can either stretch or fray or otherwise become elongated. Being on the ship right now I can't go look in the shop, but I am pretty sure that a lot of the other elastic girths that I have lying around have got doubled elastic. (I try to buy them at the horse club jumble sale to use the stainless steel buckles for repair) Heidi (the owner of the girth) takes very much pride in maintaining her tack, so I am certain that it isn't because of bad maintenance or mistreatment of the tack that it is damaged. She is training to become a riding instructor, so it might see more use than most hobbyists girths, but I am pretty sure that she only uses it on her own horse, maybe both her horses, but not more than that. And given that it is really expensive (in the UK I have just seen it for £ 275), in my opinion it should be much more sturdy. I eased up the edges that the elastic seemed to have taken damage from, but it could still be that it wears in that spot. I can't remember if there is room to double the elastic, but I kind of doubt it. Brgds Jonas -
Repair of Scharf freedom girth
Mulesaw replied to Mulesaw's topic in Saddle and Tack Accessory Items
Yes it is an interesting design, as far as I have understood it is a really fine girth that gives a lot of freedom to the ribs of the horse etc. It is well made but apparently not a flawless design after all. Good idea to make suspenders. that hadn't occurred to me :-) Brgds Jonas -
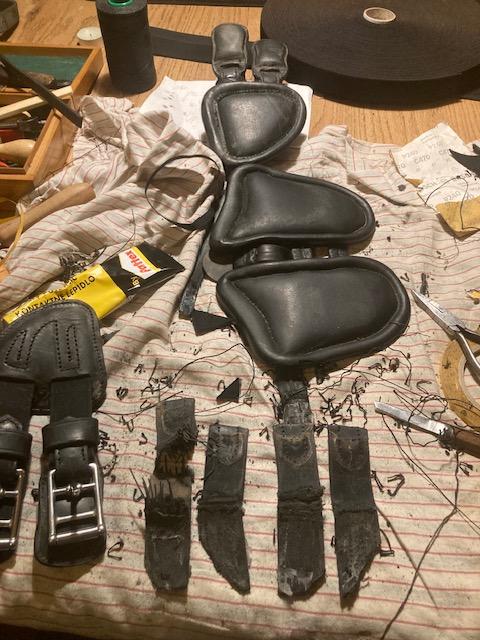
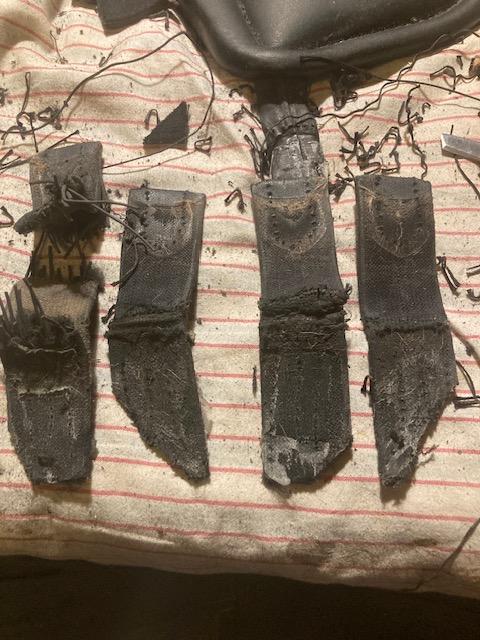
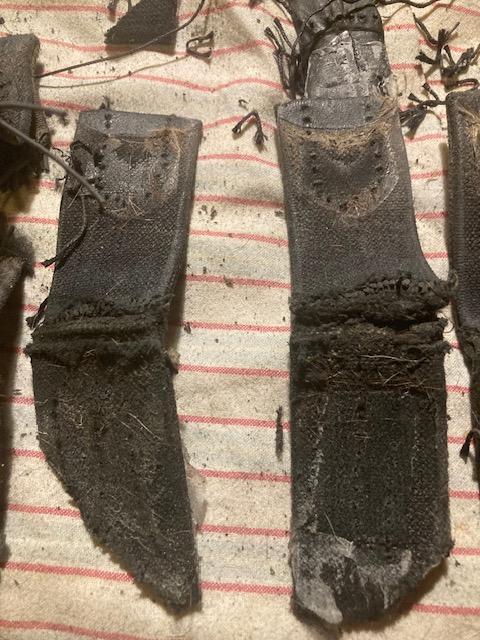
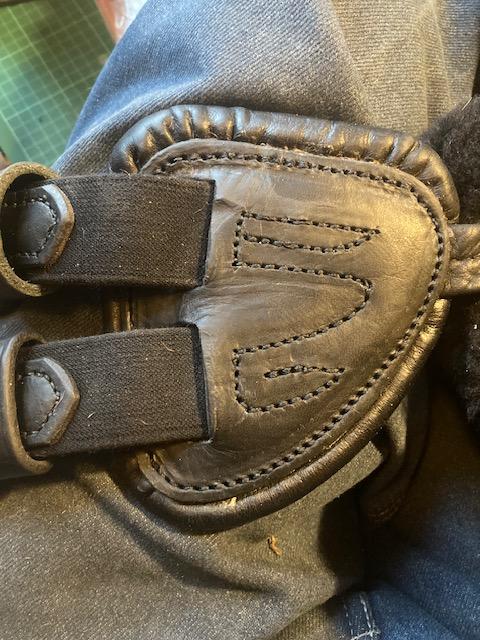
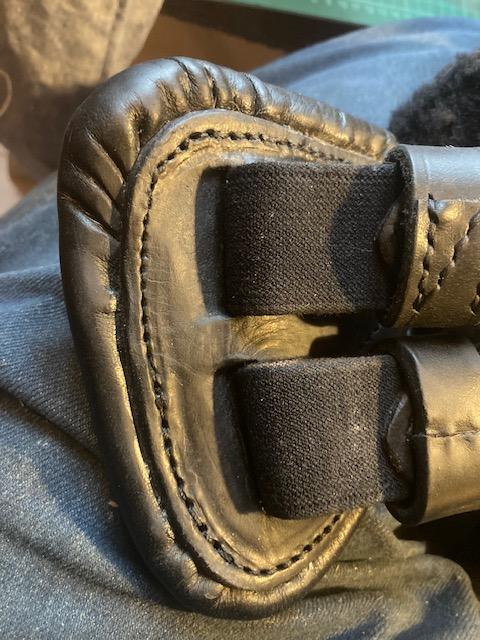
The girlfriend of our oldest son asked me if I could repair her dressage girth. It was a Scharf Freedom dressage girth just a little over a year old that had developed some damage on the elastics that hold the buckles to the girth. I have replaced girth buckles every once in a while, but I have never before seen the elastics getting damaged like this. The girth is expensive and she said that she didn't want to bother with warranty etc. given that it was just over a year old, and I could totally understand that. I managed to find a company that produces girth elastic in England, and I purchased a roll of 40 m (the minimum that I could buy). There were no distributors in Denmark, so I figured that if I had some spare elastic I could always use it on some repair project in the future. After disassembling the girth, to me it looked like the fault of the cracks in the elastic was some fairly sharp edges where they go though the padding, so I softened up those sharp edges before installing some new pieces of elastic. I had to make a belt keeper as well, because one of them was missing, aside from that it was "merely" a question of getting it all back together in the right order. The design of the girth is fairly complicated, with the two outer pads needing to be sewed first so they hold the elastics and the connection strap that ties them to the center pads. Once the elastics and the connection strap are sewn, the actual padding goes on next. I forgot to take some pictures of what it looks like on the inside, and I have to admit that I had forgotten that I even took these pictures, so the job was made back in December (and I can't remember much of the details now). The repair job did take a while, but it came out nicely, and structurally sound afterward. And that's kind of important to me :-) One side complete, the nearer side pad is not yet sewn on. The damaged elastics. The leather was very sharp where the bending occurred, I think that was the cause of the damage. Close up of the damaged elastics showing the severed parts. A completed outer pad mounted back on the girth, the sewing pattern is kind of elaborate. New elastics and a new belt keeper
-
Large stainless D-rings manufacturing
Mulesaw replied to Mulesaw's topic in Hardware and Accessories
That is a very noble approach, I couldn't agree more. It is nice to see that some companies try to get production back to Europe instead of having it all made in the far east. -
What am I doing wrong? Saddle Soap Making
Mulesaw replied to ToddW's topic in Leatherwork Conversation
I'll keep my fingers crossed, -
Large stainless D-rings manufacturing
Mulesaw replied to Mulesaw's topic in Hardware and Accessories
@jcuk Brexit could definitely have been handled better from both sides, but like you say, enough has been written about that. The H Seal elastics were the only company I could find that produces girth elastic, and it is one of those companies that were established 150 years ago and still manage to do the customer service in the same way. That coupled to a unique and high quality product is getting scarce as hens teeth those days :-) I have to admit that I like to support European made products if they are genuinely made in Europe, and England happen to have a fantastic palette of companies that produces the same stuff that was used 100 years ago. I bought some green baize from Hainsworth some years ago for lining gun cases, it took me a while to track down the correct wool baize. And again it was a company that had been in business for well over a century. Brgds Jonas -
What am I doing wrong? Saddle Soap Making
Mulesaw replied to ToddW's topic in Leatherwork Conversation
@ToddW I'd try to use some ivory soap at first. I haven't got any experience whatsoever in glycerin soap, but I use grated soap a lot for washing our floors at home. If I make a solution of grated soap and water and leaves it to stand it will turn pasty in a matter of half an hour. I am pretty sure that the grated soap is just regular white soap that has been grated, but in Denmark you can still buy it everywhere, so I have never tried to grate my own. An American I know used Castile soap that he grated and mixed with water to make a soap paste, and that worked well. I think you can also buy a product called soap flakes. I think that there is a lot of difference between different types of soap as to if they swell up when left with water or not, and given that neither the beeswax or the neatsfoot oil should do any thickening it must be the soap. Maybe another brand of glycerin soap would do the same, but like I said ,I have never tried a glycerin soap (to my knowledge at least). Good luck :-) Brgds Jonas -
Large stainless D-rings manufacturing
Mulesaw replied to Mulesaw's topic in Hardware and Accessories
Thanks, I have to say that Abbey and F Martinson has got some superb stuff! But I couldn't find a D-ring large enough to meet my 1:1 criteria. Technically I think it might be overbuilt, and the closest I found was something for pulling straps on harnesses, but they were still not quite the correct size. Also I have to admit that the Brexit (no matter how fine an idea it is) has made it incredibly difficult for the rest of us slaves of the EU to buy something from England.. bought some elastic girth strap from H Seal elastics, and it was an uphill struggle.. H Seal elastics were efficient and friendly, but I had to register my company in Denmark as an import/export company, and that extra trouble on behalf of the inefficient Danish Customs and Excise is pretty much enough to scare anyone away from trying to buy stuff from great Britain So far I have tried to order from Laederiet in Denmark and Pethardware in Chechia, I found a couple of German suppliers as well for saddlery hardware, but I haven't tried those yet. Brgds Jonas -
Thanks for the tip, thinking about it, it seems like a brilliant idea!
-
Great idea! I think that it would be interesting to see if the leather retains it strength depending on what treatment it has received. E.g. Neatsfoot oil soaking vs mineral oil soaking. Dry veg tan vs. veg tan that has been given a bit of oil/grease Brgds Jonas
-
Large stainless D-rings manufacturing
Mulesaw replied to Mulesaw's topic in Hardware and Accessories
@TomE Thanks Tom, I think that even that 1" D-ring isn't long enough. I tried to see if I could find some D-rings for harnesses, but I wasn't able to find any of the same size and thickness. The D-ring needs to be extra long to accommodate the leather from the double wrapping around the lower part of the D and still leave enough room for the 30 mm straps that come from the noseband. I am not sure if it really needs to be that beefy, but I wanted to make a 1:1 copy of that old stallion halter. Technically I think that the buckle for that original stallion halter was also homemade, but I "cheated" and bought a stout 30 mm buckle instead of making one myself :-) Brgds Jonas -
Large stainless D-rings manufacturing
Mulesaw replied to Mulesaw's topic in Hardware and Accessories
@DieselTech Thanks, I normally just make one of a kind of hardware, so it was a bit new to me that I had to make a jig, but it worked better than I had hoped for :-) Brgds Jonas -
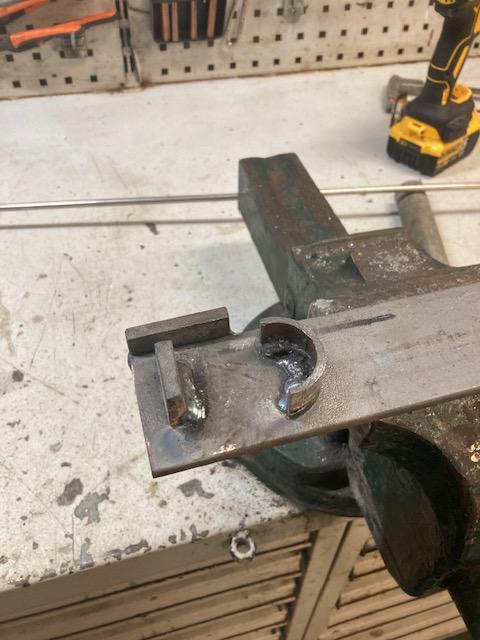
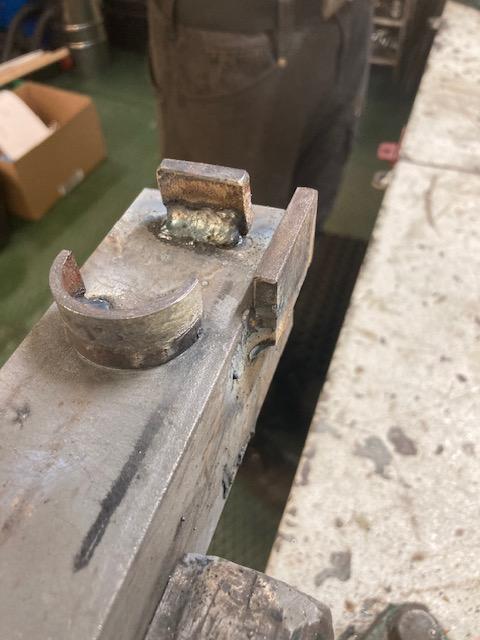
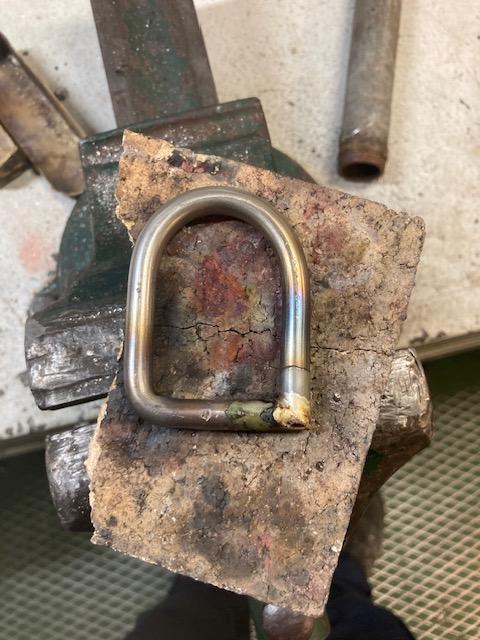
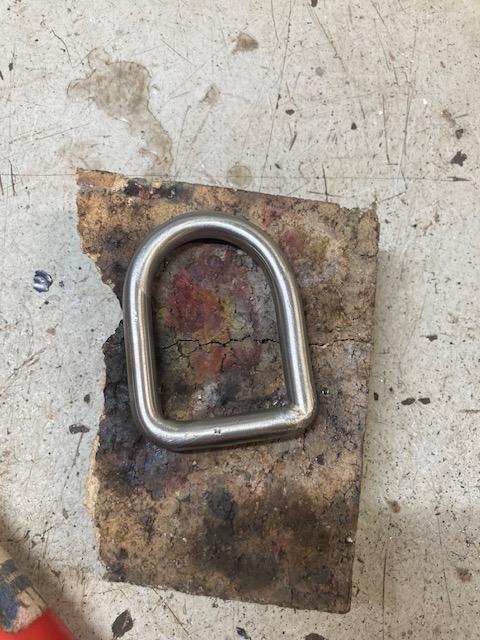
For the stallion halter project I needed some large D-rings. The D-ring on the old halter that I copied looked like it was homemade. At first I tried to search the net, but I couldn't find anything in that sort of size, so instead I made a small production run. I made a bending jig out of some old angle bar and a few bits of flatbar that was welded onto it. A piece of a pipe made sure that the rounding of the D-ring would be somewhat neat. The stainless steel is 8 mm (5/16") in diameter, and first I heated it to red-hot and bent it in a right angle. That part was inserted in the bending jig and the rest of the bending was done in the jig. I tried to heat up the steel for making the rounding, but after a test I discovered that the bending looked better if I didn't heat up that part. When the D-ring was shaped, I used a hack saw and a file to make sure that the corner mated nicely and then I silver soldered the corner together. When cold I cleaned up the corner with a file and sanded everything with some emery cloth- Silver solder is incredibly strong when the mating surfaces are well fitted, and I'd say that on a D-ring like this where the corner is filed round afterwards it is as strong as the welding I could have made using welding electrodes. Perhaps TIG welding would have been marginally stronger, but I kind of doubt it. The advantage of the silver solder is that it fills the entire opening between the two parts, so there is also bonding in the middle of the steel, that is harder to achieve with welding unless you are willing to risk melting it all. I ended up making 12 D-rings as far as I remember, so I've still got enough for a couple of halters. It is definitely easier to buy the hardware, but once in while it is also satisfying to make it yourself, especially if it is something that can't readily be bought. Out here on the ship I have sometimes made some belt buckles, mostly that has been to show some of the trainees and apprentices that it is possible to make something from scratch. And they have been incredibly proud of their belt when it was done since they made it all from the buckle to the sewing. Jig for bending large D-rings Jig seen from the other side. A D-ring after silver soldering D-ring after filing the corner round and cleaned up using emery cloth. The D-ring mounted on the stallion halter


-
@toxo I experimented a bit using old thread rolls, and then I just start by winding some thread on it and use it afterward to "feed" the bobbin when it needs to be replenished. Mainly I use the same colour and size of thread for 95% of the time, so in that case I just purchase an extra roll of thread so I can always wind a bobbin. Gütermann has got some really nice thread rolls where you can lock the thread in one end to prevent it from unraveling on its own, So whenever I happen to have an empty one of those I keep it to rewind it with those odd colours that I sometimes use.
-
One happy little customer
-
I really don't see the need for restricting persons by forcing them to write 100 posts before they are allowed to post about wanting to buy or sell something. From the top of my head I think I have seen once or twice in the recent years someone trying to sell the leather tools from their deceased family members. Those people seem genuine to me as most of them clearly states that they would just prefer the stuff to go to someone who will appreciate it. Also if a person has had this hobby for years before deciding to sign up on this site, why shouldn't that person be allowed to post a genuine post about wanting to buy a sewing machine/splitter/headknife or whatever? The same with the payment, I prefer to trade in cash, but that requires that I see the item in person. But to make a rule about it when you can't enforce it seems a bit of a waste to me. It is OK to suggest that people use this or that type of payment, but I'd leave it up to the buyer and seller. A few people seem to join to sell cheap leather jackets and post it in the wrong sub fora's ,but to me it seems as the moderators are very efficient in weeding those out in a short time. I am not a moderator, so I guess I don't see all the problems, but if there is a need for restricting selling/buying ads, I think that the payment part needs to be left up to the buyer / seller. Brgds Jonas
-
Does it have to be a loop type cartridge holder? I once had a Mosin Nagant ammo pouch that I really liked the look of, I just never had the need for making a single version of it. Something like a single part of the picture sized to house 6 rounds. If it has to be a loop type, could you use a piece of thick leather maybe 3/8" wide that you sewed under the loops, for the shoulders to rest on? Kind of like your idea with paracord except the leather would be on the outside. Another option is to make the loops with a bottom, but then you'd have to put the rounds in with the projectile facing up. I've attached a picture of an old experiment of mine for shotgun shells. So kind of the same system.
.jpg.9c48ba7d6747182f0fa0f02270d99f5a.jpg)
-
@NatesLeatherGds I use a small manual press, and that has done wonders for me. The fact that it is able to press absolutely straight means that the caps don't flare to either side. Whenever I try it with a hammer I manage to get it slightly shifted no matter how much I concentrate on the job. An alternative could be a drill press if you have one? you just need to put a small bolt in the jaws and make sure that it is filed flat and smooth at first. But I am afraid that you need what you describe as: a proper snap button bench press Brgds Jonas
-
The leather work looks really good, but I can see the problem with the zipper. Admittedly I only replace zippers in riding boots, so I haven't made them on a "round object like yours". But what I have learned over time is that if the zipper needs to bend around a curve it greatly helps to make a bunch of small cuts in the fabric of the zipper where the curve is going to be. Also when installing the 2nd side of the zipper, it is easy to stretch either the leather or the zipper a bit more than on the first side. (used riding boots are probably more soft than a new piece of leather) So a tip here is to start by marking your zipper for say every 3-4" with something like a silver coloured marker or a pencil etc. Just leave the zipper closed and mark out on the fabric all along its way. Next you make the same marks on the leather. from start to end. Since your shape is so curved I'd might use a divider to step off the distance. When you sew in the zipper, check that the markings on the zipper and those on the leather match in pairs. It is OK that there is a difference between the leather marks and the zipper marks, as long as the difference is the same on both sides. (If the left side zipper is lagging 3/8" behind the next mark on the leather, then the right side zipper should be lagging by the same amount) I use double sided tape to hold my zippers in place before sewing, that can help a bit too, and it will let you check the markings and rearrange a bit in case that is needed before doing the actual sewing. God luck. Brgds Jonas
-
Congratulations on the position :-) I think that I'd add small telescope magnet and maybe some sewing machine oil and some brake cleaner. Brgds Jonas
-
Welcome :-) I don't know if you have looked around on the forum yet, but there is a subforum on here dedicated to holsters of different sorts. and lots of other specialty sub foras. Brgds Jonas
-
Does anyone have a good saddle soap receipe
Mulesaw replied to ToddW's topic in Leatherwork Conversation
In my experience neatsfoot oil doesn't soften that much. And I wouldn't worry about it in the amount used in connection with soap. (I can't see the video because of poor internet onboard), but lets say that there is used a total of 1/4 cup of NF oil in the soap batch, maybe that is 20% of the total volume. To clean your backpack or a bag you might use a tablespoon's worth of soap. and 20% of a tablespoon is probably half a teaspoon, and that is not a lot of oil :-) There have been some discussions in earlier threads about whether or not to use mineral oil. Working with a lot of oil in my day job (marine engineer), I just want to mention that a lot of oils have additives in them, and while pure mineral oil might be OK (think petroleum jelly), a lot of those additives aren't good for your skin. So you might want to stay away from e.g. gear oil, two stroke oil, motor oil and hydraulic oil. But then again, in those volumes there probably won't be any problems. Brgds Jonas