


Mulesaw
-
Posts
789 -
Joined
-
Last visited
Content Type
Profiles
Forums
Events
Blogs
Gallery
Store
Everything posted by Mulesaw
-
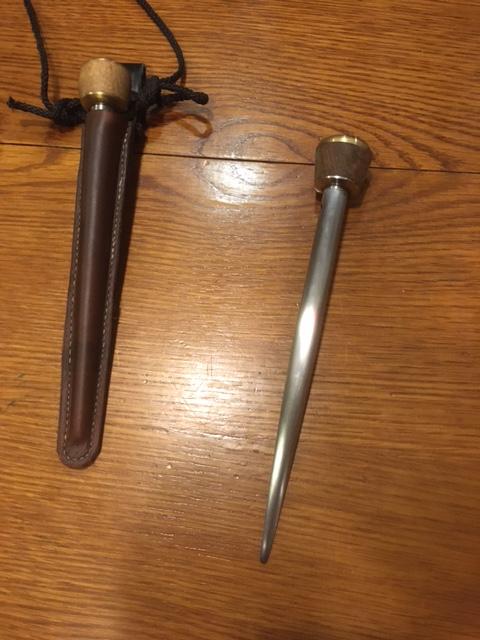
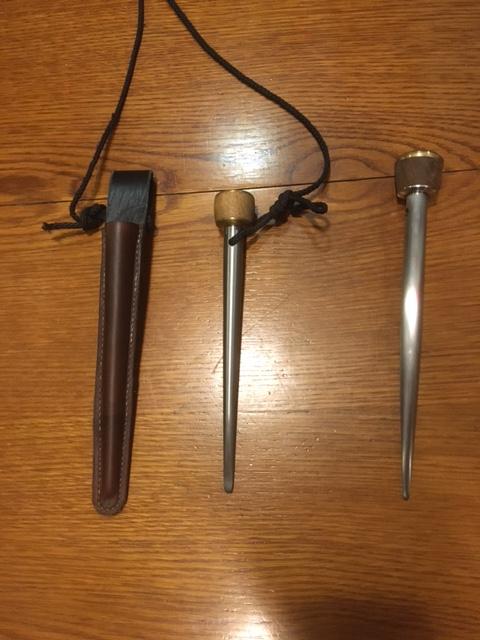
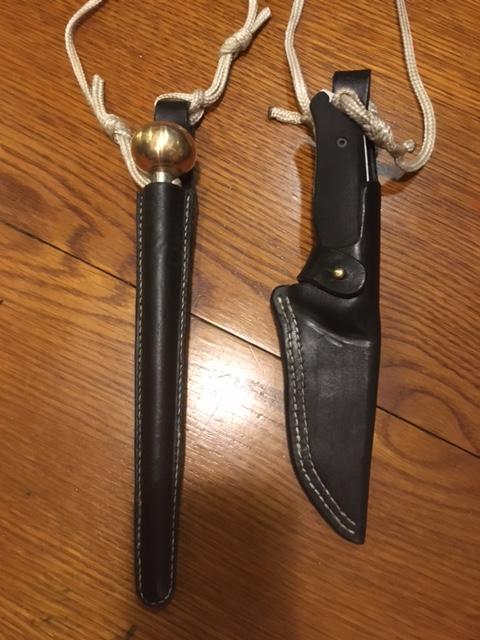
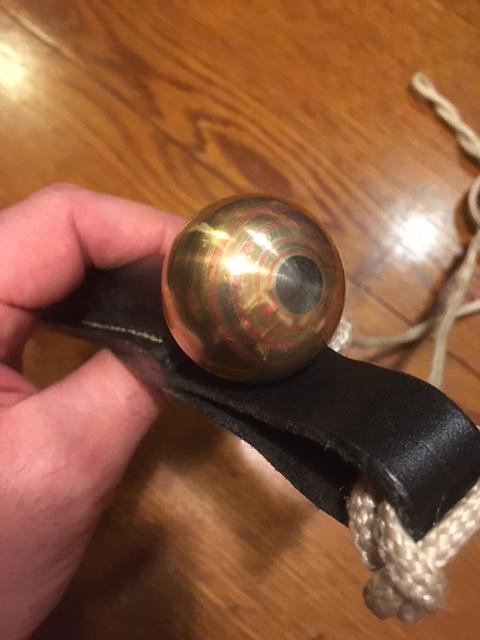
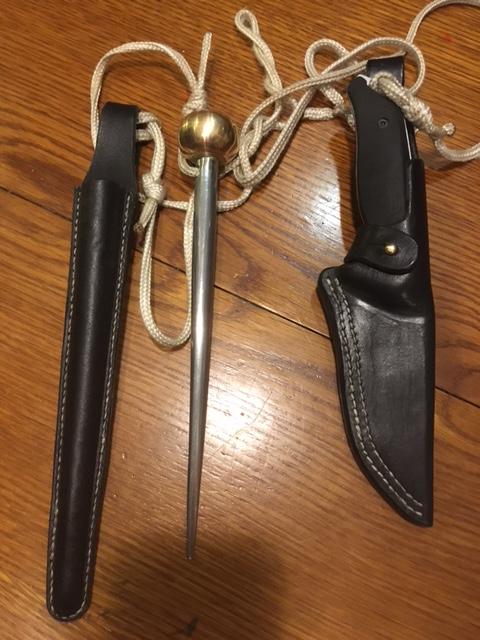
Last time on board, I helped our volunteers make marlinspikes. the basic form was the same, but each made the head of the marlinspike according to his/her own idea. some were made with wood and one made a pressed leather head, and one chose for a fancy brass/copper head. I had brought with me a small set of leather working tools, just so that I could make the breast collar for my son's horse while I stayed at the quarantine hotel, and for some reason We ended up talking a bit about working leather. The volunteers are sort of 19-22 years old and neither of them had done any leatherwork earlier on. I explained how they could make a sheath - and one guy tried it. It was an instant success, so the rest of them also wanted to make sheaths. The first volunteer then asked me if it was possible to make a sheath for his knife as well? And I explained that it was certainly possible. So I helped him turn a Sam Browne button on the metal lathe, and he used that for the closing mechanism. A sheath for a pocket knife was made too. One other guy also made a sheath for his knife, and he did a really nice job, also since he had seen me polish the edges, so he ended up doing the same as well. All in all I managed to introduce leatherworking for a bunch of youngsters and they were happy with their own results and rightfully proud of what they made. Laurids' and Simon's marlinspikes Simon's sheath for his pocket knife. Aske's marlinspike and knife sheaths Fancy head of marlinspike Secured for working in the rigging

-

Need some feedback on holsters please
Mulesaw replied to stamphandj's topic in Gun Holsters, Rifle Slings and Knife Sheathes
I'd say that the workmanship looks best on the upper dark holster. Here are my thoughts on the two compared to each other: The sewing looks to be more consistent on the dark holster in that that the lines seem "straighter" and the distance to the edge is more even compared to the light holster. On the light holster, a lot of the sewing is too near to the edge on the top of the holster, compared to what it is on the lower part of it. The holes for the belt loops look better on the dark holster. The light holster have some issues with the rounded ends of the strap holes. most notably on the upper hole. On the light holster, the reinforcement piece has got a nice little "peak" that I think looks good. But due to the stitching not having a hole at the same spot, the stitching sort of blurs this little detail. Maybe the peak should have been a smidge higher, and then there should have been a stitching hole exactly in line with the peak. That way the stitching would have accentuated the shape of the reinforcement piece. Carvings or no carvings is a matter of personal taste, just like the colour of the leather. So any opinion on that would just be my personal opinion and that is not really constructive criticism. But all that said, I still think the holsters are looking good, and the most important thing is that they hold the gun they were designed to do. Brgds Jonas -
Paraprosdokians are figures of speech
Mulesaw replied to LatigoAmigo's topic in All About Us and Off Topic
This really made my day :-) The only one I can think of was a coworker who once told me that - If you can't do anything else, you can always be a bad example. -
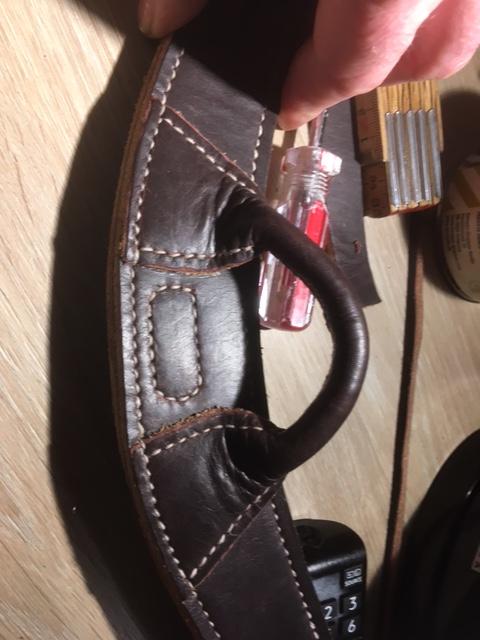
I didn't know that there was a special tool for making round reins. The round parts that I have made, I have made by wrapping the leather round a small piece, then done some hidden saddlestitching through the side. Right now one halter is missing since my wife's horse decided to ditch his in the mud somewhere. I guess I'll have to make a new one at some point. Brgds Jonas
-
Nice and clean looking halter. I like it when the throat latch (or whatever the name of it is) is made as a round piece.
-
Done, Good luck :-) brgds Jonas
-
Hi Søren, I live on the island of Mors in the northwest of Jutland. So far from Copenhagen, but close to.. hmmm nothing really :-) Cheers Jonas
-
You are really moving forward on this project! Thyregod green is a nice colour. I just thought of Reseda green since most of my woodworking machines are that colour. I think it used to be sort of a standard machine colour for e.g. tablesaws and bandsaws etc. Brgds Jonas
-
I think that Laederiet has got all you'll need. They haven't marked out stuff for BDSM, but I guess it is mainly D-rings and carabiners etc. They also have lockable buckles. https://www.laederiet.dk/produkter/98-seletoejsspaender/4142-dbrullespaende/ That could probably be used too. I have rarely looked for hardware for bags since I do mostly equine stuff, but they have a ton of different hardware. May I suggest that your order their physical catalogue, somehow I find it easier to browse through a paper catalogue compared to do it on the computer. It is free of charge if you order anything from them, you can also pick it up if you visit their store, but right now due to the pandemic, the store is closed for visitors.
-
Beautiful work. I really like the round detail of the closing hasp. it looks great combined with the leather covered rivet you added.
-
Which horse related projects for a beginner? (Equine Tack, Saddles)
Mulesaw replied to JKos's topic in Getting Started
I would start out making a leather halter. The easiest and cheapest way to do that in my experience is to either find an old halter in the stable that has a broken carabiner. You buy a new carabiner and then you simply copy that halter 1:1 using leather instead of the nylon webbing and reusing all the old pieces of hardware on the halter. Most of the cheap everyday halters are made out of 25 mm nylon straps (webbing), so you would be well under way if you got yourself some 25 mm leather straps. If you can't find a broken halter in the stable (or if you don't have access to a stable, then just buy a new cheap halter and do the same, in that case you have all the necessary hardware on hand, and you have a live functioning model so you can se how it should be put together. Most people in the horse world I know uses a nylon halter for everyday use like getting the horse to and from the paddocks, and then when it is time for some competition you put on a nice leather halter. https://www.horze.dk/grimer/horze-howard-grime/22244.html#color=RBBR https://www.horze.dk/grimer/horze-basic-grime/22239.html#color=BL The first link would make a nice halter project, and the buckles for the neck strap would work just as well in leather. the second link is cheaper but the neck buckle might not work that well for leather. Depending on if your daughter has got any friends with horses, or does riding herself etc. I would suggest making a size of halter that would fit any horse that she may know and hopefully have access to. If she has got a friend that has a pony, well then buying and making a pony size would be ideal, there is a special sense of pride in seeing a horse wearing something that you have made, and it will be equally frustrating to have made a really nice halter size X full, just to realize that no one within 3 hours drive has got a Clydesdale, a Suffolk Punch or a Shire that you could try the piece out on. Good look and have fun. -
Laederiet.dk also has a lot of hardware, I have bought from them several times and I like them. They are not super cheap, but the service is great. It also depends on what type of hardware you are looking for? Is it for saddles or belts or bags etc? I haven't bought anything from Pethardware or Abbey, so I don't know about those.
-
Are you painting it "Reseda green" (Hannover green) ? I guess it'll be spectacular once done, since you are sanding it down and all first :-) I really dislike making stuff ready for painting, so I am always impressed with those who take the time and do it.
-
I really like the green "hammerlak" paint on the Vilhelm Pedersen machine. Tha Dania is looking good too
-
Welcome, I am pretty new in here myself, but it sure is a nice place with a wealth of information. Our farrier once told me that whenever the horses are nervous, it helps to sing to them, her theory is that they get so confused with the singing that they forget to be nervous. I saw her employ that trick on my wife's warmblood once, and it worked. So I don't know if that trick works on American horses too, or if it just Danish horses that can't concentrate on being nervous and listening to singing at the same time :-)
-
Thanks, I need to wait for the edge burnishing until I am out of the hotel quarantine. I haven't brought any sandpaper with me, and besides I am afraid that the maid would get angry with the amount of fine dust produced. So for now it is just edge beveled on the front and back with my homemade screwdriver beveller. But when I get onto the ship I'll probably turn an edge burnishing tool that I can mount in the drill press or the lathe, That should hopefully help in obtaining a nice edge.
-
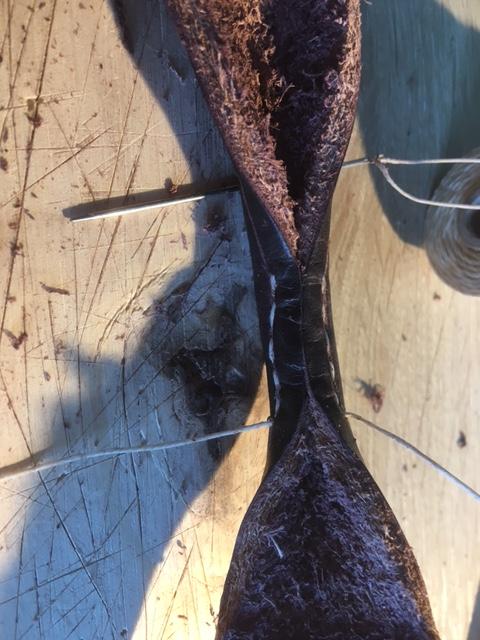
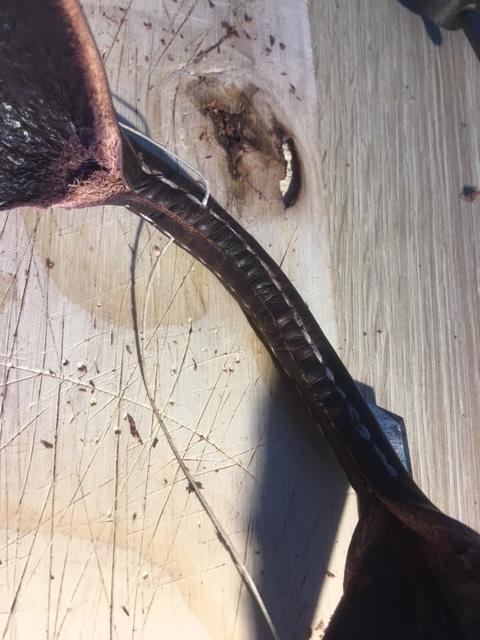
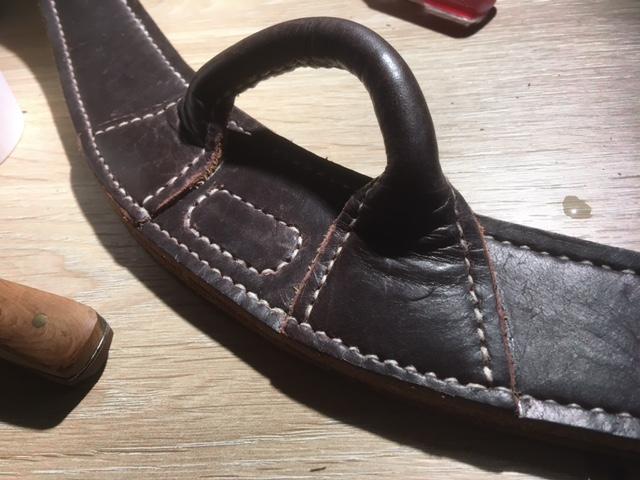
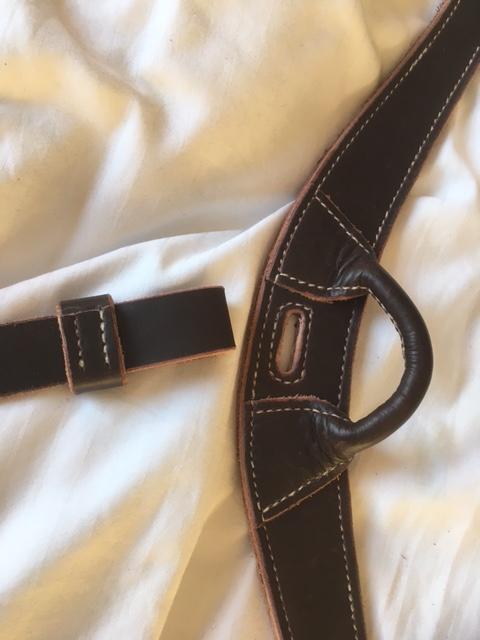
I have managed to make a steady progress on the breast plate. Two days ago I started the most difficult part (for me at least), to make the loop that will eventually be used for attaching the martingale. I had to thin down the leather a bit to make it possible for me to make a round sewing without it becoming too bulky. Still I think it came out all right. Yesterday I sewed together the two central pieces of the breastplate and also made a hole for the strap that will connect to the girth. I started making the round piece from the middle, and then worked to both ends of it, because it was so hard to roll near the ends. Stitching is done. It is beginning to look more like a breastplate and less like a bunch of leather straps. Now there is even a hole for the strap.
-
Now I could suddenly see some more pictures :-) But if the 3S is obsolete then I guess there is no need to be able to go back again. I am looking forward to seeing some pictures of the finished machine at some point. Cheers Jonas
-
Hi Søren So you want the arm with 3 holes to replace the mint green arm with 4 mounting holes? If you get a machine shop to make a piece of flat steel bar that is the same size as the base of the 4 hole arm, and drill 4 holes into that, then you can drill and tap 3 holes in the top of that plate (or have the machine shop doing that) The 3 hole arm might sit a bit higher, but it depends on how it should have been mounted originally. That way you could still fit the 4 hole arm in the future if there ever was a need for that. Oh and buy the way, it is a nice looking machine :-) I could also have completely misunderstood it all (I don't know the first thing about skivers, but I know a great deal on machines in general) Cheers Jonas
-
Do you have any pictures? Instead of drilling and tapping new holes in the machine itself, you could make an adapter flange. One that has got the 3 holes for your arm, and 4 holes for the back of the machine, Off course it depends on if the arm mounting holes are more or less the exact same position as the 4 first holes. (I am not sure if this makes sense, it is kind of difficult to explain) Brgds Jonas
-
Great looking project. The oak really looks good with a lot of texture and colors. The belt in the picture looks really fine too.
-
It really does look like fibreglass. I watched https://www.rodnikkel.com/content/index.php/building-a-saddle-tree/ He uses rawhide as far as I can tell, but I guess there are many ways to skin a cat (or build a tree). You said that the lady selling the saddle got it when she was 3, so is it a childs saddle? In Europe we measure saddles from the front to the back, and adult saddles are 17" and above, childrens saddles would typically be 15" or 16", not that it is an exact science though.
-
Welcome, I am new to the Forum as well. Brgds Jonas
-
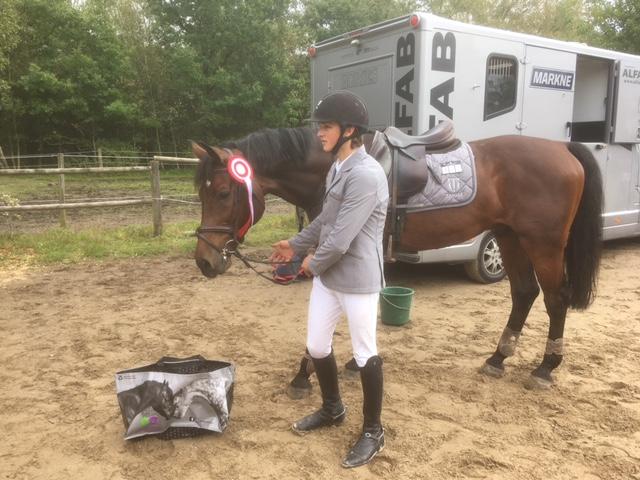
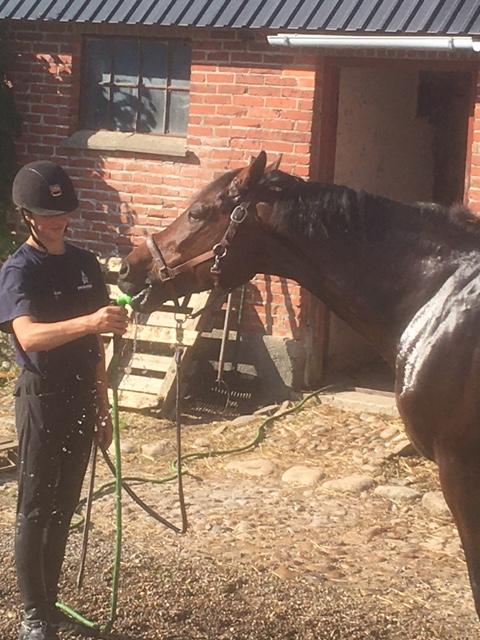
Gustav and Cajou (the horse), winning a major round of chocolate, at his first ever B level event (young riders), He was the only one with four perfect rounds, I think he came in this particular round. Winning a C level competition, and posing with the sponsor gift. Washing and drinking at home.

-
You are much too kind :-) I am improving on the saddle stitching though, so I guess there is some merit to the "practice makes perfect" one thing that bothers me a bit is the hardware, I wanted some smaller snaps to where the upper part of the saddle is connected to the breastplate, and also the buckles weren't exactly as I wanted them, but I also wanted to support a local shop, so that trumped my vanity in what hardware I should use. There aren't many leather supply shops in Denmark, so I figured it is best to support those that still remains. Anyway, in the heat of the battle, few will notice as long as the equipage is doing a good job.