


Mulesaw
-
Posts
798 -
Joined
-
Last visited
Content Type
Profiles
Forums
Events
Blogs
Gallery
Store
Everything posted by Mulesaw
-

stitching horse plans to build from
Mulesaw replied to rdahlinspeedboy77's topic in How Do I Do That?
Super :-) I think I have the pdf somewhere as well, but at the moment we are on the ship, so even thinking of attaching a file is like asking for trouble. Brgds Jonas -
stitching horse plans to build from
Mulesaw replied to rdahlinspeedboy77's topic in How Do I Do That?
I used the plans in an old book called "farm woodwork": https://ia802605.us.archive.org/32/items/farmwoodwork00roeh/farmwoodwork00roeh.pdf You can see the final result of my build here: The only thing I am not so happy about is that I made the strap for tightening the clamp out of some too soft veg tan leather. I should have used something better for making the strap. It resulted in that the holes started to tear in the strap when I used it. I have later repaired it with an old piece of strap from a saddle. The stitching horse work very well and the instructions are easy to follow. Have fun building whatever model you choose. -
That is downright rude. It is fair if people ask for a price out of genuine curiosity, but that was insulting. Nice looking bag by the way, is the grey part of the saddlebag leather/suede, or is it some heavy felt? The contrast of the different surfaces looks really good.
-
Sounds like it is going to be a super thing to be part of! I'd love it if there was a real need for draft horse stuff over here, but the wagon/working scene is very limited. Only one of my customers have a harness set for driving horses, and I had to do a little bit of alteration, I think it had to be shortened and maybe altered a little, but that is the only chance I've had to work on a driving harness.
-
@BlackDragon Good luck with setting up shop :-) I think you are really lucky that people are already asking for your service, that must mean that there really is a customer base nearby, and that makes it all a lot easier compared to having to search for potential customers. Depending on your expected hourly rate, I think that it might be difficult to compete with prices of foreign made odd the rack stuff. So it is better to charge a realistic amount that you will be OK with and then point out to customers what the difference in quality is and why it matters. If there are Amish customers around, I would guess that they need more driving harness stuff than English dressage stuff, and likewise if there are people working cattle from horseback they might need specific gear, and templates that are to the liking of some people might not suit others. So my best advice is to talk to the potential customers. I'd ask the Amish farrier if he could perhaps introduce you to some of his customers, and the when you get to talk to them, ask if you can see some of their harness or other gear that they like, or something they feel is ok, but they would like to have changed. Bring a measuring tape and a sketch book and a camera. take pictures of details like how stuff is routed on a piece of harness etc. measurements and sketches of size and where stitching is made. Hardware position and size etc. It could be that they have some old stuff that they really liked but it has become brittle or just worn out. If you ask nicely perhaps they'll let you borrow it. If you manage to do that, then you can recreate it with any alterations that might be sought after. Like reproducing a 50 years old harness so it fits a newer type of horse (fatter or slimmer than the old). I have just done it with an old stallion halter that I borrowed from the local stallion station. They had bought some of those many years ago and I have never seen that model before, but now I have made one that will be on display so people can see that I can make those. I would love to sell new stuff, but have a really hard time selling new leather products to horse owners. I have made some really nice looking leather halters, but compared to what is available from regular shops of decent looking halters, I don't stand much of a chance. But I do make quite a lot of repairs, and that is good stable income. In our area it is mainly dressage and jumping for hobby and some breeders. Repairing stuff is sort of in vogue at the moment, and people seem to think that it is sorcery that I am able to sew two pieces of leather together. So I have sort of settled on the fact that I won't sell any new leather products, save perhaps for a walking line or something like that. But rebuilding and repairing is pretty constant. I don't know what type of leather that would be good for you since I am pretty sure that our designations are not the same as yours. I use Hechte since it is the best leather on the cow, and most of the work I do is some type of straps, and this is the perfect leather for that. If there are any working dog clubs in your neighborhood, it might be a good idea to tell them that you can repair leather. Some of those lines or harnesses need mending once in a while, and again can be a stable sort of income. And like with the horse gear, if some of the have a favourite piece of equipment, ask if you can see it and take some notes on how it is made. For repair jobs I charge an hourly rate, but broken down to the nearest 5 minutes, so I have no problem billing people 20 minutes if the job only was a 20 minutes job. I know it might not make me ultra rich, but the customers get back and will know that I don't overcharge them. Materials except sewing thread and glue will be billed, so hardware and leather will be billed, the reason to not do it for thread and glue is that it would look like I was a greedy bastard looking to get as much out of it as I can. Instead raise the hourly wage a tiny bit, and people will more likely think that it is ok. Good luck Brgds Jonas
-
@rastanley I can't remember the name of the stitch on the knee pad, but I am pretty sure that Al Stohlman shows it in his book "hand sewing leather", maybe it is blind stitching? To me it looks like it has been done from the inside (before the saddle was assembled). Both edges are butted against each other, and you use a curved awl to make a stitching hole from one flesh side - through the middle of the butted assembly - and back up on the other flesh side again. Then you sew it with a regular saddle makers stitch. I could be wrong though, but it is my best guess. You could try to see if you could recreate that on the knee pads and then sew it "on top" of the leather in front of the knee pads. If you have to make any doubling it would be best if it is a place where the knees or legs don't touch, in order to not get a blister from a protruding edge. The cantle might be a bit more difficult since you wouldn't want to have a protruding edge where the butt of the rider rubs up and down during riding. A suggestion is to make something like when you wrap a steering wheel in leather. You first make a regular saddle stitch along the crack, maybe 1/4" below. on both sides. Then you lace those saddle stitches together in a crossing zig zag pattern with a thread. You just need to find some sturdy thread that can take a bit of rubbing without breaking. I'd go with some braided stuff. Good luck. Brgds Jonas Here's a picture I found that gives the general idea, except the picture only makes a single zig zag, not a crossing zig zag.
-
@jcuk That makes a lot of sense :-) I usually do like Tom describes, by forming and gluing before marking out for stitching, so that's what puzzled me a bit about the pre-pricking thing, but it makes sense if I don't glue first, then I could unfold it and prick at least one layer. I must say that I think that gluing at least those long double straps gives a good look. If not I'm afraid that the leather will slide a bit apart when it is put around the neck of the horse. Perhaps I should try to give tacking a try. In hindsight, I should have wet formed the chin strap, and taken the time to readjust the sewing machine to be able to sew through the 4 layers. Used the sewing machine to prick the leather and then hand sewn it. I guess I'll just have to make another one next time I get home :-)
-
Thanks for the kind words. I'm not quite sure I understand what you mean by pre-pricking, but I'd love to get a trick or two since it actually bothers me that it looks so wavy and disorderly in the ends. :- ) I did indeed hand stitch in the areas sort of where the leather flapped over for the D-rings etc, so sort of 3" length at each end. I was afraid that if I used the sewing machine, the stitching would be less durable and not quite as tight as I could make it by hand. I used a marking wheel and put the (much too bulky) parts in the stitching horse, and then used a diamond awl. But those results weren't super great (to say the least). But I suppose that I could have taken the thread out of the needle of the sewing machine and used that one to do the pre-pricking. I have actually done that on an earlier double stitched halter, but I can't really remember why I didn't do it on this one. Technically I think that I could have made it a bit tighter around the massive D-ring if I had wet formed the straps first, and then let them dry in position before gluing it up with contact cement before the sewing, but I'm afraid that it wouldn't have helped much on my sewing :-) Brgds Jonas
-
That was actually also how I read it at first, but now I can see that it didn't exactly say that :-) Trotting poles and cavalettis are great for getting a fluent move on the horse. And also great for instilling a bit of security in young riders.
-
He does look like a champion :-) I have tried to make a halter a couple of years ago that also featured a brow band, The plans were from an old German saddlers book, but sadly I had made the halter according to the measurements in the book, and it was too small for our warmblood. I am not quite sure what the benefit of a browband on a halter is, but I would guess that it makes the halter sit a bit better. A regular halter can be a fairly loose fit, but I'm only guessing. I enlarged the picture, and I can see that strap you are talking about. It also looks like the poll strap sits rather tight on him, but I guess he was a powerhouse, so better safe than sorry when handling him. A fellow parent back when our youngest was in kindergarten had some Oldenburg horses on a meadow in the village. The youngest of her horses (around 3 years I guess) had a neck strap on. I can't remember her explanation why, I just remember that it was so tight that one day when we were looking at him, I asked her if it would be ok with her that I loosened it. She seemed a bit afraid of the horse and she said that if I really thought that I could do it and still keep it on him it would be ok. I loosened it maybe 3 holes and I felt so much better for that poor horse. She moved not long after and I don't know what became of her horses. But that is technically the only horse I have seen wearing a neck strap. Learning to jump that way sounds scary, but I see the idea of learning to have a good seat and not jerk the horses mouth, and a neck strap seems like a much more secure thing to grip than trying to grab a handful of mane if you loose your balance :-)
-
The nasal bone could be a very logic explanation, I have never thought about that. And given the worth of most of those stallions at the stallion station, I am pretty sure that they don't want any of them to be damaged. The owner told me that when he had purchased those halters back in the days it had cost a small fortune, so he had the name of his stallion station stamped into the halters to ensure that they didn't "wander off"
-
Hi Sheila I think that might be the case. The halter rings can be broken, but doing it this way, the leather will sort of absorb the pull and just distribute it evenly to the rest of the halter (at least that is my theory). Also being 1.25" wide, and doubled everywhere there is a serious amount of leather to distribute any pulling force. I have never seen a halter like it either. That's what made me curious and wanting to make a copy of it. The design might be old, but the original halters are maybe 30 years old. the owner told me that he had them made at a saddle maker who had a shop around 50 miles away (the most local one at that time) I don't know if that saddlemaker made up the design himself or if he had some very old models that he copied. As far as I could understand, the neck strap / poll strap sits more like a regular neck strap. I am not sure if you use that on your side of the Atlantic, but some people use it over here. It is basically just a belt that goes around the neck of the horse, and that's it. I think the idea behind those are that they can't be pulled off, like some horses manage to do with their halters. And then on this halter the idea should be that it is indestructible and impossible to tear off in case the stallion gets angry while being loaded or doing its thing on either a phantom or on a mare. They never seem to use that model as a regular everyday halter. But maybe they do use them when there is a stallion show off, they can be fairly aggressive when there are other stallions nearby I guess. The halter that Secretariat wears looks just like a normal halter to me. I have made 4 halters following the excellent plans and instructions given by TomE on this site. They are either made as triple stitched halters or double stitched. They are very sturdy yet elegant. But I guess that they can be broken, and if you have a spirited 1400 Lbs stallion - that might result in an accident if it manages to break one and takes off :-) I'll try to take a picture when I get home, with the halter mounted on a horse.
-
Hi Tom, At first when Ib (the owner) told me about it, I couldn't envision what he meant. He kept saying that the leather wrapped itself around itself. I was so puzzled that one day I drove out the Katrinelund and asked if I could see it. I borrowed one of the halters with me home to be able to make an exact copy of it. He told me that they bought a couple of them from an old saddle maker who lives about 50 miles from the station. I don't know if he designed them or used an old design. I trust that it is a wise decision to not do any actual breeding on a phantom anymore, From what I hear there is a high risk of bruises and broken toes etc. Katrinelund sometimes have other peoples stallions in the stable, and they also buy new ones, so I guess that they can't always be sure on that their horses are well behaved :-) Gustav has started working for a rider called Konstantin Künnemann, who has got something called KK Stables. At the moment they have got Zir Oculus in the stable to train a bit. That is one of the jumping stallions from Katrinelund. It seems like a nice horse, but I can envision that when it gets a bit "heated" up, there is a bunch of power in there. mail order husbands - thats a fine expression :-) Brgds Jonas
-
Thanks, it is a bit of a working piece, so not particularly elegant, Though I think it helps a bit with the contrasting colour with the white thread.
-
It seems kind of overbuilt (very close to being chunky), I did a 1:1 copy of the original halter, same lengths of straps etc. I think my leather is a smidge thicker than the original, but maybe an ounce or two, so nothing major. I personally like the regular style of halter better, but I know that they can be broken by an aggressive horse, this one I doubt will break :-) As I could understand of the owner of the stallion station, the halter sits more like a neck strap and less like a halter (if that makes any sense?). So it should sit further from the ears than a regular halter as far as I have understood, but I can see your concern. The noseband seems very large to me, I can't remember the circumference, but I think it was around 32", so it will sit rather high up on the head. On the original model, the side straps had deformed quite a bit so that there was more of an angle between the noseband and the neck strap - which would make it sit even more like a regular neck strap instead of a halter. I think those halters are only used when a stallion needs to mount the phantom or if an aggressive stallion is to be transported in a truck or a trailer. So it is not used as an everyday general use halter. (at least that was my impression) I can see the need for something very secure if a spirited stallion needs to be taken to the phantom. they can be pretty rough. It actually never occurred to me to take a picture of it mounted on my wife's gelding. I'll try to do that when I get home in about a months time. Then I can see how it really sits on a horse. Brgds Jonas
-
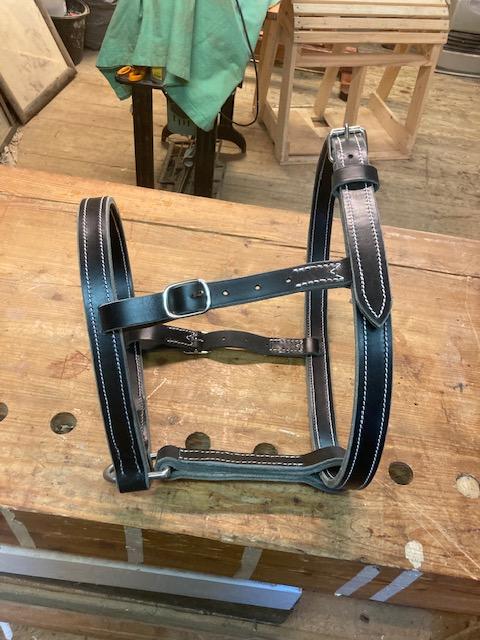
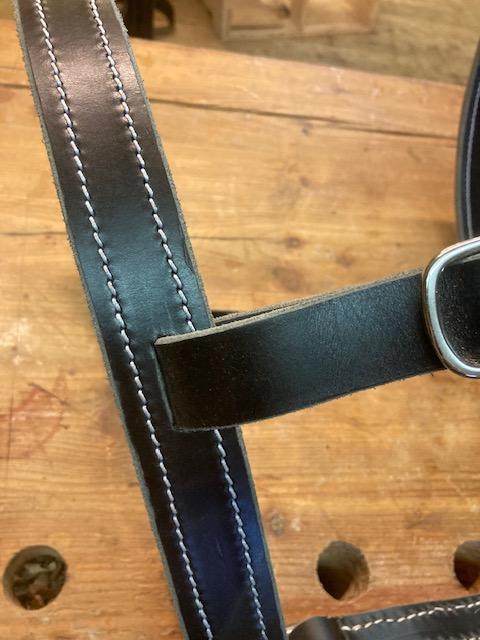
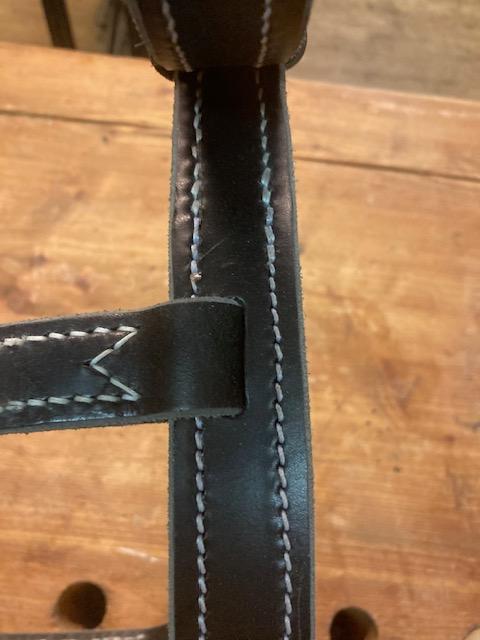
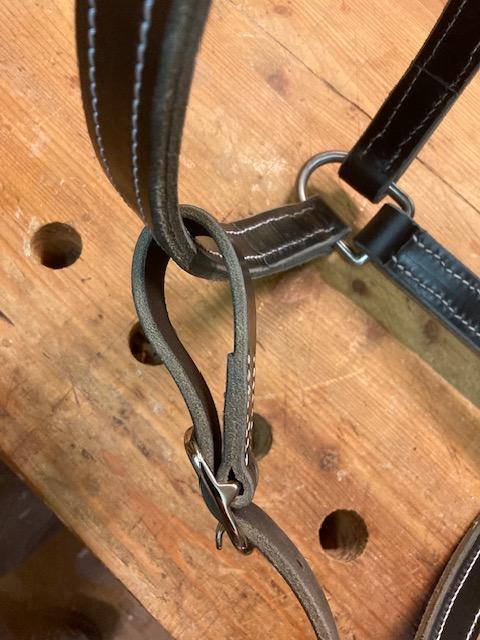
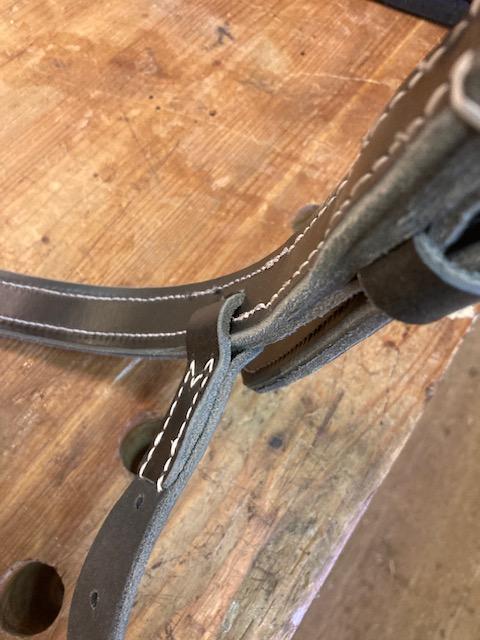
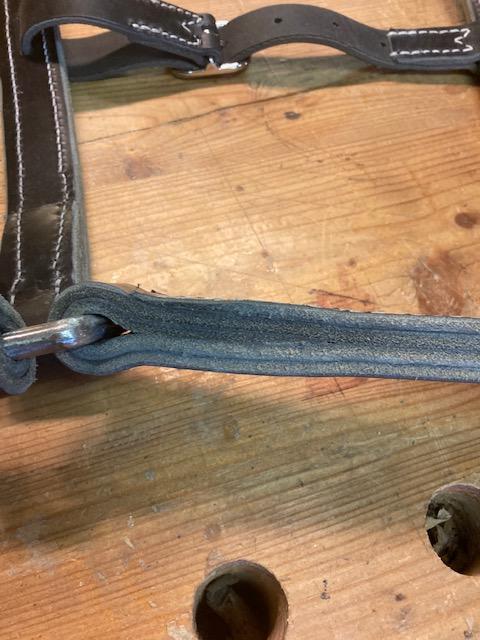
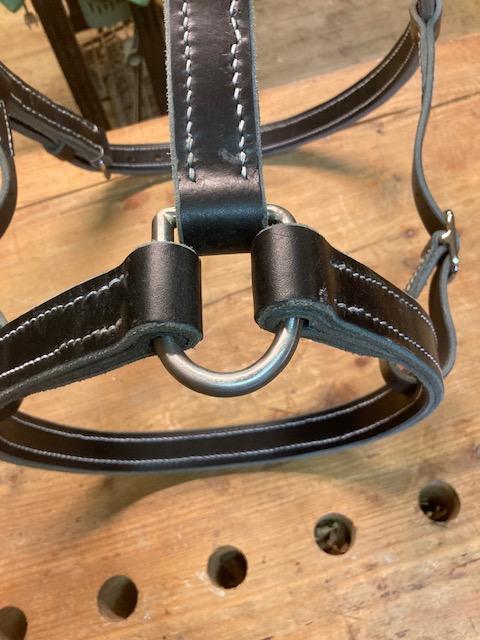
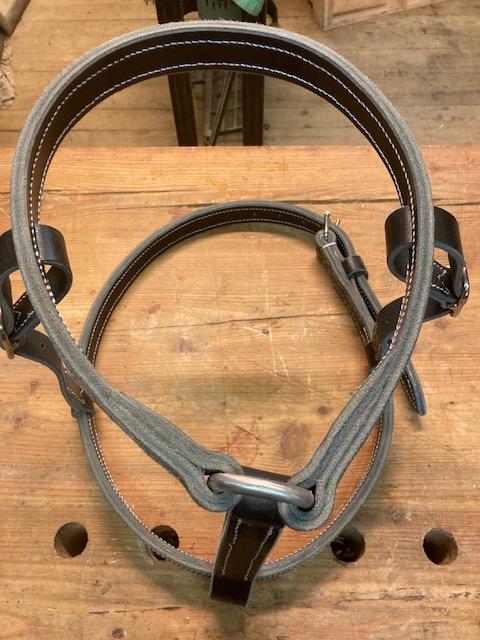
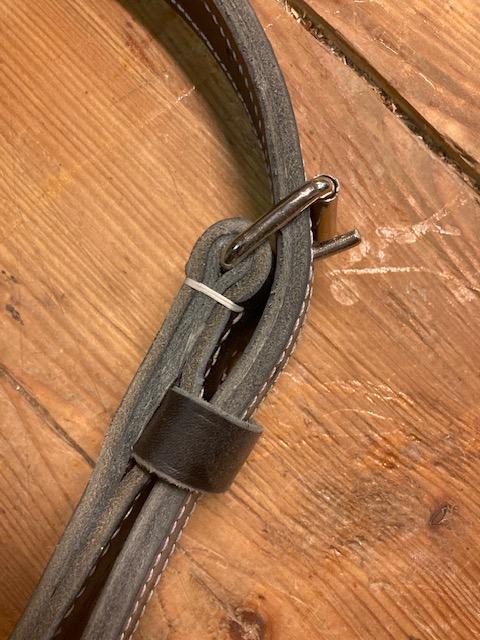
Previous time I was home from the sea, I talked to the owner of the local stallion station, and he mentioned that he once had some special stallion halters made. I borrowed on to see how it was constructed, and last time on the ship I fabricated some special D-rings that was needed for that type of halter. This time at home I made a copy of the halter, just to try it, and also so that I could return the borrowed one. Plus it gave me a rough idea of how much work was involved in the making. I had suspected that it would be faster to make, but in the end I think I used around 6-7 hours. Not including the time used to fabricate the massive D-rings. The halter is very beefy and I believe it when they say that it can hold up to an enthusiastic stallion. The main straps are all 30 mm (1.25"). The side straps are 1", and those are the only straps that aren't doubled. It looks a lot like a regular halter save for the double thickness and the missing regular type of hardware. The noseband and the neck strap are connected with the side straps but instead of doing it via hardware the straps go through elongated holes in the leather of the noseband and the neck strap. I made my halter out of black Hechte leather. There is almost 18' of leather involved, and it is all made out of a heavy thickness, I used 4 mm, and I have no idea how much that is in ounces. The D-ring is made out of 8 mm stainless steel (5/16") it is made for a 30 mm strap in the 3 sides of the D. I couldn't find any D-rings of that size, and on the original one that I borrowed, I could see that it was homemade too. I sewed as much as I could on the old Singer, but there was still some hand sewing included. The biggest ups I made was during some of the hand sewing, where I accidentally tilted the diamond awl the wrong way resulting in a ugly wavy stitching. Good thing is that it is low on the halter where few people will see it. The bad thing is that I know it is there.. I know I didn't concentrate, and I have no one to blame but myself. I hope that the stallion station will need an extra halter of this type at some point, since it is an interesting project to make. The completed halter. Note the less than impressive stitching in the lower part of the noseband (where it joins the D-ring) Side strap connects through the leather of the nose band. And it connects through the leather of the neck strap as well (some issues with the hand stitching on the neck strap as well) "Continuous" loop for adjusting the length of the side strap. The fixed side of the side straps are attached to the neck strap. 4 ply chin strip will most likely hold up to whatever being thrown at it. Beefy D-ring and spectacular hand sewing.. How the nose band wraps around the D-ring. Buckle of the neck strap. Mounted the same way as on the original with a 6" piece of strap to double the thickness for strength.
-
@Younes I tried to google a bit. Sieck (a major sales company for used leather machinery) has a similar machine for sale. I am pretty sure that they have their own repair department. You could try to write them and ask if they had a wiring diagram. http://www.sieck.de/en/machines/new-arrivals/?produkt=9456&cookie=okay
-
@Younes Hi If the machine is hydraulic, I don't think that the wiring is overly complicated. If you can find a local electrician who specializes in automation he should be able to troubleshoot in a short time. Can you explain what the machine does and doesn't? I mean do does the hydraulic pump start when you press start, or is all just dead? My best guess without knowing the machine would be that you are required to push 2 places in order for the press to work (in order to keep hands away from the machine, if one of those switches or pushbuttons are damaged, you can press but the machine won't see the signal and won't move. If you can locate those push buttons, you can try to measure them yourself if you have a multimeter (around 100 SEK in Biltema) 1) Unplug the machine while you work on it. 2) Put the selector on the multimeter on OHM (resistance) 3) look on the back of the pushbutton, you might have to unscrew it from the machine to get access to the back. 4) measure the resistance when you activate the push button. If the button is healthy, it should have a resistance close to 0 Ohm. if not, the pushbutton is bad. 5) if there is an emergency stop on the machine, the measurement is the opposite. When the emergency stop is not operated you should be able to measure approximately 0 Ohm over the terminals. Another thing that could potentially be wrong is the solenoids on the hydraulic valves. You can measure the resistance and check that there is some resistance in them. Probably around 25-50 Ohm If there is a very large number, the winding in the solenoids are burnt and you will need a new solenoid. I hope this helped a bit. Good luck with the machine. Brgds Jonas
-
Agreed, actually the German text is a bit vague. He describes that the pot should be heated to red hot, but that would cause the leather to burn, unless you had put a tight fitting lid on to prevent any air from entering. And he doesn't mention the lid. I don't know if anyone still does this case hardening on a small scale. But apart from the atrocious smell of roasted leather, it could be an interesting experiment.
-
I had to look up Wootz steel, and it sure does sound a bit like it. I Googled case hardening yesterday after my post, and it is still done. An example could be a sprocket for a gearbox, where you machine it almost completely. Case harden it, complete the machining and harden it. It should leave you with a hard outershell and a robust core. But if carbon from leather is better than say powdered carbon from charcoal - that I don't know :-)
-
Congratulations. Looks like a darn nice machine!
-
In an old German saddler book, the author specifically writes about utilizing scraps. All sorts of scrap that are to small or to bad to be used for anything else should be put into an iron pot and carbonized by heating this pot over the fire till it is burnt. The burnt leather is then mashed while in the pot, and when it has cooled off, it is finely ground. The carbonized leather is (according to the author) sold to knife makers and instrument makers, And they use it for hardening fine steel. I am pretty sure that the hardening process he is referring to is called "case hardening". You fill a steel box with the carbonized leather and put the item to be hardened into it. put a lid on it all and heat it all to red hot. Keep the heat for a couple of hours. That will cause carbon to infuse the surface of the steel to be hardened so you get a higher carbon content and you can then harden it like normally. I have no idea if anybody still does this since nowadays you can easily get steel with a defined carbon content in. I guess it wasn't quite as easy in 1908. But anyway that is a suggested use of the final remnants of scrap according to the book "Das Sattler, Riemer und Täschner Handwerk" by K. Vollmer Personally I try to use my small scraps for belt keepers and stuff like that. But I think that I could do better. I might have to look into making some key rings.
-
I built my first pair of chaps using a free pattern from Tandy. The yokes were just one size, the difference was how wide yo made the legs - and how long you made the back- and front belt. Later I have bought a pattern pack from Tandy, and the yokes are still just one size. The first chaps were for my daughter and I am pretty sure she is something like 30" (I didn't measure though). If you are going to make your own pattern for the yokes I'd make them so that they leave maybe 6" forward and probably 4" in the rear, but that is just guessing from how I remember they sat on her. For inspiration there's a part of this forum specifically for stuff like chaps: https://leatherworker.net/forum/forum/100-clothing-jackets-vests-and-chaps/ @FrenchMich and @Rolandranch have both made some gorgeous chaps, so for inspiration it is definitely worth looking at their posts. Brgds Jonas
-
Does anyone like this type of belt buckle?
Mulesaw replied to chingyoung's topic in Hardware and Accessories
No, too much decoration and bling to my taste. -
@Alexis1234 I just googled hame bender to see what one looked like. I have no idea how much one would cost, but having a son who is training to become a blacksmith I am pretty sure that any youngster (or oldie) training to become ablacksmith / metal worker of sorts would be able to weld one together for you in a couple of hours. A bottle jack shouldn't be too expensive either. So in case a new one is expensive, I'd try to get in touch with any local technical colleges you have nearby and ask if they could make one for you as a training exercise. My son would without a doubt be willing to make one for you, but I'm afraid that the shipping will be a killer :-) Good luck with finding one.