


Mulesaw
-
Posts
774 -
Joined
-
Last visited
Content Type
Profiles
Forums
Events
Blogs
Gallery
Store
Everything posted by Mulesaw
-
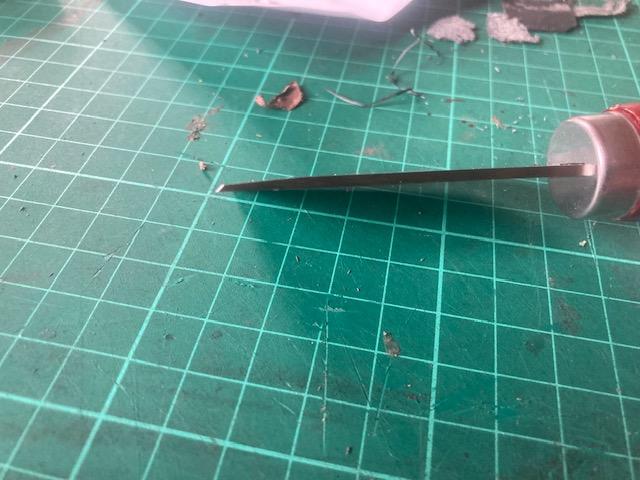
I got myself an account at Temu because I needed some tips for stilettos heels, and it was the only place I could find some with an assortment. There is a lot of leather tools and stuff being offered at Temu, and I was curious to some of them. I have often considered making a Japanese type skiving knife, and suddenly one jumped up as a suggestion. The price was very reasonable, and I decided to give it a chance. After the waiting time of about two weeks time (after all the stuff comes from China) I got the package with the skiving knife. The first thing I have learnt about Temu is that it is incredibly important that you look at the measurements given on the page regarding the products. The page is a master in making things look bigger than than they are. So pay very close attention to the measurements given and try to compare it with stuff you already have to make sure you aren't getting something that you would consider a child's size. The skiving knife was a decent size, maybe a bit on the small side compared to if I would have made one myself. The handle was fitted decently on the blade and all in all the overall shape and feel was OK. What was not OK was the edge.. The thing was able to cut something, but not able to skive very well. The problem here was that the edge of the blade was ground in a 45 degree angle! If I have to prepare a wood chisel for coarse work like mortising for timber framing, I normally use 35 degrees, but 45 degrees is just plain weird in my opinion. I took the skiving knife to the shop and put something like a 20 degree edge on it using the grinding wheel. (I just eyeballed it, so I don't know the exact angle). Followed by some water stones and buffing and then back to testing. This made a whole lot of difference. Now the edge cut as it should. I like the style of the Japanese skiving knife for some jobs, the round knife for others, but when both are sharp they will work. I haven't tested the knife over a long time, so I can't say if the steel is good, average or bad, but I suppose it is average. and most knives that I know of will benefit tremendously from stropping before using , so I guess that if I do this the knife will work as intended. If all has to be summed up, the shape and quality feels OK compared to the price, but the knife is unusable out of the box, so you have to use a bit of time on sharpening it before it will work. Skiving knife straight out of the box. 45 degree cutting angle. Trying to visualize the cutting angle with a piece of paper. This edge won't cut easily!


-
@CreativeName I have never bought or sold anything on Etsy, so I can't give you any advice there. But if you have some well made products, I would think that a craft market or something along those lines would be a good way to sell some. I have no idea id there are any in your area, or what your local regulations say. But if you are allowed to apply for a vendors license in the state or city, then you could try to set up a small booth at a place where a lot of people come by. If there is a local grocery store, ask if you can set up a booth in the parking lot or something along those lines. The good thing about belts is that: 1) they are not bulky to bring along 2) they are something that most people can /will use 3) they are not prohibitively expensive which means that people could decide to buy without having to give much extra thought to it (as opposed to a new saddle) I know that I am old fashioned, so I would prefer to buy something I have seen and touched with my own hands. And just maybe there are more people out there like me. Brgds Jonas
-
Nice looking belt. Welcome to the forum :-) Brgds Jonas
-
beautiful work as always! The stitching looks fantastic, and the colours are spot on.
-
I am so glad that you aren't mad at me. :-) The beret thing is interesting, I never knew that there were different "fashions" in how to wear them. So if whomever receives the notebook immediately can identify the war pig as a paratrooper - well then it should definitely outweigh that it might be a bit out of regulations :-) But I forgot to mention that the tooling looks really good to me. I especially like the shadow effect that you get from giving a bit more depth to the border on the right side of the tooling compared to the left side. It sort of gives a bit more depth in the tooling that both sides are not to the exact same depth (if that makes sense) Brgds Jonas
-
@RidgebackCustoms I have a couple of comments. And I am in no way able to make something like that myself since drawing is not my strongest suit, but you asked for comments so here they come :-) To me it initially looked like an angry Santa Claus merged with an orc. (Sorry about that) I think the beret is a trifle too long, or it should fold nearer to the insignia mark over the left eye. I guess there are different models of berets, so it could also be that your model beret is longer than a Danish one. Normally when I see them on personnel, the tip ends sort of just under eye level. The long tip is what made me think of Santa Claus. The tusks are spread out too much, and the aft tusks are somehow too visible. I think that is why I initially thought of an orc instead of a wild boar. On your drawing it looks as though the main tusks are set in the upper part of the mouth, and that looks kind of strange when they are in the lower jaw on a wild boar. I would suggest leaving out the aft tusks all together since they very much contribute to the orc look. The beard/hair looks nice, with good flowing lines. The eyes and the wrinkles around them including the scars also look good. Brgds Jonas
-
@DoubleBarrelCustomLeather I haven't participated in large events as a vendor yet, but I was offered a booth last year which collided with some other plans, so I couldn't go. But my suggestion would be something like: - nice leading ropes. - belts, perhaps with some tooling or stamping - key fobs with a horse head on them or the stamp of popular horse brand in the OHSET (quarter horse, Morgan, Danish Warmblood etc) - pictures or examples of stuff that you have repaired or can repair. (If you do repairs) - cowboy cuffs - spur straps - halters - dog leads - dog collars - "luxury items" like saddle bags and complete headstalls. Be sure to bring lots of business cards that describe what you do, like for instance: Doublebarrelcustom leather, bespoke leather goods for the active horserider, specialty: Headstalls and western gear. repair of all horse related leather equipment. (again only advertise for repairs if you do them) My experience in setting up a booth is that if you put the table between yourself and the customer, kind of like a counter at an airport, it will feel kind of like at a border. Not particularly welcoming. By orienting the table the other way, you sort of "invite" people into your space which can lead to people feeling more comfortable and apt to talk to you. And then you can explain much more in depth what you do and why your products are good. I like items for sale to be labelled so that customers can see the price. A small label tied on with a piece of rustic looking string signals handmade more than a sticker. A couple of curiosity objects can spark the interest in customers and lead to interest in your booth and your products. I'm thinking of something like a good quality drawing and a model of how you attach a buckle. Many people won't know that you skive the end of the leather, bevel the edges, sew a saddle stitch, polish the edges etc. So by making a non skived, non beveled double cap riveted buckle attachment and place it next to a really nicely done example, you can explain people what the difference is and why that makes your products so nice. Also explain that double cap rivets are super fine for some uses such as key fobs, but for stuff like a girths or breast collars, safety is paramount, and that is why you use the saddle stitch. And by coincidence - you happen to have an enlarged example so people can see what that is. Dog leads and dog collars play well with horse tack since people at horse shows are "animal people", there is most likely a large percentage of those who have a horse who will also have a dog or two. And it gives you more products to place on your table. By far, my biggest income from leatherwork related jobs has been repairs of tack and other leather equipment. So when I find the time to set up a booth an arrangement, That will be my biggest focus point. I would describe my price list and also explain the typical time it takes me to do a repair, and make sure to tell people that mailing is not a problem and that my mailing rates are this or that. Get a roll of heavy brown paper to wrap any purchase in. Few things can deduct from a buying experience as having the thing you just bought either just handed over, or worse, just slapped in a cheap thin plastic bag. If it is for a small item like a key fob or something similar, you could go with a small brown paper bag. Good luck and remember to have fun Brgds Jonas
-
Impressive work! I bet it is flatter in the bottom now than it was when it was new :-) Brgds Jonas
-
Sound advice form @Dwight as always :-) I might be reading it wrong, but you mention that you already have a shop, in case that is a boutique (shop) then the advice might be different compared to if you have a workshop (shop). Also cases is a fairly broad term, so my understanding of cases might not be what you are referring to. So if you have a picture or two that could help in us giving some better suggestions to you. The two types of social media that I am familiar with is blogging and Instagram. Both can generate sales, but blogging is something that takes a lot of work before you'll see some sales from it. Instagram might be a bit quicker in that respect. I think the secret on IG is to use some accurate hashtags, and make sure that they correspond with what your cases can actually be used for. At the moment in Scandinavia, knitting is incredibly popular. So I would guess that if you could make some super cool and elegant cases for knitting supplies and you used some knitting hashtags, then it could help boost sales. But you most likely need to specialize, if not - your IG posts will never reach those hardcore in whatever field you choose. My company (which I have together with our oldest son) specializes in horse related stuff. post once in a while with pictures ranging from repairs we have done, or stuff we have sold such as special productions for tack rooms. We get 99% of our business from word of mouth advertising and very little from social media contacts. But still the 1% is nice because it is a new customer that we didn't have before. You can make a pretty good page easily on blogspot (Googles blogging system). That will enable you to post every time you make a new product or do something special. And it is free to use. Instagram is also free which is a huge benefit. If you set up a homepage where you need to pay, even if it is only 150$ per year, you still need to make those money first. A real advantage of using a blog as sort of a "showroom" is that if people ask questions or comments, you can answer them and explain more about the thing they comment on. This will work kind of a FAQ except it is a bit more personal. Good luck Brgds Jonas
-
@Frodo Darn that is some impressive work! Great to get a truck back on the road again. I still firmly believe it is better for the environment if people fixed their old cars instead of buying new electric cars and throwing the old ones away. Brgds Jonas
-
My best guess is that you accidentally used the diameter of your arm instead of the circumference. That would give a cuff about 3 times smaller than what you would need. You need to use either a tailors type (soft) measuring tape, or a piece of string to measure around your arm. And remember to measure outside on any shirt etc. that you want to wear under the cuffs. I just tried to see what my measurements are: And with bare forearms mine are something like 8" for the fwd part, 10.5" for the upper part, and the length is something like 5". The picture / diagram in your book sort of gives the wrong impression size wise. You need a fairly large piece of paper to be able to draw the pattern. Good luck, brgds Jonas
-

Replacing the insole in a riding boot.
Mulesaw replied to Mulesaw's topic in Shoes, Boots, Sandals and Moccassins
@Tastech Thanks for the explanations. I sadly don't have a wooden or a plastic last, so I just hope that the insole will mould to the foot over time. I suppose I could have tacked it all together I never thought about that. My anvil is an old cobblers thing with a cast iron base that extends around 24" from the ground. I have different sizes of foot shaped anvils that fits on top of the base. Most of them seem to be for really small feet. The biggest I have is a size 8 as far as I remember. But I can move the boot around to get support all the different needed places. Originally Gustav wanted to throw out those boots, but I sort of wanted to try to copy them, so for a long time my plan was to cut them open and copy the shapes and then try to make a new couple based on that. But I am glad that I repaired them. I need to find the time to make some wooden lasts so I can try to make a set of boots or jodphurs or Chelsea boots. But there always seem to be so much going on that it is difficult to find the time to do it. In the mean time Gustav has ordered some new boots and those that used to be the daily boots are now in need of a repair job. I think it is the heels that are won on those. They are a different model with stacked leather heels. I have replaced the outer rubber piece of the heel some time ago, but I thin that he has worn them down so much so that I need to replace the entire heel block. I was wondering if I should buy real sole leather for that, or if I could take some thick veg tan and moisten it before compressing it - then leaving it to dry. My guess is that sole leather is just heavily compressed veg tan, but I could easily be wrong here. Brgds Jonas -
Replacing the insole in a riding boot.
Mulesaw replied to Mulesaw's topic in Shoes, Boots, Sandals and Moccassins
Glad to be able to inspire a little :-) I think I would use a regular diamond shaped awl if I had to make holes in leather soles. But I'd make sure that it was well sharpened before using it. So a bit of sharpening and stropping should help I think. The hook-awl I used for attaching the uppers to the insole was a cheap one I got form the Internet (TEMU), it was not at all sharp when I got it, so I started by making it nice and sharp. And like in woodworking: Sharp fixes everything. If you have leather soles, I think it also depends on if they are sewn along the edges (Goodyear welt as far as I have understood), or if they are sewn from the inside (McKay stitching I think it is called). I don't think you can do the inside stitching without a McKay stitcher which is a big sewing machine. But if it is a Goodyear welt, you can do it with hand tools. @Tastech is a pro, so if he chimes in with advice, I'd 100% go with what he suggests. This is my first attempt on this type of repair. If you needed advice on replacing zippers in riding boots, I'd be much more comfortable giving advice since I have done that a lot. brgds Jonas -
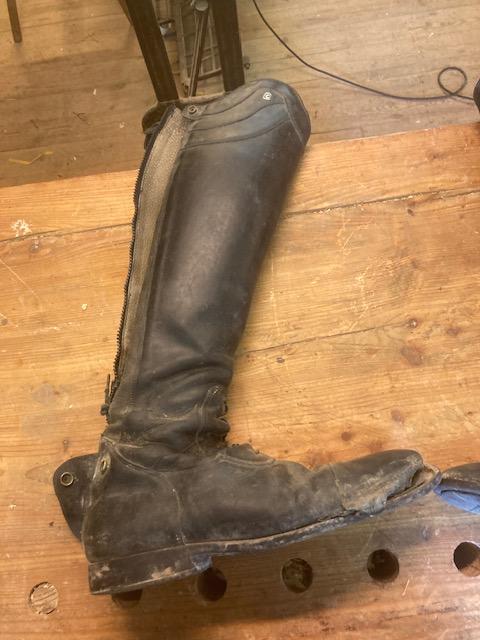
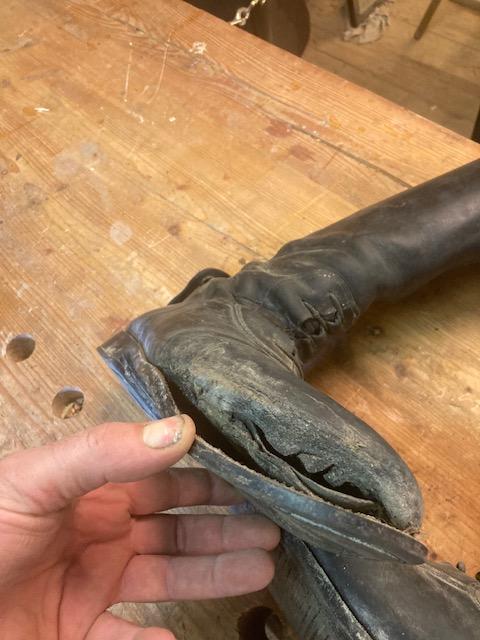
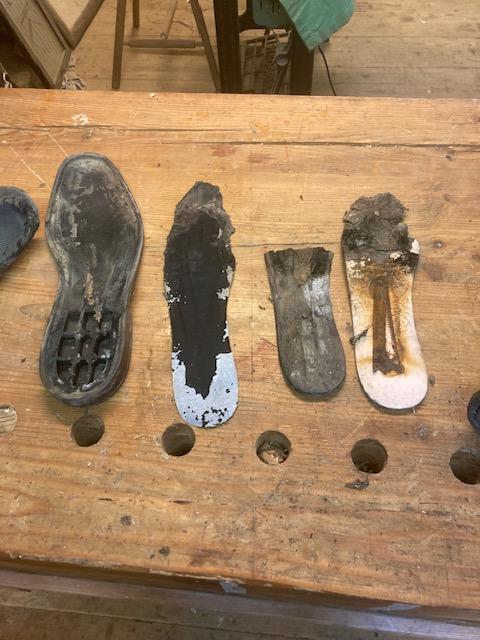
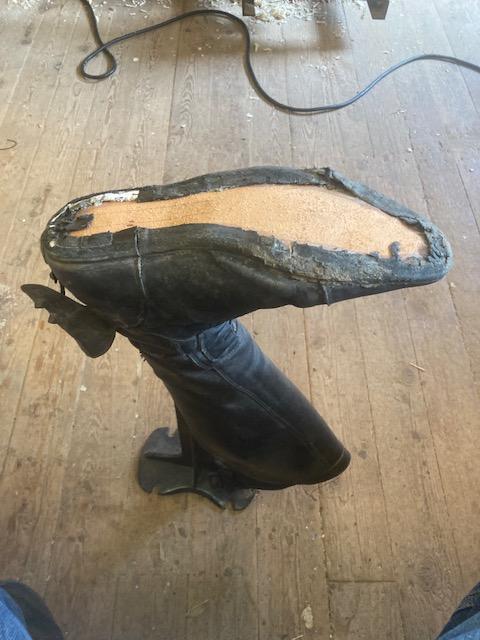
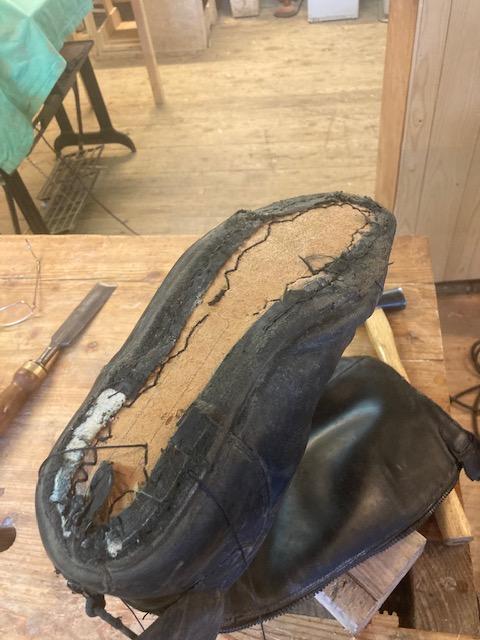
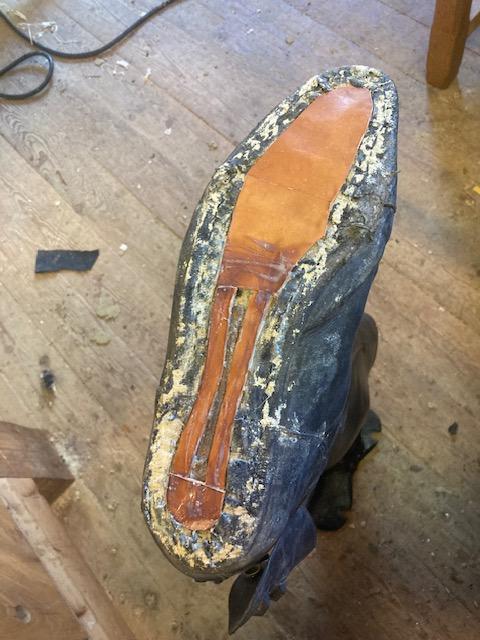
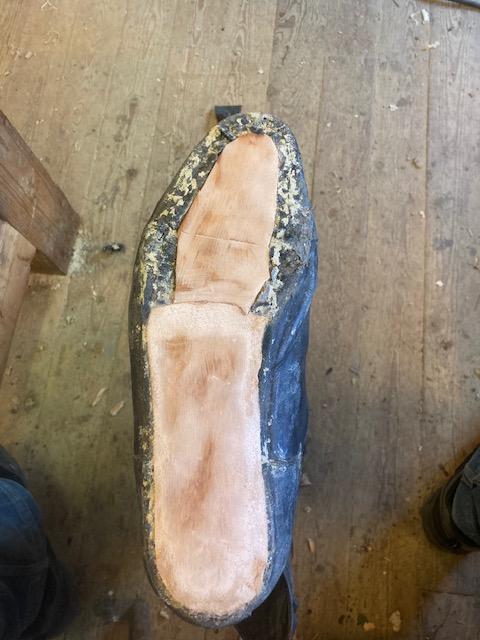
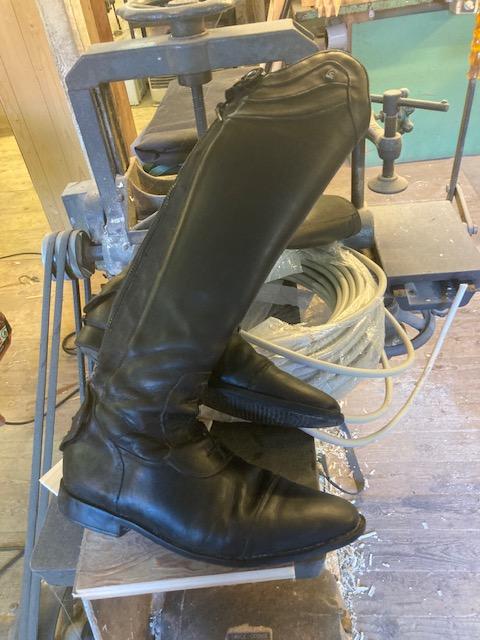
I got hugely inspired by @Tastech to do some more serious repair work on a riding boot this time home. Our oldest son works full time as a rider at a jumping stable, and his old daily boots had come apart. The glues outsole had loosened completely, my guess is that it happened since the insole was only made of some pressed cardboard like material, and the uppers were only glued to the underside of it, so at some point everything started to loosen and the boot was damaged. I took off the outsole and inspected the boot. The midsole was also some cardboard like material, and that was removed as well. I made a new insole from a piece of veg tan leather, tracing the remains of the original insole and guessing how the tip should look. The new insole was glued in place and I used a curved awl with a hook on it to make a lock stich to attach the uppers to the insole. Since the original sole didn't have a sewing channel, I thought that I'd better not change the design too much and that's why I chose the lock stitching method. When the insole was in place, I glued the sole stiffener in. I didn't have any cork filler, and I had too little patience to get some. So I tried to make my own filler from latex paint, sawdust and PVA glue. It looked all right, but I after letting it dry I as afraid that it would not hold up to the job, so I removed it all again. I didn't want to risk that the sole came off because of my homemade filler. After spending a lot of time removing the sawdust paint filler, I decided to fill in the voids with some scraps of veg tan instead. That went surprisingly well, and after attaching the mid sole, I rigged up an old round sanding wheel, and roughed up the bottom and shaped it to correspond to the inside of the sole. After one failed glue attempt where I had placed the sole too far back, I managed to get a decent positioning and everything was hammered tight. I don't have a heel press at the moment, but hammering seemed to do the trick. I didn't time myself for the repair job, but given that a set of boots like those will most likely set you back around 600 US$, it is still worth spending a couple of hours doing it plus the added benefit that it is an interesting job and I like to learn something new. The biggest surprise for me was that the original insole and midsole were of such a crappy quality. And also that the upper and the insole/sole only relied on glue to hold it together. Aside from that, it was daunting at first to separate the boot, but once I got started it all seemed fairly logical. And given that the boot was so damaged that Gustav originally wanted to throw it away, I didn't risk much except investing a bit of time and learning something in the case that I hadn't been able to repair it. Damaged Cavallo riding boot. Close up of the damaged part of the boot. Sole, inner lining, midsole, insole with stiffener on it. The new insole is glued in place prior to stitching. Wavy stitching, done with a hook-awl, it doesn't look pretty, but I think it holds better than no sewing. The white stuff is the remains of the homemade paint/glue/sawdust filler. Now the voids have been filled with veg tan that is glued in place. New midsole installed and the underside has been shaped on the sanding wheel. The sole is glued on again and the boot should hopefully hold up for a bit more use.
-
@TomMeyers If it works I can't see anything wrong with that. I think it will take bit of experience to make it easy and look nice, but so does most things. A saddle stitch makes sense to use where it is needed due to strength. But for purses I doubt that there will be much risk at stake should a stitch fail. So I definitely think that you should go for it. Brgds Jonas
-
Source for engraved metal hand bag label
Mulesaw replied to goober's topic in Hardware and Accessories
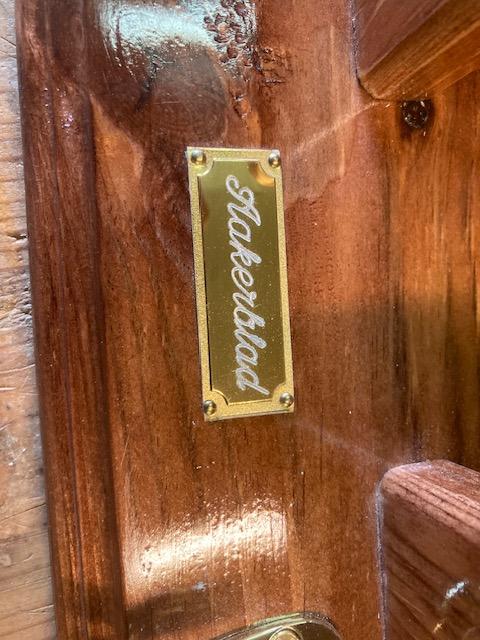
I think you just need to find someone in your area that does sport trophies. In Denmark they normally do engravings, and they would most likely have different types and shapes of small brass plates, that you could get anything engraved on. Again I don't know what the tradition is in America, but other shops that could do it would be jewelers or those shops that make dog tags and cut keys etc. If the shop has got a pantograph engraving machine, they can engrave any shape that you desire. I have got one, but it might be a bit easier to find someone local that you can talk to directly :-) The machine can reduce an image easily, so if you draw your logo say 4"x4", then the machine operator simply follows the lines and the engraving head makes an exact reduced copy of it. My machine can reduce 8 times. So if the original is very large and you need the engraving to be on a tie tack, then you could always reduce it in two steps. Here's a name plate that I engraved for a custom made headstall holder for a customer. Here's a closeup of the engraving. Brgds Jonas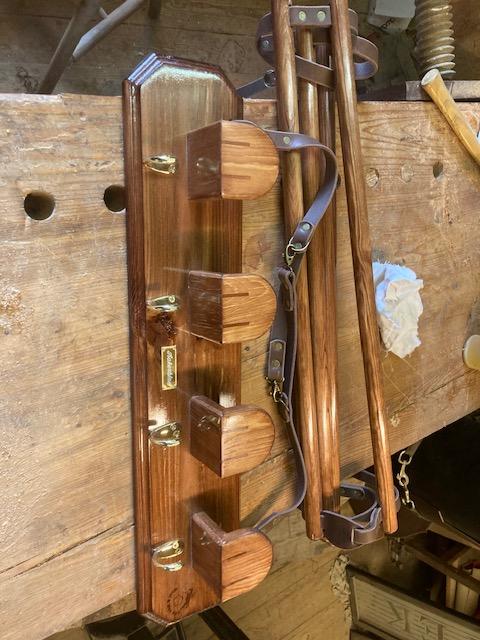
-
@TomE Hi Tom, I just got back to the ship today, and while I was at home, I looked in the old German saddler book regarding the use of pitch/tar on rivets - but I couldn't find anything mentioned about it. My best guess is still that it was done for some sort of water proofing. I have seen some old leather gear that was made using iron rivets and iron buckles etc. They often tend to get damaged when those things start to rust. So perhaps the original maker of the surcingle wanted to make sure that it didn't happen even though he/she used copper rivets. I think that if you used iron/steel rivets, coating with tar would effectively seal all the "end grain" in the holes that you punched to insert the rivet. But is is still puzzling. Brgds Jonas
-
@TomE Really nice job. There is just something about nice fluffy new fleece that looks attractive :-) I have always liked those halters that are completely covered in lambs fleece. They just looks so comfortable. Brgds Jonas
-
Morning, and welcome to the forum :-) I am pretty sure that it is described in "encyclopedia of saddle making" by Al Stohlman. I am not near my own copy at the moment, so I can't check it out for you. But as far as I remember, the saddles that makes in the encyclopedia are all made using hand stitching. Generally what I have found while repairing saddle skirts (on English type saddles), the most important thing regarding the look of the saddle is to be consistent with the tension and the position of the awl and the thread in the holes. So I would guess the same applies to a western type saddle. There is an entire sub forum assigned for saddles and tack, you could try to look there as well to see if there are some tips and tricks regarding skirts. https://leatherworker.net/forum/forum/62-saddle-construction/ Good luck. Brgds Jonas
-
Very interesting. My initial thought is that it was done to waterproof it. In the 2nd book of the "little house on the prairie" series (I think it is called farm boy in English), Almanzo's family get a visit form an itinerant shoemaker. He uses some tar to impregnate the sewing thread to waterproof it. But then again there is a difference between a rivet and a stitching. I'll try to look in the old German book when I get home, to see if there is any mentioning on pitch/tar. Brgds Jonas
-
That is really a nice looking press. I think I know how you feel with that wire coil heel attaching machine. Those old machines that are purely mechanical are small engineering marvels in their own right. And it is cams and levers that do all the job. Absolutely fascinating to watch. I am looking for a mechanical heel press, and a boot shaft enlarger (probably not the correct name), but I also try to tell myself that I should build some more knowledge about the process before building a bigger tool collection :-)
-
@rac1812 That HD machine sounds like a beast! Could you please take some pictures of it, if you decide to borrow it for the sewing? (Just out of regular old fashioned curiosity and interest in old machinery :-) Cleaning and setting up is still easier and cheaper than driving a long distance to get a new machine. Who knows, perhaps he'll even be willing to sell the machine to you? Most of those old machines can be taken apart in more manageable chunks, If the head is separated from the table, perhaps it could be possible to get it out of the basement. Provided that he is willing to part with it off course. Good luck Brgds Jonas
-
@Tastech That slide hammer looks fantastic! A couple of days ago I watched an English cobbler on Youtube who used one, though his was not nearly as good looking. I thought that I could try to make one myself some day. Do you think that any regular cobbler/shoemakers supplier have got those special nails? Brgds Jonas
-
How about some granulated cork? You could get a couple of sanding blocks at a home center and then "grind" them up. Maybe use something like a really coarse file/rasp to granulate the blocks. I don't know if you can get readily granulated cork, but it might be possible. Coarse sawdust could also be a solution, though I think that cork will result in a softer product. Sawdust/chips pack pretty hard. Mind you that I have absolutely no experience with bucking rolls, so I am just suggesting based on what I would use for something like that. Brgds Jonas
-
I wish I could (go home and fix the boot I mean), but I have a feeling that there will be a bit of an explanation to the office and the rest of the ship in case I clear off, but I'll go home on Wednesday, so I can see an end to it :-) I think I have a lasting plier at home somewhere from all my dads tools. I just have to see if I can find it. then I could really get going. Brgds Jonas