Members TheCyberwolfe Posted June 4, 2015 Members Report Posted June 4, 2015 I don't think I'd ever be able to get a gas pump near my bike again if I put that much work into a tank cover Quote -- I don't suffer from insanity, I enjoy every minute! www.rogueleather.com
Members Peter Darby Posted June 4, 2015 Members Report Posted June 4, 2015 Wow! Very impressive, Well done. Quote
Members OdinUK Posted June 4, 2015 Members Report Posted June 4, 2015 How did you manage to tool the formed leather after the wet forming? I'd have guessed the tooling would be done before forming, but then it may stretch. Quote Lord Of Leather
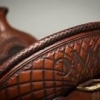
Members skivery7 Posted June 4, 2015 Author Members Report Posted June 4, 2015 Initially I was worried about stretching the pattern out too - as well as trying to eyeball centering the panels when I glued them, which is why I decided to mold them first. I used both a glass slicker and the side of a large, round screwdriver to really get the leather to "behave" while wet forming. Then when I popped the dried panels off they retained the memory of the panel shape really well. That, combined with skiving past the edge and a bit further into meat of the panel (1/8") made it all really malleable and clearly defined the tooling space. Then I just taped the backsides and tooled away.... I kept my registration marks on the backsides of the leather as well as directly on the panels - so I was able to line everything up really precisely when it was time to glue, working the glue from the center out, and it went on just fine and with no struggle. I've used this method a few times in the past with good results. I'm not so gentle when it comes to the molding part: I really work it pretty hard and wouldn't want to mangle my tooling, so I've found this works best for me. Quote
Members Craftsman Made Posted June 4, 2015 Members Report Posted June 4, 2015 Absolutely fabulous work. So detailed great job. Quote
Members OdinUK Posted June 4, 2015 Members Report Posted June 4, 2015 Thanks for describing that, very interesting. I'd like to make a removeable tank cover with a soft lining, perhaps suede or microfiber cloth to protect a custom paint job when its being used for general use. Quote Lord Of Leather
MikeG Posted June 4, 2015 Report Posted June 4, 2015 Not only is the workmanship off the chain, I love the way the theme and the colors all fit the bike. WOW. Quote
Members Oakley Posted June 5, 2015 Members Report Posted June 5, 2015 Absolutely stunning !!! Especially the holes for the screws are absolutely perfect, how do you cover them? Quote
AndyL1 Posted June 5, 2015 Report Posted June 5, 2015 Love it! We don't see Native American art tooled into leather very often. I really love that type of art. Your execution is beautiful and perfect! Thanks for sharing. Quote Blackthorn Leather on Etsy • Blackthorn Leather on Facebook


Recommended Posts
Join the conversation
You can post now and register later. If you have an account, sign in now to post with your account.
Note: Your post will require moderator approval before it will be visible.