All Activity
- Past hour
-
Nice work on the stitching without a clam, I love hand stitching things no matter how tedious it can seem to be at times once I get into it, music playing in the back round or listening to the TMS ( Test Match Special ) its Cricket commentary. What is the spi you have used. Regards JCUK
-
My cutting board is used only for cutting I do not use it for anything else as I know it will mark or scratch my work, so it would maybe better to get another board and use that for other things other than cutting and punching. Once I have finished cutting that board is removed from my bench same with my punching surface. Hope this helps JCUK
- Today
-

Custom speed reducer pulley for Singer 51W56
Scoutmom replied to FDC's topic in Leather Sewing Machines
Love the table. Do you mind sharing how you made it and where you got the parts? I see the foot pedal is mentioned above. The machine and speed reducer look great. -
I'm a huge LOTR fan. Here's an absolutely hysterical thread about a dungeonmaster (think that's the correct term!) trying to get a group to play LOTR as a D&D game! https://www.shamusyoung.com/twentysidedtale/?p=612
-
-
Being a lazy sod I'd use an electric planer
-
T'other night my #1 favourite dottir was telling me about a D&D game she is leading. The players play remotely by computer link-up The game was so seriously involved it made 4 dimensional chess seem like an infants game
-

Custom speed reducer pulley for Singer 51W56
GerryR replied to FDC's topic in Leather Sewing Machines
Links to AC Drive Components: VFD good for up to 1HP 3-phase motor: https://www.amazon.com/dp/B0DFB57721/?coliid=I8NFU0YE5UPT8&colid=17LBFSFMFWW6H&psc=1&ref_=list_c_wl_lv_ov_lig_dp_it Note: I bought mine through Ebay, but this is the same one. Motor: https://www.bodine-electric.com/products/ac-3-phase-inverter-duty-gearmotors-and-motors/42r-fx-parallel-shaft-ac-3-phase-inverter-duty-gearmotor/ Note: I was able to get model 2263, which has 58 in-lbs. of torque and 340 RPM at 60 Hz. You can choose outputs suitable to your needs and even get right angle output shaft versions. Just for comparison, the DC servomotor I was using was rated at 28.8 in-lbs. Foot Pedal Control: This is where I got a little creative. I took a TIG welder foot pedal and did a little rewiring. I got the unit off of Ebay: https://www.ebay.com/itm/176920994141?_skw=TIG+Welder+foot+pedal&itmmeta=01K01RR8XF07B0ETNHVT3SNZC6&hash=item293150215d:g:7KQAAOSwha9jZI28&itmprp=enc%3AAQAKAAAA8FkggFvd1GGDu0w3yXCmi1cdg2dYapN7bLOj7QNBNYvFBgb9nYOw6ivyhEaLfbTDARnhlFmmmIvRE5v%2BmSHS6NHzBxmYRm%2FS%2FOUguxh4QASZ6dKnq4aAfCKcCK9LWjU5OyPxxvNKcH3CjV9WGIL7ylcLvGzb6%2Bdvpe9MAB418aLD72qlvGirmqZ2XNTPpOEnSdadqe%2BJUuU70vTyKzaCPmAPE85JgmuvVu3AwzJYH9iW5vfdQNC7nCE8q1Im3b6Kp6cynjjiIrNBiNTH1T%2Fur%2B7h1JYK8hs%2Bt5hyHSlK4eaNsbSQ%2FRi%2Bmrmp2OVY%2BjRpfg%3D%3D|tkp%3ABk9SR4CP4biAZg I rewired it so the knob-controlled pot limited the top speed so the foot controlled pot had full range to that limited speed. I put everything in a case: https://www.ebay.com/itm/165626696069 These are the basics. I added circuitry for a position sensor that worked off a jog button. I don't use the position sensor, but it is available if I ever want to use it. The jog is so slow that I can stop the needle anywhere I want. This should give you a good start. Feel free to ask any other questions you might have. Happy to help! -
They look spot-on there I've seen far worser being sold as 'artisan' made. And they weren't cheap The house I used to live on was built over a clay base. Clay was only 18 inches below the soil. The whole area used to be known for high quality clay pots and bricks. Still is for the bricks, major exporter of
-

spring flowers and good food
chuck123wapati replied to chuck123wapati's topic in All About Us and Off Topic
thought i would post my first successful pot. Nice kiln LOL. I made the small ones are a couple of test pots for the different clays I found, the large one is the first attempt at a real pot. it is kind of wonky but it didn't crack. I'm going to collect more of the good clay today and maybe a few fish, do some foraging, have a cold one in the mountains, Have a great day, friends !!!!!!🍺

-
DnD related question
chuck123wapati replied to UnderTheRedMoon's topic in All About Us and Off Topic
Truthfully, all i know about DnD is what I've learned from watching Big Bang Theory lol. -
 Looks like a model from the 1980 which is slightly different to the latest model. IIRC the blade spring on the rear is a different one on the latest model but thats the only major difference I recall. Right now I have a very similar machine here and can take some pictures if you need assistance. Some time (years) ago I translated a 8346 mechanics manual from German to English for one of our members (seems I had a lot of spare time back then 😊) but I have to look for it in my records. I´ll send you a PM if I find it. BTW some of the parts I see in the pictures obviously do not belong to this machine. FI the Singer class 15 bobbins and the bobbin cases.
 -
Very wide twin needle guage machines?
Constabulary replied to medion's topic in Leather Sewing Machines
be careful with very wide needle spaces and Singer 212 machines (& their clones - probably). I have a 212G141 and have it set up for 1/4" + 3/4" and wanted to use 1" as well BUT due to the width of the double needle holder it is necessary to alter / grind off some material from the casting to make room for the wider needle holder. I only can speak for the 212G1414 (using 135x16 needles) but the problem may be the same on other machines / brands as well. However in my case I´m using a split needle holder which is longer than the standard needle holder so it may depend on the machine and how you set it up. I just wanted to share my experience. 😉 This is what I did with my 212G141 some years ago -

Very wide twin needle guage machines?
nylonRigging replied to medion's topic in Leather Sewing Machines
Any of the needle gauge sets for the mechanics of Needle-Feeds machines, like Singer 112/212 style feet and feed will go past farther than 1.5 inch wide. Real easy to set-up also. reasonable priced and easy to find. For newer machines I like the double-needle juki LH model in that foot style and feed. but I still got old singers to. example here .. offer up to .. 1 - 3/4" .
-

Juki 5550N experiencing problem in the bobbin area
thobgood replied to thobgood's topic in Leather Sewing Machines
I shall do this first thing tomorrow! Thank you so much for the suggestion friquant! -
 I can see that the timing is off, as it moves too far clockwise / not far enough counterclockise to drag the thread around the bobbin. (Even if it did manage to pick up the thread in the first place) I have not been able to find a service manual for this machine. As @Cumberland Highpower said: "Just look over the mechanisms, you should be able to "see" what the problem is with a little careful analysis." I would start by removing/opening covers. See if you can trace the movement of the hook all the way back to the main shaft. That is, figure out which shafts, rods, gears, cams, and/or arms are involved in making the hook turn. At least of of those members will be adjustable in a way that allows you to change the hook timing. Feel free to post additional videos as you make progress. Once you figure out what to adjust to effect a timing change, try setting the hook so that in its clockwise swing the point of the hook only goes about 5mm past the needle before the hook turns around to go counterclockwise. I expect that will put you in the ballpark where it will actually sew.
 -
Nice work. Looks great to me. What choice of leather did you use?
-
Juki 5550N experiencing problem in the bobbin area
friquant replied to thobgood's topic in Leather Sewing Machines
Wow it's hard to see down in there. I'm used to having a vertical-shafted hook where you can see the thread take a round trip. Can you take one more video with the feed dogs removed, as close as you can but still in focus, and move the handwheel very slowly. (About four seconds to do a full turn ought to do it.) Then maybe we can see what's clunking around. If we can't see it from above, you may be able to get a shot from below the left side. (This may require partially disconnecting the arm that the feed dogs ride on so we can get a better view) If using an iPhone, Uwe made a demonstration of how to lock the focus on an iPhone for taking close-up videos: https://www.youtube.com/watch?v=twl_V_vlq2Q -
Sounds nice, question is the pin straight through? Ground in on one side and it didn't seem to have a head. Thank you
-
 Do you sell the clincher links that Standard Rivet carried, or know where they might be found? Found them on your website! Will place an order, thanks.
 -
Hello! I've been a reader here for years and seeing other people's machine problems and the comments from other forum members suggesting fixes has helped me many a time. This week I've experienced a machine problem of my own, and for the first time I can't find anybody who's had the same issue, so I'm posting this with hopes that someone wiser than myself might be able to help me out. I've been sewing for nigh on 45 years now, but I'm still no machinery expert. I can figure out most little things (tension—it's always the tension!) but this one has me stumped. I've got a nice little Juki 5550N that I bought new (back when I could afford to buy things new!) I've had it about 9 or 10 years now I think, always sewing the same sort of stuff, but recently it's been acting up. I've noticed the occasional skipped stitch, and have noticed the thread momentarily going slack now and then. The past few days I've been tearing my hair out trying to diagnose the problem (and I lost my hair years ago, so that take some effort!) I'll list what I have tried at the end of this post, but right now I'll tell you what I've figured out. I think this issue is in the bobbin area, with possibly the thread catching on something or having trouble making it around the shuttle. It still sews and produces nice stitches most of the time, but there is definitely an issue. When I did a test sew just using the handwheel, I noticed that resistance is felt when the take-up lever is reaching its lowest position and just starting to move back upwards. If I continue to move the handwheel, two little pops are heard, as if the thread is catching somewhere and being released. As I mentioned earlier, when sewing with this issue, I've started to see the occasional skipped stitch, sometimes two in a row, and occasionally the thread will momentarily go slack between the take-up lever and the needle, justjsut for a moment. Then it gets tension again. I've made some videos showing the behaviour while handwheeling. I'll link those at the end of this post. Here's what I have tried: I've changed the needle for a new one. I've changed the size of the needle (even though I've been sewing with that size and that type of thread for years with no problem.) I've tried different cones of thread. I've changed the bobbin. I've tried a different bobbin case. I made certain the needle was inserted correctly. I've rethreaded the machine. I've disassembled the upper tension assembly to make sure it wasn't clogged with lint, and carefully reassembled it. I've adjusted the tension to make sure it is correct, and it does form nicely balanced stitches. I've taken off the needle plate and feed dogs and cleaned the bobbin area. I've oiled the machine. I've checked to make sure there are no foreign objects clogging the bobbin area (and there are none I can see.) That's about the extent of my machine knowledge, and now I'm stymied and frustrated. On to the videos! I tried to shoot from a few different angles to give y'all the best views possible. I'm handwheeling slowly so you can hear the pops hopefully. They're happening just as the take-up lever reaches the bottom and starts back up, and I've tried to show both the bobbin area and the take-up area so you can see how they correspond, and have also done a closeup of the bobbin area. Test sewing on scrap fabric: https://youtube.com/shorts/CofAeMaxJ8A?feature=share Needle plate removed, shot from left: https://youtube.com/shorts/794Q-e1iLlw?feature=share Needle plate removed, shot from right: https://youtube.com/shorts/pplD9J6i8Zo?feature=share Needle plate removed, closeup from front: https://youtu.be/9bncMsKGbBE Any suggestions would be SO appreciated. I'm at my wit's end and haven't gotten anything done for a week or more. Between that and the floods, it hasn't been the best of times here in NC! Thanks so much.
-
Custom speed reducer pulley for Singer 51W56
Calidora replied to FDC's topic in Leather Sewing Machines
Wow yours look way better than mine. They are amazing machines. Now that I have mine up and running it makes working on things much easier. I find that post beds are some of the most versatile machine out there. I don't have too much experience with several others but I've used a cylinder bed and flat and I like my post bed much better.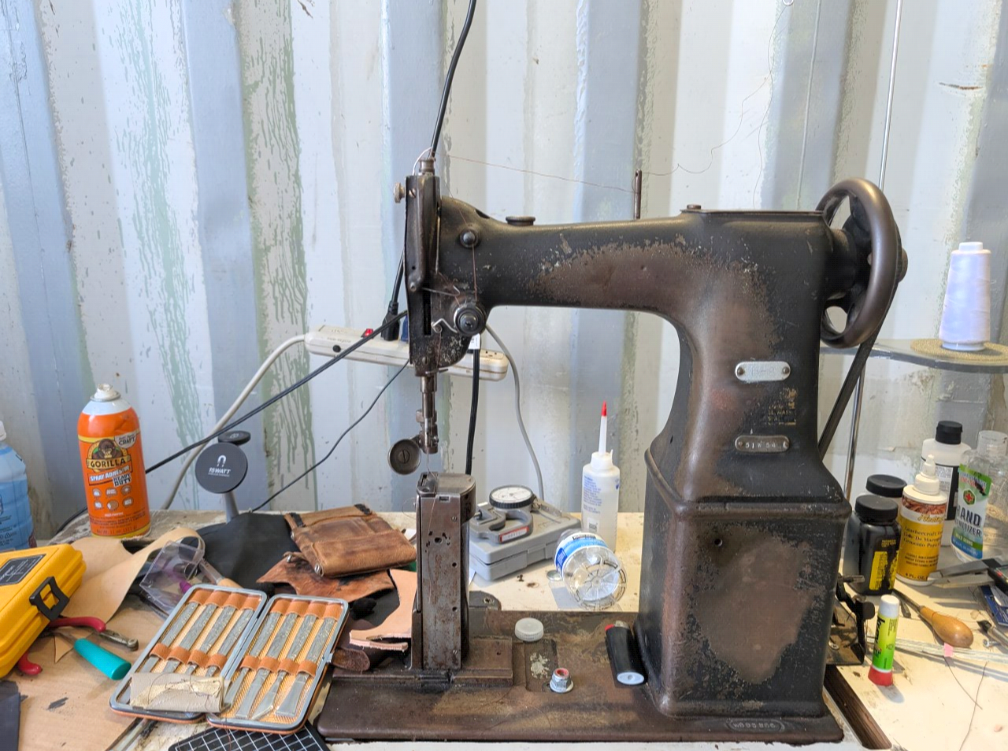
-
Custom speed reducer pulley for Singer 51W56
friquant replied to FDC's topic in Leather Sewing Machines
Can you post links to the pieces one would need to buy in order to build this setup? I'm interested -
Custom speed reducer pulley for Singer 51W56
friquant replied to FDC's topic in Leather Sewing Machines
Yes I mean the pulley on the servo motor. They are typically 75mm. If it has a 15mm cylindrical shaft, that pulley can be replaced with a 45mm pulley for about ten dollars, which will slow down the machine. - Yesterday
-
 Here is the correct link: https://blinginthering.com/blogs/news/what-happened-to-the-standard-rivet-company