

All Activity
- Past hour
-
Does anyone tool English bridle leather and is there any secret to tooling/stamping? I got another order for a belt but I ran out of belt blanks... Since I don't sell many belts, I usually only cut a few out of a each side. I didn't want to order a whole side quite yet because I have plenty to continue making holsters. So I jumped onto weaver's website and came across Hermann Oak english bridle 10/12oz 1½" belt straps. They're veg tanned and can be stamped and tooled. And since I only use Hermann oak veg tan I thought this might be a great option. I got the strap a couple days ago. It's a nice solid piece of leather with nice tight top grain. I'm not so happy with the flesh side. It's been finished and it's obvious there's a ton of loose fleshy leather. I'll line it anyway, but that's a red flag for me. It wouldn't be a part of the hide I would use for holsters because that typically tells me there's no real solid body to the leather. This strap feels solid though I gave tooling a shot on the cutoff, which is where the most loose flush side is. It definitely feels tight and sold. So solid it's hard as hell to tool. It carves easily enough, burnishes like a dream, but it almost feels like I'm tooling a dry piece of leather. I need to hit my tools quite a bit harder than I'm used to, which is putting my tooling skills to the test. Before I start the actual belt, I had to ask the questions above Thanks
- Today
-
That's a cool looking holster.
-

The perfect oval punch.
wizard of tragacanth replied to bsshog40's topic in Leatherwork Conversation
In regard to my last post, two up ( I wish these posts had numbers for reference) I must have been suffering from old-timers disease. I meant to say that most CCW/casual belts are 1.5" wide, so the slot should be a little wider, like a minimum of 1/8" wider, so 1 5/8" for a vertical slot. Listen to Bruce Johnson. He said it right. Sorry. -
Use a good boot waterproofing and buffing on the sheaths and thumpers, then take care of them like a pair of good boots. On the dog collars, an initial oiling with NfO, then the dog's own oils keep them supple unless they are really water dogs on a daily basis. Acrylics tend to crack and peel when actually used on stuff that flexes, then do no good anyway. Plus my ignorance of its chemical properties and laziness to look up possible problems I wouldn't put it next to my dog's skin on a permanent basis.
-
Thanks everyone !!!
-
Legal is 8.5 x 14". Yeah, your right. Sunday morning brain cramp ...
-
Size - far and away I sell more 1-3/4 inch to makers than any other size for pancakes. The standard 1-1/2 inch belt and the cant of the slots. The guys who wear a 1-3/4" duty or heavy concealed carry belt - then we go to 2". Some makers have patterns with less or more cant and they call for 1-5/8 inch or 1-7/8 inch punches. The big thing is for the belt to fill the slot and no up-and-down play.
-

Singer 29k1 presser foot doesn't work
Wizcrafts replied to MelissaViarengo's topic in Leather Sewing Machines
I would lower the stitch length gib until it just hits the top of the foot when it is in the manually raised resting position. This is the highest position the foot can reach and the longest stitch length setting possible for this type of machine. With the foot lifted by the lift lever, push and pull on it to see how much slop is in the mechanism. If it has noticeable slack motion, that translates into lost stitch length. The thicker the material, the greater the loss of stitch length no matter how tight or loose the foot drive parts happen to be. Remove the needle for this item! With the foot lifted, rotate the balance wheel towards you from the top. Verify that the foot moves forward then backward. Hold the front of the foot by the legs and see if it still pulls backward under a slight resistance of your hand on it. If it fails to pull back, the feed motion cam is worn beyond viability and must be replaced or rebuilt by someone with welding or soldering skills. Otherwise, move on to the next item. Lower the foot lift lever and check to see if the bottom of the foot is in contact with the throat plate. It must be in contact if it is to sew thin materials. The movable slider on the back takes care of how high the foot lifts as it moves forward to pull the material. If it doesn't go all the way down, something is interfering with its up-down motion. It could have to do with the next item. Make sure you have a decent amount of spring pressure on the foot! Tighten the thumbscrew on the middle of the big spring along the back to add more pressure, and vice-versa. Make sure there are sharp teeth on the foot. Dull feet won't feed most materials, or slick leather. You can hammer or rub out the tooth marks later on. So, make sure that the lowered foot goes all the ways down, then lifts up to the height set by the lifter on the back. Verify that the foot feed motion cam is moving the foot backward as the machine turns over. Know that parts specific to this model (-4) are obsolete. Most people have to find donor machines to strip parts from, or have parts repaired or modified. Pray that the little gears inside the arm are still good! -
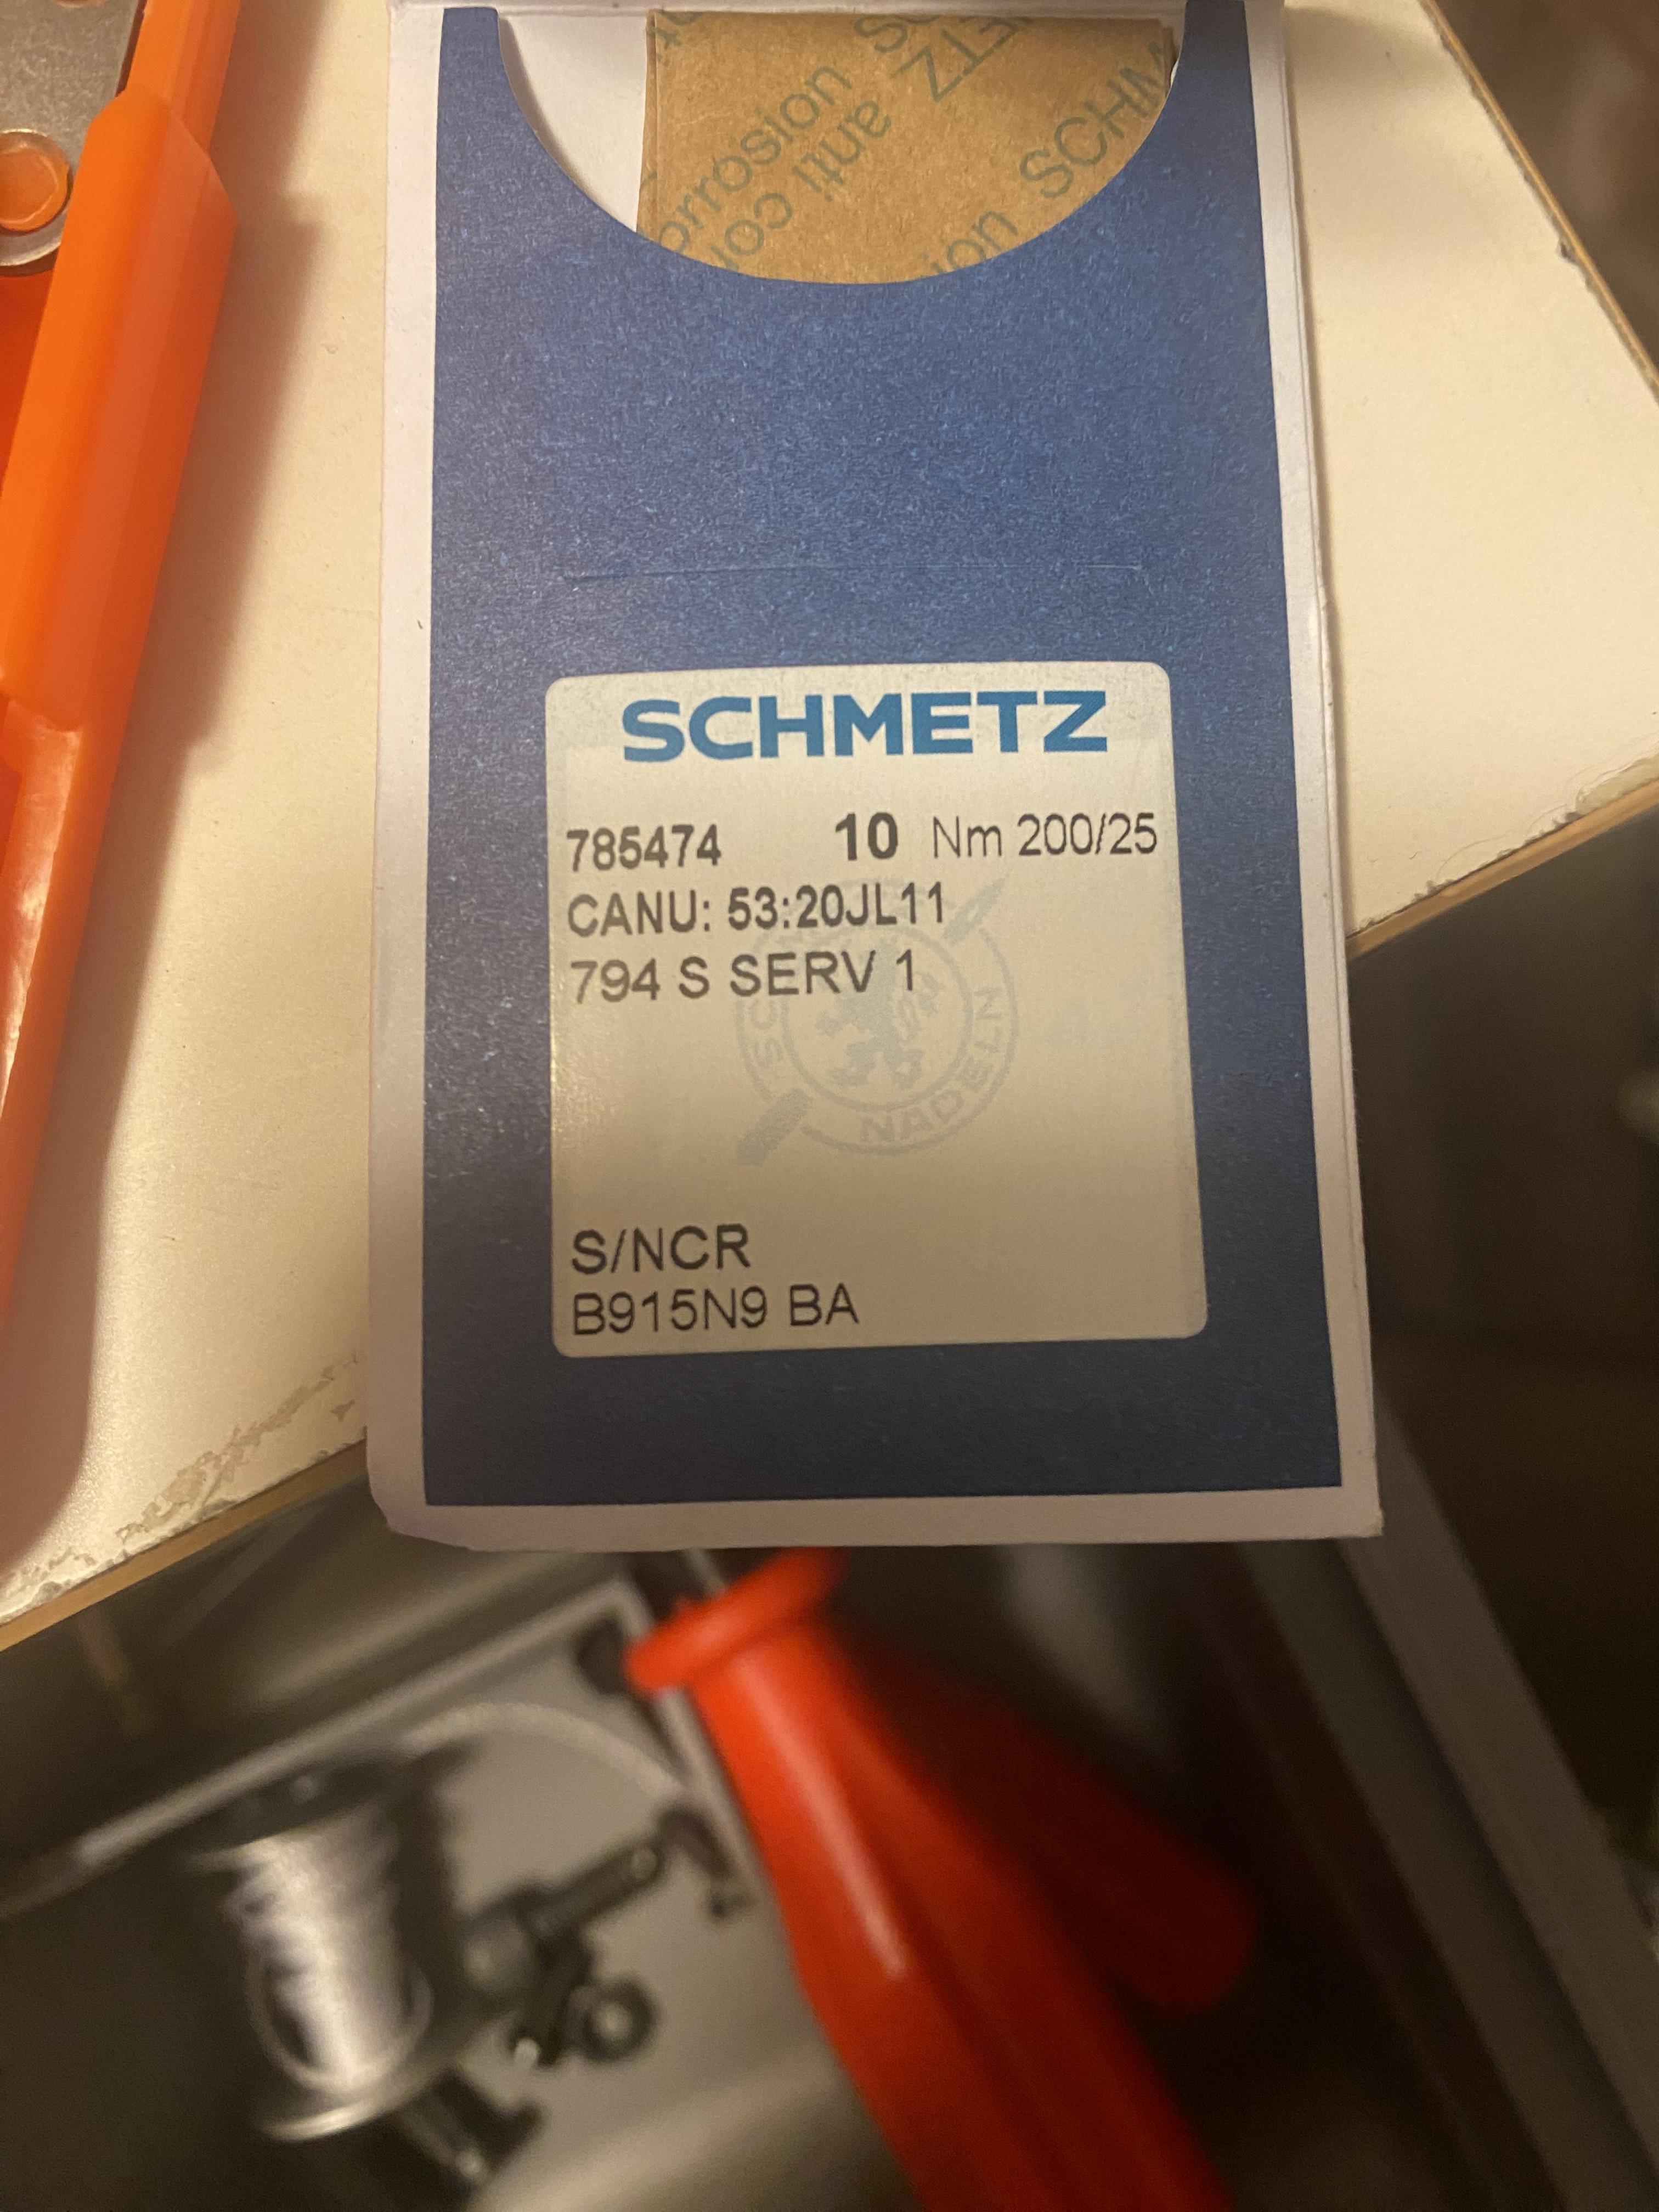
My apologies for the delay. My needle pack says 794 S with 277 thread. Did not know all that about the needle geometry. And if I’m looking at the correct bracket it’s not loose. I’ll try to take a video today or tomorrow to demonstrate.
-
Legal is 8.5 x 14". 11 x 17" is Tabloid or Ledger. Commercial scanners like at Staples or UPS stores handle 11 x 17. Hard to find others for larger pages, but there are some that will do it.
-
11x17 is standard legal size. I don't know if a Staples could scan it or how much trouble it'd be. Large format stuff can be expensive.
-
Each sheet is 11x17 so 22x17 folded in half. That would be a difficult size to print or scan.
-
Kudos and bonus points to @NerdyLeather. Definitely got my eye out for a hard copy. Is that longer than a regular 8.5x11 sheet? I'm just wondering if an office supply type place might be able to scan a pdf? I'd certainly chip in to cover the cost.
-
-
Now for the stranger thing. I bought one in a set a few months ago- the first I had actually seen. I asked a guy at the Sheridan leather show if he'd seen them or used one before. He bought it. There is a glimmer of hope more than one made it to the US. However, there are other versions made here in the US that are available.
-
@David Hall, my friend, that is a 15 year old post, the original poster hasn't been seen since 2013 and the website he lists is defunct! Stranger things have happened but I wouldn't get my hopes up!
-
Ya, I just bought one of those iron sets off amazon for now. I found one size in there I like. They're pretty sharp. Can't complain about them right now. I'm sure if I get to using it more, I'll have to start sharpening.
-
 steadystate joined the community
 -

spring flowers and good food
chuck123wapati replied to chuck123wapati's topic in All About Us and Off Topic
Second time is a charm LOL. If you ever get large lumps of fresh meat, age them them about a week in the fridge before freezing them, it helps a bunch. A favorite cut of cheap beef we like is the London broil, its basically just a really thick chuck steak and usually are tough as nails. To actually enjoy eating them I sprinkle them with Accent, meat tenderizer, then use a fork to tenderize them working the accent into the meat. A good sprinkling of salt and pepper then broil them about 7 minutes to the side, and let them set for about 5 minutes before cutting. they come out medium rare but the real secret is slicing it super thin at an angle across the grain of the meat. so you would cut the steak at about a 45 degree angle. I went fishing yesterday at the world-famous Miracle Mile, its about an hour's drive. This time of year its about five miles long lol the lake is way down. we caught a few fish and they are going into some brine today for smoking its still a bit warm but if i start early in the morning it may work out. Here are a few pics of the place, San Pedro Mountains. ever hear of the San Pedro mummy? the mile from the bridge doesn't look very spectacular, wild rocky mountain bighorn ewe, we had to stop to let them cross the road lol.


-
That is very nice of you @NerdyLeather. It must have taken you so long to do it. Thank you. Thanks for converting it into pdf form @Johanna
-
Ahh. That makes sense. Putting it in the correct position would have validated the use of the ruler though. Surprised they did not think of that.
-
Thank you.
-

Singer 29k1 presser foot doesn't work
Constabulary replied to MelissaViarengo's topic in Leather Sewing Machines
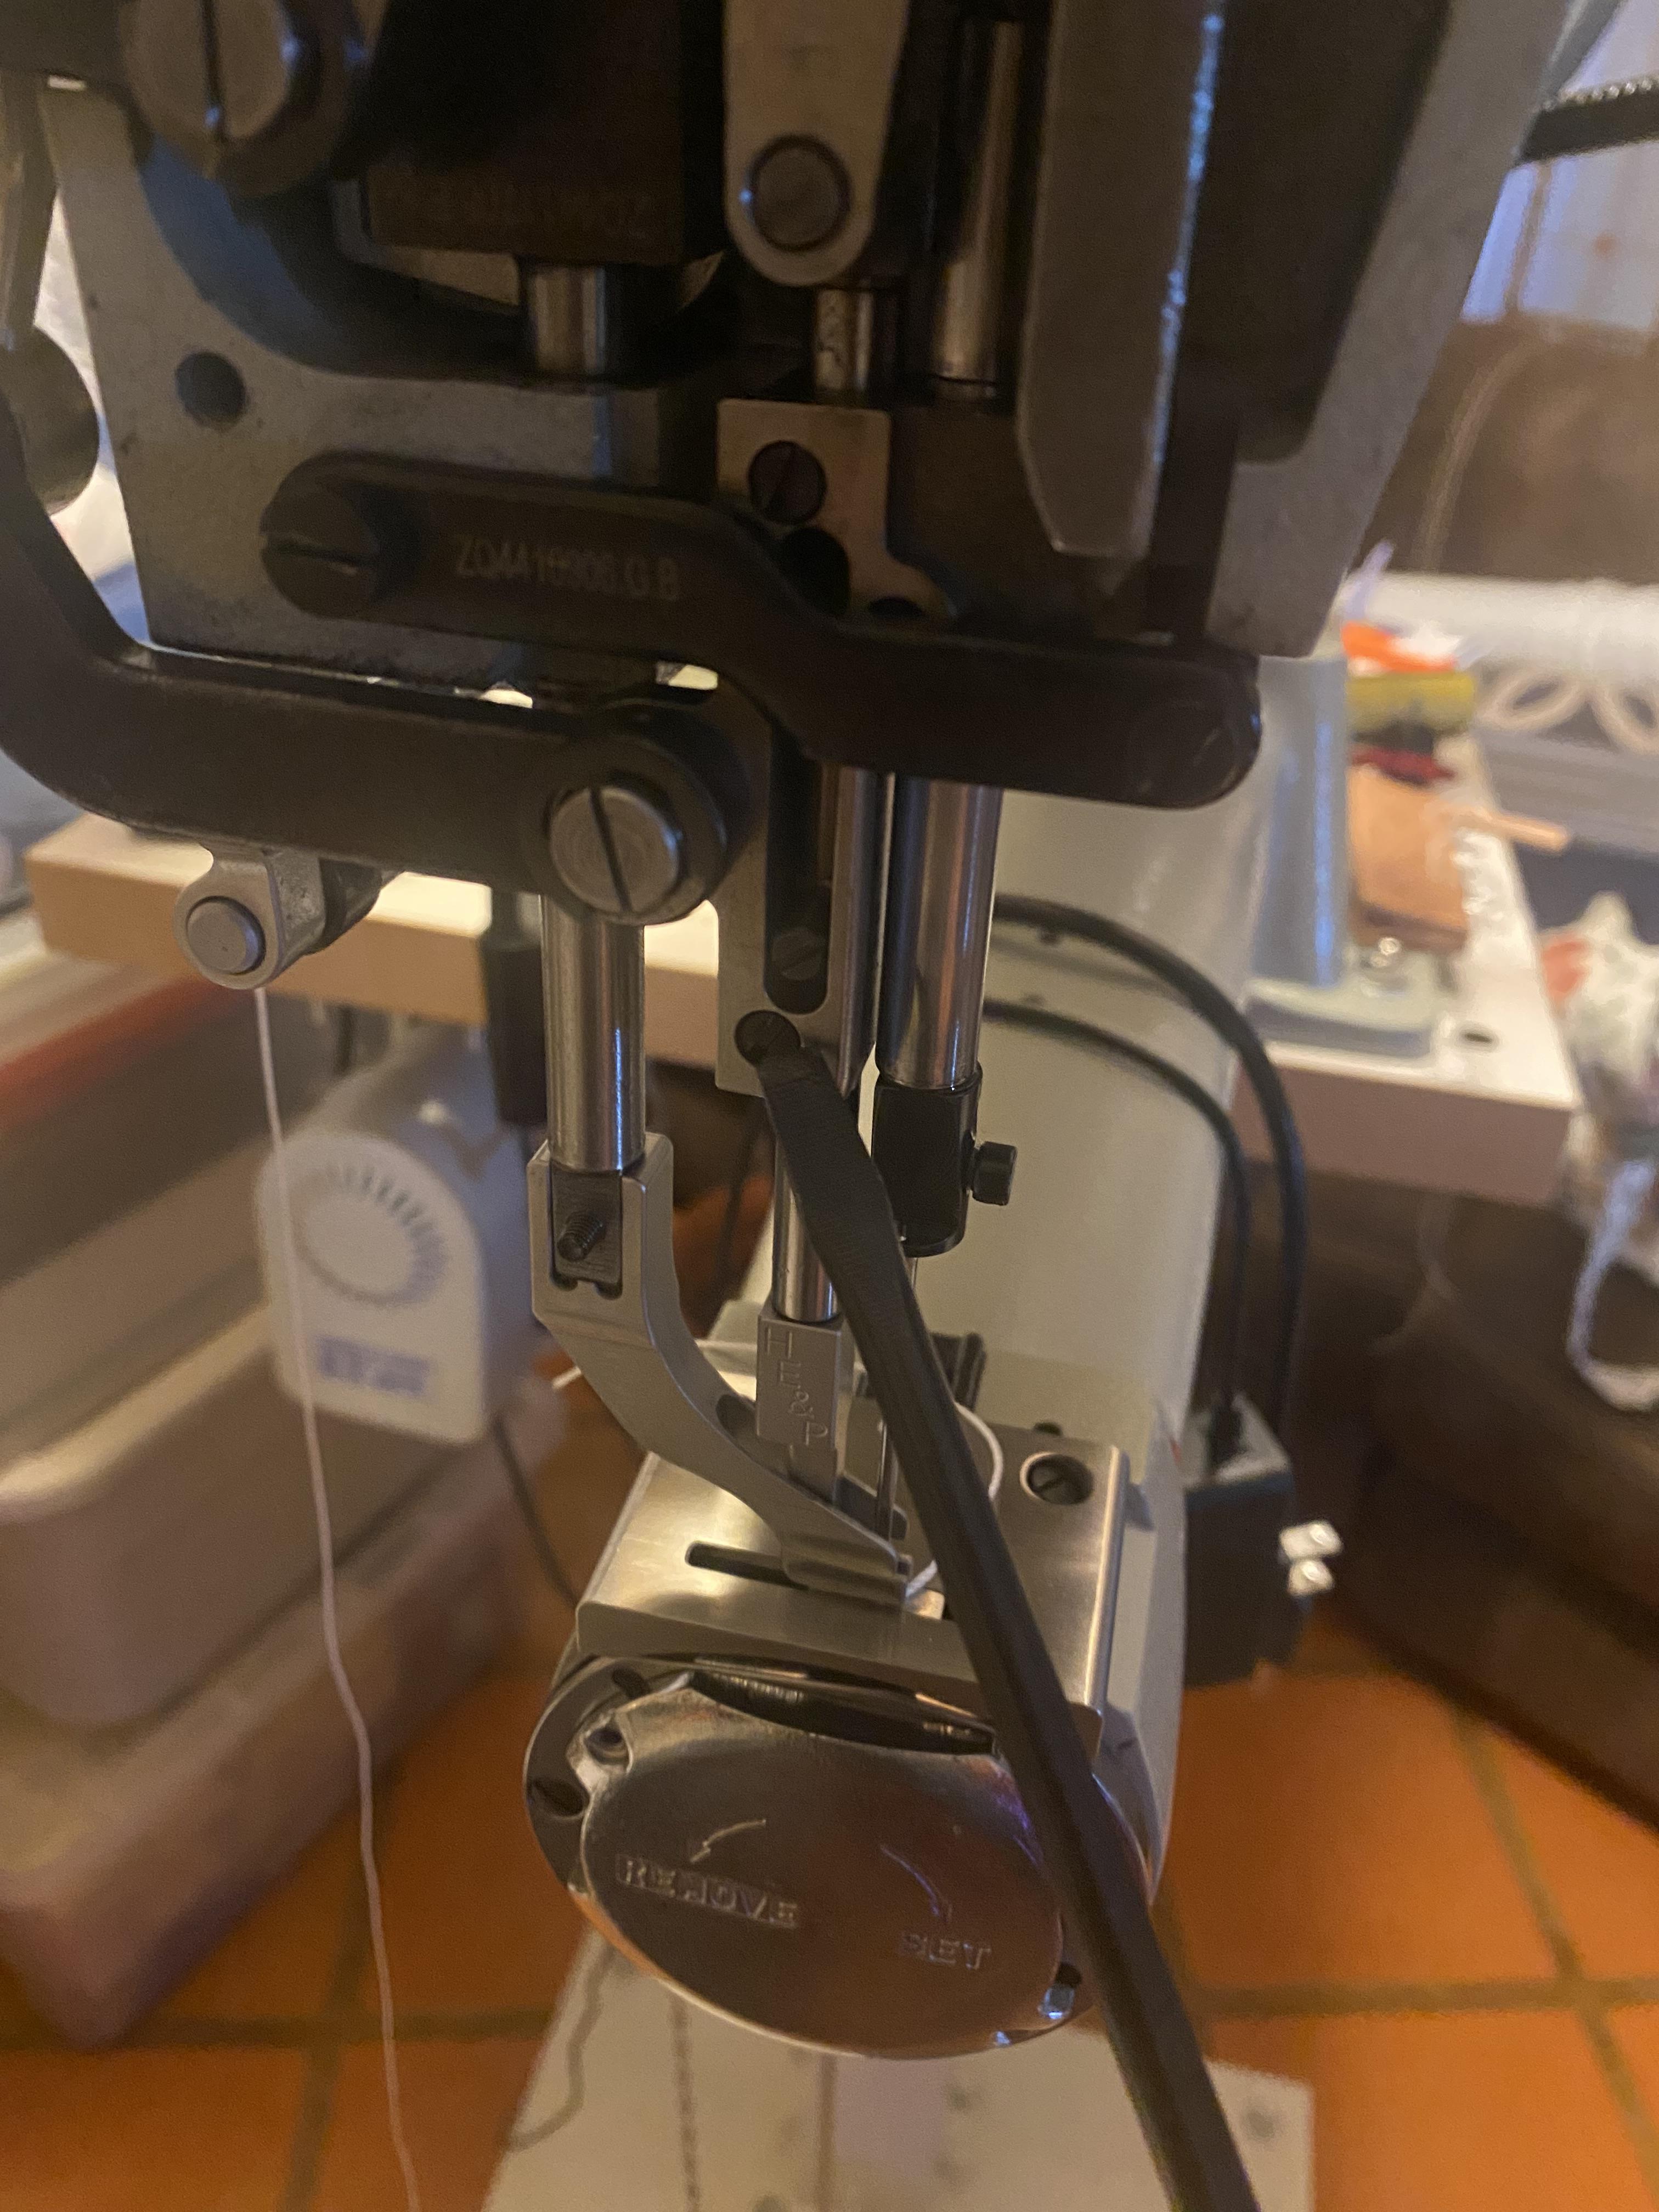
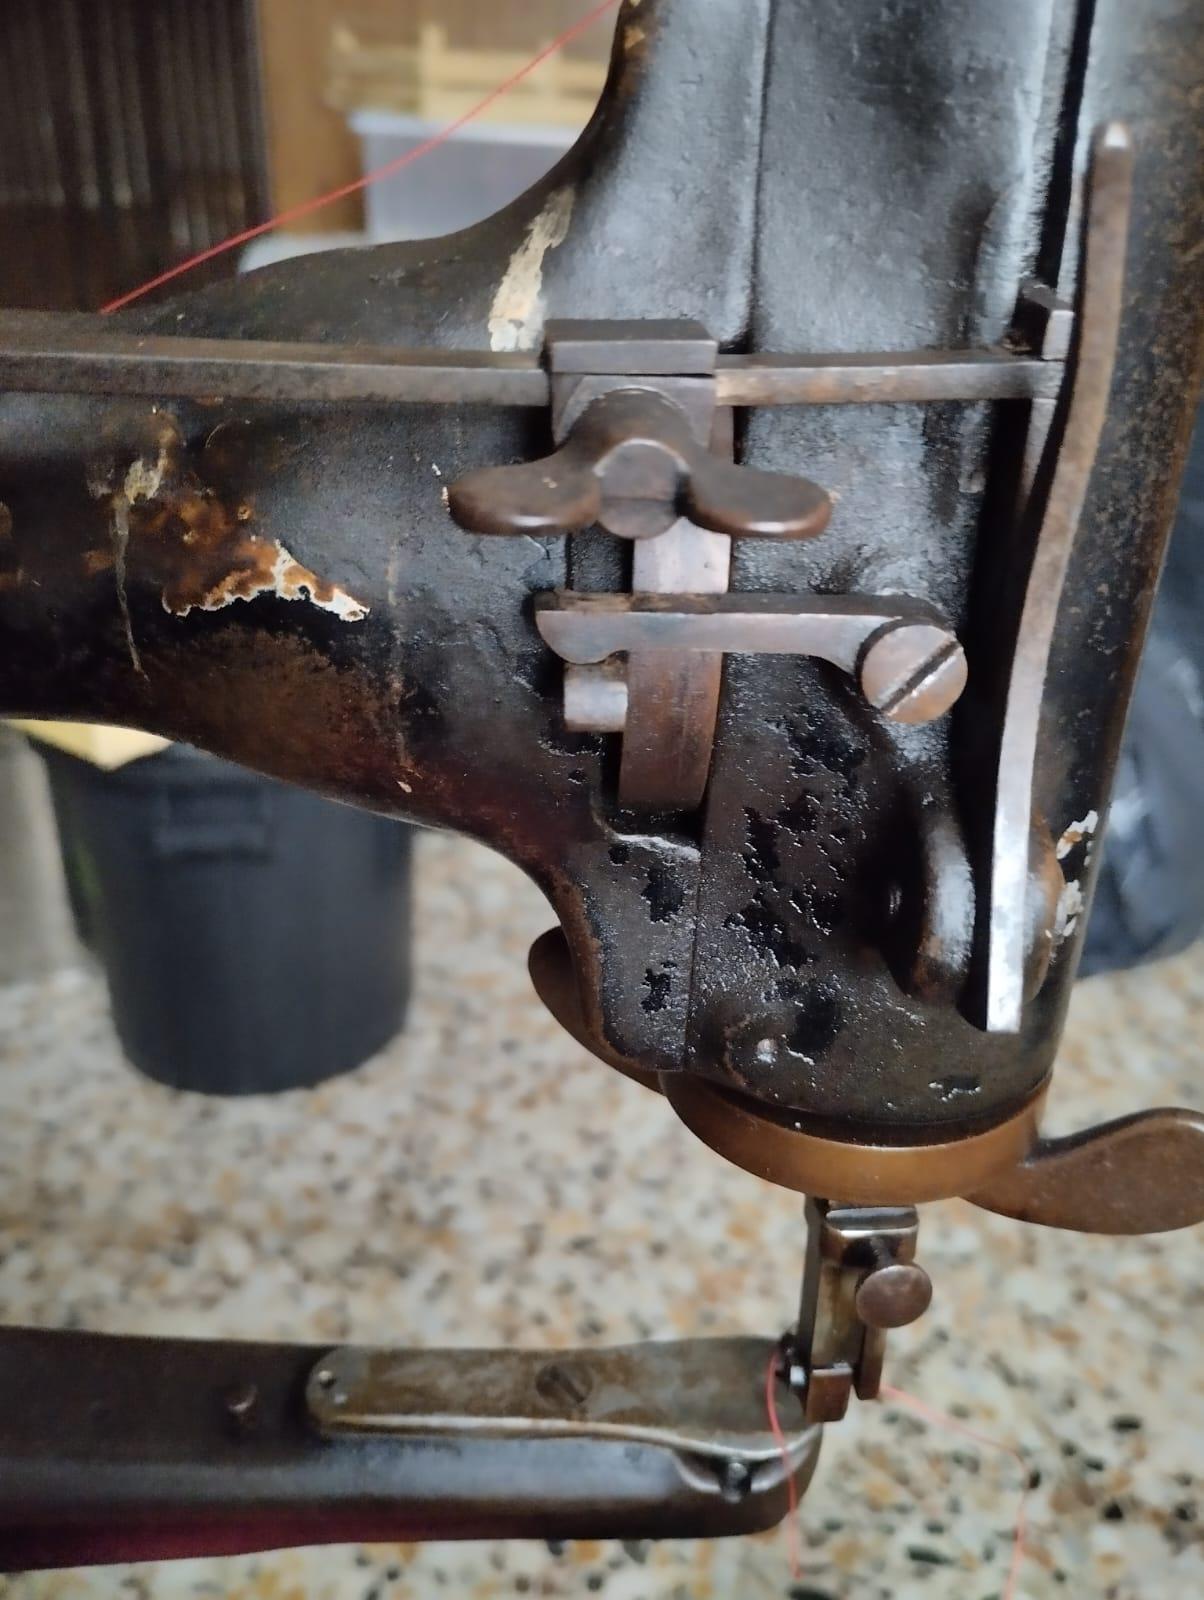
you probaly have chosen a short stitch lenght or the bell crank lever is worn down (or both). Maybe teeth on the presser foot are dull / worn down. Also theck if the "gib" on the stitch lenght adjuster is installed correctly. See pictures here: -

Singer 29k1 presser foot doesn't work
MelissaViarengo replied to MelissaViarengo's topic in Leather Sewing Machines
Hi! I fixed the tab and I will post pictures but It still doesn't take back the fabric, I tried with two layer of leather and also with only one but it still has this issue. Also I don't know if it has to be like this but the tab moves if I push up the bar with my finger. I don't know if it's also part of the problem but even if it was screwed in the previous position that was incorrect, the tab moved free as I moved with my finger. Also the presser foot is up in the photos.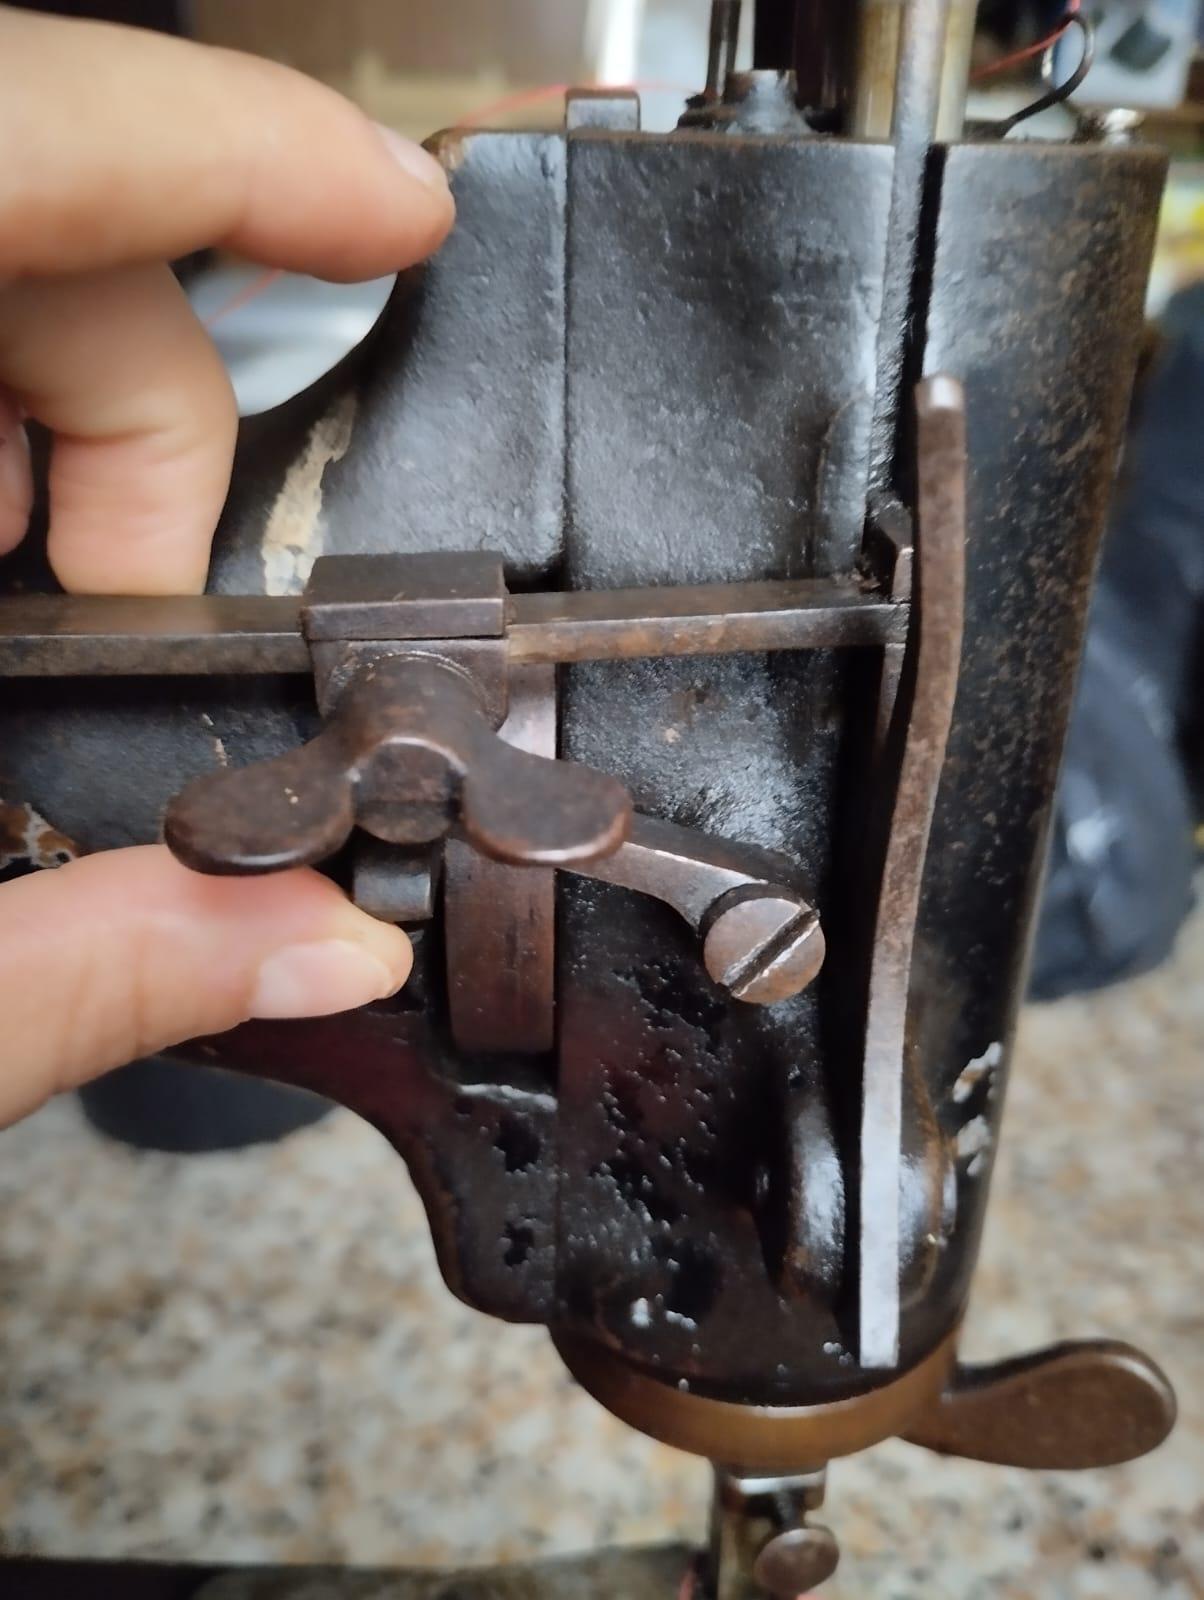
-
Yep, and if you want to cut out multiple items a die will be far more efficient. My 10w cuts leather ok but 'tis a wee bit slow. I'd like a bigger (better) one but the pre-built units, in an enclosure, are for me prohibitively expensive. Anyhow, I've been spending much time (including with Lego ) trying to figure out the best method of getting suitable leverage for the bending end of the jig. I've discarded several ideas (I really wanted to use a cam arrangement but I don't have any steel big/thick enough to make a cam) and think I've got one that should work. I was going to make the handle upright and push forward but looking at a commercial unit they have the handle sticking out the back and you push down, which looks like it might be more comfortable,. Tomorrow looks like welding day.
-
You're quite right, of course, Dwight, but playing Devil's Advocate here, once someone has a clicker die and some means of applying the needed pressure then it's very quick to cut out multiple pieces and you don't even need any power (or computer) to do so. And not everyone wants to mess around with lasers and such, which is precisely why a colleague is teaching himself how to make dies. Me, I've got all that computer stuff, 3D printer, laser and small cnc engraver, but I'm currently getting a headache trying to build a die bending thingy. The only reason is 'cos I haven't got one and want to prove to myself that I can make dies. It's a problem I have, once I get an idea into my brain........ But for getting a design out fairly quickly yeah, your method is great.


.thumb.jpg.6e903dd66163ad5672f00f144058c571.jpg)


