All Activity
- Past hour
-
These look like horse saddle bags to me. Just something that showed up in my utube notifications.
-
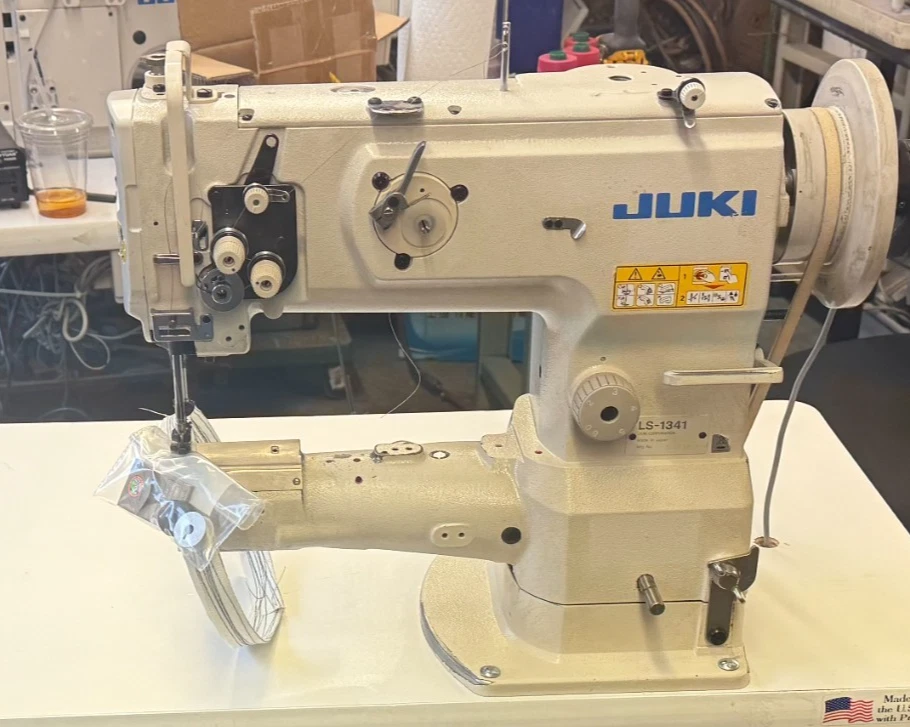
 For me since both were used in a production environment I would pass as I have see a couple that looked in very good shape exterior wise but the internals were on there last legs needing almost a complete rebuild. I find that Juki machines built in Japan have a better build quality then those that are made in China. If you are going to get the use out of a machine take some of your stuff to a Juki dealer. Test ride the LS-1341 and the DSC-246. That said you really can't compare a used machine against a new one, just to many possible variables. When it comes to binding I am presently using a Techsew 2750 Pro and previous to that a KOBE 1341. I stupidly sold the KOBE but the Techsew does work. However I 3D printed table tops that allow me to use standard inline attachments so I can use all flatbeds attachments on my cylinder arm machines (class 314/1341 and 441). kgg
 - Today
-
 i bought a clone 1341 from techsew and it was not great. it had little flaws, like the half length bobbin spring lever that i could never open without a tool. the binder attachment didn't fit well. didn't sew well compared my flatbed juki machines, 2810, 1541s, 1540. i used a new juki 246-7 this spring and was blown away by the difference in sewing quality and ease of use compared to my techsew clone. i am not knocking techsew, many people seem to love them but mine wasn't what i expected.
 -
the 1341 is $1600, the 246 is $2600. new motors. both used in production. new 246 is around $6000.
-
The Juki DSC-246: i) dsc-246 hand lift is 9mm and by knee is 15mm vs Juki LS-1341 hand lift is 9mm and by knee is 16mm ii) the thread ranges on the dsc-246 uses needles sized from 90 to 160 (#14 to #23) so that means it should handle V46 to V138 in thinner items vs Juki L-1341 needle size of 100 to 180 (#16 to #24) which means it can handle V69 to V138 in heavier stuff or V207 in thin. iii) the max stitch length is 6mm for both machines iv) use a "M" style bobbin for both machines dsc-246 loads from the cylinder arm front vs ls-1341 loads from the cylinder arm top v) cylinder arm diameter is smaller on the dsc-246 then the LS-1341 vi) Since we all jam up a machine at some point in time the LS-1341 has a safety clutch while I don't think the DSC-246 has one. In a nut shell if you need / want to use with thicker thread and with heavier / thicker items or seams buy a LS-1341. If you want a binding machine buy the DSC-246. Parts / accessories for the DSC-246 are not as common as for the LS-1341. I sort think of the LS-1341 as the cylinder bed version of the DNU-1541S flatbed. How much are they asking for the machines?? Keep in mind you may want to consider a new LS-1341 clone for about $2700. I would like to know if these machines were used in a commercial environment or by a hobbyist. If they were used in a commercial environment then I would be very wary as they would more then likely have been rode hard and put away wet. kgg
-
If you would be so kind as to give us the location of the post, we may be able to fix it or at least to take the links out so it doesn't cause upset or confusion to others.
-
 OctoberLeatherCo. joined the community
 -
 I'm no expert but at first glance it looks like the 246 has a moving plate on the arm which is usually found on binding machines. possibly the feed dog movement is side to side rather than an oval movement which gives more control over more types of material.
 -

spring flowers and good food
Darren8306 replied to chuck123wapati's topic in All About Us and Off Topic
Weird. My parents said they found me in a cabbage patch, in the prairies, near a wrecked airstream with Wyoming plates. They gave me some clothes, and here we are. -
I need some help distinguishing the main differences of the 2 juki cylinder arm machines. i prefer the bobbin arrangement of the 246. I sew backpacks, so need this machine for sewing in bottoms, doing some repairs, binging round bottoms and items with tight corners, sewing collars ect. I used a 246-7 earlier this year and was impressed, and the swing away binder attachment worked well, though i have no need for -7 version. i do not want a dedicated binder for this machine. Advanced sewing has both models available used and trying to make the most informed decision i can. on the pictured 246-6 they offered to set it up as a manual machine, new motoor with needle positioning. my work is at alpineluddites.com if you want to see exactly what i build. i did buy a Pfaff 355 a few years ago and it didn't have pull i needed and kept breaking needles. i sold it to a leather worker. thank you

-
 MarloK joined the community
 -
the links on this one work.
-
 Thank you for the feedback @Dwight
 -

spring flowers and good food
chuck123wapati replied to chuck123wapati's topic in All About Us and Off Topic
Some folks believe Wyoming is just a myth. Have you ever watched the x files? The truth is out there lol. https://bigthink.com/strange-maps/wyoming-doesnt-exist/ -
Nice 73,😍 I love lever guns. They are just cool all over. I am green with envy, all I got is an old trapdoor Springfield lol. Thank you, I have braided about five times, mostly round hat bands. But I figured out it's in the prep work, like most things, edging, and beveling a piece of 4 oz is a pain lol, but worth it. 1/4" strap of 4 oz, bevel and burnish the skin side first, then skive the flesh side edges. Thank you.
-
Thanks Thanks, man, I try.
-
Looks amazing 🥰 And thank you for the tip with Serafil, I was looking for new thread in larger quantities as I seem to use a lot of white and black. Actually saw that my supplier has them in stock for 13,90€ per roll. Now I am much more confident to buy one or two rolls.
-
The whole trick is to work back and forth along the handle until the desired amount of leather has been molded over. Too much hammering at once will flatten the handles. We used to do that when covering the steel surcingle handles for exhibition/circus riding. Those handles had to be good to take the performers' weight without hurting their hands. I just decided to try it on a hollow tote handle and it worked well.
-
I’m going to try to make a Main & Winchester inspired set of pommel bags. I’ve never made anything like this before, and was hoping to find some guidance. I found an old post on here that included links to a pattern and instructions specifically for this style of pommel bag, but unfortunately the links no longer worked. Any chance someone has some resources they’d be willing to share?
-
For the last couple of years . . . been telling myself I'm gonna make me a set of saddle bags . . . horse and rider type saddlebags . . . not the Harley kind. Every place I look . . . patterns and all . . . they are almost the size of a woman's small purse . . . On the western's on TV . . . they seem to be a lot bigger. The question I'm asking . . . what are the largest set you've seen or made . . . height / width / depth. I'm looking to replace my AWOL bag from the Navy . . . and I thought that might work . . . Thanks for whatever help you can toss my way. May God bless, Dwight
-
 Stitching is good . . . better than I do by hand . . . I'm a machine guy. BUT . . . do yourself a favor . . . scratch around on the internet and grab up a Harbor Freight sale flyer or coupon . . . usually good fo 5 to 15 bucks. THEN . . .go to harbor freight and buy a 30 inch bench top belt sander . . . the one with the little 1 inch wide belt. Buy some 80 grit belts to go with it. Trying to cut leather so that all the edges match will cause you to pull your hair out. Cut both of the a "tad" big . . . glue em up . . . and sand the edges. I don't know anyone who can cut his pieces for as good a fit as I can make them with my litle hand dandy sander . . . I actually have 2 of em . . . Glue seom scrap pieces together . . . put a line on it with an awl . . . and sand it to the center of the line you struck with the awl . . . practice with it a bit . . you'll learn . . . and you'll be just plumb tickled that you bought that little rascal. May God bless, Dwight
 -
Here's a service manual for the 1341 in case you don't already have one. Assuming your machine has a hook safety clutch, you'll need to re-engage it. If the handwheel is hard to turn after engaging the safety clutch, you'll need to look for more clues. Disconnect the motor drive belt and remove the needle so the machine can turn as free as possible. Oil the machine, especially the bushings for the hook driving shaft. Also check that the timing belt is spinning the lower cog. Is the hook stiff to move, or is it colliding with something and coming to an abrupt halt? As for removing the hook from the machine (if you still find the need to do this), after removing the center screw if the hook does not come out easily soak it in a few drops of diesel or other penetrating oil. I broke the first hook on my pfaff 545 trying to pry it out when it had been dry for years. (Some dried up old lubricant seemed to be sticking it together). Eventually I got the broken pieces out with penetrating oil, a kitchen torch, and some light tapping with a small hammer. Bottom line is, hooks are very hard and brittle so be gentle with it. Good news is, you'll never deform one such that it is out of tolerance And yes we do like videos and photos 🤩
-
@revilop Just adding my two-sense since you’ve acquired some of the tools to get you going. Leather working is a life long pursuit for many of us, and growing never stops. Books are fantastic, but which ones you may ask? Here are two: - Leathercraft: Traditional Handcrafted Leatherwork Skills and Projects https://a.co/d/7IBDi6Q -The Leatherworking Handbook: A Practical Illustrated Sourcebook of Techniques and Projects https://a.co/d/g1cVSHy If you need more, say, in the video format I can’t recommend Nigel Armitage enough. https://secretsfromtheworkshop.com After all of that, PRACTICE. And more of that. You’ll shock yourself how far you can get in just a few years with diligent, disciplined practice.
-
Thank you for the feedback @ClaimedVacancy
-
 johnrembo joined the community
 - Yesterday
-
@MarshalWill Thank you for the suggestion! I very much so like what you did there. I have experienced some discomfort with the handle at the edge even with it beveled to a #3 beveler. So fortunately i can make the adjustment to it. For the design, it’s fantastic. Once i made all the minor adjustments on the template to account for various lengths of parts, stitching edge distance, etc, it just kinda fell together. The way the Swiss designed this is a huge testament to their craftsmanship. I have three more Swiss bags that I'm working the templates out. All various shapes and designs. I’ll be sure to post once completed.
-
Thanks all. It was a fun project. It's always interesting trying to determine the proper sequence when putting something together: install hardware, attach liner, stitch some finish some edges, stitch some more, finish some more edges ... And invariably I typically manage to do some parts in the wrong order. I guess it just means that I need to do more so that I can stay in practice.
-
 Thanks for the tip. I haven't checked this for some time because of lack of replies. Took out my roll pin and I can adjust mine,too. Thanks again!!!

.thumb.jpg.6e903dd66163ad5672f00f144058c571.jpg)